
Index:
UPDATED ✅ Do you want to know more about what are the columns in Microsoft Word and how to configure them? ⭐ ENTER HERE ⭐ and learn how to do it FROM ZERO!
Microsoft Word has been noted as the leading word processor in the digital environment, for many years. Well, because it is hosted in the office suite of this company, is a program that is installed on many computers, by default.
In addition to this, thanks to the numerous versions that it has had, Word has presented excellent improvements and, nowadays, It is a very complete tool when preparing, editing, personalizing and managing any digital writing. Of course, in view of the many features and options it provides.
Thus, one of the main elements used to enrich the texts, without a doubt, are the tables that are created in Word to present information of interest in various professional and even academic fields. However, many users they do not know what the columns of said tables are about and here, we will clarify that information.
What is a table column and what is it for in Word?
While it is true, the tables refer to the most appropriate format or representation to be able to easily organize multiple data that should be displayed in a related way in any document. Which, to simplify this, have data entry boxes that are known as “cells” and each of them are referenced through the row and column in which it is located specifically.
Therefore, both the rows and the columns of a certain table are substantial elements around the organization of the data that is entered in it. However, in this post, we will only focus on the definition and use of the columns of a table in Word.
In that sense, the columns of a table they consist of a set of boxes located one below the other, vertically. That is, just as you can see the columns in any building. Therefore, are grouped perpendicularly from top to bottom on a given worksheet.
In this way, it is worth noting that the column of a table serves for split the document or a part of it into several segments and, therefore, they are very useful for dividing up information that must be interpreted separately. Well, they facilitate the distribution of a single text in several cells in order to present the content as you choose, without having to change the document by the fact of exchanging the number of columns that you need to have throughout the writing.
Steps to set up a column like an expert in Microsoft Word
Although the columns of a table in Word are so essential, many users do not really know how to handle them correctly when starting an editing or customization process around this content. Therefore, it is important to explain each of the steps that must be followed to easily add columns, as well as to delete or join them.
Thus, below, we proceed to detail these processes to follow through this section of the post:
add column
Without a doubt, the most prominent question regarding the issue of columns in Word tables refers to the way in which one or more columns should be added. So we start this explaining the indicated step by step to introduce columns without any complications in this program:
- Located within the Word document where you want to add the column, you have to locate the table you have already made.
- Next, place the mouse cursor and click on a certain cell in the area where you want to add that column. Either to the right or to the left.
- Next, through the section “table tools” at the top of the main window, select the “Presentation” tab.
- Now if you want include said column to the right of the cell you chose primarilyfocus on the Rows and Columns group, and there click on “Insert right”.
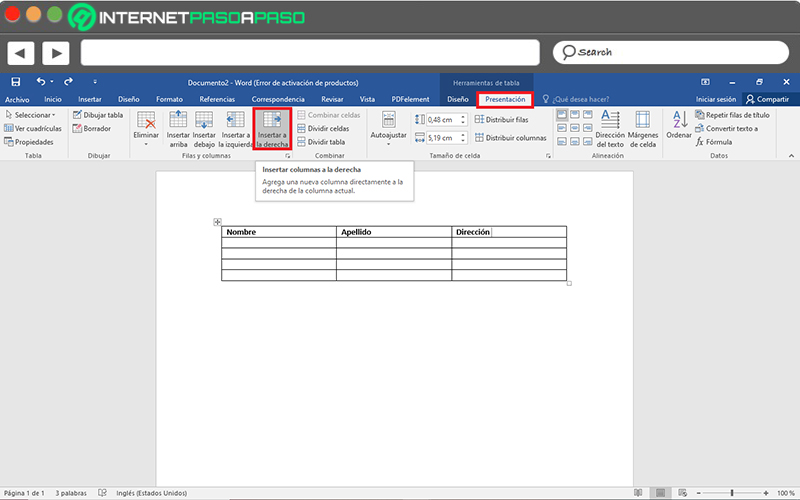
- In case you need add a column to the left of the cell in questionfollow the same step as above and Select “Insert Left”.

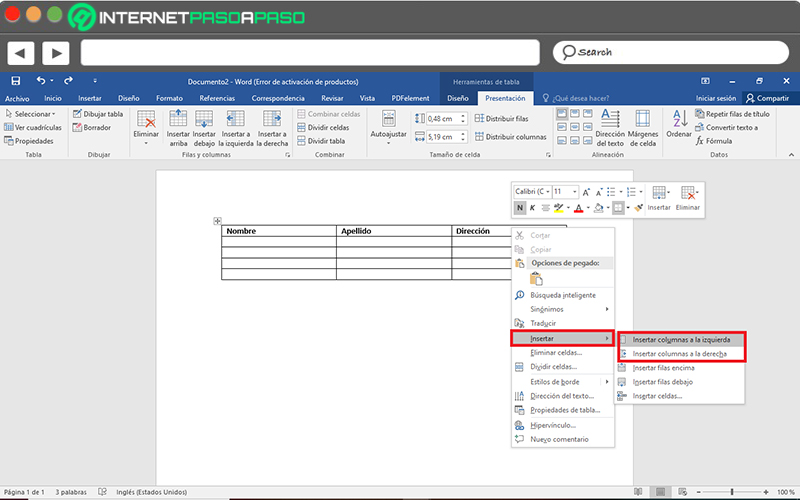
On the other hand, there is also an additional method that you can use to add columns in your Word table easily. Which consists of right click on the cell from which you need to include the columnfor later Click on the “Insert” option and there, choose if you want “Insert columns to the left” either “Insert columns to the right”. That way they will be added automatically.
delete column
In the event that due to some error or correction you have to modify your elaborated table and you need to delete a certain column, it is likely that you assume that it is a complicated process to carry out. However, fortunately, there is the possibility of removing columns with just a few steps.
Next, we mention what they are:
- As in the previous case, start with access the document you need to edit and locate the table to modify.
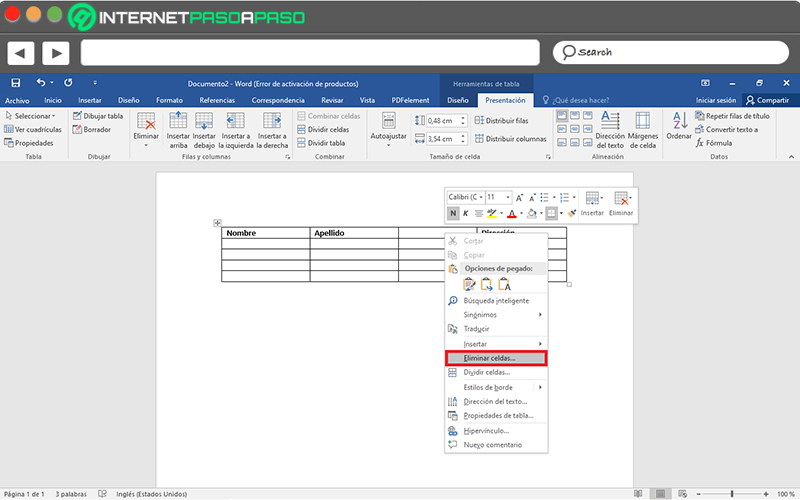
- After that, locate the first cell of the column that you need to delete from your writing and right click on it.
- After the above, a menu of options will appear and among all, click on “Delete cells…”.
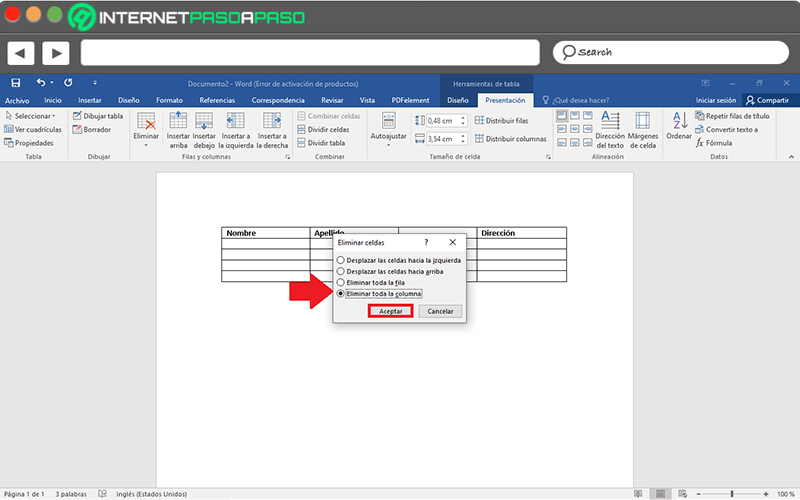
- Finally, they will show you a small box on the screen with several selections to choose from and there, you will have to click on “Delete entire column” to confirm the action by pressing the OK button and that’s it.
In addition to this, there is also another way that makes it easy for you to delete any column in Microsoft Word. So the trick is to click on the beginning of the column in question to be able to select it completely and then, press the delete key on your computer. This will remove it immediately.
Join columns
Aside from adding and deleting columns, Word users today have the ability to unite or combine. Which basically consists of merge two or more vertical cells that are in the same tablein order to simplify the distribution of information.
In this case, the steps to follow are much simpler and, below, we detail each of them:
- Initially, it proceeds to open the document to be modified and find the table you want to edit there.
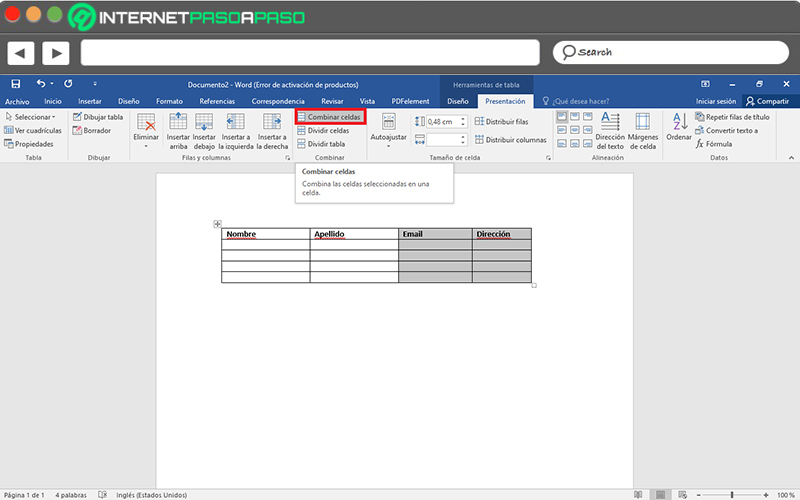
- In second place, select the columns (entirely) you need to join; this by simply dragging the mouse pointer over them. Whereas, they can be two or more.
- Done the above, from the Table Tools section, click on the tab that says “Presentation” and inside the Combine group, just select “Merge cells”. That way they will automatically mix.
Computing