
Index:
UPDATED ✅ Do you want to know the tricks to get the most out of Google Docs? ⭐ ENTER HERE ⭐ and find out what they are ✅ EASY and FAST ✅
In office automation, without a doubt, one of the most important and used tools are the word processors. Which are considered very helpful both for personal use, as well as at an academic and professional level. Although it is true, the most recognized word processor is Microsoft Word, but since it is a paid application, users look for other alternatives.
In this sense, one of the best solutions of this type is Google Docs which is available at all times, since it is a cloud-based service. In addition to this, it reveals other advantages such as its lightness, its possible use on the computer and mobile; which is estimated as one of the most significant tools of the search engine.
However, many Google Docs users or those who want to try this word processor are not aware of all its available features. Reason why, we have decided to gather the 30 most special tricks to get a fairly complete experience in Docs and increase its capacity.
Google Docs vs Microsoft Word Which is the best tool to generate and edit texts?
As we mentioned at the beginning of the post, Microsoft Word is defined as the main word processor and editor in the world, thanks to its remarkable fame. So, surely you are wondering Which tool is better, between Word and Google Docs for these purposes.
Next, we introduce you their most important differences:
User interface
Regarding the Google Docs interface, we note that is ideal for basic users, since it maintains a comparatively simple approach. In this way, it reduces the design of the toolbar functions and with that, it provides an easy-to-manage job site.
Thus, it puts most of the frequently used buttons at your fingertips and everything else, it gathers it in drop-down lists. Definitely, ensures a simplified experience.
On the other hand, in the user interface of Microsoft Word, you can find loads of features available on the ribbons and toolbars. Which is perfect if you require enhanced and/or advanced features, but if you are a basic user this particularity it can only complicate your experience when processing texts.
Keeping in mind that it can be extremely exhausting to navigate between so many functions trying to find the one you need.
functionality
Since Word is an older tool than Google Docs, it has had more time to bundle multiple functions and of course, creating some pretty solid software. For this reason, Microsoft Word is considered to provide a more advanced experience in terms of functionality.
However, it is not that Google Docs is insufficient, since for about 90% of people who use word processors, the functionality or text processing capacity of Google Docs can be more than competent. But, for those who opt for more advanced features, the best option is Word for its better implementation of elements.
Collaboration
While it is true, these two tools used to edit texts have collaboration functions. However, in this regard, it is presumed that Google Docs is ahead Because it offers integration with Google Drive, it’s easy to navigate to files that have been shared with you, and it also makes it easy to see the files that you’ve shared.
Additionally, it allows you to control which users can edit the document, who can see it and who can comment on it.
On the other hand, Word allows collaboration and provides the ability to save documents to OneDrive, but forces you to send the document to specific people and this reveals a greater complication to give access to a more open audience.
Formats
Unfortunately, in the format game, Google Docs has a notable disadvantage. Because when you attach images, tables, or spreadsheets to the document in question, you can’t be sure if the file format will be the same if it’s opened in a third-party document processor.
Instead, Microsoft Word does not reveal this drawback. Taking into account that, said Microsoft tool guarantees greater ease when creating unique text formatting rules.
Other Important Differences
Google Docs |
Microsoft Word |
| Is completely gratuitous | It’s not free and you must pay a subscription every month |
| You are limited when it comes to offline functionality, as it will always be necessary to be connected to the Internet to use it | It is the best option for those who need a document processor with access without Internet connection or offline |
| It has the ability to cloud saving automatically | you shall be an Office 365 subscriber so you can automatically open, edit, and sync your files online with Word |
| Currently there 7 file formats available in this tool | offers some 15 file types available today |
| Docs provides, only, some template elements | word has more templates and even allows you to create your own |
In short, to be able to specify which word processor is better between Google Docs and Microsoft Word, everything will depend on the types of use of each one and the needs of its users. Because, while one of them may have more advanced features than the other, the scales are leveled by additional, all-important features.
List of the best 30 Google Docs tricks to get the most out of it
Now, it is time to know and detail the best tricks that you can take into account when managing your texts from Google Docs, in order to get the most out of this cloud-based tool.
Next, 30 of the best recommendations to implement there:
Use templates for iterative projects
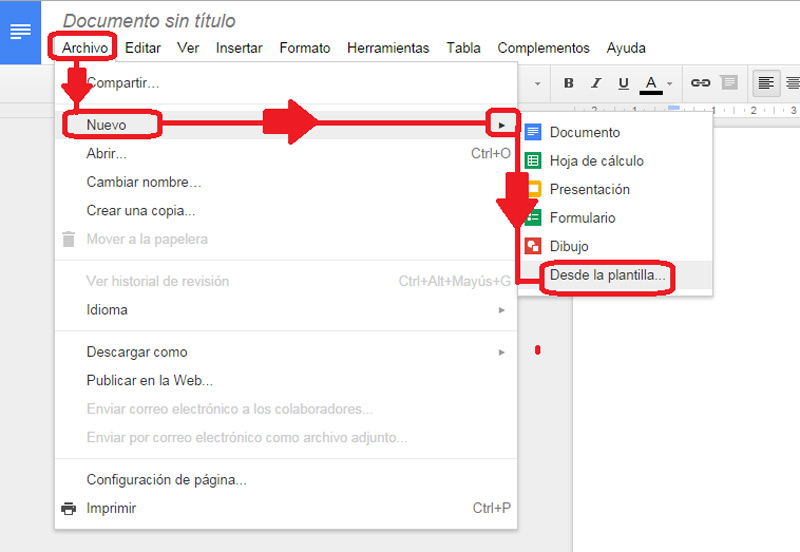
Many times, Google Docs users have to send the same type of document and information to their study or co-workers and even their clients, over and over again; so this tool has a function to obtain greater productivity in such cases.
Thus, Google Docs allows you make use of one of the pre-designed templateswhere the following types are found: quotation templates, job offers, memos, sales letters, sales reports, contractual agreements, among others.
So, in order to use them, follow these steps:
- Within the tool, click on the section “File, Archive”.
- Then click on the option “New” from the menu.
- Next, in the new dropdown menu, click on “From template” to select the one you need.
Use the colored labels to organize yourself better
Since organized environments offer greater productivity to users, Google Docs has taken this into account and therefore allows you to open specific folders in Google Drive and section them through color labels, in order to make your document in the cloud easier to find and faster to access. use.
In that sense, to locate things in a much more organized space in Docs, you have to set those labels by simply right-clicking on a specific folder, press the “Change color” option and there, choose the one you prefer.
Perform open license image search
In most cases, when you write a text in a word processor, it is of the utmost importance add media to be able to complement the information and offer a more striking document. Therefore, Google Docs provides you with an image search to facilitate this procedure.
In this way, we recommend you go to the section of Insert imagethere you can find a wide variety of elements of this type and even establish that only those that have open use license; from the section “Search” and categorizing the content directly from the tab that says “Any kind”where there are several options to select.
Take advantage of the add-ons that Google Docs has
In case you did not know, Google Docs has add-ons that consist of functionalities very similar to plugins, that is, they make it easy for you to execute a lot of things. In order to access them, you just have to click on the menu “Accessories” inside your Google document and there, explore all that are available.
The most common and recommended of them are:
- “table of contents”: To integrate tables of contents to the text.
- “Translate”: Allows you to translate the words, instantly.
- “Template Gallery”: Ideal for downloading pre-designed templates.
- “Gliffy Diagrams”: Add diagrams and mind maps.
Use smart voice typing
One of the best tricks to try in Docs is based on make use of the smart voice typing that the tool makes easy for its users. Which has been designed for those who prefer to use their voice, instead of writing long texts that can reduce the performance of time while managing their documents.
In this sense, To test the writing by voice of this word processor, the process to carry out consists of:
- To get started, go to the section “Tools” of Google Docs that is seen in the upper bar of options.
- Next, click the “Voice typing” selection and immediately, you can start talking.
As a recommendation, we limit that, if you want to add punctuation marks, You must also say it while “writing your text by voice”. For example: To add period, you have to say “point” and the system will detect it as a spelling symbol automatically.
Add signature to your documents
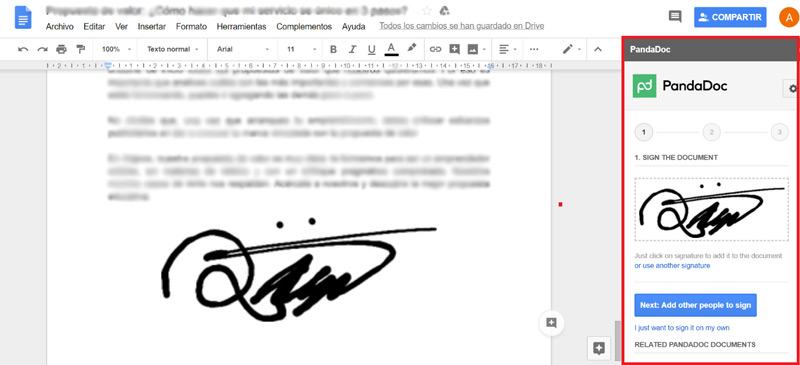
A lot of Docs users usually have to print the document done, sign it, scan it and after that, if they can send it to their clients. But, to avoid this tedious task, now there is the possibility to add your signature directly on the digital document.
To be able to perform this excellent trick, you must make use of a plugin called “PandaDoc”, from which Google Docs will introduce the ability to sign a document using the touch screen of any of your devices from which you access the word processor. It should be noted that, you will have to create an account in said plugin and then integrate it to the text sidebarso you can sign, click and go.
Share the text with others and edit in real time
Earlier, we let you know that one of the biggest benefits of Google Docs is its ability to share the text with other people and that it can be edited in real time. But, surely you will have wondered what should be done to specify this function.
Well, initially, it is necessary that press the blue button in the upper right cornerto be able to add other people or, it is possible to do it by copying the document link and sending it directly to all those users that you want to see the text. In this way, you will be able to use one of the most useful functions of this tool.
Immediately publish a document
Luckily, with Docs you can create a file and publish it on the web, in a matter of seconds. If you want to do it, go to the menu “File, Archive” found in the upper options bar of this word processor. After that, click on the option “Publishing on the web…” and immediately, it will be incorporated into Google Drive and you will even receive a link that indicates where the file in question is located.
Use the Correction tool
Even though Google Docs previously lacked a spell checker, luckily today you can count on such a feature in this online word processor. which exhibits the ability to make a quick change to other wordsadd certain words to the dictionary, or tell it to ignore them.
To do this, you simply have to access the section “Tools” which is at the top of the document window and after that, click on the first option called “Orthography” and there select what you need in the dropdown.
Use files without internet connection
Although it is true, Google Docs is a purely online service that requires an Internet connection to be able to use it. But, many users have connection problems, in some cases and so, are affected to edit their jobs written from this processor. However, there is a very effective trick for it.
This trick is based on a continuous synchronization of the Google Docs files that you host in Google Drive and allows you to access them without having a network connection. For which, you must go to the configuration panel of the Google Drive service, enter the General section and check the box that says “Synchronize your work with this computer”which offers you the possibility to edit the texts offline and update the work continuously.
Explore bibliographic content
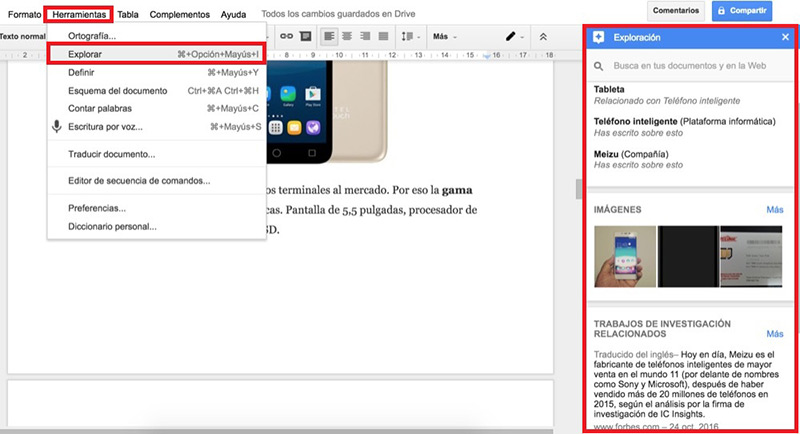
In general, before or while you write a piece of writing, it is valuable that you inform yourself from reliable sources and in order to ensure better productivity, Google Docs has designed a tool with which it offers you the possibility of browse bibliographic content directly from the compose sheet.
In this sense, the function has the ability to detect the key themes of the text, offers images, similar research works and hUp to links that you can use as the bibliography of your article.
If you are interested in using this tool, you must click on “Tools” and press “Explore” which is located in second place. Thus, they will show you a new section on the right side that has all the power of the Google search engine.
Send a fax without a fax machine
Despite the fact that faxes are not used much anymore, nowadays, there are several clients who ask you to send them one of them and Why not meet the requirements of those customers? Well, to meet this need of the most vintage people, Google Docs accepts a trick that makes it easily possible.
In this sense, it will be necessary to use a plugin called “Hello Fax”with which you only need enter the recipient’s phone number and it also allows you to create an express cover for the document in question. Thus, very useful to avoid wasting time looking for a stationery with a fax.
Simplified link search and insertion
In general, to undertake a search for links that must appear in the digital document, it is necessary open an alternate tab and search for the web address to be able to enter it in the text in question. But, there is a much simpler trick to punctuate this task.
Thus, it consists of select the part of the text where you want to include the linkthen click on the section “Insert” which is at the top of the window and press the option “Link”.
You’ll be shown a box with two boxes (one to the text and one to a small address search box) and then when you type the first few letters, you’ll be able to see the search options available to you. simplify locating the address you need.
Leave comments on mobile
In most of the times that you share a text with another person, you want to leave one or several annotations in a specific area of the text in question, but without having to enter or modify any line. Well, for that, the present trick that Google Docs has recently incorporated has been detected, from which you can make comments to leave notes directly from your mobile.
Make use of the Docs Web Clipboard
Another one of the best tricks to which we can refer regarding Google Docs, is the copy and paste. But, it is not about the basic function that we all know to copy and paste, but it refers to a Web Clipboard or a “copy&paste” advanced that contains this word processor.
In this sense, the Web Clipboard gives you the ability to save a large number of texts and paste the one you want or need. In other words, it works as an excellent shortcut for when you have to write long textsbe it a list of characteristics, a recipe or even a phrase that is repeated several times.
Next, the steps to take:
- Within Google Docs, look at the top for the section “Edit” and click on that option.
- Now click on “Web Clipboard” where a menu will be displayed.
- After that, choose the selection “5 inch IPS screen” and in it, you can choose between “Paste as rich text” either “Paste as HTML”depending on what you require.
Insert a special symbol
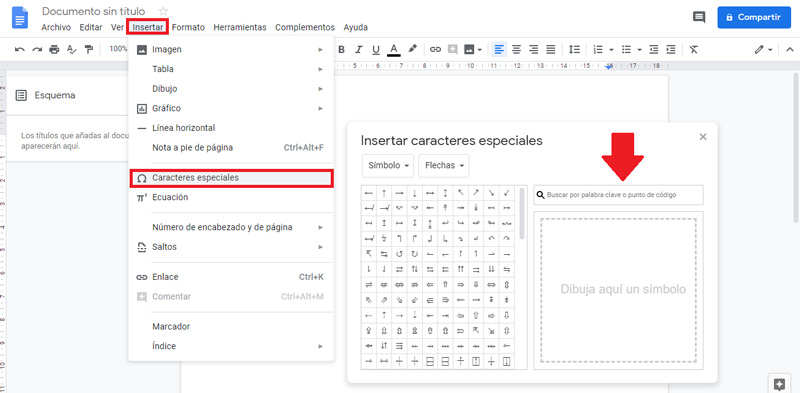
If you didn’t know, in Google Docs you can also write “strange” symbols inside your document. This trick is one of the simplest and most effective when writing in said word processor.
For which you must follow the following step by step:
- Once you open a new document, click on the “Insert” section which is located at the top.
- Now, among all the options in the drop-down menu, click on the one that says “Special characters”.
- Subsequently, you will see a new box that opens and there you can select the character you prefer.
However, this is not all. Well, in this tool there is the possibility of draw the symbol you want from of your touch keyboard or using the mouse. In order for the same system to recognize it and offer you a similar symbol; being very useful to quickly find the strangest symbols.
Use different templates
While it’s true, Google Docs normally starts with a blank page, but actually It has several templates that can facilitate different tasks. Being these, an essential addition for an excellent management of this tool to edit texts.
In order to use them, you will have to locate you on the home page of the service and proceed to download the different selections it contains. Basically, they are about resumes, market research, shopping lists, etc. These provide the prefabrication of a text skeleton that will save you a lot of time.
Change words to uppercase
Sometimes, it is common that when copying some text from the Internet or anywhere, some words or the body of the writing in general is in uppercase and you need to return it to lowercase and, although this option is available in Word, in Google Docs you do not find it.
But, to solve this fault in the Google service, we have the possibility of making use of a complement that facilitates this option. which, it is about “Change Case” that you can locate from the Complements section and once installed, you will simply have to go to that tab, select the text to modify and apply the change.
Crop or edit images directly from the document
Fortunately, this Google service provides you with a tool with the ability to cut or edit the images added to a text.
being this, a very simple function to execute and that is based on the following procedure:
- Located in the document in question, click on the image you want to modify.
- Then click on the menu “Format” that you see at the top of the window and select the option that indicates “Image” (it is one of the last).
- After doing the above, you will find the command with which to crop an image and also a selection called “Image Options” where you can make use of functions such as adjusting the brightness, transparency, contrast of the image and even recolor it.
Make video conferences from Google Docs
Believe it or not, today, there is the opportunity to make videoconferences directly from this tool to manage texts. which is quite useful for edit documents remotely with your study or work colleagues, since it is used to also work together with the file and with great ease.
You can run this function from a plugin available for Docs. which is known as “UberConference” and normally, it is used to schedule and make conferences from the digital writing.
Translate a document without a Docs plugin
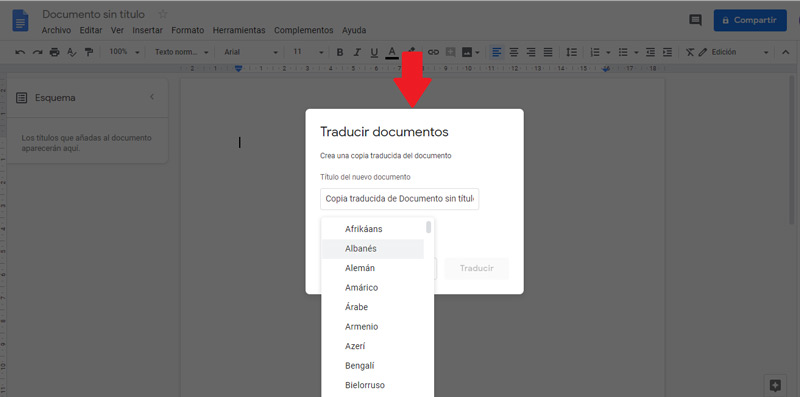
In one of the tricks mentioned earlier in the post, we recommend you make use of a plugin that allows you to translate words instantly within this tool. However, the word processor itself has an option to perform translations so you don’t let a language barrier stop you from communicating.
In this sense, this trick is based on a native Google Docs system with which manages to translate complete documents into other different languages.
The steps to accomplish this consist of:
- At first, click on the Tools menu.
- Then, within the drop-down menu, select the option “Translate document”.
- With the above, you will have to enter the title of the new document that will be translated to be able to identify it from the other and select the language you need to change it to. Although, it is very simple.
To direct people to a specific section of the document
In terms of collaborating and sharing digital writing, Google Docs offers several features to simplify such activities. Thus, one of them is direct one or more people to a certain area of the document that you have made and this is enabled by the bookmarks function there.
That way, Docs bookmarks have the ability to create a direct link to any site of the text in question and to carry it out. The following is required:
- To get started, place your mouse cursor where you want the specific link to reside and right then and there, access the insert menu.
- Now, among all the options, choose the one that prints “Marker”. This will display a popup window with the text and link.
- Then you simply have to click “Apply” and proceed to verify that you have shared the document correctly with the other people.
Copy formatting from one text area and apply it to another
It’s based on a trick that, with just a few clicks, allows you to copy formatting from one area of text in your document and quickly apply it to another. Said trick, you can find it inside the paint roller icon which is displayed in the upper left corner of the options bar and is called “Copy format”.
The steps to follow for that are:
- First of all, you have to place the cursor on the text that contains the format that you want to apply to another part of the text and proceed to press the icon indicated above.
- In second place, click on the paragraph to which you want to apply that format. That is, the size, font, style and color as well. That’s it.
Note: In case you want to apply text formatting to more than one part of the document, you need to double click on the paint roller icon when starting this procedure. Well, that way, it will stay enabled and support numerous applications.
Add images from Google Photos
For loyal Google Photos users who create, edit and manage written documents in Google Docs, this trick can be of great help. Which, basically, consists of a task that allows you to add images from a collection of photos from Google Photos directly to said texts.
To be able to do it, you have to start by clicking on the section “Insert” from the options bar, then select the one that says “Image” (it is in the first position) and in the drop-down menu that is observed, there is the option “Photos” that enables the import of images from said Google service.
On the other hand, you also accept the possibility of including images from google drivefrom a URL, search from the web, etc.
Keep Google Keep as a notebook
If you are one of the users that uses Google Keep as your note taker, by default; Docs has an option from which you can access your notes while writing a document in this word processor. Even, in this way, it allows you to insert a complete note in the current page of the digital writing.
So, if you are interested in using this trick, you will have to access the Tools menu and in it, click on the option “Keep notepad”. Once the sidebar opens, you have to press on “Keep” and since then, you will be able to observe and edit your notes, move the cursor over them and add them, if you need them.
Make your own word substitutions
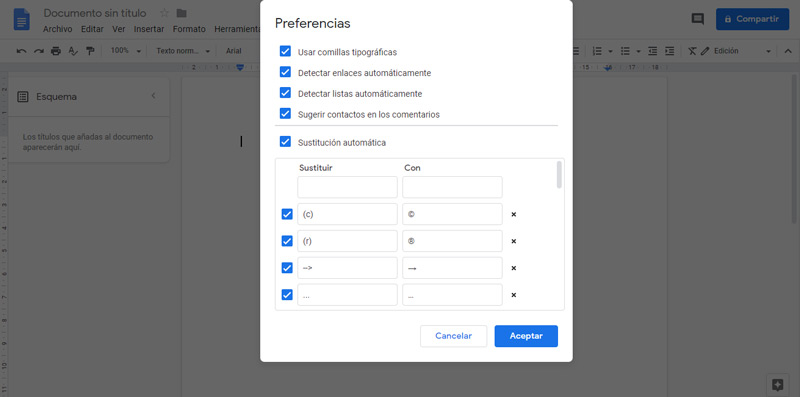
Surely, you still do not know that it is possible make your same word substitutions in Google Docs, according to your preferences or requirements at the time of writing the writings. Which will help you remarkably during writing.
In this sense, the present trick consists of make a list of automatic substitutionsso that the same system can recognize them, carry them out and allow you to obtain better productivity by customizing your needs.
For this, simply go to the Tools sectionin the new menu click on the option “Preferences” and proceed to specify the necessary substitutions and other parameters referring to your priorities when writing.
Download a document as a PDF, Word Doc and more
Many Google Docs users don’t know they can download their digital documents in specific formats and directly from this service, so they sometimes turn to format converters to select the one they need. But, here we will tell you how you can download in a certain file format from the word processor in game.
Thus, it consists of a function of the Google service that allows the writing to be sent in certain formats and not in an editable documentas a large number of users do when sharing it with other people.
Fortunately, There is the possibility to choose between several formats, as follows:
- Click on the section “File, Archive” from the top toolbar.
- After the above, you have to click on “Download”which will immediately open a dropdown menu.
- Now, choose the format you need or prefer. These formats are: Microsoft Word (.docx), OpenDocument Format (.odt), Rich Text Format (.rtf), PDF Document (.pdf), Plain Text (.txt), Web Page (.html, compressed) and EPUB publication (.epub).
- To finish, click “Download as” and ready.
Start a new typed document from anywhere within the browser
Although it is an extremely easy trick, the truth is that it is considered a great help to quickly enter Google Docs and start creating or editing the texts. For which, you will have to add “docs.google.com/create” as a bookmark and after that, enter it in your bookmarks bar or by making a customizable keyboard shortcut that opens the link in question to start the new document in Docs.
Use the revision history of the word processor
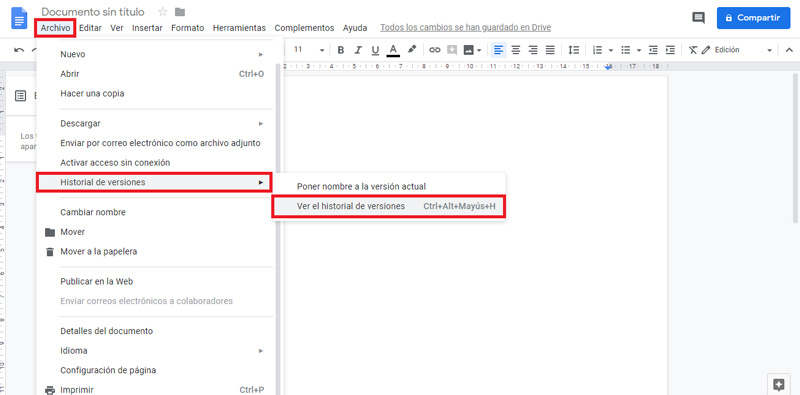
In case you lose information while you are editing a text, there is no need to worry if you know what this trick consists of. which makes it easier for you get a previous version of your documents, very quickly and for what you will have to enter the section “File, Archive” and click where it says “Version History”.
The last option contains a drop-down menu with two alternatives and in these cases, the one you have to select is “View version history”.
Once you specify the above, you will find absolutely all previous versions of the document you need. Taking into account that, this will be shown at the top of the list and you will not lose any information of the current version where you were. In addition, from this function, you will also be able to see all the changes made to the highlighted text.
Some of the best keyboard shortcuts for Google Docs
Although a large number of very useful and effective keyboard shortcuts are known to manage your documents from Google Docs, there are certainly some of them that can be considered as the most important.
Next, each with their functionality:
- Ctrl + C (on PC) and Cmd + C (on Mac) – For paste text.
- Ctrl + B (on PC) and Cmd + B (on Mac) – To place words bold.
- Shift + T – For create a new document (this is a unique shortcut).
- Ctrl + Alt + M – For insert a comment (it’s also a unique shortcut).
On the other hand, you can find and get the list of keyboard shortcuts in Google Docsjust by pressing the following shortcuts in each operating system:
- On Windows or Chrome OS computers: “Shift +” either “ctrl +”.
- On a Mac: “Cmd +”.
Software