
UPDATED ✅ Can’t change the language in Windows 10 from Spanish to English or vice versa? ⭐ ENTER HERE ⭐ And discover how it is done step by step
You have always searched as change windows language, and it has been so tedious that you have abandoned the process halfway. It is that the old versions of this OS have made this a real odyssey. Everything is because the system already came with a default language and you had to go very deep to change it and If you were not very clear about the steps you had to follow, you could spend hours and hours without achieving a successful result..
In view of this, Windows in its new version (Windows 10) has developed new functions, so that this work is not so overwhelming. While before when you bought a computer outside your country, you had to change the language, or even have to pay someone else to do it, but now with version 10, you can change the language of up to three computers at the same time without much fuss.
Today we bring you the best methods and steps so you can install a new language on your Windows 10 computer. In addition, we will teach you its shortcuts with the keyboard. You will find very helpful information in each of the sections that we leave you below.
Steps to change the default language on a Windows 10 computer
One of the problems that microsoft operating system has been dragging for quite a while, it’s the language. If we buy a computer outside the country, it is configured with a default language, being really complicated to be able to change it when having to download language packsand install them manually.
Aware of the problem that many Windows users experience, the new Windows 10 was bornwhere changing languages and installing it is very simple, and you can always do it easily as many times as you want. To do this, you simply have to follow the steps that we present below.
- The first thing you must do to be able to make the change in Windows 10 is to go to the “beginning”, later “Setting” and there you will see the following. As you can see, the default language in the image is Spanish.
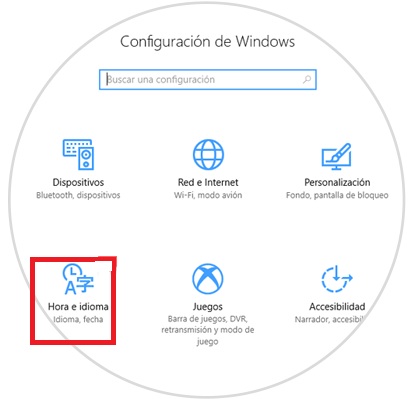
- In the same place you are already, look for the option “Hour and idiom”, from there you go to the line that says “Region and Language” and the following options will be displayed.
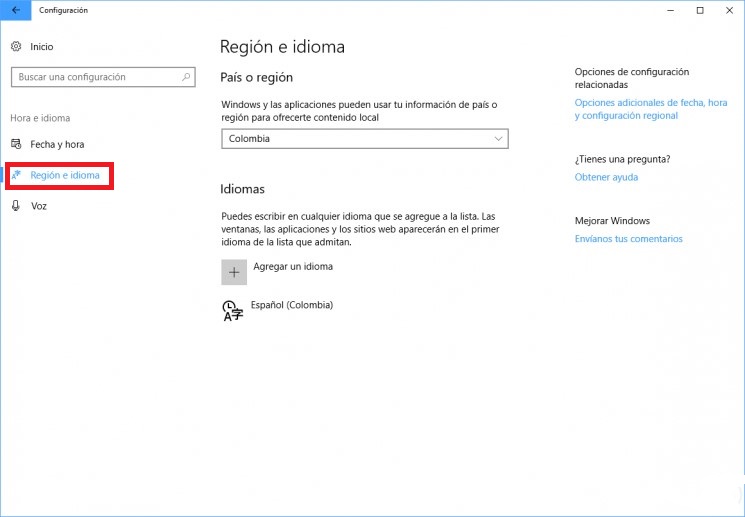
- As you can see, by default the system is in Spanish and, other languages are not available. For cases like these, if what you want is to change it to English, you will have to click on the option “Add a idiom” and in the window that is displayed you can search for it in the entire list, or simply enter the name in the search box.
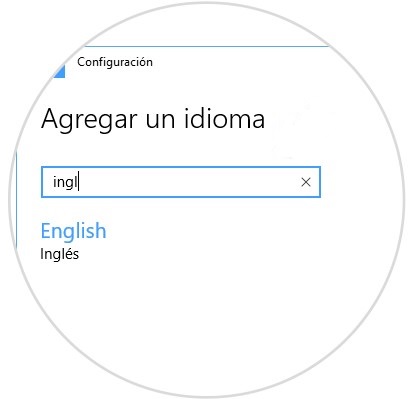
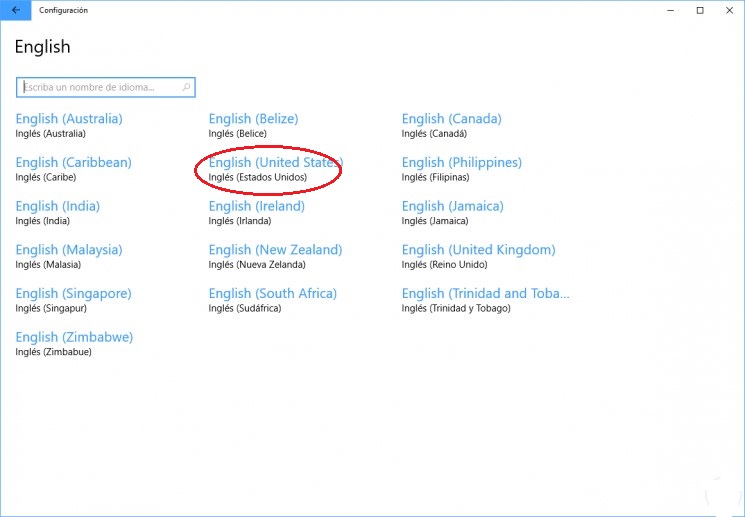
- Click on the option you want (English) and you will see that new options associated with the chosen language will appear, remember that each language has many variations, due to the different accents in each country.
- Among so many options, you select “English (United States)” and the window will be displayed again. “Region and idiom”, in which you will see that the language is already available. While there, click on the chosen language and other options will be displayed.
- Then click on the tab that says “Options”, and you will be able to see the download in progress of the language that you are going to configure.
- You will be able to download parameters such as language, voice and handwriting in the same place. Once the download process is finished, you will proceed to install the language.
- You return to the window “Region and language” and click on the language to set and select the option that says “Set as default” and you will see a message like the following.
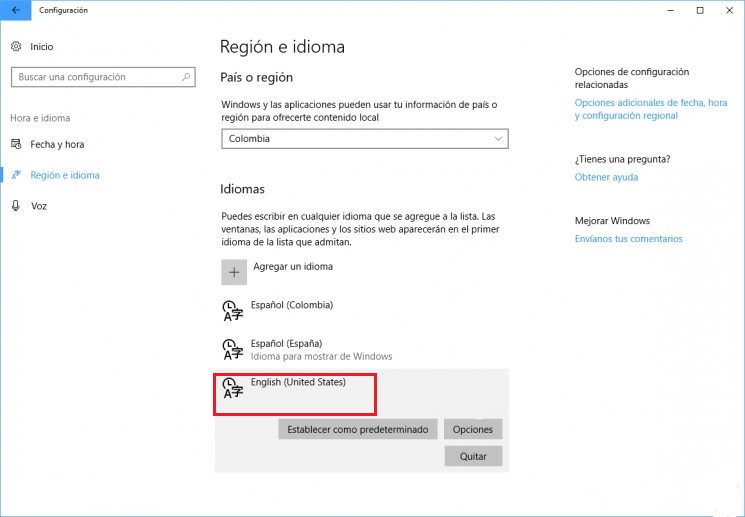
- In the next sign in to windows 10, this will be the default language from now on in your Windows. You will have to restart the system to be able to verify the changes and you will see that Windows 10 is now completely in English, as we have configured it.
Change the display language
Many of the users use the same computer but both use different languages. It is a very annoying thing that they have to download and install a new language every time you use it. For those we bring you how to configure the screen and the system for a specific user.
- As a first step go to the Windows menu, search for “Setting” and then in “Time and language”.

- A window will appear, in which you will look for the option to “Region and Language”.
- The languages that you currently have available will appear in the window, click on the language of your interest and select the option Set as default.
Change the language of the user account
The language that is already configured on your computer or user includes the different support windows, menus, assistant dialogs and all the elements that make up the interface. When the language is changed, it is shown specifically to the user, but is not included in these cited items. For this you will have to follow these simple steps:
- Locate the “Control Panel” of the team and go to “Region”.
- It will open a window, which you will select “copy configuration” so that the language you currently have is cloned to all elements.
- You will find in the window the option to mark that your current language is copied to the login session and system accounts. Right there you can select so that these same details are copied for new users. and click on “To accept”.
Configure Cortana’s language
This is one of the new Microsoft features, which helps you with many tasks within the Windows system. The problem with Cortana is that no matter how much you enable it from the installation, it will only be available for countries such as:
- United Kingdom.
- USA.
- China.
- France.
- Spain.
- Italy.
For this reason, the other countries will have restrictions to be able to use it, therefore it will be very necessary that you try to do the following steps, if you are within those countries, which enters the group of restricted countries.
- First make the change of languages as we have described previously. When you already have the new language established, you go to the option “Region and idiom” again, click on the “Options“(Options).
- Then you will see a window, which there you must download the option “Speech” of the installed language, and wait for it to download and install it on the system.
- Once installed, in the window “Region and idiom”, select the line “Speech” and in the field “Speech Language”, select the new language, in this case it is English. It will be very necessary that you activate the box “Recognize non-native accents for this language”.
- Once all the changes have been made, restart the operating system and you can use Cortana freely and with their fully active functions. You need to define the keyboard with the language already selected, for this click on the default language, which is located on the taskbar. From the displayed list, you search for the language and select it. In this case “English (United States)”.
- Finally, you will be able to change the current region of the system for everything organized, for this you go to the control panel.
- You select the option “Clock, Language and Region” and in the displayed window, click on Region. Once there, you select “United States” from the drop-down list and click “Okay”.
- By always following these steps you will be able to establish a new language to your Windows and also enable Cortana functionalities, whenever you want.
How to add a new language to Windows 10?
As in the previous method, you can install a new language in your operating system, since in it you can add the languages you want.
Follow the steps below:
- To do this, you’ll need to open the control panel first. In the Windows 10 search engine, type Control Panel, then you will see the options, select the option with the same name to open it. Once there, select the option “Watch, language and region” and click on the option “Add a idiom”.
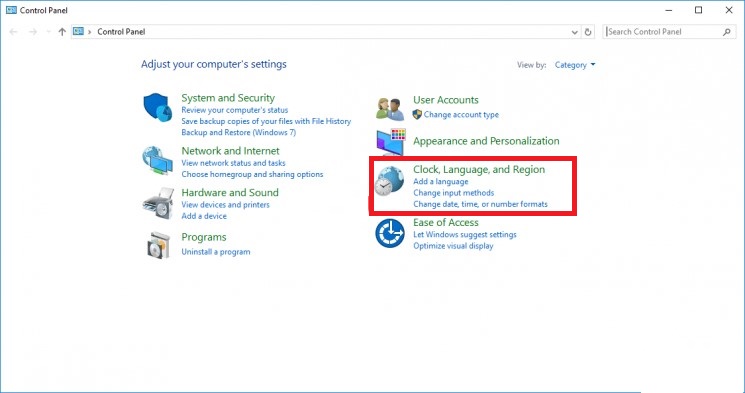
- Select the languages that you will find in the list(the ones you want to add), and then click add.
- When you return to the window of your languages you will see that the one you just added already appears among your languages, which are installed.
How to remove an installed language in Windows 10?
There are two methods to be able to remove a language in Windows 10:
The first method It consists of looking for the option of “Region and idiom”, click on that language you want to delete, and in the options that are displayed, select “remove” either “Put off”.
The second methodconsists of opening a command prompt terminal as administrator and executing it with the following syntax: lpksetup /u (language). For example, if you need to remove the Spanish language, you run the following: lpksetup /u en, and if you want to remove the English: lpksetup /u en-en.
Shortcuts and key combinations to change the language in Windows 10
Something that we have always liked about this operating system is its keyboard shortcuts. Those key combinations that give you easy access to sections of the OS that would be much more difficult to access normally. Unfortunately, there is no one of these formulas to change the language completely.
The closest thing that exists is the combination “Windows Key + Space Bar” to change the keyboard language. However, we take the liberty of making a guide to keyboard shortcuts in Microsoft’s operating system for you. So take note of each of them.
Split screens of applications and windows
To be able to make a division of screens or as it is said in the language of Windows, a snap, too easy. This has improved a bit in version 10 and here we will explain the keyboard shortcuts so you can try it out.
Application windows can be positioned on any side of the screen, like in Windows 8, but this version can assign to quadrants so you can make or have four frames (windows) open at the same time.
- + left — snap, from the active window to the left.
- + Right — snap the active window to the right.
- + top — snap the active window to the top.
- + down — snap the active window down.
You will see that when you are Snapping a window to the side or quadrant, Windows will suggest that you locate among the applications that you already have open, in some quadrant that is empty.
virtual desktops
The virtual support for desktops that Windows 10 brings, shows how much this operating system has evolved, to offer a better quality to its users. It is as if you have several additional invisible monitors. You can save a different activity on each desktop, but what is not different is the wallpaper and the shortcuts.
- + Ctrl + D — creates a new virtual desktop.
- + Ctrl + Left — move to the desktop on the left.
- + Ctrl + Right — move to the desktop on the right.
- + Ctrl+F4 — close the current desktop.
- + Tab — view all your desktops and applications.
Cortana settings and shortcuts
Cortana is the best search assistant on the platformIt has functions that are being improved every day. You can activate it by your voice, but if you are one of those who do not like (for comfort) shout “Hey Cortana”, or whatever the reason for not doing it, we offer you the shortcuts that will help you. Once you have already activated Cortana, you can choose whether to use the voice or only the keyboard.
- +Q — to launch Cortana ready to receive voice commands.
- + S — to launch Cortana ready to receive written commands.
- + i — doing this opens the Windows 10 settings page.
- + to — and you will see that the Windows action center (or notifications) opens.
- + X — so that it opens the context menu of the start button.
The terminal
This version has a new terminal, and therefore also new shortcuts for this. If you want to use them, you just have to right-click on the terminal window bar, which is where you will choose Properties. On the tab that says Optionsyou will have to activate the shortcuts using the Ctrl key, as well as the text selection options.
- Shift + Left — highlight text to the left of the cursor.
- Shift +b Right — highlight text to the right of the cursor.
- Ctrl + Shift + Left (or Right) — highlight blocks of text instead of just one item at a time.
- Ctrl + C — copy the selected text to the Windows clipboard.
- Ctrl + V — paste the text from the “clipboard” to the terminal.
- Ctrl + A — select all the text.
You’ll be able to use these same shortcuts for other text-based applications, but they’re new to the terminal.
classic shortcuts
Adding all the keyboard combinations that W10 brings new to your community, there are also a few shortcuts that have survived through many of the versions of this operating system, and despite this, they are still very useful. Here we leave you some other combinations that you will need, to be able to navigate through the interface of your new system.
- + D — minimize all applications to go directly to the desktop.
- Ctrl + Shift + M — restore all minimized applications (very useful after Win + D).
- +Home — minimize all windows except the one you are using.
- + L — lock your PC and go to the lock window.
- + E — open the file explorer.
- Alt + Up — go up one level in the file explorer.
- Alt + Left — go to the previous folder in the file explorer.
- Alt + Right — go to the next folder in the file explorer.
- Alt + Tab — switch windows (hold Alt while pressing Tab to visually choose which window to go to).
- Alt+F4 — close the current window.
- + Shift + Left (or Right) — move a window to your next monitor.
- + T — switch applications between those on the taskbar (press Enter to choose).
- + Any number key — open the application on your taskbar located in that position (example, Win+2 opens the second application located from left to right on the taskbar).
Computing