
Index:
UPDATED ✅ Do you want to optimize Windows 7 by increasing the size of virtual memory? ⭐ ENTER HERE ⭐ and Learn Everything FROM ZERO!
Although it is not the latest version of Windows operating systemthe truth is W7 has been one of the most relevant of all. Well, it brought with it numerous changes that marked a before and after in the remarkable evolution of this operating system for provide an optimal user experience. Valuing that, has support for 32 and 64 bit architectures.
In addition to this, it is an OS that occupies less space and requires less Kernel, apart from the fact that, is able to save energy by using the machine components to a lesser extent. Additionally, it provides greater synchronization between the user and the PCguarantees great security, has compatibility with numerous devices and even, reveals unparalleled speed.
But, under certain circumstances, users of Windows 7 notice irregular behavior on your PC that, unfortunately, it decreases the performance and capacity that it exhibits by nature. Which can be solved by expanding the size of virtual memory and given its importance, here we will give you the steps to follow to do it.
How does virtual memory affect the performance of my Windows 7 PC?
Generally, computers use the RAM to store all the information needed by the operating system so that users get the desired answers at the right time. So if that memory offers high performance, you can ensure optimal PC performance. However, since it ends up taking over over time, Windows looks for another alternative based on virtual memory.
So, basically, virtual memory refers to a memory management technique used by operating systems whose purpose is to be able to access a greater amount of memory than is physically available for take advantage of a part of the computer’s storage as additional memory. That is, the virtual memory choose to “borrow” a few megabytes of hard drive or SSD in order to free part of the RAM memory, once it runs out and begins to have low performance.
Therefore, virtual memory is a fundamental element in PC performance, in view of his great influence. Since, it helps the computer’s processor to perform its functions in a relevant way, when the RAM memory is saturated. Which, you can do by moving data from that memory to a space known as “pagefile” in the system. Thanks to this, increases the speed of execution of processes that the machine has to carry out when responding to user requests.
That is why, the fact of managing and expanding the size of virtual memory, offers optimal benefits to users in Windows 7. Among these, it is worth highlighting the following: Provides a virtually more extensive starting from the same real memory, it optimizes the effective multiprogramming, ensures greater acceleration in system performance and removes restrictions based on ability to initiate actions and/or tasks.
Learn step by step how to increase the default size of virtual memory in Windows 7
While it is true, virtual memory windows 7 It is automatically configured by the system. However, as certain processes can impair the performance of the PC over time, it is recommended to adjust this setting manually in order to optimize the performance of said equipment.
Luckily, it’s an easy-to-do setup that offers the ability to increase team performance. This, even when it is a computer with more than 8 GB of RAM memory because, under this particularity, it can also cause various breakdowns if virtual memory is not used properly.
So, without further ado, we proceed to teach you what to do to increase the size of this memory on your W7:
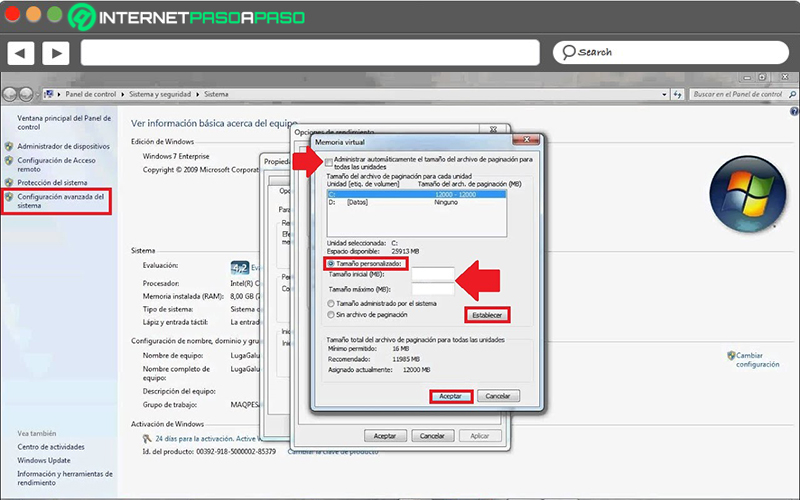
- To get started, find the Team app and right click on it, to choose “Properties”. This application can be found through the Windows 7 Start menu or even, in a direct access from the Desk.
- After that, a new window will appear and at the top, specifically on the left, you will see several links. In this case, it is necessary Select “Advanced system settings”.
- Next, the system will offer you a box that has several tabs full of options. There, it’s time to Click on the “Advanced Options” section.
- Now, go to the section that says “Performance” and in it, click on the lower button of “Setting…”.
- Once the above is done, a new window will automatically be displayed with several alternatives. in which you have to Click on “Advanced Options” to then look for the section corresponding to the Virtual Memory and there, choose the button that says “Change…”.
- After that, you can see another window that provides the different alternatives dedicated to Virtual Memory. In this case, to manage it, start with uncheck the box that says “Automatically manage paging file size for all drives”.
- Next, choose the system partition and likewise, the other available solutions will be activated and thus, you can click the box that says “Custom Size”. This will enable two options that allow you to set the amount of MB you want for Virtual Memory (both Initial Size and Maximum Size).
- One time enter the desired values in these boxesonly remains click “Set” to save the changes made by clicking on “To accept” in order to improve the performance of your machine.
Now you might be wondering what are the recommended values to set in the Initial Size and the Maximum Size of your Virtual Memory, in order to achieve excellent results. So, mainly, we advise you to use more than 100% of the amount of RAM used by Windows.
That is to say, if your PC has 1 GB of RAMin these boxes you can put 2,000 MB (equivalent to 2 GB) and so on. Also, in other cases to be more specific, it is recommended to resort to certain values that will help you get a better performance on the PC.
These values consist of the following:
- In Initial Size (MB): Enter the amount shown in “Recommended” in the Total paging file size for all drives section (at the bottom of the same Virtual Memory pane).
- In Maximum size (MB): You can make use of a proposed formula to acquire the ideal value for efficient performance. This formula refers to: 1024 x Amount of RAM in the computer x 2 (for example: 1024 x 8 x 2 = 8192).
Tips to optimize your Windows 7 and make go faster
Although increasing the size of virtual memory can be a great improvement for PC performancethe truth is that it is also essential to resort to other solutions that help optimize the operation of the operating system so that it operates faster.
Therefore, in this section of the post, we want to let you know some effective recommendations, techniques and tricks to maximize its effectiveness, without any complications:
Make use of ReadyBoost
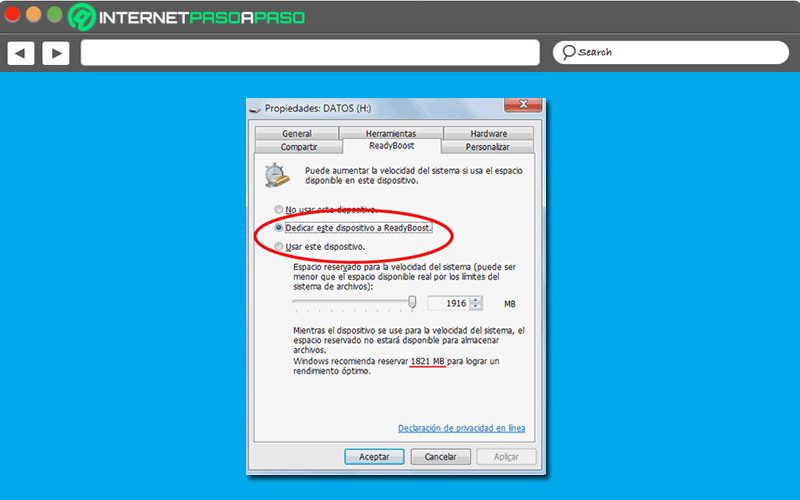
One of the tips that you should not fail to put into practice in W7, refers to using the famous “ReadyBoost” tool It has the ability to improve PC performance to a great extent. This, mainly, using the space of memory cards and USB flash drives that, in a certain way, it is equivalent to expanding the RAM memory of the machine.
For its part, to implement this solution, you need to know how you can activate ReadyBoost and, below, we will explain each step to follow in order to achieve it:
- To start, you have to connect the pendrive or SD to your PC. For the best possible result, it is recommended use a device that has at least 1 GB of empty memory. Assessing that the more capacity this has, the better it will be.
- Then, on your PC, proceed to open the Start menu and click on the “Team” option. Or, you can open this utility from the desktop, if you have its shortcut there.
- Next, locate the device you have connected and proceed to select it to right click on it and there, in the menu that appears, select “Properties”.
- Now, among all the available tabs, you have to click on “ReadyBoost” so, start managing this powerful tool.
- Once you have done the above, you must check the box “Dedicate this device to ReadyBoost” to determine that it uses all the free space in order to speed up the computer.
- In case you prefer set a specific value (in MB) as the space that will be specifically assigned to ReadyBoost, you have to check the box “Use this device” and there, write the value you prefer.
- Finally, press the “OK” button and in such a way, the file will be created ReadyBoost on your USB device or SD card. Which, you must not delete.
Turn off power saving
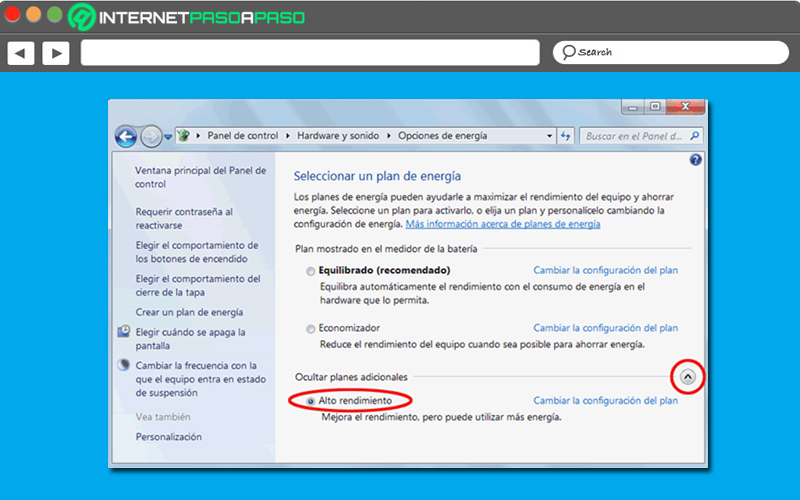
Even though that him energy saving reveals some benefits, in most cases, tends to reduce PC performance. For this reason, although it is a utility that is activated and configured in Windows 7, by default, it is best to disable this feature in order to improve PC performance.
Here, we show you step by step how to do it:
- directly from the Start menu of your PCin the search bar, type “select a power plan” and press the key Enter to open the obtained result.
- Second, head to the bottom and in the “Hide additional plans” sectionproceed to click on the box “High performance”.
- In case this option does not appear directly, you have to click on the button with an arrow to the right of “Show additional plans” and from there, you can select the mentioned option.
Disable visual effects
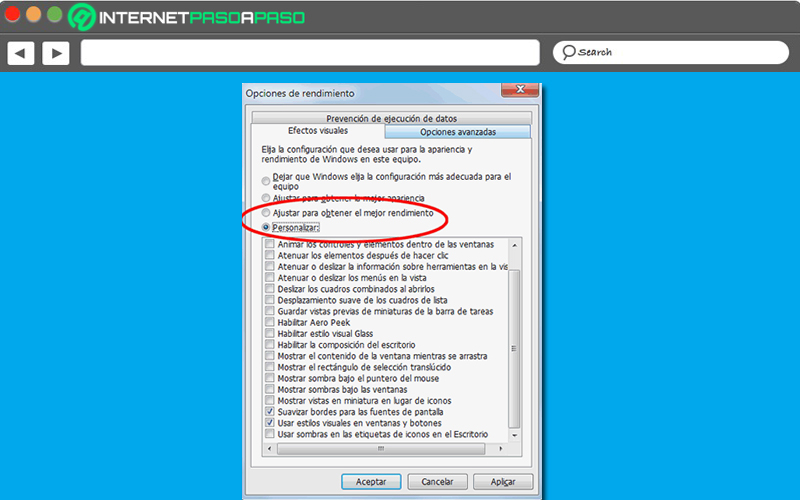
Another helpful method for increase PC performance, is to disable the visual effects. Which, despite providing a prettier appearance to the computer, is also characterized by generate a greater slowness in this and thus, they minimize their potency.
Therefore, it is advised to disable this function and that is executed as follows:
- First of all, find and click on the start button. Once the menu opens, go to the search field and write “visual effects” to select the result it says “Adjust the appearance and performance of Windows”.
- You can then see various settings available in that window. But, in this case, the most important of all is the one that says “Tweak for best performance”. Which, you can check to disable all visual effects to greatly improve performance (ideal if you don’t care about the look of W7).
- In case you find the look of Windows and at the same time you want to expand its performance, you can use the “Customize” option and select it. With it, individually, you will have the possibility to choose the visual effects that you want to keep.
- When you make all the desired changes, it’s time to click the “OK” button in order to save them correctly.
Clean your PC’s hard drive
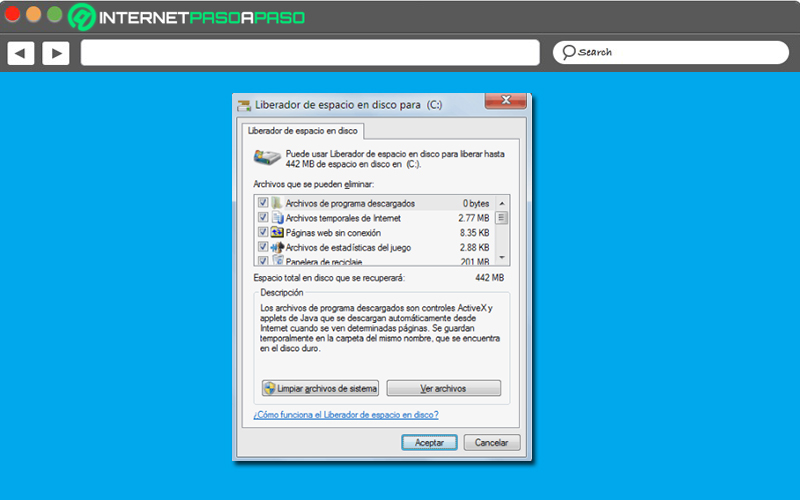
While it is true, useless files stored on the hard drive take up space that, by nature, tends to slow down the computer noticeably. Therefore, for optimize PC performanceit’s a good idea to remove temporary files, empty the recycle bin, and delete other unnecessary items.
Luckily, although it seems like a tedious task, the truth is that it is easy to do thanks to the Disk Cleanup that Windows 7 contains. So, being a tool of the same system, offers timely operation and that is why we advise you to use.
Thus, below, we show you how you should use it to achieve this task:
- Initially, click on the start button and through the search box, introduces the terms “disk cleanup” to get this utility as a result.
- Once you click on said result, automatically, the window corresponding to it will appear in a dialog box and there, you have to choose the name of the drive in the “Files that can be deleted” box to proceed press the button “Clean system files” on the bottom.
- Following that, you may be asked for an administrator password or confirmation and to continue the process, you will have to enter said password or accept confirmation.
- Then a new window will open showing the calculation of the space that can be freed and once this process is finished, you have to press the “OK” button.
- Finally, it’s time to click on “Delete files” in the dialog box for disk cleanup.
Speed up the taskbar
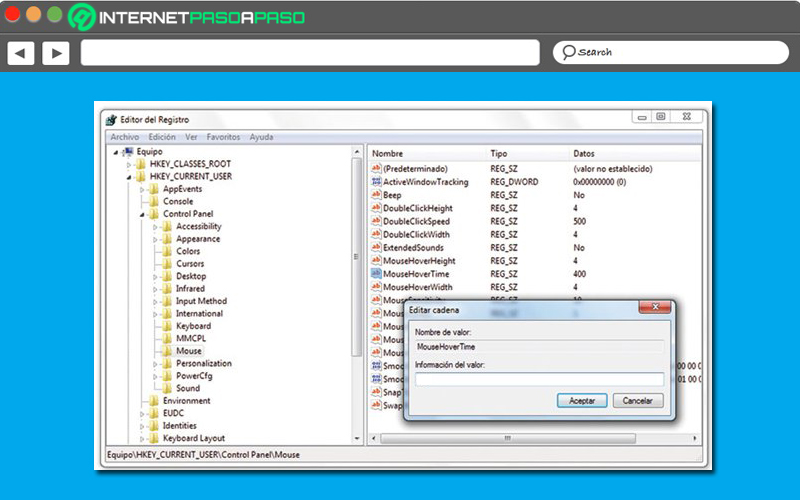
It is no secret to anyone that the most attractive feature is the new windows 7 taskbar and, as a consequence, it is optimal to be able to accelerate it. Reason why, the system accept this setting in order to provide a better performance during the user experience.
In order to do so, the steps to follow consist of:
- First of all, click on the button Start Y proceed to write
regediton the search bar to press the key Enter. - Next, you have to search for a specific entry which is
“HKEY_CURRENT_USERSoftwareMicrosoftWindowsCurrentVersionExplorerAdvanced”to right-click on it and choose the option “New”. - After that, in a small menu, several options will be displayed among which you have to select “DWORD Value” (if your computer is 32 bit) or “QWORD value” (if the PC is 64 bits).
- Next, to the mentioned entry, you have to rename the folder to the following:
ThumbnailLivePreviewHoverTime. - Once you do the above, proceed to right click on this new entry and Click on “Modify…”.
- After that, in Base, you have to click on “Decimal” stop there choose a number in milliseconds (between 200 and 500). Which, will determine the acceleration of the taskbar.
- Finally, to save the changes madejust left Restart your computer.
Computing