Index:
UPDATED ✅ Do you want to know more about how to make a floor plan in Microsoft Word? ⭐ ENTER HERE ⭐ and learn everything FROM ZERO!
If you need to make a design a floor plan and you don’t want to work with other specialized softwareyou will be able to use Word as an efficient tool to do this type of work.
For this, you will have to use your ingenuity so that you can discover which are the tools that will suit you best to obtain the best result.
We will introduce you in this article, the step by step you will have to do to make a 2D plan and a 3D model. We will also show you other specialized design programs with which you will have a professional result. Do not miss any detail.
How powerful is Word for creating a floor plan?
With Word you can create a floor plan, but you will not have the same result as if you did it with other computer tools. This is because Microsoft’s word processor does not have features that allow you to be precise when editing.
In addition, it does not provide different elements with which you can work more quickly. Nor will you be able to insert textures such as types of walls, floors, grass, etc.
What are the best Word tools for making floor plans?
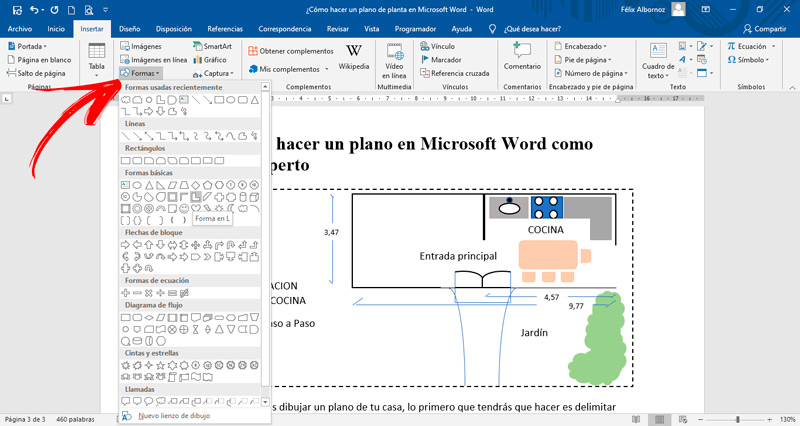
With Word you will be able to make floor plans using some tools that are available to you. Among them is the function “Shapes”with which you will be able to draw rectangles, circles and many other figures that will allow you to generate a 3D or 2D effect.
You can use the functions “Images” and “Pictures online”, with which you will be able to insert illustrations from the Internet or from your computer. In this way you can have much more real perspectives.
Another tool you can work with is the function Typography text effects. With this function you will be able to give a style to the letters that you incorporate in the plan.
Steps to make a plan in Microsoft Word like an expert

In case you want to draw a plan of your house, the first thing you will have to do is delimit the property area. To do this, you will have to use the form “Rectangle” and choose as line the choppy.
Follow this guide:
- To do this task you will have to go to “Insert” and then select “Shapes” and then you must click on “Rectangle”.
- With the mouse, move the cursor to form the desired size of the rectangle.
- At this time you will have to go to the option “Shape Fill” and select the function “Unfilled”. If you want to change the color of the outline, you must click on “shape outline” and choose the desired color.
- Next, you will have to click on “Stripes” and choose the function “Script”.
In case you live in another place, where you do not need to delimit your property, these steps will not be necessary. So far you have delimited the general space.
Next, you will have to draw the limits of your home. You will have to follow these steps:
- Click on “Insert”click on the group “Illustrations” and then in “Shapes”.
- Choose again a “Rectangle” and draw it inside the figure that you already have a leaf.
- Next, establish the measurements guided by the horizontal and vertical ruler that you have in Word.
- At this time you will have to draw the corridors and all the areas that your house has. For that you will have to select the form “Line”.
- You should keep in mind that you can increase or decrease the length of each stripe by selecting it from one end. For more precision, you will have to press the key “Alt”.
- When you’re done, still thinking “ctrl” select all the shapes they have and then right click.
- Choose the option “Group”. This will form a single figure which you can move as a group as you wish without having to do it one by one.
- To draw a door or any other opening, you will need to select the shape “Delay” of the group “Flowchart”.
- In case you want to insert the elements of a bathroom you should use “Terminator”of the group “Flowchart”. Another function you are going to have to use is “String” Y “L shape” of “Basic Shapes”. For the kitchen and the living room you can also use these figures.
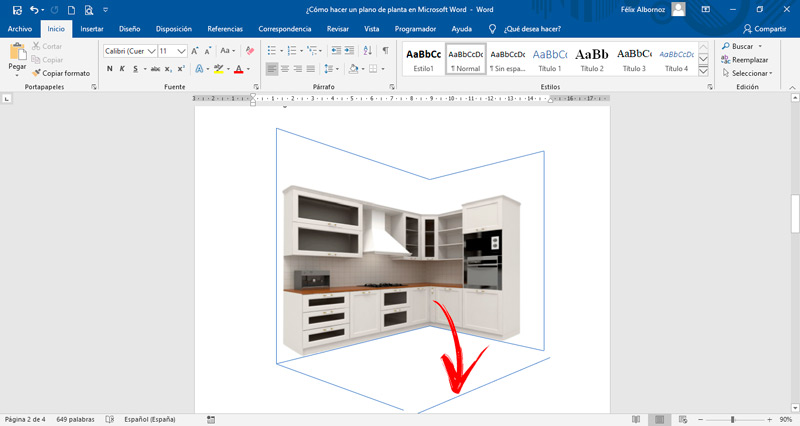
What we have seen so far is a 2D plane, but you can also generate a perspective make a figure in three dimensions. For this you will have to use the same figure tools, but you will have to add real photos that will help you obtain an image with a professional style.

The steps you must perform are the following:
- Draw a “Rectangle” and choose a dark color.
- Then insert the shape “Trapeze” and place it so that it looks like the floor.
- What you should do now is download an image from the Internet. To do this you will have to click on “Insert” and then click on “Pictures online”. Find the one that suits you best. In this case we will choose a kitchen.
- Please note that all images must be in PNG format. This will help you to erase the background of the image and only have the photo you need.
- In case you have one in which you want to delete the white background, you can use the tool “OnlineImageEditor”. You will have to drag the image and click on the third option. If you don’t want to use this tool you can use any image editor. “https://www.online-image-editor.com/”
- When you have the element that you want to incorporate ready, you will have to insert it in the plane that you are making. Press “Insert” and then choose the function “Images”. Next, you will have to choose the image that you downloaded from the destination that you assigned to it.
- In this way you can incorporate all the images you want to be until the plan is in accordance with your needs.
- To finish, you will have to join the figures with the function “Line”.
List of the best programs to make alternative plans to Microsoft Word
Next, we will show you the best programs with which you can make floor plans:
autocad
This software is one of the most used by people who want to make 2D designs or 3D models. It has a free 30-day subscription and tools that will allow you to find the solution to every detail of the job.
It is compatible with Windows and MacOS. You can choose whether you are a business user or need it for teaching.
Revit Architecture
It is characterized by presenting tools that allow the design of drawings based on intelligent objects, being able to generate a 3D effect..
You can use it on MacOS and Windows. The pin tools allow the visualization to be a photorealistic work, being able to coordinate multiple disciplines that can work in a coordinated way on different tasks of a work. You will have a 30-day free trial.
Dynamo BIM
This is an open source software that allows 3D modeling to perform the construction of plans. In this way, users will be able to access a program that receives permanent updates and has the most modern functions of today. You can download it for any operating system.
One of its great advantages is that it allows editing graphics in a simple way, in relation to other floor plan editing software.
MSVisio
This is one of the simplest software we have named so far. It belongs to Microsoft and is a program that is designed to make drawings with vectors. You will have different tools with which you will be able to make professional diagrams and any other graph, which you will be able to integrate with Office 365 without any problem.
edraw
With this program you will have the possibility to create a floor plan quickly and easily, since you will have different functions that They will allow you to save time in your work. In addition, you will have tools that will allow you to make flowcharts and other types of drawings that you can insert into Microsoft Word.
Computing