Index:
UPDATED ✅ Want to learn more about restricting formatting and editing in Microsoft Word documents? ⭐ ENTER HERE ⭐ and learn everything FROM ZERO!
Editing of a Word document can be restricted with very simple steps. In this way, you will be able to share with other people the writing of your text knowing that nobody will be able to modify the content.
You must bear in mind that in order to this task you will have to be registered as a user in Microsoft. You can share with all the people you want without any restrictions.
We will teach you in the following paragraphs of this article all the secrets you will need to know to become a Microsoft Word pro. Let’s not waste any more time and start.
Why is the formatting and editing of a document in Word restricted?
Editing format can be restricted when you need to share the document with other people, but they do not have the authorization to modify it the text or illustrations contained in the file.
The use of these tools is very frequent in work or study environments where it is necessary to present ideas through Microsoft Word.
Steps to restrict formatting and editing of a Microsoft Word document

The first thing you should do is write the text and add tables, images or any other illustration you need. When you have finished you must follow these steps:
- Go to the menu “File, Archive” on the ribbon.
- Look in the left column painted blue for the option “Share”.
- When a pop-up window opens you will have to click on “Share with other people”.
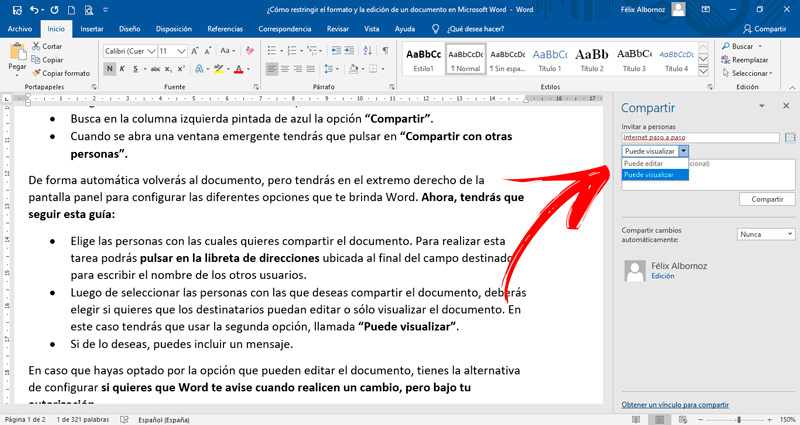
You will automatically return to the document, but you will have a panel on the far right of the screen to configure the different options that Word offers you. Now, you will have to follow this guide:
- Choose the people with whom you want to share the document. To perform this task you can click on the address book located at the end of the field intended to write the name of the other users.
- After selecting the people you want to share the document with, you’ll need to choose whether you want the recipients to be able to edit or only view the document. In this case you will have to use the second option, called “can visualize”.
- If you wish, you can include a message.
In case you have opted for the option that they can edit the document, you have the alternative of configuring if you want Word to notify you when they make a change, but with your permission.
To do this task you will have to choose to be asked beforehand or not to be able to make any changes. When you have finished you will have to click on the option “Share”.
Computing