
With the large number of social networks that exist today and the even greater number of users that populate them, it was logical and to expect that large companies would be encouraged to launch their own proposals to the market. Of course, in a race in which all bid to enjoy a greater number of inhabitants, Google could not miss. The technology giant launched Google+ years ago, a network with which to try to get everyone to get on the social car they wanted to offer.
Over the years, something has been left behind in a race in which Facebook, Twitter and Instagram have taken a huge lead, but their full integration with services such as Gmail or Google Drive continue to make it a very interesting proposal. In fact, anyone who has previously registered a Google account has direct access to this social network. There are those who have not yet done so and, therefore, try to know how to open a new account on Google+ without complications.
For all those who are still taking their first steps this guide is dedicated, and here we are going to explain everything that needs to be done, step by step , to be able to register in this service and start using it quickly and easily. Also, we explain how to proceed to take advantage of its more professional and business side, Google+ My Business , an element that the company makes available to all professionals to improve the visibility and position of a local business, both in the search engine and its location in Google Maps and thus provide information to any user that may be interested.
Index:
How to create a new profile on the Google + social network?
With everything we are going to tell you next, there can be no room for any doubt, since we clarify everything necessary to make the relevant records without problems. These are not excessively complicated procedures, but there may always be some occasional confusion that we hope to avoid during the registration process.
Any user who has a Google account has, automatically, an associated profile in the company’s social network . However, if you have never done it before, we will explain how to create a new profile on the Google+ social network . Something that also allows you to have a Gmail email and access other services of the internet giant. Thanks to the unification of services / accounts that Google has, it is now much easier to have a user profile in different applications and tools that puts the great G. at our disposal.
1 – Go to the Google+ website and start the record
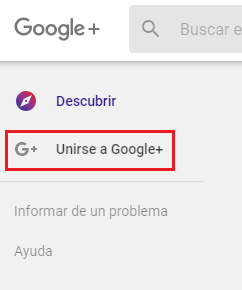
In your PC’s web browser, go to the online Google+ portal . To do this, enter the URL that we will now indicate in the address bar of your browser (usually located at the top of the window). This is the address to enter: https://plus.google.com/discover. Once there, you must begin the new user registration process. To do this, go to the left and click on “Join Google+”.
2 – Enter your user data
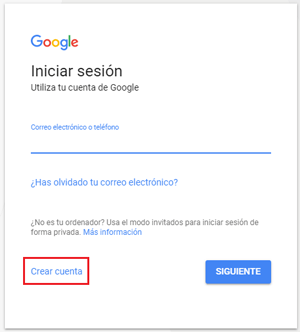
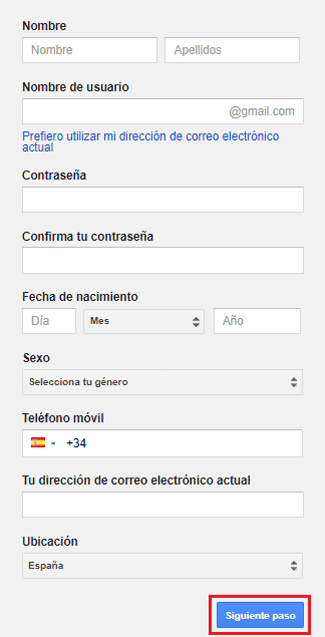
Next, click on the bottom where it says « Create account «. Once inside the registration website, on the right side you will find a fairly simple form , with a series of essential data to enter. First, you must fill in the first and last name fields and your username . Keep in mind that the latter, in addition, will be linked to an email from Gmail , so it is advisable to use something easy to remember and that is not malicious, to avoid any problem with other users.
The next field is enter your password, confirm it (must be personal and non-transferable), your date of birth, your sex, your phone number and other alternative e-mail . These last two points are the most important, since they are used to finish validating the account and confirm your identity, in addition to being able to reinforce security through two-step verification.
3 – Accept Google’s terms of use
After completing the previous section, a pop-up window will appear with all information about Google’s privacy and terms of use . Click on the “ I accept ” button to continue or, otherwise, you will not be able to continue and finish the new user registration process.
4 – Ending the registration!
You have finished the account creation process on Google . Once the terms of use of the company have been accepted, you will have completed all the steps to create your profile in the system . However, there are now some final touches to enable your account on Google+ .
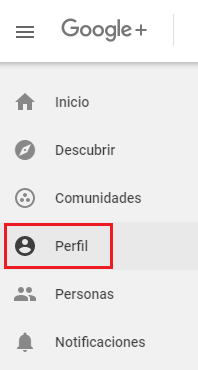
After finishing the registration, the main window will appear on screen to finish set up your profile on Google+ . Here, you can choose to allow your full name to appear or use a dummy one. Choose and, once you are clear, confirm to finally have your profile on the Google+ social network.
From this moment on, you can start moving around this Google network and use it to connect with users from all over the world. Although not as well known or used as others of the caliber of Twitter or Facebook , it has one of the most important companies in the world, and that is always an incentive to take a look to see what it is capable of.
- Have 10 or more followers (people who have added you to their circles).
- That your account is at least 30 days old.
- Include a photo in your profile.
- That your account has good use with respect to Google’s policies.
How to create an account for companies on Google Plus? Google My Business
Google Plus also has a section for companies . Its purpose is to maximize its presence in networks, allow users to find them more easily and even have access to data such as opening hours, location and reviews.
Due to this, knowing how to create a account for companies in Google Plus through the My Business system is considered as a necessary option for any business. Doing so is quite simple and intuitive, although it requires following a series of important steps to ensure that your company’s network identity is well reflected. Next, we explain how to do it:
1 – Enter Google My Business
On your PC, open the web browser you usually use and enter the following URL in the address bar: https://www.google.es/intl/es/business / . Thus, you will enter the Google+ home page for businesses.

Once inside, click on the green button in the upper right: “Start Now” . This will start the process of registering the new account for your company.
2 – Enter your Google account
Now, you must enter your Google account email on the screen that appears. Do it and click on “ Next ”.
After this, you will be asked to enter the password to be able to login. Type it in the field enabled for it and, again, click on “Next”.
If, by chance, you still don’t have an account in this service. We recommend you take a look at the previous section to follow the necessary steps to get it. Once you have it, just return to this step.
3 – Start with your company data
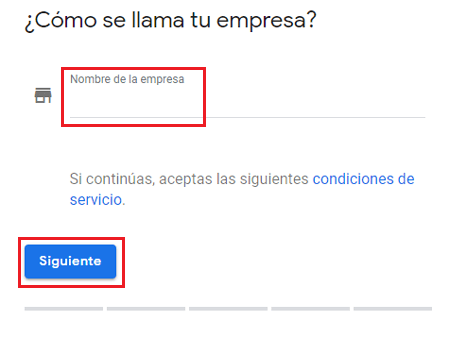
The first question that Google will ask you is the company name that you want to register in My Business. Write it on the screen that appears and click on “ Next ” once you’ve done it.
Now, you will have to enter a series of data about the company. First, you must indicate the country where you are, along with a postal address, zip code, city and province . This data is absolutely necessary so that a real location can be offered to any user interested in your services or products.
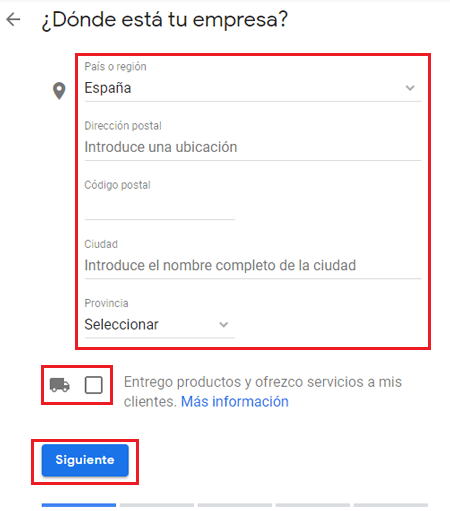
Once all these fields have been filled in, you can check the box just below these fields in case your business sends packages or offers services to customers (if you do, you will be asked if you prefer to hide your address) . Otherwise, skip this section. All this done, go to the “ Next ” button and press it to advance.
4 – Specify more details about your business
If you checked the shipping and services box , Google will now ask you how you send the products to your customers. Choose any of the three options (mail, or the two variants of delivery in person) and click on the blue button with the text “ Next ”.
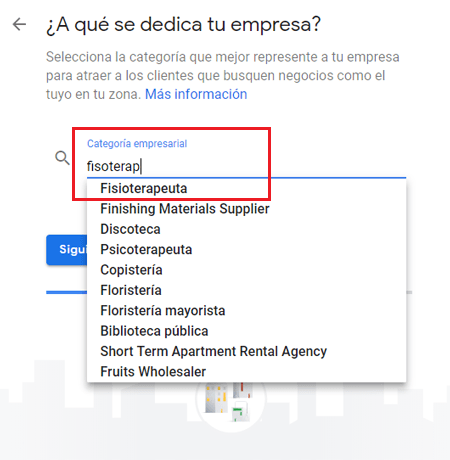
The next point asks you to indicate what your company is doing . Go to the “ Business category ” field and click on it. When you start writing, options will appear between which to choose the one that best fits what you offer. Choose the most appropriate option, or write it down if it does not appear, and click on “ Next ”.
Now, in order to facilitate contact for your potential customers, you must provide a phone number and a web page . It is recommended that both the company’s contact phone number and the main page of your website be used here, if you have one, although this step is optional . Fill in both fields properly and, after this, click again on “ Next ”.
Google My Business will ask you now if you want to receive information , recommendations and other advice from the team to improve your company’s presence in networks. Choose the option you prefer and continue with the same button as always.
Before continuing, all the possibilities offered by this service to your business will appear on the screen, the most prominent being:
- Have your company found on Google Search and Maps
- Respond to customer reviews
- Create promotional publications and upload photos
Track your company’s analytics
Check out what they offer and click on “Continue” to move forward.
5 – Verification
Since we talk about something with a business objective, Google demands to verify the identity to corroborate the validity of your business data . To do this, you must click on the “ Mail ” button to receive a letter at the address indicated previously.
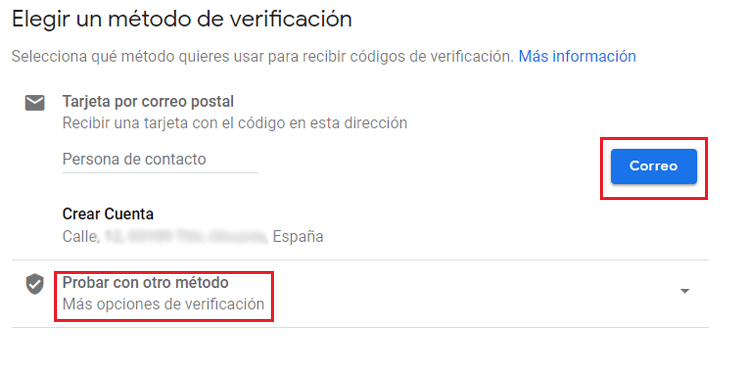
If you want to wait to validate the account, click on the arrow to the right of “ Try another method ” and click on “Later”. If you need more information about how to verify your local business on Google , you can take a look here .
6 – Account created!
Your company’s Google Plus account has already been created . You just have to wait for My Business to send your letter to receive the verification code with which to finish checking the identity of your company and, finally, start taking advantage all its services at maximum performance.
7 – Access to My Business panel

Once you have created your account, you can access your My Business control panel by clicking click here . We even have the option to download the official app that offers us in Google Play Store for Android or App Store for iOS.
With these mobile apps we can view all the data from our smartphone. In this panel we can see all the important aspects to take into account so that our business can gain visibility before our potential clients, from completing our information with new data, opening and closing times, business photos, management of announcements and reviews and a long and so on.
