
UPDATED ✅ Do you need to analyze or repair a drive or USB with CHKDSK in W10 and don’t know how? ⭐ ENTER HERE ⭐ and discover step by step how to do it ✅ EASY and FAST ✅
One of the biggest headaches for modern users is undoubtedly the failure of disks and USB sticks.. It is a serious case since in these storage devices we usually store personal information of great importance.
That is why when we come across this scenario we usually get a little desperate. We all care about our information. Fortunately, in Windows there is a free tool developed to solve these types of errors..
In this article we are going to show you what the CHKDSK command in Windows 10, 8 and 7 is and what it is for, so you can repair your drives and other storage devices whenever they start giving you trouble.
CHKDSK command What is it and what is it for?
CHKDS is a diminutive for CheckDisk, which in Spanish would be checker or disk analyzer. What it does is what its name indicates; is responsible for analyzing storage units like USB flash drive, physical disks (SSD) and any other device with one of these.
Its beginnings date back to the 90s, when Microsoft decided to implement them in its operating system. At that time it was running automatically after booting the OS to check for errorsespecially after a sudden equipment blackout.
However, Microsoft was not its inventor. Its creation dates back to the beginning of computing itself, based on other similar tools that had been integrated into systems such as MS-DOS. But it was not until its inclusion in Windows that its use became popular among the average user.
The CHKDSK command it is very useful even today, and its concepts are the basis of many premium programs that offer disk analysis and repair solutions.
With it we can do things like:
- Analyze and identify physical errors in disks and storage devices.
- Repair physical errors in disks and storage devices.
- Monitor disk health and performance in real time.
Steps to use the CheckDisk command to analyze and repair errors on hard drives or USB
You already know what this command is and what it is for, and now we are going to teach you how to use it both to analyze a disk and to repair the errors that exist on it. These steps are for Windows 10, but they also apply to versions 7 and 8.
To analyze disk
Scanning a drive with CHKDSK is one of the easiest things you can do as a Windows user. All you have to do is follow our instructions:
- In the start menu of your computer type “CMD” and in the result that appears you right click and select “Execute as an administrator”.
- This will open the console “Symbol of system”, in which we will activate the command. Once it’s open just type “CHKDSK” and click “Enter”, which will make the tool start to work.
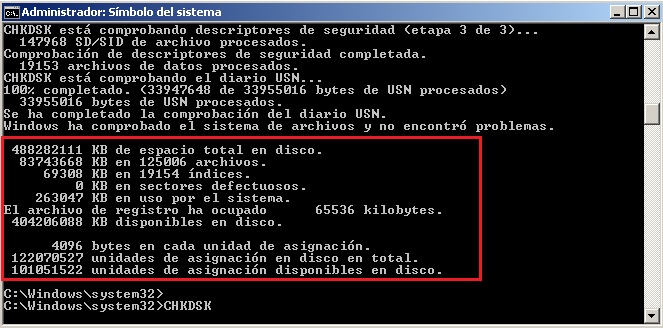
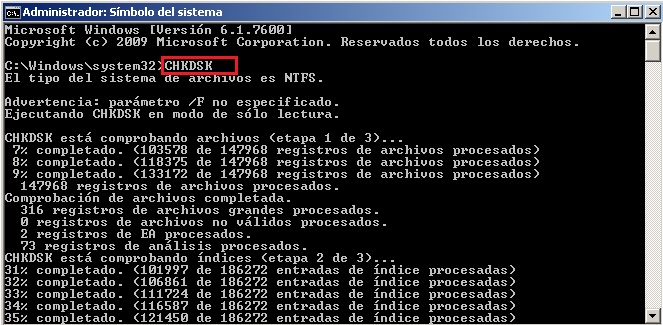
- After the analysis, you will see the results in a section similar to the one shown in the image.

The result of this analysis was positive since no problem was found, this disc is in perfect condition.
To fix errors found
If you find an error after performing the analysis with CheckDisck, what you should do is use the different parameters that it allows to repair errors. What you should do is that with the window of the “Symbol of the system” still open execute the command “chkdsk G: /f /r /x”.
These parameters work for:
- /F – Correct errors on the disk volume.
- /R – locates errors in bad sectors of the disk.
- /X: Check the volume.
Once you do the above, a process will begin that will take several minutes to complete. After that you will have to restart the computer and then run another scan with CHKDSK to verify that there are no errors yet.
List of parameters that can be used with Windows 10 Disk Analyzer
In addition to the parameters that we showed you before, there are also others that perform more specific functions. We are not going to deceive you, in order to use them at a high level you will have to do a lot of research on computer storage solutions since many of them are designed for professional use.
But nothing you learn weighs you down so we proceed to teach you the main parameters of CHKDSK. Take a look at the following:
- /F: Corrects errors in the volume for which it must be locked.
- /Yo: NTFS only. Basic analysis of the disk, without going too deep.
- /l: NTFS only. Shows the real-time size of the entire log file.
- /p: check any disk, even if it is not marked as “dirty”.
- /r: Locates bad sectors on the disk and recovers all readable information (implies /f and /p).
- /v: In FAT: displays the full path and name of all data on the volume. On NTFS: shows you the messages after cleaning if there are any.
- /x: NTFS only. Forces the volume to dismount first, if necessary.
- /b: NTFS only, from Vista. Clears the list of severely bad sectors on the volume.
- /?: shows you the list of available CHKDSK parameters.
List of the best programs and applications to analyze physical disks and identify errors
Well, CHKDSK is a great tool, but it doesn’t do everything. Fortunately, there are many easier-to-use programs that are frankly more powerful at their job, as this command is still just basic computing.
Next, we are going to present you 5 excellent programs that are the perfect alternative to Windows CheckDisk:
CrystalDiskInfo
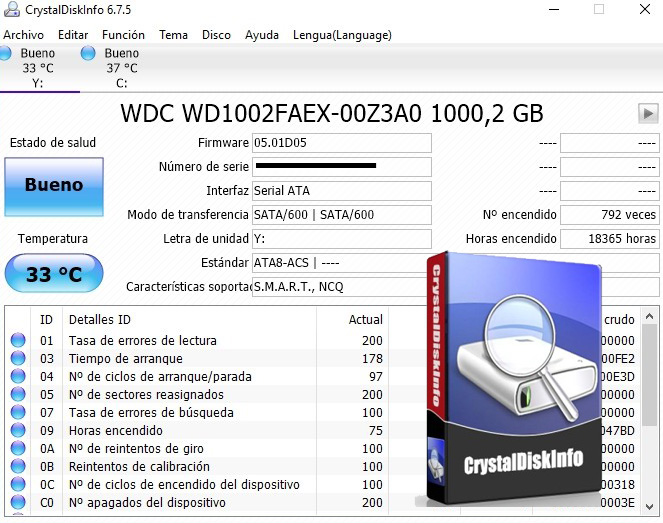
This is a fairly complete program that although it is not so good in the solutions section, it offers you one of the most complete damage reports. You will obtain important data from the SMART parameters of your disks, and you will also be able to analyze all kinds of storage devices.
This is an open source program, so you won’t have to pay anything to get it on your computer. It has other interesting functions such as activating notifications of risk and damage reports in real time, as well as doing small tasks such as freeing the cache memory and little else.
HDDScan
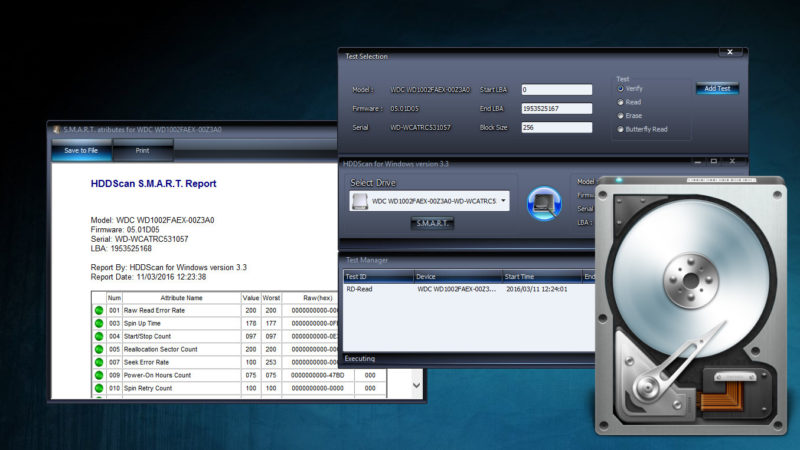
This is a more powerful option than the previous one since it has very similar features, such as SMART parameter reports, but with much better bug fixes on your internal or external storage devices.
It is very easy to carry since it does not need installation and it does not weigh at all. so that you can carry it on a USB to use it in any equipment that needs a complete diagnosis of what is happening inside. You’ll be able to perform various disk performance tests as well as delete unnecessary data in the cache.
EASIS DriveCheck
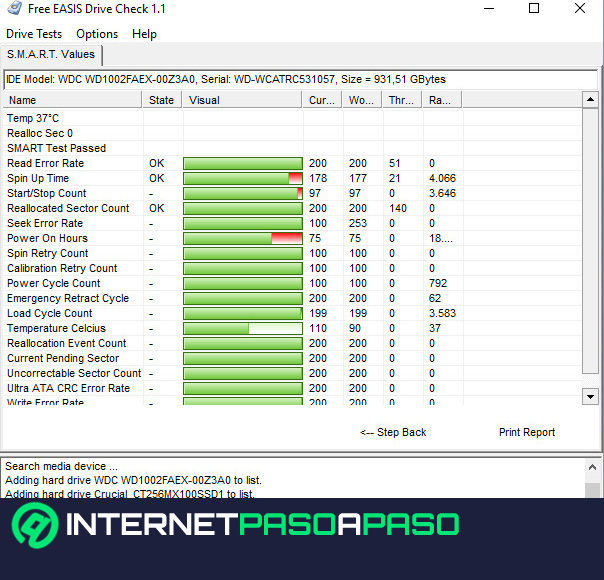
A very basic but efficient tool. With it you can obtain very complete reports of everything that happens inside your disks, as well as carry out various performance tests, which will tell you if a hard reset or a complete system restore is necessary to be able to eliminate unnecessary files.
It’s completely free and ad-free, so you shouldn’t have an excuse not to use it. It is easy to handle since when you open the interface it only gives you two options; perform a SMART or surface test.
Operating systems