UPDATED ✅ Do you need to ORGANIZE your trip with the Google Trips app and don’t know how to do it? ⭐ ENTER HERE ⭐ and discover how to do it step by step with this TUTORIAL ✅ EASY and FAST ✅
wouldn’t you love have all the information about your next trip unified and easily accessible? Printed tickets, reservations for different hotels, each one scattered around in the mail, suddenly you don’t have internet to consult Booking, AirBnB, tourist brochures, uncomfortable plans… Be careful because the answer to your prayers is Google Tips.
Google Trips is a complete trip planner that will delight the most restless who love to travel by train, bus, car or plane to travel the world.
If you are curious about what exactly it is, what it offers and how does it workkeep reading because we are going to tell you absolutely everything you can do, going point by point to achieve it.
What is Google Trips, Google’s trip planner, and what is it for?

Google Trips is a travel planner mobile application that comes from the hand of Google. This stands out for bring together in a single platform diverse information about your next trip: reservations, places to see, itineraries, places to eat and drink and many other services.
Among some of its characteristics we can highlight that is available on Android and iOS for free and that does not have a desktop version. You will also be delighted to know that you can download your entire plan to have it available without internetbecause we know that when traveling you cannot use too much data on the street or, depending on the place, connecting to our own network has a high cost.
This software is used to manually configure itineraries and add all kinds of information. However, something that I love is the fact that synchronize with your Gmail to automatically add data from the emails with the reservations that you have done, something that gets the google assistant with its artificial intelligence.
In this way, you’re going to set up an entire experience that includes everything you want to dowith complete information, dates, itineraries, services available to contract, suggestions and much more.
How to use the Google Trips app for travelers? Tutorial

Now that we know exactly what it is and what it’s for, all that’s left to do is show you how it works, that is, how you can configure your next adventure in a simple way, step by step, and considering all the options and tricks that the app offers.
Configure the settings
Here you will find, to activate or deactivate, points such as export trips from Gmail, keep memory and data settings and configure the type of notifications we want to receive. In addition, you will find all kinds of information related to the privacy policy, the conditions of service and software licenses.
- The settings are configured by clicking on the upper icon to the left of three horizontal bars.
- You will see the profile picture of your gmail email with which you are logged in. If this is not the case, you will be prompted first to do so to sync the information.
- Left you find the “Help” menu and, under it, with “Settings”. click on the latter.
Choose your destination and create your trip
- As soon as you open the application, you are already asked where you want to go.
- You only have to type a place in the search bar and as you do it, possibilities will be given to you; choose yours by clicking on it.
- Another option is to click on the cross to close the search and “Explore”. It is an option that appears in the foreground and that gives you examples, in a carousel, from different sites. You can click on the one that catches your attention.
- In both cases, clicking on the option we will change the window (main window of the trip) and we will go to see a photo of the place and, under it, the different elements that we are going to keep on the trip in question.
- You just have to click on “Create Trip”.
- In the next window you will fill in the most basic data: name of the trip, destination, round trip dates and the possibility of adding more destinations, re-entering the dates in which we would be in this new place.
- Click on “Clever”. When you do, the main window of the trip will have changed and you will have as many tabs as there are destinations, so that all the information is sorted by place.
Main trip window
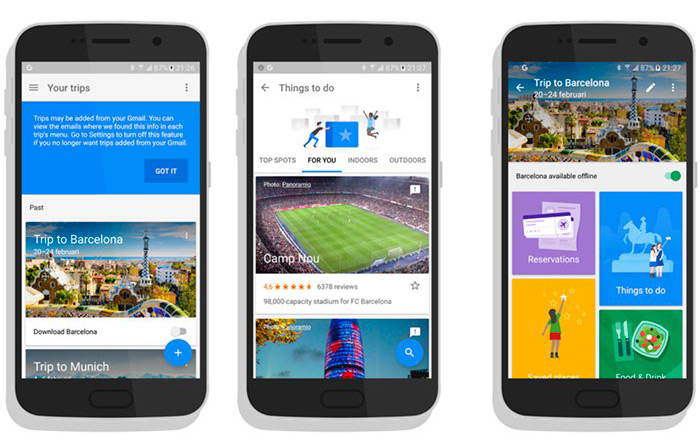
As we say, the main window of the trip includes different aspects to classify all the information about our trip. From here we can modify the previous aspects and take a look at everything that each destination has to offer us.
Bookings
- You enter and you find the icon “+”, which allows you to add your first reservation. press it.
- Then you will have the different types of reservation available (Flight, Hotel, Train, Bus, Car rental and Restaurant). Depending on the one you choose, you will have different parameters to fill in.
- Flight. Airline company, flight number, departure and arrival airports, departure day, flight time and confirmation number. You save with the floppy disk icon.
- Hotel. Hotel name, address, check-in and check-out dates, confirmation number and phone number.
- Train. Departure and arrival stations, departure and arrival dates, configuration of the different passengers (adding one by one with the “+” icon), including car, seat and class, and, finally, confirmation number.
- Bus. Departure and arrival stations and dates, passenger configuration, including your seat, and confirmation number.
- Car rental. Company, address, phone number, pick-up and return dates, the option to return to a different location, type of car and confirmation number.
- Restaurant. Restaurant name, address, date, time, number of guests, confirmation number and phone number.
- Also here you have the option of add notes (“Grades”). You just have to click on the option, write the note (up to 10,000 characters) and save by clicking on the floppy disk icon (top right).
Things to Do
- Here you will find an endless amount of interesting points for the filtered tourist according to different aspects:
- Best Sites.
- Recommended.
- Covered spaces.
- Outdoor spaces.
- Suitable for children.
- More long.
- Places from A to Z.
- You can expand the information by clicking on the informative rectangle of any of them. You will change the window and go to another with the name, the icon to save in favorites, images of the place or event, a description, its location on the map, directions to get there, its website, the option to call, schedule, rush hours , rating and finally the reviews of other users.
- The places can be seen, if you wish, on the map, so that you can position yourself better. You just have to click on a map icon that we find in the upper area on the right.
- From here you can add the place you like the most to an itinerary, by clicking on “+”. At this very moment, the place that you have decided to add will be placed in a new itinerary that you can continue configuring point by point as we tell you below.

One day itineraries
you will start seeing some suggestions of itineraries. You can click on any of them and see them in detail, with points of interest fixed in a certain order that you can see more widely by clicking on them (description, note, reviews, place on the map, peak hours…
these itineraries can be changed by pressing on the pencil icon, at the top right once we have entered the itinerary in question.
At the top left we have a filter for choose if we want to spend the whole day, the morning or the afternoon, in addition to a specific day of the week. This will help you not find closed sites.
After doing this filtering we can move on to remove or add points of interest:
- These are highlighted on the map with a blue location icon; You can click on them for more information..
- You can also choose between:
- pin this sitewhich causes it to be added to the itinerary.
- Remove this attraction. If it is not of your interest, delete it and you will not be overwhelmed by so many options.
- start from here. Place the beginning of the itinerary in this place.
- If you are not interested in that point, you can directly click on another and you will know its information and you will have the same options to include it or not in your itinerary.
If none of the itineraries convinces you, you can create one yourselfbefore entering to modify any of them. Just click on the “+” button. The map will appear with the points of interest and you only have to do the same as we have already mentioned, only this time you do not have pre-established places, but you choose them all from the beginning.
Food and drink
Here you can see restaurants, cafes and bars using various filters as if they are open at the moment, ordered by distance to the place where you are or with the possibility of showing only those that you have previously saved, so that you do not get involved.
At a first glance you will find an image of the establishment, its 5-star rating, the number of reviews it has, whether it is open or not, the average price and the icon, on the right, to save it to favorites.
Clicking on the establishment expands the informationincluding a map to find out where it is located, driving directions, phone and website, a photo carousel and reviews.
saved places
here you will find everything you have saved in the rest of the menus (food and drink, one day itineraries, things to do…).
By clicking on the map icon in the upper right area you will see your saved sites located in the cityso that you can get an idea of the distances and, with it, set up the itinerary that best suits you.
discounts
Finally, we have a discount option. Clicking on it we can discover what discounts are in force in all kinds of interesting points for tourists: transport, tickets, menus…
You can browse them one by one and, if you are interested, these discounts are enjoyed in different ways (contracting the services at the moment, redirecting you to other consultation websites…).
Always pay attention to them because there are very interesting things, including, for example, car rental or the creation of your itinerary, based on your interests) by a local.
Applications