
Index:
UPDATED ✅ Do you need to activate the developer options to deeply modify your Android? ⭐ ENTER HERE ⭐ Find out how to do it ✅ EASY and FAST ✅
While it is true, one of the greatest advantages offered by Android devices to its users is the freedom to do many things with it. That is to say, they easily allow you to modify various settings and also activate certain important settings on the smartphone.
For this, all you have to do is go to the settings menu and from there, navigate through all the options that they offer you to customize the screen to your liking, as well as the sound. However, beyond these selections that are used by all those who use Android, there are also sections for change more advanced menus. which are called “developer options”.
These developer options have long lists of settings from which you can modify aspects that you didn’t even imagine you could carry out without the help of an expert in the field. Since, they usually go unnoticed. Next, learn more about them.
What are developer options on Android phones and tablets and what are they for?
Also known as “Developer Options”, these refer to a complete menu of advanced options offered by the operating system itself. Which, as its name indicates, have been created for the Android developer, being a key tool in the establishment of mobile applications and also in debugging any of these devices.
Although, for ordinary users, this settings menu may seem of little use and even useless, the truth is that it can be of great help to carry out specific actions with which achieve better performance of your mobile or tablet. From there, lies the importance of knowing what they are for and which are the best of them.
In this sense, we emphasize that the functions of the Developer Options” are varied, but the most important of them are detailed below:
- They allow you to make your smartphone consume less battery than usual. This, thanks to an excellent adjustment with which the battery can be extended remarkably, even though the device exhibits the same performance.
- You may easily speed up your cell phone, making use of graphics hardware. Which is achieved by accelerating the process with the GPU of your multiprocessor and immediately, you will notice an increase in speed, especially on devices with low performance.
- If you want to get your mobile go fasteryou can also remove the animations from these options.
- It offers you the ability to reduce background apps limit, so that the device does not keep many applications open. This is ideal for phones with little RAM.
- You may use debug mode; this being extremely important for most of the apps that communicate an Android with the computer.
Steps to activate the “Developer Options” on your Android to edit it at will
Surely, it may seem difficult to activate these options on your Android to get the new advanced menus “at your hand” and so on, edit the device to your liking, but it’s really the opposite. Because, enabling the Developer Options”.
It simply consists of a few steps that you must complete to the letter and they are:
Enter the “Settings” or “Configuration” menu
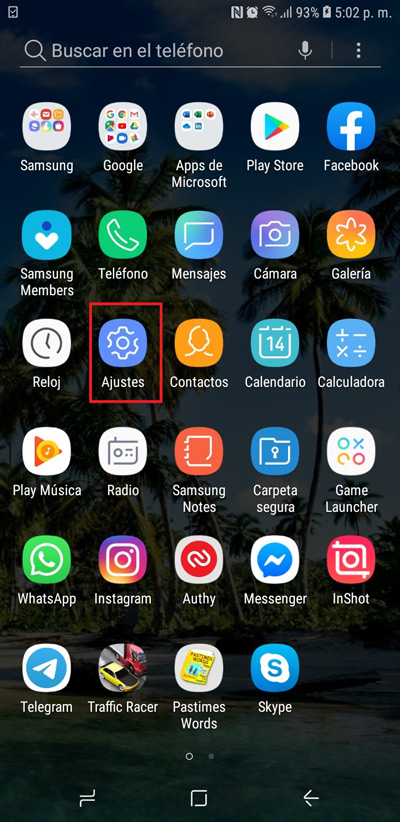
To start, you must go to the usual settings menu of your smartphone or tablet. In which, in the first instance, you will be able to see that there is no section that offers you these advanced options.
Now go to “Device information” or “About phone”
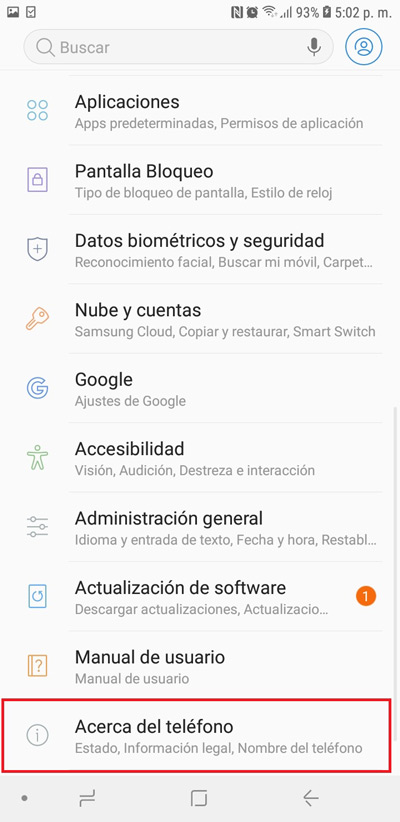
Once you enter the menu “Settings” of the equipment, you must navigate to the bottom of the screen to get the option that we indicate and click on it. Being this, the one that will allow to enable the Developer Options“, mainly.
Look for the choice “Build number”
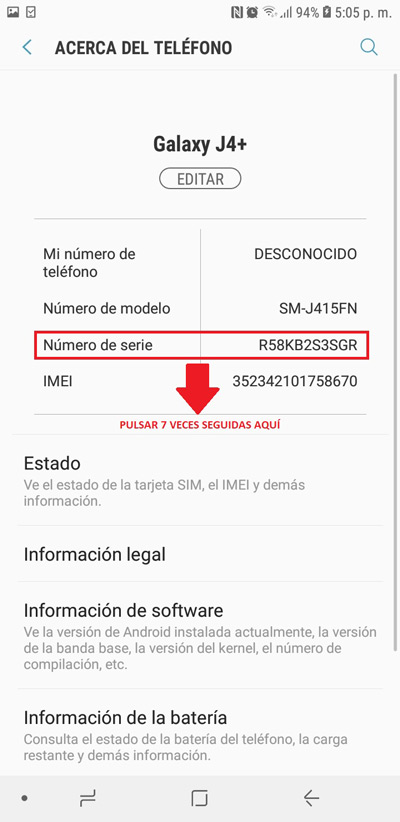
After accessing the information of the phone, you will see various data of interest. But, in this case, we are only interested in the specified option or, failing that, “Serial number” either “Version number”. Thus, on it, you must press a total of seven times in a row, without exceeding that number.
After that, the system will ask you for your password, PIN or pattern and once you provide it, it will proceed to enable these developer options on your Android device, prompting you with the following message “You are now a developer!”.
Finally, go to “Developer Options”
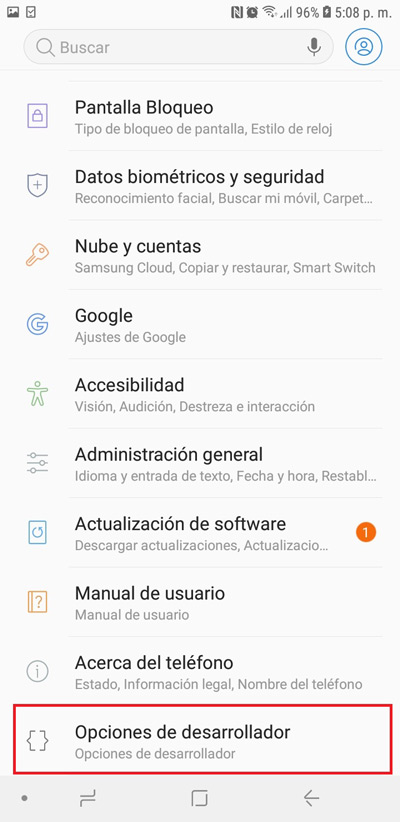
By completing the above, you can enter the General Settings section of your Android again and very surely, in the final part of the entire menu, you will find this new selection to access these advanced options. Which, you will see below that there are many.
What are the best development options that we can activate on our smartphone?
After activating this menu and accessing it completely, you can see that there are many options to enter or that you can enable. However, being a common user, you do not know what each of them works for and how they could help you.
Here we indicate a complete list so that you know and know how to use each option to develop properly:
main
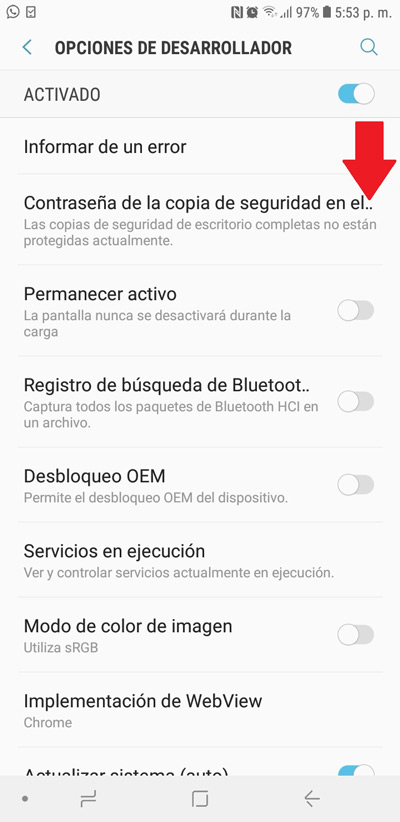
As its name indicates, these advanced options are the most essential and well, the ones that every Android user should handle perfectly. Which, in general, are found at the beginning of the menu in question. These top picks are:
Report a bug
By clicking on this selection, you are provided with two options to choose from. In other words, it is an option that can be used in two ways. The first one refers to a “Interactive report” and the other is for a “Full report”. Basically, both work in the same way and allow you to know all the information about the general operation of the mobile.
Desktop Backup Passwords
It is an option that allows you back up your device. This, by connecting it to a computer and activating USB debugging; then, by means of ADB commands, this security process can be facilitated. That way, you can create a password only accessible by you.
stay active
If you enable this option, the terminal screen will never turn off during charging. Which means that it will never go to sleep and is extremely useful for watching videos or movies. and that the transmission is not interrupted.
Bluetooth search log
This option makes it easy for users an HCI inspection via Bluetooth. Since, by enabling it, a security expert will be able to analyze the Bluetooth HCI by means of a packet on the device in the route and through tools as Wireshark that simplify the study.
OEM Unlock
To remove protection from your Android whenever you want, you’ll need to enable this selection. which basically will remove anti-theft protection and it will also allow you to root the mobile.
Running Services
When you enter this option, you will be able to see a complete section where they show you the memory of the device and, additionally, what each application occupies, also the active processes at that moment and the apps that are in cache. Being an essential menu for control all resources consumed by the computer.
Image color mode
It consists of a very traditional way of screen calibration, which allows different tones to be obtained and, in general, less saturated and/or more muted than the common ones. Being an option that is always added to AMOLED screens.
WebView Implementation
Taking into account that “WebView” is a process that enables applications to have an internal browser, in order to connect to the Internet more quickly. So, this developer option gives you the power to decide which will be the default app for this.
Update system (auto)
It refers to the automatic updates of the system and when activating this option, the same Android will be in charge of check for new updates and directly, the warning will jump to proceed to update. If you do not enable it, you will only have to click whenever necessary to check if there are new versions available.
Demo mode
It is an extremely effective way to take screenshots, but always showing the same status bar. Therefore, it cleans notifications, shows the battery to the maximum and also the network to the greatest possible coverage.
Graphic aspects (pointers, animations, etc.)
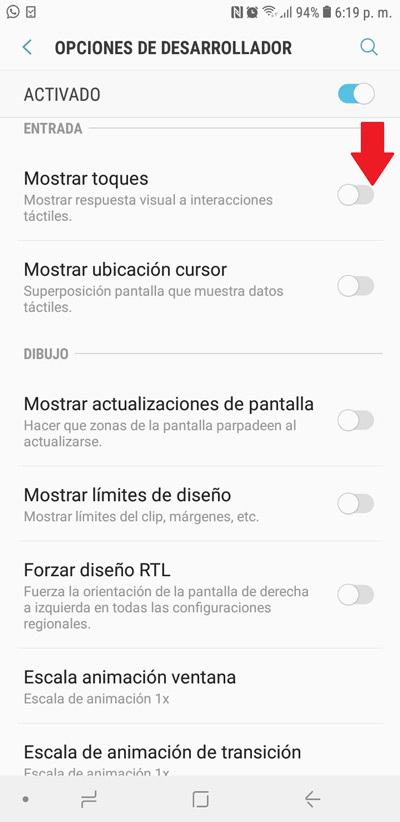
For this case, in which what is shown on the screen can be modified, tThere are also a variety of options that we indicate below:
Show Hits / Show Taps
Once you enable this option, they will show you a small circle that will mark where you have clicked. Which means that every time you press the screen you will see this new element, which it will last a few seconds.
show cursor location
It will also change how your screen touches are displayed, but unlike the first selection, this is more complete. Since, it is in charge of showing the entire route of your last touch gesture and will also show the coordinates and even the pressure executed to do it.
show screen updates
It consists of an option will illuminate every time the screen changes, by means of an extremely conspicuous pink flicker. Since, despite the fact that it does not seem to be so, the screen of your smartphone is constantly updated.
show design limits
This is a choice that can show the borders of each screen element, if you enable it. In other words, it will make it easier for you to know how far the section goes and also the limits in which your touch will activate it. It is very useful for know the layout of the device menus.
Scale window animation
Animations play a key role in giving a sense of fluidity and also show flashy and gimmicky transitions. Well, through this option, Android offers you the ease of adjust the speed at which the menus and windows of your mobile open.
Transition Animation Scale
Very similar to the previous option, but it really works when changing screen. That is to say that if, for example, you choose a long animation time, when you change it you will notice the animation more. But, if you choose a small speed, this modification will be immediate.
Animation Duration Scale
Basically, it allows you to set the speed at which loads the different elements of a menu the terminal screen. In this case, if you select a small time, everything will be displayed instantly. On the other hand, if the time is high, everything will be seen step by step.
Simulate secondary screens
It is an adjustment that consists of selecting the simulation of screens of various resolutions, which fluctuate from 480p to 4K. In this way, a small floating window will appear that is responsible for repeating what it shows on your mobile, but at a different resolution.
minimum width
It offers you the ability to change android dpi and also to modify the size of what is displayed. Thus, highly recommended if you want more information to be seen on the screen.
debugging
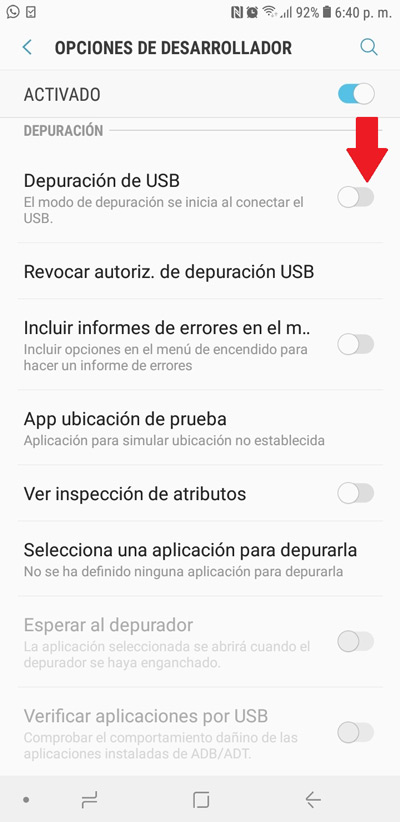
Among all the advanced Android developer sections, this one is extremely important; thanks to the different decisive actions that it facilitates to execute. Next, the most interesting options:
USB debugging
It is a very important selection to activate to be able to enter from the computer, once you install the Android SDK. Therefore, for exchange data between your mobile and desktopit is essential to do it with this option enabled.
Revoke USB debugging authorization
It is a kind of “clear cache” when taking into account if you have already connected to a certain computer and thus optimize security aspects. Thus, the option allows you remove debug access USB from all previously authorized PCs.
Allow ADB debugging in load only mode
It is an option that enables the action of charging the device and at the same time continue working on the PC. Since usually when you use ADB commands on the smartphone, it is not connected in charging only mode. Finally, we advise you deactivate the option when disconnecting the mobile from the computer.
app test location
Basically, these are applications that trick the GPS and make the phone believe that you are somewhere else. For this, from there choose the application that the same system takes into account when determining your location.
View attribute inspection
If you activate this choice, it will simultaneously activate the attributes of the view of the Android SystemManager. Indeed, when you do a logcat, you will see the events in a different way.
Select an app to debug
It refers to a configuration that allows choosing a certain application for debugging and with it, prevent certain error messages from appearing. Which means that it will make any application run as it should.
wait for the debugger
It is very simple, but effective at the same time. Since, it is responsible for preventing the application from starting until the debugger is not enabled.
Verify applications by USB
Works like an extra layer of security when installing applications on the smartphone. In this way, it allows Google to scan these applications installed via ADB or ADT and thus be able to detect whether or not they are dangerous.
Buffer size for logger
It gives you the simplicity of set size for java, from 64KB to 16MB. But, ultimately, this size will depend on the architecture of the CPU of the device in question.
Of networking
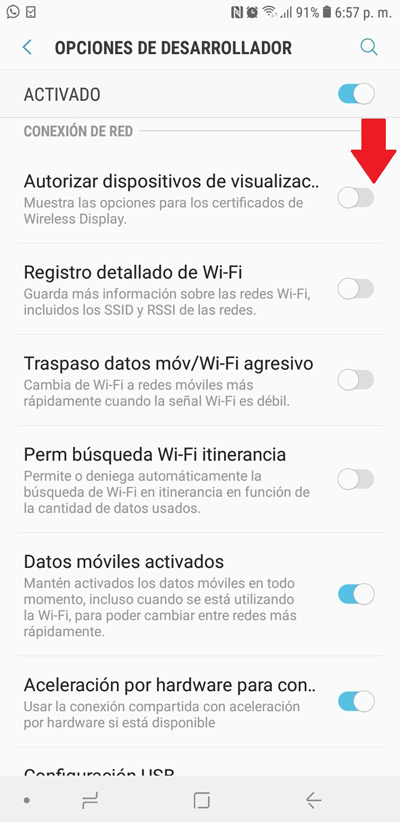
Also known as “network connection”; These options, in addition to providing you with important mobile information, also allow you to improve its performance. The most special of them, are the following:
Detailed WiFi log
Through a logcat, the developer will be able to access totally accurate information regarding the use of WiFibut only if you have this option enabled on your mobile.
Aggressive Wi-Fi/mobile data transfer
If you are using poor WiFi coverage and you have this section activated, the mobile automatically will switch to mobile data. With which, you will be able to save more battery and besides, you will not have to disconnect the WiFi every time you leave home.
Allow WiFi search roaming
For example, if there are two WiFi accesses that have the same identification, but one has a better signal than the other, this option is perfect. Since, by itself, it will take care that allow the smartphone to access the SSID that interests you most at any given time. However, battery drain can be noticeable with this option.
Mobile data activated
Through this section, your mobile data forever will remain active in the background. So, when the WiFi connection disappears, the change will be immediate.
USB configuration
It allows you choose the way you prefer to connect the USB to the computer, taking into account that there are several: Load Only, Media Transfer Protocol (MTP), RNDIS, Picture Transfer Protocol, audio and MIDI. It should be noted that, the most recommended of all, it is charging mode. Now, if you want to transfer files, you better choose “MTP”
Disable absolute volume
When you connect a Bluetooth headset, you will surely want control the volume independently and this option allows you to do it. In this way, you can also remove the maximum volume, if you find it annoying at times.
To accelerate hardware features
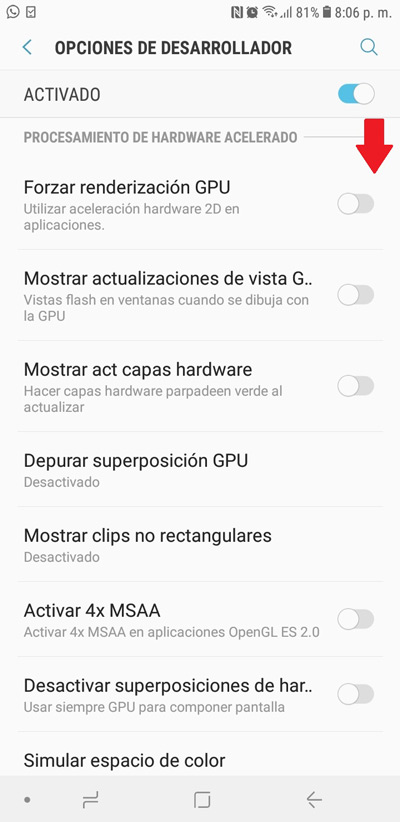
Also referring to accelerated hardware processing, this is another of the useful sections provided by the developer options in the Android OS.
Here are some of your most effective choices:
Force GPU rendering
which allows render 2D elements in all applications, in a mandatory way and although, by default, they do not do it. It is considered that it can optimize the performance and quality of what it displays, but it is a double-edged sword.
Show GPU view updates
This configuration refers to each screen that uses the GPU, which will receive a clothing layer. Generally, it is used for know when the hardware graphics is being used.
show hardware layer updates
It is a very simple option that allows know when the hardware layers are enabled.
Debug GPU overlay
On Android, some apps can display information on top of others, and with this setting you can select to show you when this happens in order to determine if the operation is normal or if it is overlapping incorrectly.
Show non-rectangular clips
It is based on debugging non-rectangular clipping operations, thus being a totally technical section. Therefore, it is considered as an option that helps developers to create very well defined areas.
Activate 4x MSAA
It is an ideal configuration for high-end smartphones. Which, allows to improve the rendering of games and images in OpenGL ES 2.0 and in this way, everything can be seen with better graphics. However, it is very likely that the performance decreases in proportion.
Disable hardware overlays
If you activate this advanced option, each app will be able to have its own portion of memory on the device. On the other hand, if you deactivate it, surely the mobile will show extremely slow performance.
simulate color space
Allows you to configure the Android mobile or tablet so that adapts to any vision problem of the user. Thus, an option clearly for all developers to see how their application will see problems of achromatopsia, deuteranomaly, tritanomaly, etc.
Multimedia and monitoring
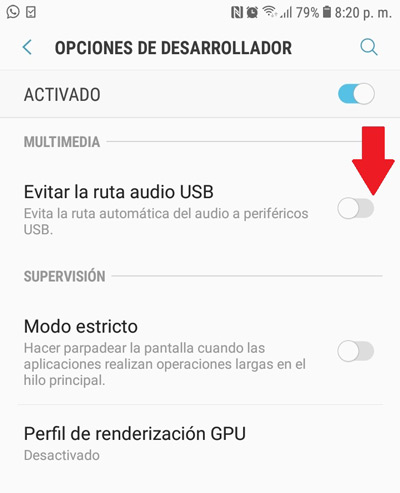
They are more basic options, but equally important to know. Next, the options that are in Android multimedia and supervision:
Bypass USB audio path
It consists of disabling routing to USB audio, either via devices such as amplifiers or microphones, or also mixers or speakers.
strict mode
It is the first selection in the section “Supervision” and basically, it emits a warning on the screen when the apps are making applications that extend over time. It is perfect to know if everything works correctly.
GPU rendering profile
Through bars, this option shows you the use of the GPU. Best of all, is that is updated in real time. But, in case you don’t use this information for something relevant, so many elements on the screen can seem awkward.
Of applications
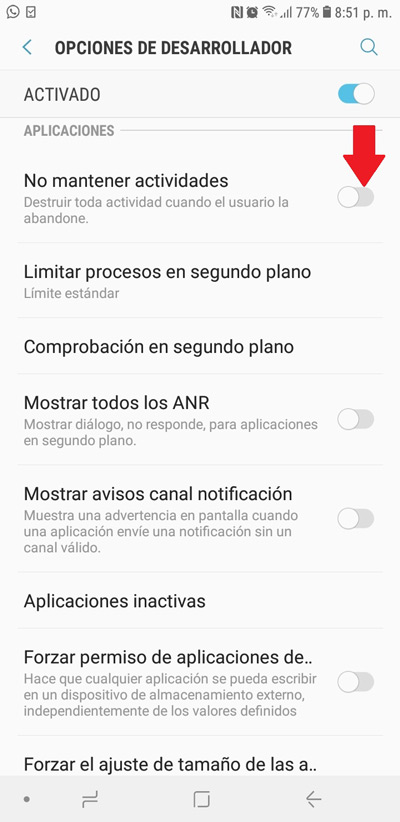
In the final part of the developer options menu, we locate the section related to applications. Your top picks here:
Do not keep activities
Generally, when we switch between one Android app and another, they stay in the background waiting to be opened again. But, if you enable this advanced setting, the system itself will be much more independent and aggressive, so it will consider close applications as soon as the user exits them.
Limit background processes
To prevent any app from running in the background on your device, it is ideal that you make use of this setting. Since, it allows you to manage the number of processes that will be executed and thus, maintain a recommended limit (eliminate all processes until you have four apps unfortunately).
idle applications
If you enter this option, you will be able to see a long list where all your installed applications are and there, see which ones you have active. As well as those that have been disabled by Android itself, because you have not used them in a certain time.
Forced download of applications in external memory
Allows you to force applications to be installed on the SD memory. Thus, it is extremely useful when you have a new and updated smartphone, but has little internal memory.
Force resize activities
It is related to the Android multiscreen and consists of forcing that all your installed apps suit split screen. To get the option to activate correctly, it is necessary to restart the terminal.
What are the risks of using developer options without knowledge?
Although it can be considered a totally simple process to activate the advanced developer options on an Android device, the truth is that must be done carefully to avoid problems and damage.
In this sense, it is essential to be aware that Developer Options They only have to be applied when their activation and/or use ensure an optimization in the general behavior of the device. So if you’re not sure what you’re going to effect when making use of any of these options, we recommend that you get the help of a developer with sufficient knowledge.
Otherwise, if you change such a setting, either by enabling it, disabling it, or using it to trigger a setting with which it has nothing to do, there is a good chance that negatively harm the operation of your Android mobile or tablet.
You could even cause irreversible damage if you manage these processes without sufficient knowledge, so that the device no longer offers the same response to all the actions for which it is designed.
Operating systems