Index:
UPDATED ✅ Do you want to know how to configure the DNS server change in your Android and iOS operating system? ⭐ ENTER HERE ⭐ and discover how to do it ✅ EASY and FAST ✅
Abbreviations they refer to Domain Name System. Its main function is to translate IP addresses to readable names and with which the user can work more easily. Not everyone is the same and sometimes it is interesting to modify them so that they manage the information more correctly.
Our operator offers us a series of domain name systems that can work well, but they do not have to be the best. Hence, for us it can be interesting change and configure the DNS on our mobile devices correctly.
This cannot be done when we are using the mobile network because we could have connection failures, but if we are using the Wi-Fi network, the operating system itself will remember the configuration that we have created and will use it every time we connect. let’s connect
Steps to change the DNS on Android and configure them correctly
Changing the DNS on a device with the Android operating system is relatively simple. It does not matter the version of OS that we are using, because the same indications are followed. A user with a very basic level of technological knowledge You can do it by following the steps that we will indicate below:

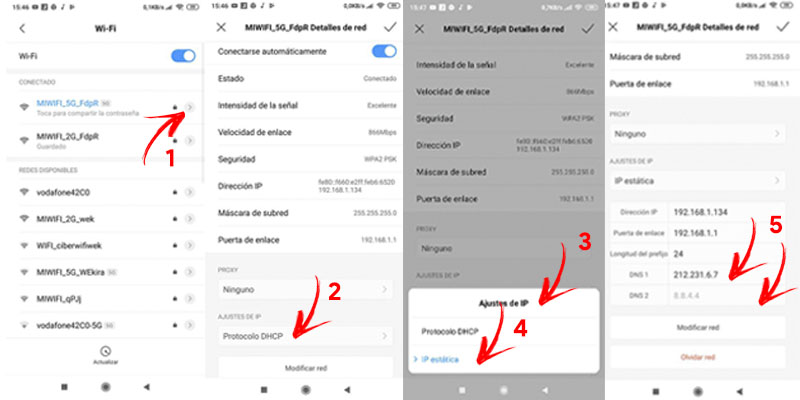
- First of all, you must access the menu “Settings“.
- Next, you need to find where the WiFi options of the terminal. You can usually find them in a section called “Connections” or “Network and Internet”.
- Once inside this location, we will have to see at least one WIFI network (to which our device is connected and from which we want to modify the DNS).
- Now we must position ourselves on the name and keep it pressed or it will have an options button.
- Several will appear. We are interested in “Manage Network Settings” or simply “Modify network“.
- Go to “Advanced Options“.
- Now is the time that we must change the IP configuration from “DHCP” to “Static”. We will do this by sliding to the “IP Settings” options.
- At this time, the menu we were seeing will have changed and the DNS configuration will appear. If we look closely, we can see that it is ready for us to edit it.
- The IP should not be touched as it is the same as it appeared before DHCP. We move towards the bottom and we will see two sections called DNS1 and DNS2. In them we will put the addresses that are to our liking.
- Once we have filled in both fields we have to click on the “Save” button so that the changes are preserved.
Steps to change DNS on your iOS iPhone phone
DNS should be changed for various reasons: higher speed, better security features or access to content blocked by countries. As we have seen in the case of Android devices, it is a very simple procedure, even if we do not have computer skills. If we go to the competition the difficulty does not increase.
Therefore, in the following paragraphs we will indicate a very useful step by step, but simple or that can help any user to configure the DNS without having to make great efforts. No matter what terminal version or operating system update you have, you just have to pay attention and follow the instructions that we are going to teach you:

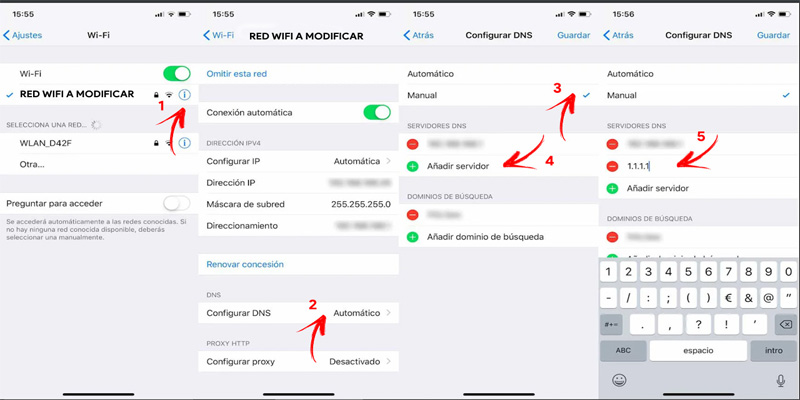
- In the first place, we must locate the button with the shape of a gray cogwheel corresponding to the function of “Settings” and press it.
- Next, we are going to access the section where the WiFi of our terminal is managed. Remember that we must not modify the mobile connection, since the provider’s patterns must be respected in order to avoid problems.
- It’s time to click on the button “Yo” of blue color located to the right of the WiFi network to which we are connected.
- Let’s look for the option “DNS configuration” and we will select it.
- On the next screen that appears, let’s change the “Automatic” option to “Manual”.
- Now we must click on “Add server“.
- will ask us enter a Primary DNS; do it.
- Let’s click again on the option “Add server“.
- This is going to make us re-enter a DNSwhich will be the secondary option.
- Finally we click on the “Save” button to save the changes we have decided to introduce.
List of operational public DNS servers
We end up offering you a compendium of DNS servers that you can connect to to test them and see which one you are interested in staying connected to. These have been tested, are free and have great features.
List of the best DNS servers with their addresses:
- Alternate DNS: 198.101.242.72 / 23.253.163.53
- CleanBrowsing: 185.228.168.9 / 185.228.169.9
- cloudflare: 1.1.1.1 / 1.0.0.1
- Comodo Secure DNS: 8.26.56.26 / 8.20.247.20
- DNS Advantage: 156.154.70.1 / 156.154.71.1
- : 77.88.8.8 / 77.88.8.1
- Dyn: 216.146.35.35 / 216.146.36.36
- Fourth Estate: 45.77.165.194
- FreeDNS: 37.235.1.174 / 37.235.1.177
- Google: 8.8.8.8 / 8.8.4.4
- GreenTeamDNS: 81.218.119.11 / 209.88.198.133
- HurricaneElectric: 74.82.42.42
- IBM Quad9: 9.9.9.9
- Level3: 209.244.0.3 / 209.244.0.4
- Neustar: 156.154.70.1 / 156.154.71.1
- Norton Connect Safe: 199.85.126.10 / 199.85.127.10
- OpenDNS Home: 208.67.222.222 / 208.67.220.220
- OpenNIC: 50.116.23.211 / 107.170.95.180
- puntCAT: 109.69.8.51
- SafeDNS: 195.46.39.39 / 195.46.39.40
- SmartViper: 208.76.50.50 / 208.76.51.51
- UncensoredDNS: 91.239.100.100 / 89.233.43.71
- verisign: 64.6.64.6 / 64.6.65.6
- WATCH: 84.200.69.80 / 84.200.70.40
networks