
Index:
UPDATED ✅ Do you need to connect to the DNS provided by Google and know the advantages they have? ⭐ ENTER HERE ⭐ and discover how to do it ✅ EASY and FAST ✅
Among the many complex things that telecommunications have, the DNS may be the only ones that really interest you, even above the IP address Why? Because these are used by internet providers to limit us in a certain way. For example, Movistar uses them to prevent you from viewing websites with pirated content, such as the portals of downloads or streaming viewing of series and movies.
For this type of thing, it is that Lately, the use of external DNS to internet providers is becoming very popular.and among the many that there are, Google’s are by far the most used and convenient. In addition, anyone can learn about them and take advantage of their advantages.
In this article we are going to show you how to configure your network to use Google DNS, whether you use a WiFi or Ethernet connection.. In addition, we will teach you more about these protocols and all the advantages you will have when using those provided by the largest internet company in the world.
What are DNS and what is its use?
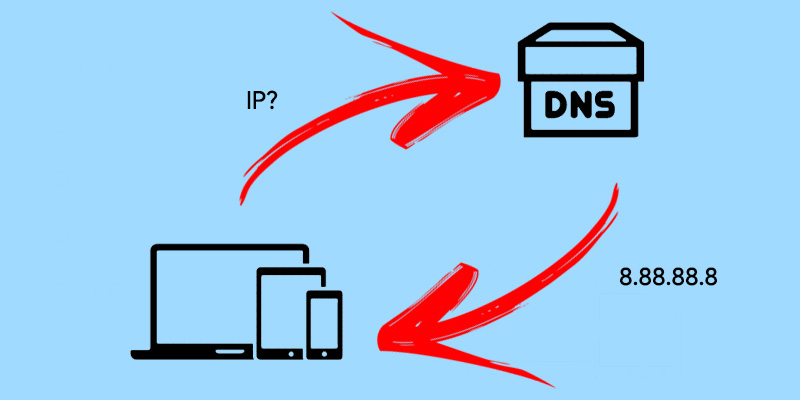
DNS is a protocol that is responsible for translating domain names into the IP addresses of the server to which they belong.. You may not know it, but when you enter a domain, like internetstepbystep.comso that the connection can be effective, it is necessary to establish the IP address of said address to the server, otherwise it would not be possible to enter the web.
The problem is that for a person it would be difficult to know each and every one of the IP’s of each one of the webs to which it enters, therefore it is necessary to have an “Intermediary” that is in charge of doing it automatically.
Without the DNS, internet connections would be much slowerand it is possible that domain names did not exist since you would have to know the IP address, which would make you worry more about this second factor than the first. An example of a world without DNS occurs in the deep webwhich as you know is a dystopian version of the internet.
when you download the Tor network and you want to enter one of the many forums of this “parallel universe”, you don’t do it by typing a simple name like Facebook.com, but you must use a series of numbers. What are these codes? Well the IP addresses of each of the Deep Web portalssince DNS does not work in Tor.
The DNS is responsible for knowing the IP of the machine where the domain to which we want to enter is hosted., and translates it so that communication between servers is effective. For example, Google’s numeric address is 216.58.210.163 (you can test this yourself by entering this value in your browser’s address bar), but you generally don’t use it because it’s harder to remember than the domain name to begin with.
In addition, these codes may change without prior notice, so you should be aware of each change if you want to continue accessing this search engine. The DNS were born as a need to translate domain names in 1987 (that’s right, before them you had to navigate with codes yes or yes), after several years of failed attempts.
It was devised by Jon Postel in 1983who during the next 4 years of his life would develop this protocol with the help of Paul Mockapetris. So you could say that these two computer scientists are the fathers of the modern internet.

DNS protocol it is made up of three parts, or rather, phases; the Client Phase 1which works on the user’s computer and is the one who makes the request for the translation of the domain name, the Server, which is responsible for processing the user’s request, and the Authority Zoneswhich are a fraction of the domain name for which the Server is responsible (to translate it into Spanish, the latter corresponds to subdomains and extensions .COM, .NET, etc).
How to know which DNS I have working on my computer?
We hope we have not confused you too much with the previous explanation, but now that you know what DNS is, it is time for you to learn about the ones you have on your computer.
This is quite simple and we will teach you how to do it for the main operating systems out there:
on Windows
To know the active DNS on your computer with Windows 7, 8 or 10, what you have to do is open the “Center network and sharing”. For this you must click on the icon of the internet connection that is on the far right of the taskbar, either via Wi-Fi or cable.

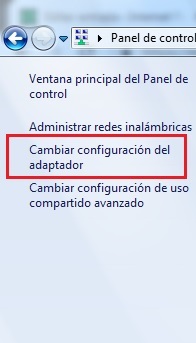
Once in the network and sharing center you must click on “Change adapter settings”which will open a new window in which you will see each and every one of the possible connections on your computer.
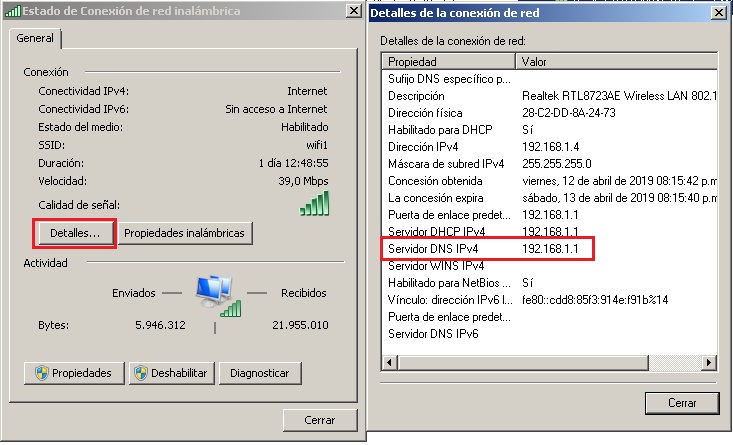
Double click on the WiFi or Ethernet connection that is active on your computer and then on “Details”, which will open a window with all the information of your connection. You should pay attention to the section “IPv4 DNS server” to find out which DNS are active on your computer.
View on macOS
On MacOS you can also see your DNS’s easily with just a few clicks. What you have to do is enter “System preferences”, where you can see all the configurable aspects of your computer.
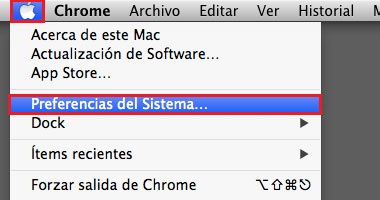
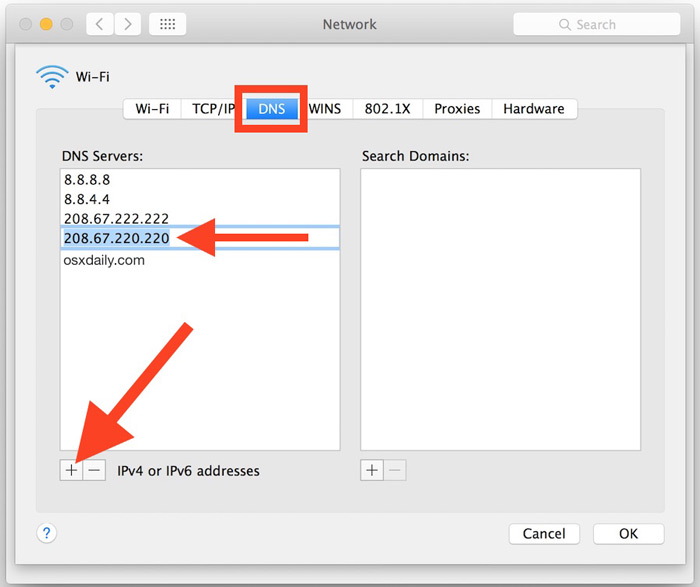
Once there you must click on “Net” and later in “Advanced”, This will open a new window where you can see various aspects of your network. What you have to do is position yourself in the section “DNS” and you will be able to see the information you want.
on Android
In Android it is easier to do since this is a system that is made to speed up processes. What you must do is pull down the quick settings curtain dragging your finger down from the status bar at the top of your phone. Once it is deployed you must touch and hold for a few seconds about option “Wifi”.
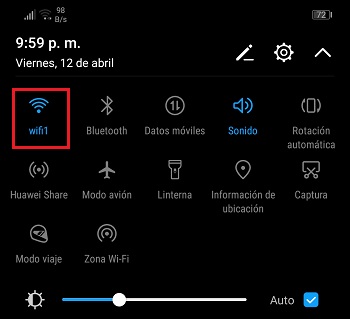
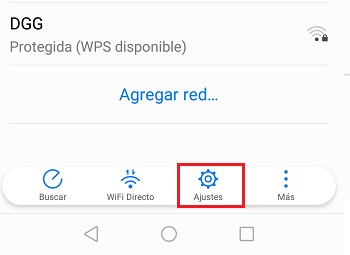
This will send you to the WiFi section. The next thing you have to do is a new touch on the option “Settings” which in newer versions of Android is at the bottom of the screen.
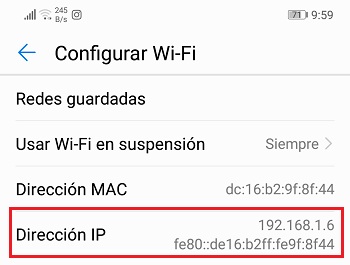
Once in this section you will be able to see the DNS in the section “IP adress”, as you can see in the image below.
Advantages and disadvantages of using Google Public DNS on your computer
Using them Google Public DNS It will have many benefits in your internet connection for many reasons, although depending on the area where you are, it may not be such a good idea to do it, but in Spain for example, It is a more than wise decision.
Advantage
The main advantage why you should consider using Google DNS is because with them you skip the restrictions that telecommunications companies imposed on various download portals of protected content such as EliteTorrent2, The Pirate Bay and similar websites. This in turn it will save you having to hire a VPNwhich is the second option you have if you want to access this type of portal.
On the other hand, there is the fact that you are have better supportwhich allows you speed up response speed of translation requests to servers, making websites load much faster. In addition, these are constantly updated, which considerably improves the security of the Internet connection and protects you from various attacks that reduce the performance of your browsing.
Disadvantages
The only downside to using these addresses is that Depending on your geographical location, instead of accelerating the loading speed of the websites, it may slow down. However, this is a problem that does not occur in Spain and most Latin American countries.
Steps to configure and connect to Google Public DNS
If we have already convinced you enough to change the addresses and use the Google Public DNS, it’s time to teach you how to do it on your own. The reality is that it is a fairly simple process that will not take you more than a couple of minutes. We are going to teach you how to do it in the main operating systems that currently exist.
But before that, it is important that you know what the Google Public DNS addresses are:
-
Primary DNS:
- 8.8.8.8 (IPv4)
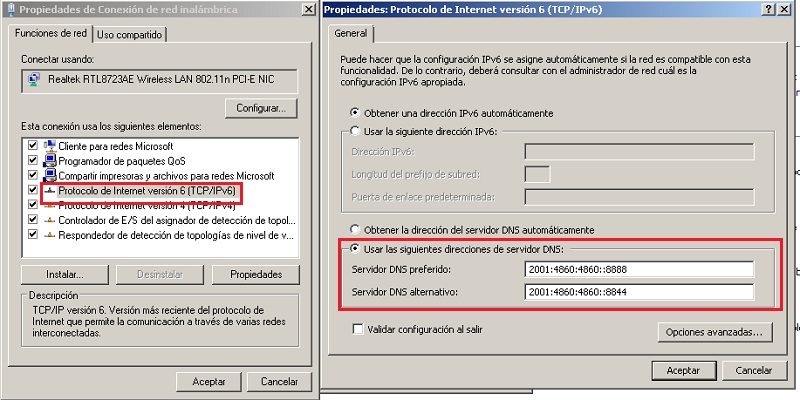
- 2001:4860:4860::8888 (IPv6)
-
Alternate DNS:
- 8.8.4.4 (IPv4)
- 2001:4860:4860::8844 (IPv6)
These are the ones that you must enter when the time comes in the explanation that we will give you so that you can apply them in the main operating systems.
on Windows
Windows is one of the most manageable OSes out there since it makes things much easier for users who are ready to configure different aspects, especially when it comes to connections.
If you want to apply the changes in the DNS, what you should do is the following:
- Open the “Center network and sharing” in the way we taught you before.
- Once there, click “Change adapter settings” and then double click on the connection you use, either WiFi or Ethernet.
- Once the window for the network you use opens, click “Properties”.
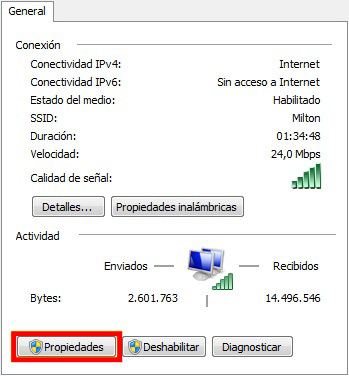
- When the properties window opens, double-click the option “Internet Protocol Version 6”and in the window that opens check the box “Use the following DNS server addresses” and write the addresses that we share with you in the corresponding boxes.
- Then do the same but in the option “Internet Protocol Version 4”.
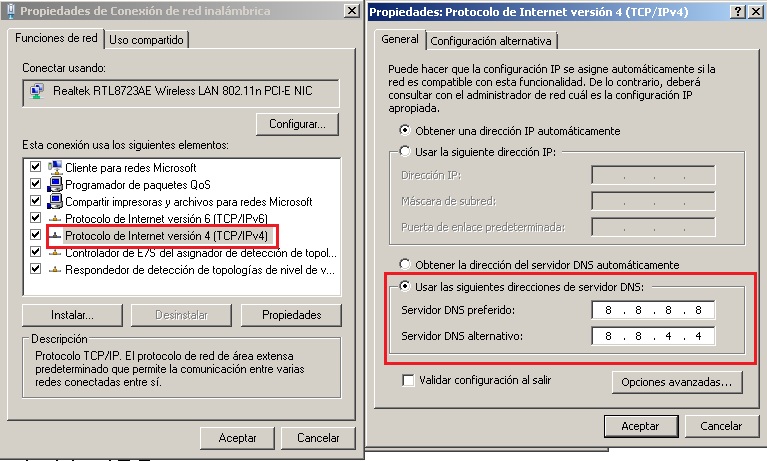
- Now in the properties click on “To accept” and the job will be done.
After that you will have Google Public DNS addresses active in your browser and you will be ready to take advantage of all its advantages.
on Mac
MacOS is another operating system where it is relatively easy to make changes at the network server level. To use Google Public DNS, you simply have to follow the steps that we explain below:
- Get into the “System preferences” and then click on the option “Net”.
- Once here you must enter the tab “DNS” and click on the sign “+” which comes out under the list of default DNS.

- What you should do here is change the ones for Google and save the changes. With this the work will be finished.
on linux
In Linux, the process may seem more cumbersome since there is no visual interface like in previous systems, but in general it is quite simple to make changes in the DNS.
What you have to do is the following:
- Open Linux Terminal and type the command nano/etc/resolv.conf and press Enter.
- After that look for the lines that start with nameserver and move the default DNS 2 lines and write the Google ones, which in this case will be only the IPv4 ones.

- Once done, press the key combination “Ctrl+O” to save the changes and then “Enter” for them to be overwritten.
On Android or iOS
In mobile operating systems such as Android or iOS, it is also very easy to make changes to the DNS of the WiFi networks to which we are connected.
What we have to do is the following:
- Go into “Settings” and find the section “Wifi”.

- Once there, click on “Advanced Options” and in the DHCP section you search for the default DNS and change them to Google’s.
What public DNS alternatives to Google’s are there?
In addition to Google’s public addresses, there are other companies that offer theirs freely for you to use. If you want to know what they are, we present them below so that you can use them in case those of the largest search engine in the world do not completely convince you.
- OpenDNS: these are the most popular addresses after Google. They are reliable since they are owned by Cisco, although you can only use them if you have a router with support for IPv6 addresses. the DNS are: 208.67.222.222 Y 208.67.220.220.
- Cloudflare: This is a little-known service since the company is not very well known, but it has gained quite a few followers since its addresses guarantee speed, security and, above all, good performance. They only have DNS for IPv4, which are: 1.1.1.1 Y 1.0.0.1.
- Norton ConnectSafe: these addresses are provided by the company that has arguably the most cache in the computing world after Google and Microsoft. With them you are guaranteed a good connection speed, as well as excellent performance. However, to set up your addresses for IPv6, you will have to make some adjustments to your network configuration that can be very complex for an average user. The DNS are: 199.85.126.10 Y 199.85.127.10.
- Comfortable Secure DNS: This company specializes in digital security and that is the strength of its DNS addresses for IPv6, which are available completely free of charge and are quite simple to configure. In fact, you can apply them from any of your antiviruses. These are: 8.26.56.26 Y 8.20.247.20.
- Quad9: this is a relatively new server that was launched in 2016. Its strong point is security as it specializes in blocking malicious domains, which can also be a disadvantage if what you want is to avoid blocking download websites, which generally enter in this category. It has addresses for both IPv4 and IPv6, which are: 9.9.9.9 Y 149,112,112,112 respectively.
- Yandex.DNS: the powerful search engine of Russian origin also has a series of DNS that are quite efficient and in fact many say that they have nothing to envy to those of Google. However, due to the location of their servers, they may affect the loading speed a bit if you are not in Europe or Asia. It has up to three addresses for IPv6; the classics 77.88.8.8 Y 77.88.8.1, the Safe 77.88.8.88 Y 77.88.8.2 that protect you from malicious domains, and the Family 77.88.8.7 Y 77.88.8.3 that offer parental controls to block adult content.
- Public DNS Server List: This is a database in which you can find DNS servers from all over the world completely free, so we reserve a specific one and invite you to enter so that you use the most convenient for you.
This was all for now. We hope we have helped you learn everything you need to know about DNS so that you can take full advantage of them and enjoy the benefits they provide to your connection.
networks