
Index:
UPDATED ✅ Want to connect to an Internet network from your Windows 10 PC? ⭐ ENTER HERE ⭐ and Discover All FROM ZERO!
Today, Windows 10 is classified as the most famous operating system of all worldwide. This being the latest version launched by Bill Gates’ company, which has been constantly evolving, with the aim of ensure the best possible user experience. Well, it harmonizes this experience against the functionality of different types of equipment.
In such a way, it is a much lighter OS that spends less resources than previous versions and only needs a 1 GHz CPU processor and 1 GB RAM. Additionally, it provides an optimal level of security and reliability, thanks to its most advanced encryption levels. Apart of this, allows you to enjoy the advantages of an Internet connection to be able to navigate at maximum speed.
Now, given that the Internet is a fundamental element for the day-to-day development of individuals, many people who use W10 are interested in knowing what are the different ways that the operating system provides to connect to an Internet network. Which, you will be able to know below, along with some recommendations for have a faster internet on your PC.
Learn step by step how to connect to an Internet network on your Windows 10 PC
To enjoy an Internet connection on your Windows 10 computerFortunately, this operating system offers you the possibility to choose three ways to do it. Either wired or ethernetthrough a Wi-Fi network and even using the Bluetooth.
That is why, in this section of the post, we will explain what you should do when implementing each of these methods in W10:
Wired Ethernet
While it is true, a significant number of users prefer to use a cable Internet connection, In view of the benefits it offers. Since, it guarantees a greater use of the bandwidth, the speed it exhibits is greater, even, has compatibility with most routers and computing devices. Therefore, in Windows 10, there are still many people who choose to use an internet network via ethernet to browse through your PC.
Thus, in this case, the steps to follow to connect to such a network are:
- First of all, you have to make the connection with the cable. To do this, run one end of the coaxial cable to the cable outlet on the wall and the other end to the cable outlet. “wire In/RF” on the back of the modem.
- Then go to connect to your PC at one end of the ethernet cable in question and the other end to the Ethernet jack on the back of the modem.
- Also, connect the power cable to the electrical outlet and the other end to the Power jack on the modem.
- Next, on your PC, search and access the Settings menu. You have to do this through Start, pressing the gear icon.
- After that, select the option that indicates “Internet and network” where more categories will appear.
- Now proceed to press on “Ethernet”via the left sidebar menu.
- Now, you will be able to see that the connected ethernet appears and there, it is time to Click on “Change adapter options”from Related Settings.
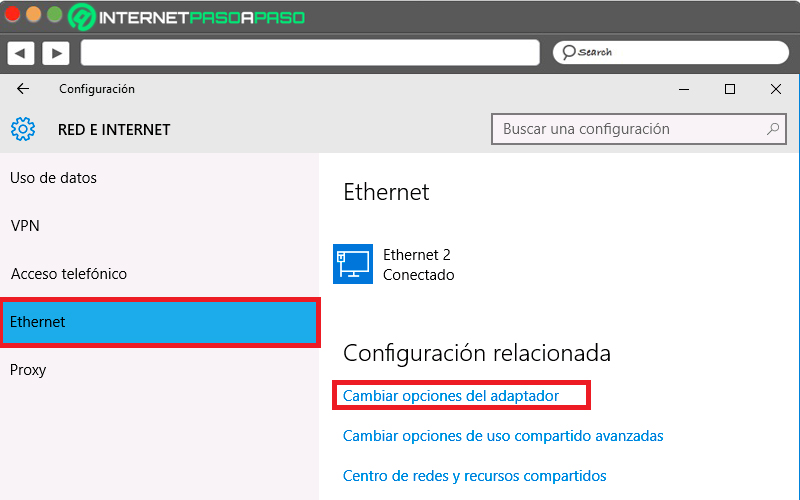
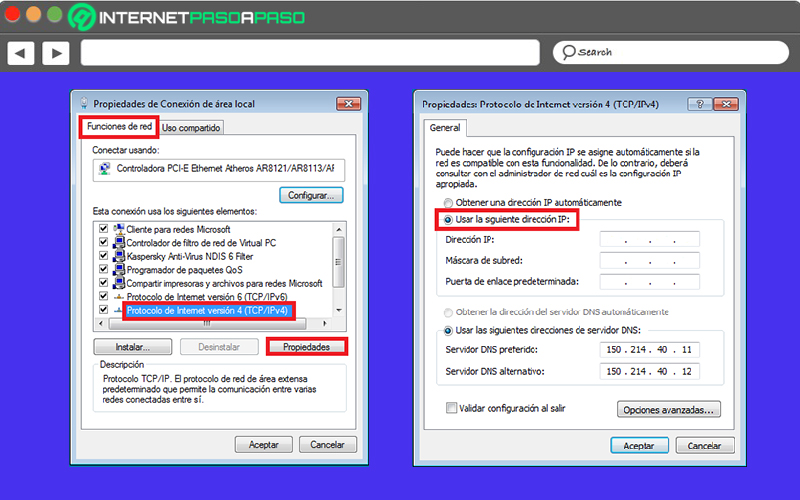
- Once the above is done, between the different connections available, choose the one that is connected by cable and right-click to select the option “Properties”.
- in the window of “Local Area Connection Properties”click on the tab “Network Features” to choose “Internet Protocol Version 4 (TCP/IPv4)” and click “Properties” on the bottom.
- To conclude, in the new window, you have to press the option “Use the following IP address” and enter the data indicated corresponding to your PC.
by Wi-Fi
Today, it is no secret to anyone that most people prefer to use a WiFi network to connect to the Internet. Due to the fact that, with this method, it is not necessary to use cables, in addition, its installation is simple, it has greater flexibility, its mobility is absolute and, In short, it is much more practical.
Therefore, if you are one of the users who prefers to connect to a WiFi network through your Windows 10 computer to browse at the maximum possible speed, it is important that you know how to connect in the following way:
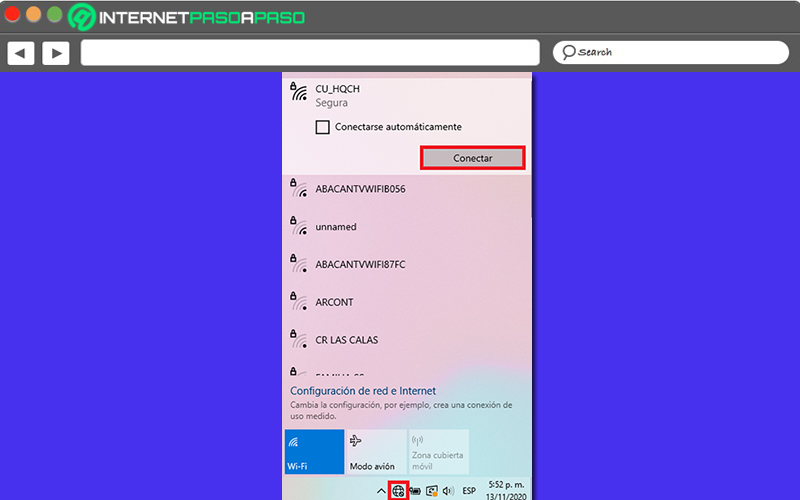
- Directly from your computer, go to the windows 10 taskbar Y click on the Network icon. In case it does not appear automatically, you will have to choose the up arrow to see if it is there.
- Next, the system will show you a list with the different WiFi networks available at that moment. In it, you will have to press the WiFi network to which you want to link the PC to press the “Connect” button.
- After that, you will be asked for the network password and when you enter it in the corresponding field, you should select the “Next” button. In case it is a free WiFi network, you will not be asked for a password.
- Finally, click “Yes” or “No”, depending on the type of network you are connected to. In addition, this also applies if you want other PCs and devices on the network to be able to detect your computer.
by Bluetooth
One of the most innovative features of W10 is that it admits the possibility of connect to the Internet via Bluetooth. Which, by default, is functionality that focuses on provide noticeable battery savings above the benefits it delivers in terms of speed. Furthermore, it is considered a secure connection type and is extremely easy to carry out.
So, if you want to try this kind of network connection to browse the Internet, you will need to perform the following process properly on your PC:
- Initially, you need to pair the PC with the device that has Bluetooth for internet sharing. In that case, first of all, you have to activate this function from “Settings” when selecting “Devices” and click on “Bluetooth and other devices” to activate it there.
- Next, find the name of the device you want to pair your computer with. If you can’t find it, you can click on “Add bluetooth or other device” to click on “Bluetooth” and select the device indicated there.
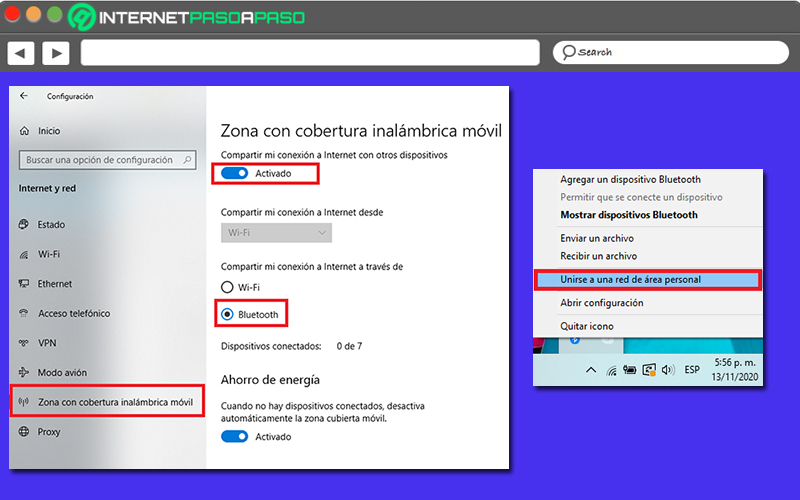
- Once the above is done, enter the General Settings menu again and select the option “Internet and network”. So that you can click on “Mobile wireless coverage area” from the left sidebar menu.
- After this, proceed to activate the function in question and choose the “Bluetooth” option as the means to share the Internet.
- Next, in the notification bar, click on the Bluetooth icon and press the option that says “Join a personal area network”. With that, they will show you the devices capable of sharing the Internet.
- Once you find the device to use through Bluetooth, you must right click on it to choose the option “Connect as access point”. Thus, you will be able to navigate thanks to the device Bluetooth.
Tips to have a faster Internet connection from Windows 10
By nature, in an Internet network it is not possible to navigate faster than the speed contracted with the operatorsince the speed of this is always limited by infrastructure and other factors.
However, in Windows 10it is possible to implement certain recommendations that will help you make your Internet connection work faster to prevent its acceleration from being lost at some point in the connection. Therefore, in order for you to enjoy an optimal Internet connection on W10, it is important that you take into account the following advice from which said connection will be as fluid as possible.
Here is each recommendation you can make:
Set up a DNS server for your connection
While it is true, the DNS server or the “name server” is defined as a server that has the ability to implement a network service to provide relevant responses to queries in a directory service. That is, it is that element in charge of resolving IP addresses or translate a text-based identifier to a system-internal addressing component.
Therefore, to obtain a faster and smoother navigation, it is necessary make use of a DNS server that is as fast as possible. Therefore, if you configure a good browser of this type, you will be able to gain more speed in relation to the time it takes to obtain the desired responses on the network. Reason why, it is recommended to change the DNS server in Windows 10.
Now, in order to make this modification in this operating system, it is essential that you carry out the following procedure:
- First of all, enter the Settings menu. This can be done through the Start menu or by using the keyboard shortcut “Windows + I”.
- Next, among the available options, select the one that says “Internet and network”.
- Then, in the section Condition, specifically in the section “Advanced Network Settings”click “Change adapter options”.
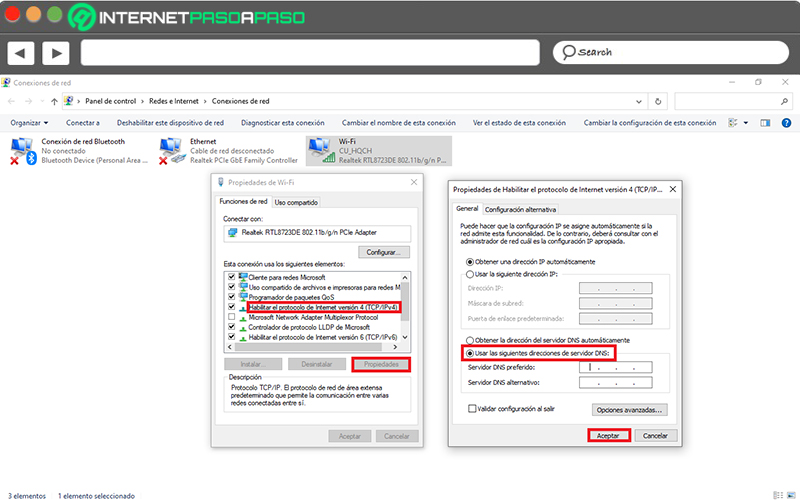
- When you do the above, the corresponding window will open. Network connections and in it, you have to select the used network adapter and right click on it, in order to click on “Properties”.
- Then from the popup, find and select “Internet Protocol version 4 (TCP/IPv4)”.
- Then click the button “Properties” and at the bottom, check the box for “Use the following DNS server addresses”.
- To conclude, it only remains that configure the two addresses that correspond to the DNS server, manually. As a recommendation, you can use “1.1.1.1” in both boxes. So, save the changes by clicking “To accept”.
Change the bandwidth limit to zero
By default, bandwidth is a term used to refer to the range covered for data transmission between an upper or lower limit which is usually controlled by the ISP provider.
However, to browse at the maximum possible speed, W10 offers certain settings that helps to restrict the limit of reservable bandwidth. As such, although Windows manages a certain amount of bandwidth by default for your application or operation requirements, users are free to limit reservable bandwidth in order to give a greater acceleration to the speed of your Internet.
In order to make this adjustment, the following process is required:
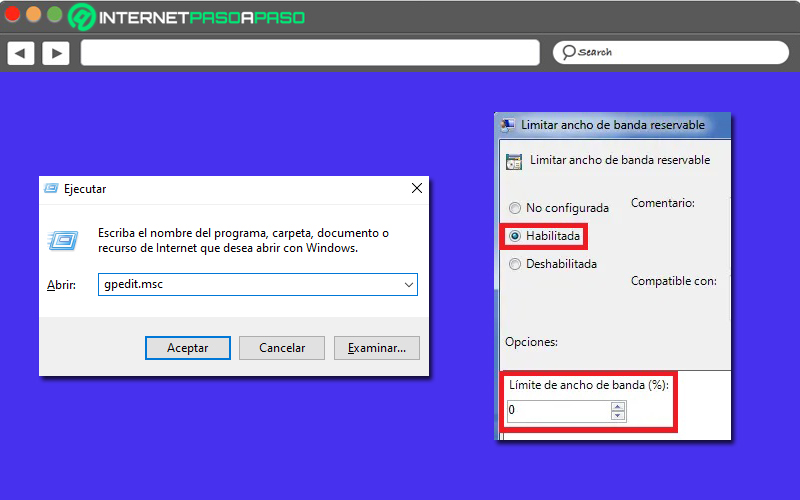
- To get started, use the keyboard shortcut “Windows + R” to open the command line Run and there, introduce the term
gpedit.mscto access the Group Policy Editor. - Once you are in the Local Group Policy Editor window, you have to click on “Equipment Configuration” to proceed to select “Administrative Templates”.
- Next, click on “Network” and proceed to choose “QoS Packet Scheduler” to click “Limit reservable bandwidth”.
- After completing the above, a new window will automatically appear, which, by default, is in “mode: Not configured”. which you should switch to “mode: Enabled” to reduce the bandwidth limit to 0 (zero).
Flush the DNS cache
Another effective technique to surf at maximum speed on the net through W10, consists of flushing the DNS cache. Since, over time, the operating system performs a dump of the resolution information when you translate domain names and stores it locally in a cache.
Thus, although its objective is to reduce the loading times of previously visited web pages, the truth is that it can also make charging time is longer than usual; in case the information stored in the system cache has been saved incorrectly. Which, in short, it generates a very slow internet speed. So, to reduce this type of problems, the most advisable is based on perform a manual DNS cache flush.
In the case of Windows 10, you can do it in the following way:
- Through the taskbar on the main screen of your PC, use the keyboard shortcut “Windows + R” to be able to open the Run program in the lower left corner.
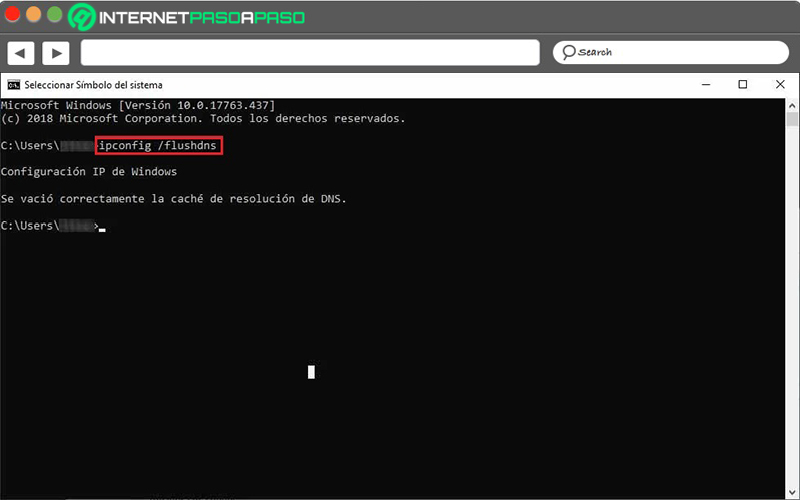
- After that, you have to open Command Promptintroducing the term “cmd” in Run and click on the button To accept.
- Once the W10 command console is open, it’s time to write the command
ipconfig /flushdnsto press the key Enter. which will make automatically flushed DNS cache.
Clean the system TEMP folder
If the temporary files folder or TEMP folder is overcrowdedsurely, you will be able to reduce the speed of navigation over time. Therefore, although it is cleaned automatically and regularly to avoid problems.
Sometimes not emptied as often as necessary to ensure smoother operation PC Optimum, in terms of web browsing. As a consequence, the computer begins to show obvious signs based on an Internet browsing experience slower and less efficient than normal.
That is why another ideal trick to improve your Internet connection in W10 is based on cleaning this folder to obtain optimal performance and here, we show you how:
- On your computer’s home screen, press the keyboard shortcut “Windows + R” and with that, the command box will open run on the bottom.
- Followed by that, in said box, write
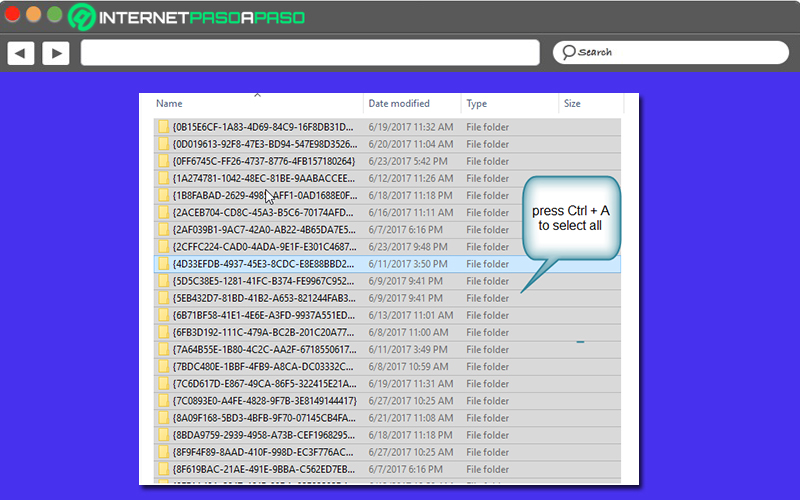
%TEMP%and proceed to press the enter key. - Next, the system will open a typical folder, by means of the System File Explorer. Inside that folder, all temporary files are saved.
- Finally, it’s time to right click in the selections you decide to make, so choose the “Delete” option in the corresponding menu.
Choose a channel that is not saturated
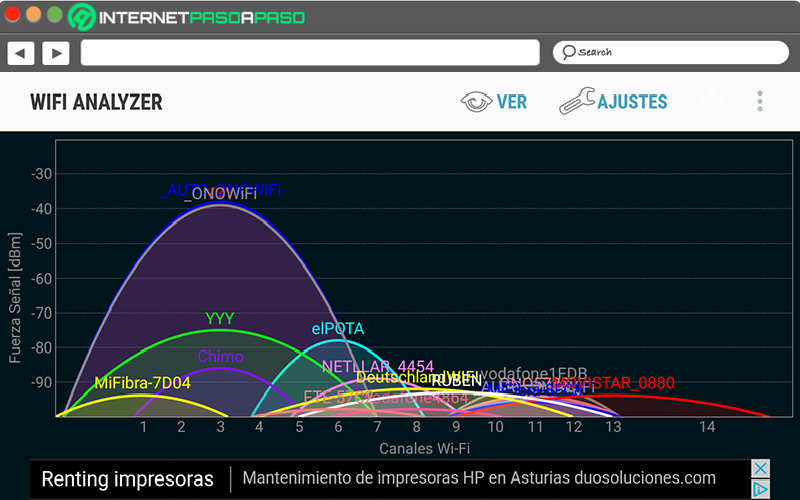
It is also efficient select a channel that is not saturated. Since, sometimes the network connection signal may be affected, when using wireless routers. Well, by default, these devices operate on some specific channels that may be more saturated than others. Therefore, it works like a radio station that, with a good signal, offers perfect reception and otherwise it reveals interference.
So, starting from your computer with W10, start trying different channels, in order to check if the speed of your internet connection is optimized by doing so. Assessing that, to obtain a good result in this process, you can rely on certain tools that have the ability to check which channels are most free to use them and thus know what channel to select in your router configuration. One of these benefits is “WiFi Analyzer”for instance.
Other recommendations
- Check if someone is stealing your WiFi. In certain cases, the Internet connection reveals useless operation because other users are hogging a good chunk of bandwidth. Therefore, it is very helpful to check if there is someone else connected to your network using programs dedicated to it (such as, for example, Wireless Network Watcher) to take action on the matter.
- Select the best channel for WiFi. If you use the Internet over WiFi, it is recommended to choose the fastest channel that is available. Considering that the 2.4 GHz channel allows a maximum connection of 400 Mbps and, instead, the 5 GHz channel supports a connection of up to 1,700 Mbps (so, this is the most recommended).
- Use a decent router. As the router is the most relevant piece of a WiFi connection, it is essential use a truly trained section that does not tend to minimize the speed of the Internet and can even increase the signal obtained. Therefore, as far as possible, get one with the best specifications.
- Put the modem in a suitable place. Note that the closer you are to the modem, the the better the WiFi signal and the speed you get from it. Therefore, in addition to its proximity, also consider locating it in the center of your house and at the highest point to avoid interference.
- Do not use Internet “optimizer” software. Since, instead of improving the connection to the network, this type of program they usually make it worse because of the constant queries they make to the network. Therefore, if you already have one of them installed on your PC, the best thing to do is to eliminate it due to the damage it can cause in the long term.
Internet