
Index:
UPDATED ✅ Do you want to use your Arduino projects to connect via bluetooth? ⭐ ENTER HERE ⭐ and Learn Everything From Scratch!
Bluetooth is part of wireless personal area networks (WPANs)), it has the purpose of promoting the transmission of data and voice from different devices through a link by radio frequency in the ISM band of 2.4 GHZ. This has made this tool become one of the best alternatives when carry out an Arduino project.
In general, devices incorporating this technology have the ability to communicate with each other when they are within range. These communications are executed by radio frequency so that the devices do not have to be aligned, they can even be in separate places as long as they are within the connection scope.
In this way, this technology has been used by electronics and programmers to use it in different projects with Arduinosince this allows to increase the possibilities when wanting said project to carry out some type of activity in the physical world. Here we are going to teach you how you can connect your Arduino project via Bluetooth to sync it with other devices, To do this, follow in detail everything that we will teach you next in the post.
What are the benefits of using Bluetooth connections with Arduino?
Without a doubt, you can use this type of connections in your Arduino projects will give you certain benefits, mainly because it offers you many more possibilities when create and schedule.
This is how here we are going to show you what are the main benefits that all this brings you:
- Facilitate communications Come in mobile equipment.
- Allows you to design electronic projects that you will be able to control with your mobile device.
- delete any type of cable connection and connectors.
- allows to create little wireless networks and easy synchronization of data between personal equipment.
- becomes an option extra for programmers and developers from Arduino project.
- Bluetooth is integrated in all technological devices today, so it will allow you connect your project Arduino with any technological device you have at your fingertips.
Bluetooth connection modules What are the best that we can use?
One of the advantages of being able work with Arduino is that it offers the possibility of being able create connections with other devices without cablesfor this it offers the possibility of doing it through bluetooth modulesthis will allow you to incorporate them into each of your electronics and robotics projects and thus achieve better results. This is how we are going to teach you below what are the best bluetooth connection modules which you can start using in the Arduino platform.
To do this, follow the list that we will show you below:
HC-05 and HC-06 module
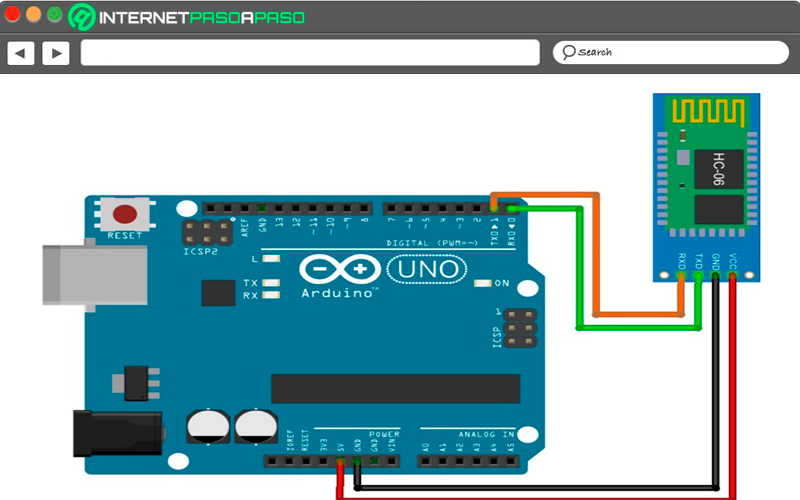
Both are bluetooth modules that can be used to communicate different projects Arduino with this wireless connectionIn fact, they are the two most used modules for this type of activity. Currently most users think that this type of connections is an outdated technologybut the truth of all this is that endless activities and very important actions can be developed through it.
It must be borne in mind that in the case of HC-06 module it behaves as a slave, that is, it constantly waits for connection requests. So if any device connects, the HC-06 module transmits to it all the data it receives from the Arduino and vice versa. seeing physically the HC-06 module it can be said that it is quite similar to the others available in the market.
It should also be mentioned that the HC-06 works as Slave and HC-05 as Master and Slavein this case the HC-05 has a total of 6 pins, while the HC-06 has a total of 4 pins.
Bluefruit EZ-Key Module
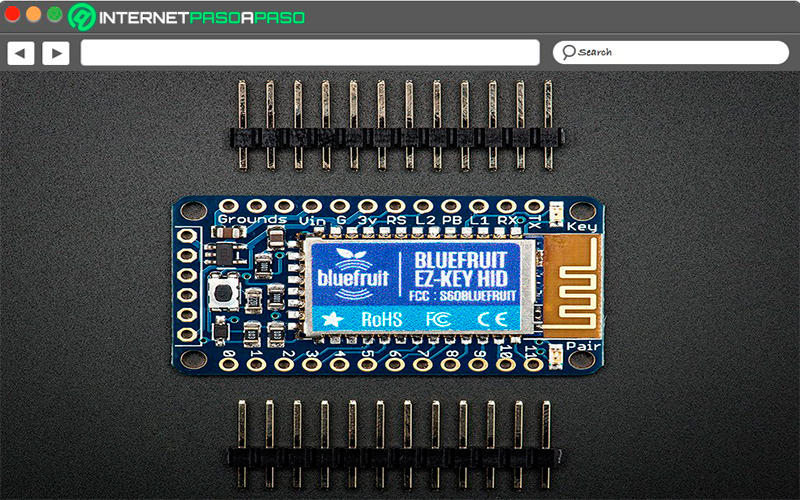
Bluefruit EZ-Key is used to create what they are keyboard drivers wireless, this is how this module is considered fast enough and easy to handle. So this Bluetooth controller works great with any BT compatible device, be it Mac, Linux, Windows, Android or iOS.
It also has a total of 12 input pinspressing one of its buttons will automatically send a keystroke to computer. In this way Bluefruit EZ-Key has become an ideal option for all those arduino projects where you need to have a keyboard.
Learn step by step how to connect your Arduino project with Bluetooth and synchronize it with other devices
Keeping in mind everything mentioned earlier in the post, the next thing will be to learn how to how to connect your Arduino project with Bluetooth and sync it with other devicesthis will allow you upload your programs to your board without the need to use cables or connectors for it. This type of technology is ideal for those programs where it is required that the arduino is out of your reach or must be handled with a control or mobile device.
According to all this, here we show you how to carry out this procedure easily and quickly:
Necessary materials
For this procedure, use will be made of the HC-05 bluetooth modulesince this module is sold with a PCB that offers the pin “Status”, This is a pin that can be configured to go low when the gate is opened. connection to the Bluetooth serial port, what provides you activate the reset and that way start the arduino bootloader operation.
According to this, here we leave you the materials that you will need to have to carry out this procedure:
- Bluetooth module HC-05.
- Arduino Uno R3.
Configuration of the HC-05 module for wireless programming of Arduino via Bluetooth
You must take into account that before this module starts working as a arduino programmeryou must configure it so that it behaves as desired.
For this it is important that the HC-05 has the following parameters adjusted:
- For Arduino Uno with Optiboot: UART set to 115200 baud, 8 bits, 1 stop bits, no stop.
- For Arduino Duemilanove / Diecimila: UART set to 56700 baud, 8 bits, 1 stop bits, no stop.
- Set the polarity of state pin for the correct polarity.
Commands to configure the HC-05 module
It is also important that you take into account a series of very important commands to configure in the HC-05, which we teach you to continuation:
- AT+ORGL
- AT+Role=0
- AT+POLAR=1.0
- AT+UART=115200,0,0,0
- AT+INIT
Now line by line you must do the following steps for its configuration:
- The first will be restore factory settings.
- Now you have to configure it in slave modefor it establishes a transparent serial bridge from the PC.
- Adjust polarity of pin 32 labeled State on the HC-05 module, so that it goes to low state when the device is connected to the module.
- The next will do what the rate match with bootloader speed.
- You finally gotta get out from setup mode and initiate normal operation of the HC-05 module.
Circuit assembly for Arduino programming via Bluetooth
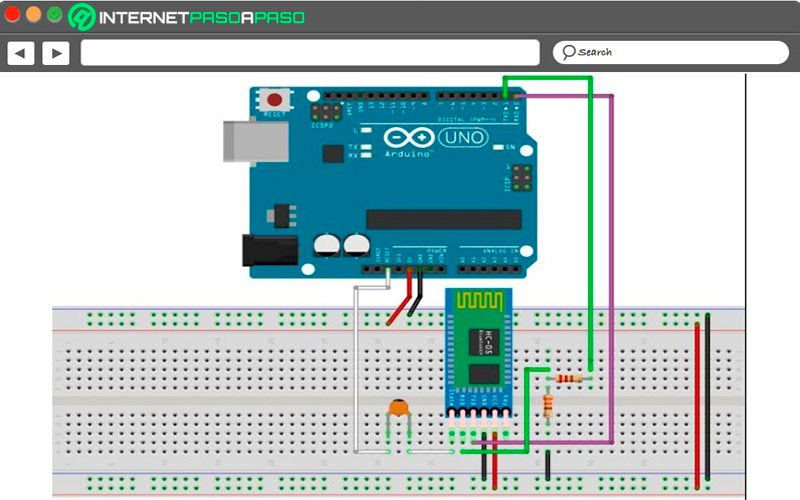
At this point it will be necessary connect the TX and RX pins of the Bluetooth to the RX and TX pins of the Arduino respectively, keep in mind that these are crossed. In the case of the Bluetooth Status pin, it will function as reset and must be connected to arduino reset pin using a 100 nF ceramic capacitor. In this case the resistors shown in the circuit are to reduce the Arduino TX pin voltage (5 volt output) to something close to 3.3 Volts, this being the most logical level that admits the Bluetooth module.
In this case the connections should be as seen in the following image:
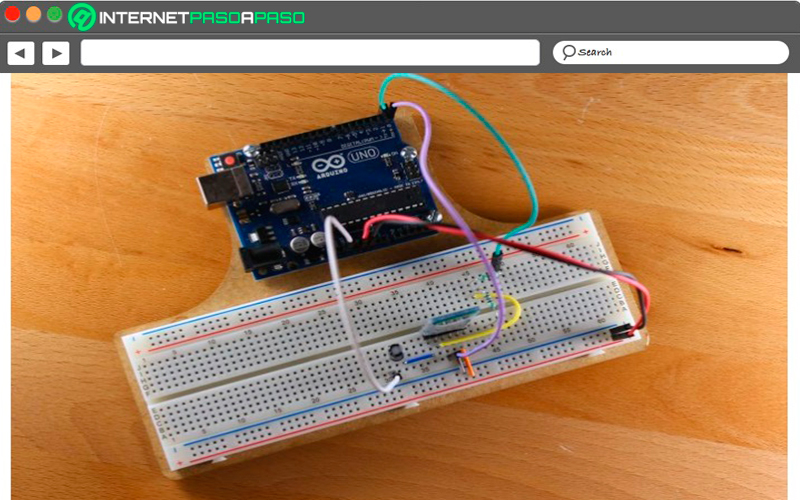
- When the circuit is already armed, it can be seen as follows in a breadboard
- After this you already have the hardware ready to try the arduino programming via bluetooth.
Wireless Arduino Programming via Bluetooth
When you already have the configured module and the assembled circuitthe following will be Wirelessly program the Arduino via Bluetooth. At this point it will be assumed that the HC-05 module with computer.
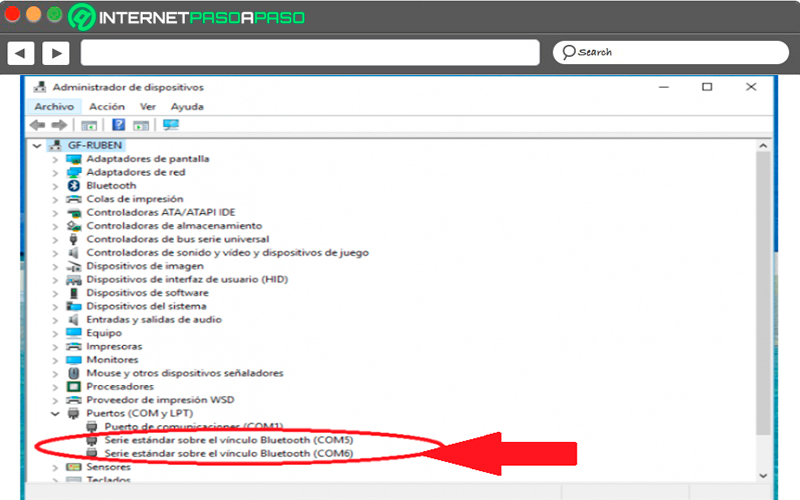
So you must carry out the pairing process and in the same way there is a serial port on Bluetooth where it shows up correctly in device manager. The procedure to be able pair a bluetooth device will vary depending on the operating system. should also be reviewed the administrator of Windows devices.
The virtual serial ports should be displayed correctly there, as can be seen in the image that we present below:
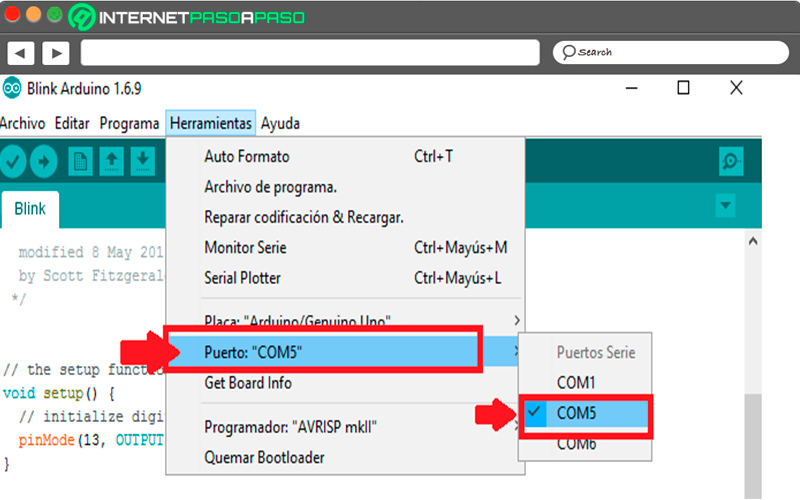
- The next thing is to open the Arduino IDE and there you must select the new serial port that has been created when paired the HC-05 with the computer.
- Now it should open Blink sketch which is located in the examples folder and we click on the button “Carry” to automatically run the download program to the Arduino board.
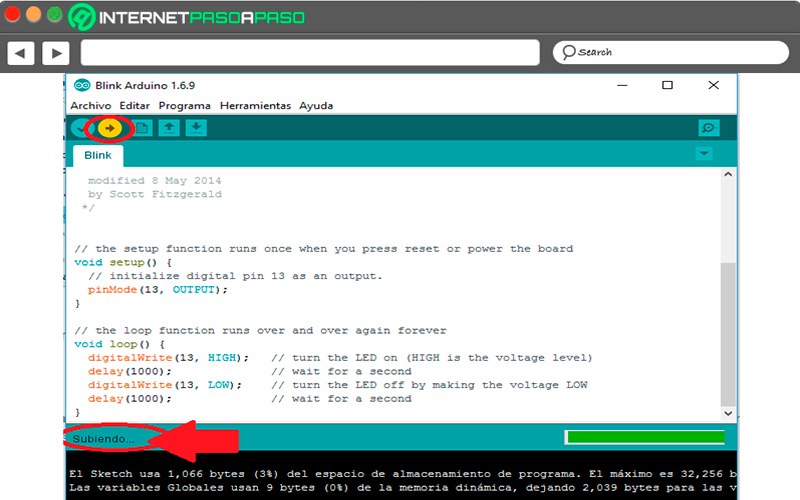
The upload of the program should proceed normally until the execution of the code uploaded to the Arduino. Now, if an error occurs, it may be due to a bad signal connection or that the polarity of the device was not correctly configured in the configuration. pin state.
If for some reason the sketch cannot be recorded on the Arduinothen it will be necessary to experiment with the capacitor valuea very good idea for this is to increase its value until it guarantees that the Arduino resets correctly when opening the serial port on the bluetoothin this case the recommended values are 100nF to 1uF.
The best Arduino projects with wireless connection via Bluetooth that you can do on your own
As has been mentioned, Bluetooth connections have become one of the best tools when carrying out certain types of arduino Projects, especially those we want to handle or control from a distance. That is why here we are going to teach you best wireless arduino projects what you can do on your own
To do this, follow in detail the list that we will show you below:
universal remote
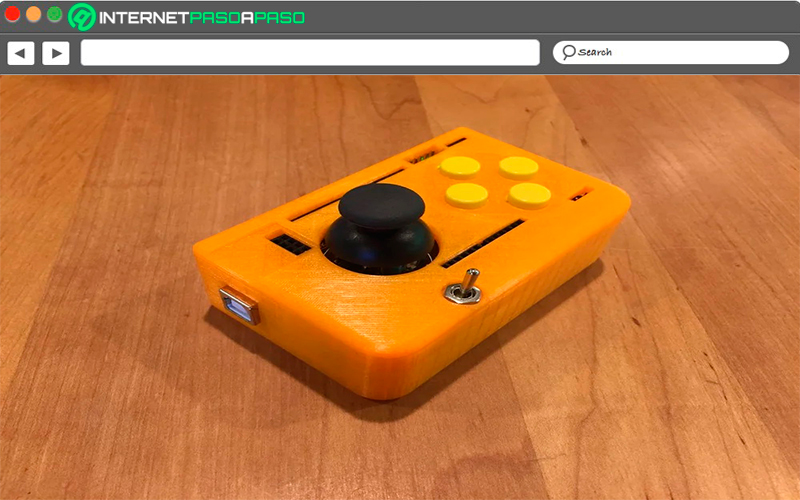
Surely you have been damaged your TV or stereo control and now you have no way to control it, for this you can start creating a universal remote combining the technologies of Arduino with that of the wireless connection. This is how this project can be created through a Bluetooth or USB connection, For this you just have to have a 3D printer and print the case, add the buttons and a joystick and voila, you can start to have control again.
BB8 life size
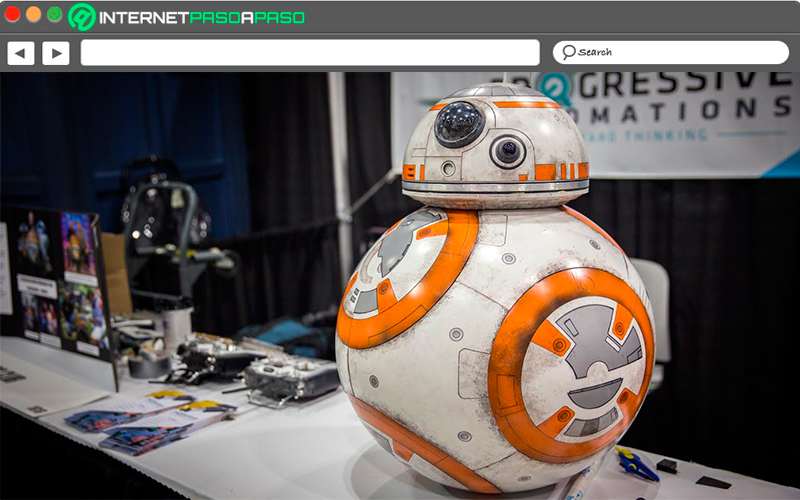
This project has been considered one of the most popular in the robotic, it consists of using a few simple roll on deodorants for what will be bb8 base, as well as other recycled materials that you will surely have at home.
For its operation, it will be necessary to have a Arduino board and Bluetooth connectivity, so you have the luxury of being able to control it from your own smartphone. Without a doubt, it has become a very motivating project due to all the use that can be made of it. recyclable materials that can be had at home without giving it any kind of use.
smart fridge
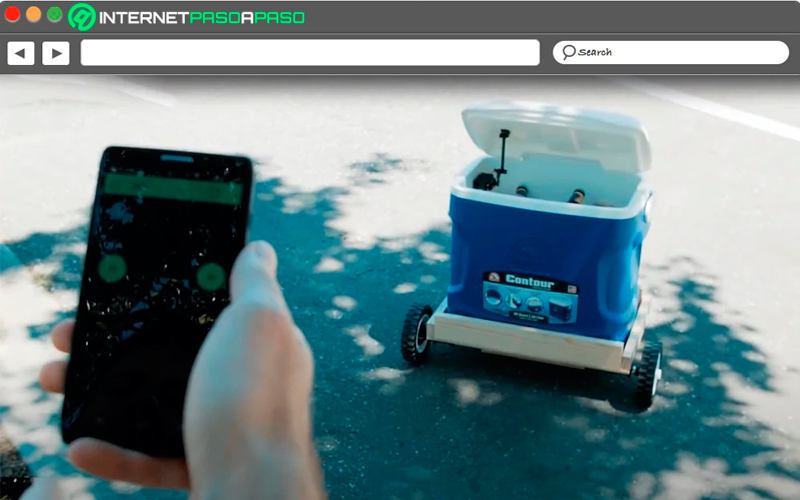
If you are one of the people who has a rolling refrigerator that you use for field trips or for your trips and thus be able to load your drinks and other foods, then you can start giving her life so that she can walk on her own wherever you go, this will prevent you from having to carry her on your own.
For this you simply need a arduino board, a Bluetooth connection, a smartphone and a mobile wine cellar or refrigerator. At the time of programming all this and turning it into a smart cellar you can control it through your smartphone via Bluetooth connectionin this way it will follow you wherever you go.
networks