
UPDATED ✅ Do you want to create your first free blog? ⭐ ENTER HERE ⭐ And I’ll tell you how to open a new Blogger account step by step to have your own blogspot
There are many things that the Internet has facilitated since its implementation and normalization. We read, communicate and even make purchases through any device that is capable of connecting to the network of networks; but above all we can use it as a speaker to reflect our thoughts, our opinion or even help others with our knowledge. To give voice to all this, the most common is the use of a blog.
Although many turn to social networks, many others have found on blogs the most appropriate place to let yourself be carried away by the letters and write at length about everything that worries you, interests you or causes you some curiosity, including content that can be very useful to users, both novices and experts in the matter in question. .
Portals like Bloggerbought by Google For more than a decade, they offer this possibility completely free of charge, so that anyone who wants it has total freedom to express themselves as much and as they want and to be able to create your own personal blog.
How to register a new Blogger account to create a free blog?

This may have caught your attention and, precisely, you have entered here trying to find out how to create a blogger account step by step. With this guide that we have prepared, you will know how to do it without any problem; but you will also learn create your own blog from scratch and write your first post using the tools that this system puts at your disposal. After following all the instructions that we will do next, you will be able to take full advantage of blogging.
Given the Blogger belongs to Google for a few years now, to be able to enter and take advantage of their services you need to have a Google account. If you do not have it, you will not be allowed to take advantage of its services or even consider using it. Don’t worry, if you want here I’ll tell you how create an account in Gmail.
Of course, the most advisable thing is that you previously register in the system of the internet giant. In fact, if you have an Android smartphone, it is more than likely that you already have an account. Be that as it may, Follow the steps below to register a Blogger accountYou will see that it is very simple.
1 – Enter the Blogger website
The starting point is as clear as it is simple, you need go to blogger home page. To do so, just open your trusted web browser and, in the address bar available at the top, enter the following URL: https://www.blogger.com.
2 – Login
- Instead of entering any registration process, go to the top right of the window and click “Log in”.
- You will appear in another Google window with the accounts that you have linked to your team, in case you do not have any previously linked or want to use a different one than those that appear, click on the following icon and then in “Use another account.”
- Now, enter the email address of the account you want link to your blogger profile and click “Following“.
3 – Enter your password
To finish signing in with your Google account, it is essential that you enter the password that you set when registering it. Do it and click again on “Following” to move on.
4 – Confirm your profile type
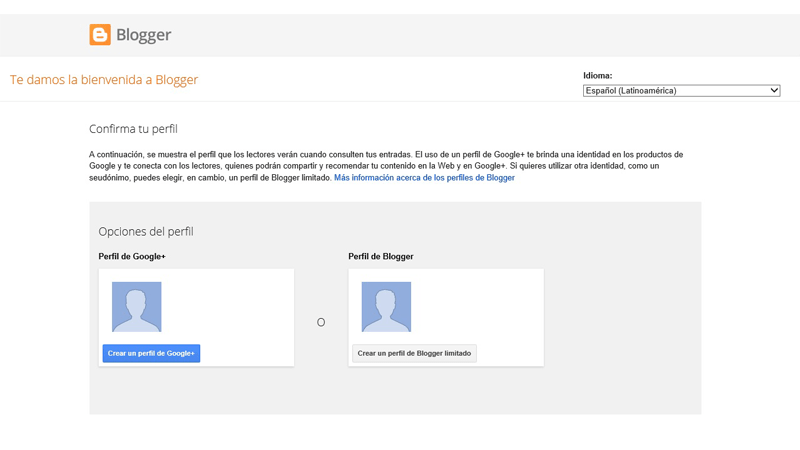
Blogger needs you to indicate the profile type What do you want to show other readers? Here you can decide between a Google+ profilewhich you will have to create by clicking on “Create a Google+ profile“, or a blogger profileto register by clicking on “Create a limited Blogger profile.”
If you choose the second option, the most recommended to treat this portal as something independent, you will have to indicate the name to be shown to other readers and users by entering it in the field that appears on the screen. Write it down and click “Continue on Blogger.”
5 – Welcome to Blogger!
You are already inside the blog creation platform, Blogger. Now you can start creating your own personal blog to write about what you want and when you want, with the total freedom and versatility that characterizes this popular platform.
How to create and configure a blog with Blogger easily and quickly?
Ok, we have already created our account in the free service or cms of Blogger, but… and now that? so now we must create and configure our blog For it to take on the appearance that we want, it is not very complicated, but we must take into account some steps to follow to start off on the right foot in our new adventure as bloggers!
1 – Log in to Blogger
Again, the first step is the clearest. Open your internet browser and type the Blogger URL in the address bar: https://www.blogger.com to access our new account, to do this we go to the top left and click on “Log in“A form will then open where we can enter our Gmail account and password.
2 – Start the creation of the blog
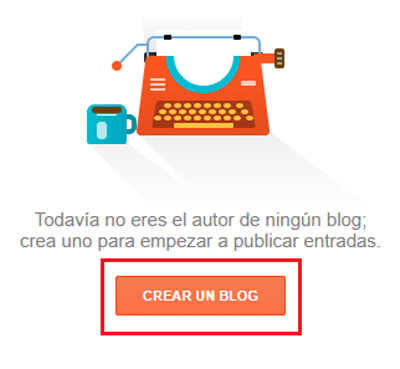
If you had previously logged in on the device you are on, when you access the Blogger website you will see how, automatically, you appear in your user panel. Once inside said panel, you just have to click on the orange button with the text “Create a blog” that appears in the center of the screen.
3 – First details
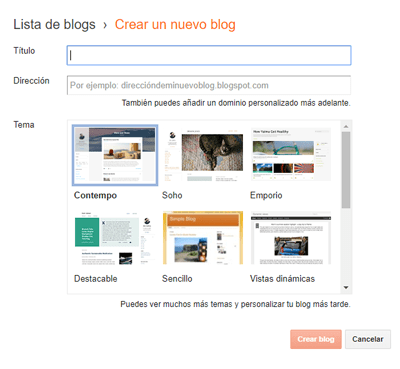
Now is the time to choose a name for your blog, an address and a theme or template. It is important that you decide well how you want to baptize it so that it distills what you want to communicate. The address, on the other hand, will be part of the URL that others will see in the address bar and the theme is what will give one style or another to the appearance of your blog.
Fill in the two fields and choose from all the available themes. Keep in mind that the address field must be unique and that, in addition, it will have the addition or extension “blogspot.com”, as an example would be, www.miblogpersonal.blogspot.com.
If there is already a blog with the name you enter, it will notify us with the following message “This blog address is not available.“, you can try other alternative names until the message appears”This blog address is available.“. Once you have done it, click on the button “create blog” to follow.
4 – Connect domain
Now, Google will ask you if you want to connect a domain name of your own to be able to connect it to your new blog. You can skip this step or click “Search“to look at one, this refers to the fact that we can have a domain of our own without the ending blogspot.com and connect it to Blogger’s cms. In case of doing so, you will have to choose one of all those that Google lists for you, select it and pay for it.
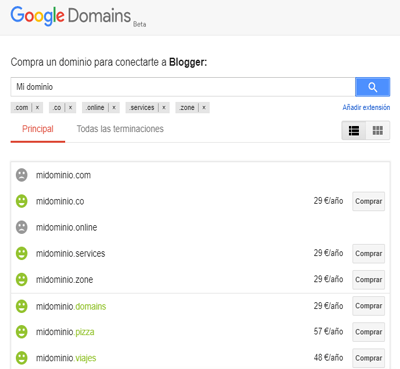
If not, just click “No, thanks” to continue. In case this is your first time in this, we recommend that you continue here and, for now, do not pay for a domain, in the future you will be able to opt for this option, passing all your posts and content created to the new domain .
5 – You already have a blog!
Your Blogger blog is now created! After the previous steps, there is already a corner on the internet where you can write as much as you like and however you like (always staying within Google’s respect and privacy policies).
How to create your first blog post?
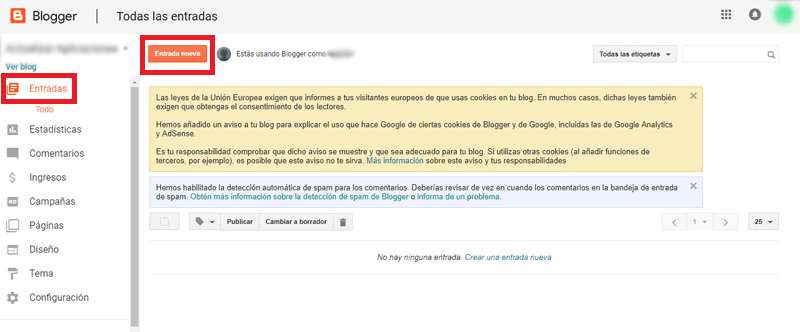
1 – Access your user panel in Blogger
Enter the blogger’s website as we have previously indicated and, once inside, click “Login” to choose your account and write the password to access your panel. If your account is already linked, you will enter directly to your user panel in Blogger as soon as you type the URL in the address bar.
2 – Create your ticket
Now click the button “new entry” that appears right next to your profile picture and the text “You are using Blogger as (username)“.
3 – Let’s write!
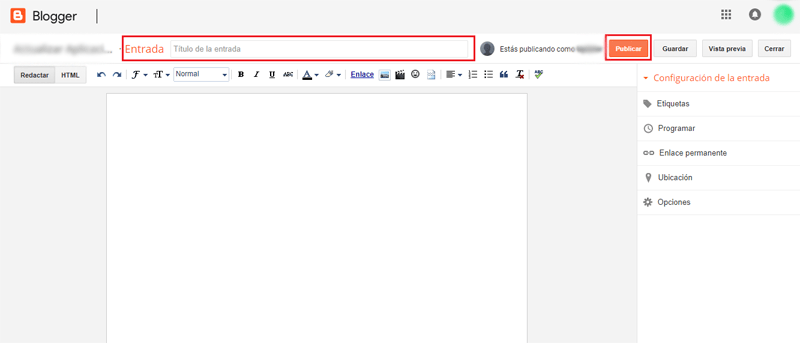
Once you have completed the previous step, you will find yourself in front of an empty document. This is the body of the text with which you will fill the first post of your blog. Write as much as you want and remember that you can give different formats to the characters, insert images, video, emoticons, adjust alignment, use lists and even insert quotes using the buttons available in the toolbar. If you prefer, even you can click “HTML” to edit using web code.
When you have your entry almost ready, fill in the field “post title” with the title that you want to appear at the head of your text and, finally, click on “Post” to launch it on the internet. Remember that you can also click on “Save” to leave it ready and continue at another time before publishing it, or even in “Preview” to see if you are convinced how the layout is turning out.
4 – Post published!
You have already launched your blog. It’s time to experiment with all the tools of the Blogger content manager to give your publications the shape you want and try all kinds of formats. The rest, already, is in your hands. For all!
Internet