
UPDATED ✅ Do you need a new alternative email account and don’t know how to do it? ⭐ ENTER HERE ⭐ and discover how to do it for free
Having an email is, on the digital plane, as important as carrying a DNI in real life. The mail not only came to be the substitute for faxes or the more traditional mail, over time it has established itself as a method with which we can identify ourselves in numerous portals to access countless services. When registering in an online store or in any platform that offers the possibility of logging in to users, one of the necessary data is an email account to link.
Due to this need, there are many companies that have been in charge of providing those interested with an email. In this case, and despite the large amount of supply that exists in the current market, we are going to focus on the 1&1 proposal. The famous hosting and domain provider has a variant that focuses solely and exclusively on emails, GMX Mail.
One that you can use completely free and that, in addition, gives you access to such interesting services as data hosting in the cloud. It has many more benefits, some really interesting, and it is all this that makes knowing how to open a GMX Mail email account free is an issue that is increasingly in demand.
Open a new email account in GMX Mail
In this small, but interesting guide that we bring you, we are going to explain step by step everything you must do to be able to have your own GMX e-mail and, in addition, we will expand by teaching you also how you should configure it in case you have an Android or iPhone mobile phone. In these terminals you can also use your email and, in this particular case, in a way that is much simpler than in the rest of the existing proposals.
GMX Mail is a system that goes beyond sending and receiving emails. Since its creation, it has opted to evolve and grow, incorporating functions of all kinds that improve the user experience for anyone who decides to use its system: store files in the cloud, organize calendars with events, appointments and other aspects of interest, access the 1&1 domain registry and many other advantages.
These benefits, in addition to its main function, that of sending and receiving emails, are what encourage many to register a new email account in GMX Mail, and that is precisely what we are going to explain next. We will detail all the steps you must follow to register from your PC and start taking advantage of everything it can offer you. This is what you have to do:
1 – Access the main website of GMX Mail
To be able to start create your new email account with GMX Mail, the first step to take is to enter your website. In order to do so, open your regular web browser and, in the address bar, type the following URL: https://www.gmx.es/mail/. Doing so will take you to that page.
2 – Start account creation
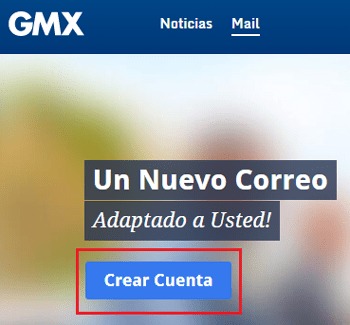
We want to have a new e-mail account, so what we have to look for is the button “Create Account”. Through it you access the registration process, so click on it to start filling in the entry form.
3 – Complete the data form
It’s time to write all the data requested by the GMX team. First of all, start by filling in the name and surname fields truthfully, in the same way that you have to do choosing your gender, date of birth and country of residence.
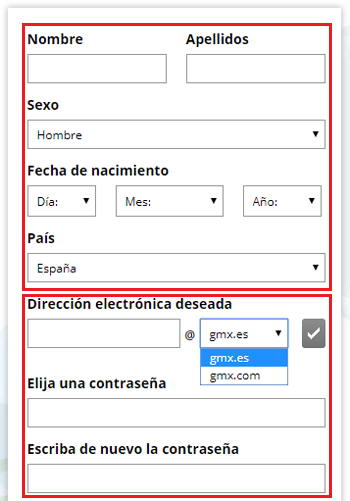
Once these parameters are established, the following is choose the desired email address. Remember that it must be unique or you will not be able to advance with the procedure, in addition, it is recommended that it be easy to memorize. Write it and choose the type of domain you want (“gmx.es” either “gmx.com”). Then, click on the button on the right to check the availability of the mail. If it is available, you can continue.
Now you must write a password with a minimum of 8 characters and with the recommendation to combine letters and numbers, as well as upper and lower case. You will have to type it twice, once for introduction and once for confirmation.
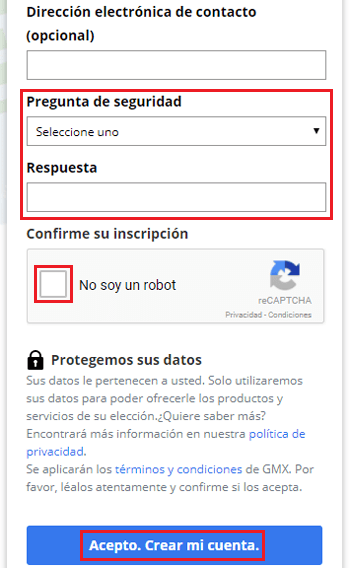
Then you have the possibility set an email alternative contact name, it is optional, but it is recommended in case there are problems with the login in later uses. Enter one you already have, choose the security question you want to confirm your identity, as well as the answer (which you must not reveal to anyone). Click on “I am not a robot” and, finally, on the blue button with the text “I agree. Create my account”.
4 – GMX mail created!
![]()
You have already completed the process of opening your new email account with GMX. Now, you will be in a window in which all the previously entered information appears. Review it if you wish and click on “Continue to mailbox” to finally access your new and brand new mail.
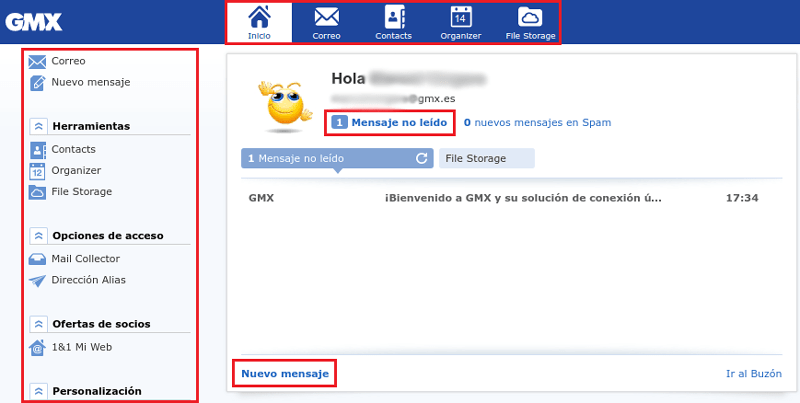
In doing so, you will enter the GMX mail web manager. From there you can see the emails received, send to any recipient or even do Google searches directly, as well as manage contacts, organize your agenda and even store files in the cloud. The possibilities, as you can see, are many and very interesting.
How to configure my GMX Mail email on the cell phone or smartphone?
We can’t always be in front of the PC to take a look at our email inbox. For this reason, it is common for there to be alternative solutions to be able to see the mailbox, send a message or read one recently received through our mobile phone.
Although there are e-mail providers that, to achieve this, require you to do a manual configuration, the case at hand it’s much simpler. If you are interested in knowing how to configure GMX Mail on your cell phone, you have it very easy. Just have to download an application and proceed as explained below on both Android and iOS.
Download GMX App for Android
if you want to use GMX on Android, the best option is to resort to the app that is available for it. you just have to enter the Google Play Store and type GMX in the search bar, then GMX Mail will appear as the first result. Click on it.
Once in the application file, proceed to the download that, in addition, will install the app automatically in your terminal. This process can take from a few seconds to a couple of minutes, it is recommended to always be connected to the wifi network to perform this process.
When it is finished, go to the section where you have the applications on your Android phone and look for the one for this mail server. Once you find it, click on its icon to enter it and start with the configuration.
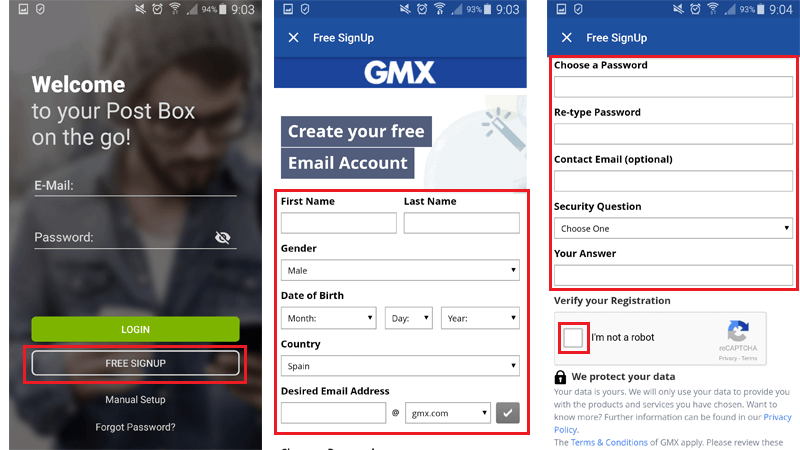
Now, on its main screen, you must click on the button “Free Signup” to create the GMX Mail account on the cell phone. By doing so, you will be redirected to a registration form practically identical to the one mentioned in the previous section on creating an account, although it will be completely in English.
Yes, on the contrary, all you want to do is log in, you have to enter the e-mail in question and your password on the main screen and then click on the green button with the text “Login”. This option is only valid if you have previously registered a GMX Mail account.
So what you need to do now is:
- Enter your name (First Name)
- Your last name (Last Name)
- your sex (Gender)
- Your date of birth (Date of Birth)
- Your country of residence (Country) truthfully
Once this is done, touch write the email address you want, remembering that it must be easily memorable and, of course, unique. Also choose the domain you want and check the availability of the email indicated with the button in the shape of “tick”.
Before concluding, You must enter a password with a minimum of 8 characters, which you must also confirm by entering it again. Then, an optional contact email in case there is a problem with the login and a security question with a secret answer.

Now click on the field “I’m not a robot” and in “I Accept. Create My Account.”, the blue button at the bottom of the form. With this, you will have created and configured your GMX Mail account on your Android phone.
Download GMX app for iOS
As for the GMX app for iOS, the process is exactly the same, only the application must be downloaded through the Apple digital store. on your phone, open the App Store and type GMX in the search engine. Download the first result that appears.
The rest is as simple as repeat all the steps explained in the previous section. From software startup to registration or login. Take a look at the previous section and follow the steps in it.
Emails