Index:
UPDATED ✅ Would you like to have a completely free email or email with many advantages? ⭐ ENTER HERE ⭐ and discover how easy and fast!
As an essential requirement for the proper use of Internet capabilities, having an email is as easy as it is necessary. There are many portals that are offered to act as suppliers with which to grant you your email account so that you can start sending and receiving emails with whoever you need, or even register in countless online sites using said account as an identifier. Access to this service is affordable, and it is because large companies have made a powerful effort to provide it to anyone interested.
It hasn’t just become something to access while browsing and looking for proposals from, for example, Google with Gmail; now it’s also something you can obtain by the mere fact of having contracted a telephone line. There are telephone operators that also give their clients the possibility of having an e-mail with their domain, and the only requirement they demand is that they register as their users after contracting their services.
The rest is an uncomplicated process that usually brings more advantages and benefits than disadvantages. This is the case that applies if we look at OR NOT. The company, now part of the Vodafone communications complex, allows all its customers to enjoy their own e-mail in exchange for a few simple requirements. In this little guide that we bring you, we are going to explain how to create an email account in ONOOnly if you are a client of theirs.
Register an email account in ONO @ono.com
In addition to this, we will also teach you everything you have to do and configure to be able to access the trays of this mail and use it without difficulties whether you are using an email manager on your computer, or if you are a smartphone user who wants to always have mail with you.
Register an email account in ONO @ono.com It is a process that requires a series of previous steps to be carried out effectively. The creation of the account itself is not complicated, but it does require that you first carry out a series of mandatory tasks. Without them, you can’t get started and create your email.
1 – Enter the client area

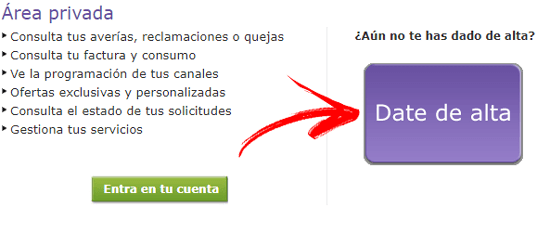
And the first thing you have to do is be a customer of ONO, owned by Vodafone. If you have contracted any type of line with them, what you should do is enter the Customer Area and register as such. Go to the web https://www.ono.es/clientes/ entering the URL in the browser and, once inside, click on “signup”.
2 – Fill in the registration form

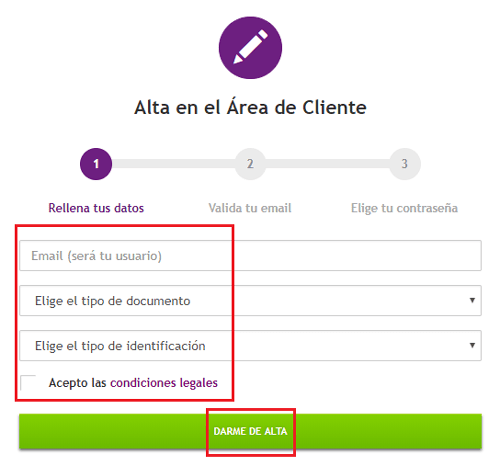
Now you must enter several very important data to properly identify yourself:
- In the first place, your alternative e-mail, which will serve as your identity as a user
- Then, choose the document with which to identify yourself (NIF, CIF, NIE or Passport)
- The type of identification (landline, customer ID or last 4 digits of the bank account)
- Accept the terms and legal conditions
Once all this has been done, the fields have been filled in and the legal conditions acceptance box has been checked, continue by clicking on the “sign me up”.
3 – Check your email
At this point, you will have to confirm your email by replying to the one you receive from the team. Go to your inbox, open mail from ONO and follow the instructions indicated in it to be able to advance.
After this, all that remains is to establish a password (if possible, alphanumeric), confirm it and proceed to conclude with your registration as a client. now play register the ONO email account.
4 – Log in to ONO
![]()
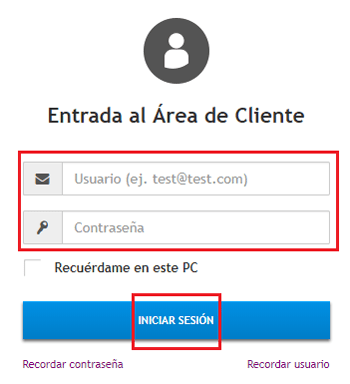
Head back to Client Area and log in by entering the email indicated during registration, along with the password you just entered to complete the entire procedure above.

5 – Configure your control panel
Once you are inside your profile and have the user panel in front of you. You must access the section “My products” and search, among the “Advantage” that appear, access to the [email protected]. Click on this option. Now go to the section “Create Account” and, again, click on it to be able to continue advancing.
Once here, you only have choose the name you want for your ONO email accountas well as a password with which to shield access (remember, alphanumeric, personal and non-transferable, if you do not want problems due to identity theft).
If you have followed all these steps as we have indicated and explained, your new e-mail address will now be available for your pleasure and enjoyment. Now the next section is know how to configure it to access both from your PC and from your phone without having to resort to the webmail service.
How to configure the ONO email account?

Both on computers and mobile phones it is possible set up ONO email account. It is important, however, to know that a series of essential parameters must be established so that both the incoming and outgoing servers work without problems. Any small error entering data can cause the information to not be properly synchronized and, therefore, you will not be able to use the mail until you fix it.
Fortunately, the parameters are shared both on PC and on Android and iPhone. Next, we are going to explain how you should proceed on any of these platforms to have your email active in a matter of minutes.
ONO Email for PC
Open the program you want to use to manage your email. In this example we are going to follow the most frequent and usual, given its popularity, microsoft-outlook. It is important to know that, although access to configuration parameters may be different from other software, the values and data entered do not change. Also, depending on which version of Outlook you use, the name of the accesses may vary.
- One time booted Outlookclick on “Tools” and, in the drop-down menu that appears, click on “Options”.
- In this new window, you must observe the tabs that appear at the top and click on the one with the text written “Mail Settings”. In this way you will access the section for this type of configuration.
- The next thing is, within this new section, click on “E-mail accounts…”.
- Once here, you will have in front of you all the e-mails that you have previously linked to Outlook, or none if it is the first time you access it. Skip them and click on “New…”. Now the time begins connect your ONO e-mail.
- First, leave the option checked “Microsoft Exchange, POP3, IMAP, or HTTP” and click on “Following”. If it is not marked, click on the circle that corresponds to it so that it East.
- The form that appears now asks for several important pieces of information. First, fill in the name you want to be linked to your email in Outlook, and then write the data belonging to said email account. That is, your address ([email protected]), the password that you set to access it and the repetition of the same to confirm that it has been written correctly.
- After this, check the manual configuration box and click on “Following”. Go ahead and accept until you reach the window “Internet Email Settings”point of vital importance.
- Now, you have to enter some information about the ONO email server. Leave the POP3 option active in the account type.
- On the server input write: “pop3.ono.com” (without quotes)
- Outgoing mail: “smtp.ono.com” (without quotes)
- As for the username and passworduse your email in the first field and the password you established at the time in the second.
- Although the ports should have been set automatically, click “More settings…” and go to the section “advanced” in the window that appears. Check that:
- The incoming server port is 110
- At the exit on the 25th.
Done all this, the rest is already proceed and move forward to get your account linked. With the data already established, Outlook will automatically synchronize to receive all the mails and manage everything you send through it using your newly connected ONO e-mail.
ONO Mail for Android and iPhone

In the case of wanting to synchronize the email account with your Android cell phone or iPhoneyou must follow a process that differs slightly in both, but that uses the same data from the previous one.
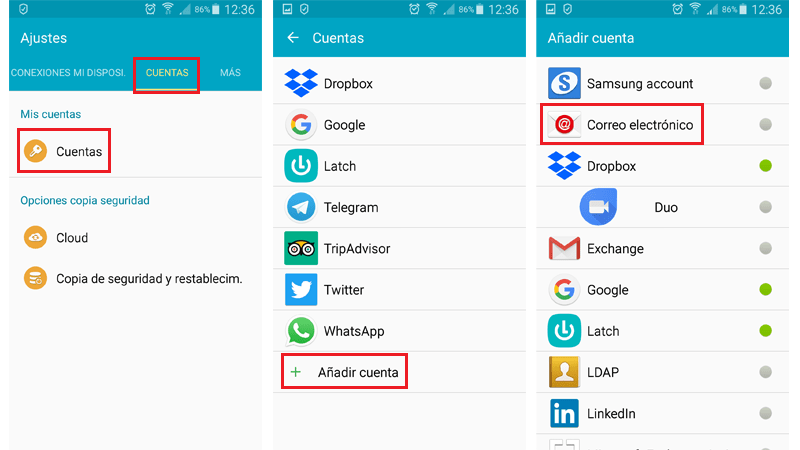
- In the first case, you should go to the “Settings”, then “Accounts” and click on “Add Account”. There, click on “Mail”.
- In the case of iPhone, also go to “Settings”, then tap on “Add Account“, in “Other” and finally in “Add email account”.
- Fill in both fields with the your ONO e-mail address and password that corresponds to it, and click on “manual configuration”.
- Choose “POP3” and fill in the first settings page using the input:
- Server: pop3.ono.com
- Port: 110
- no security or anything else
- Click on “Following”.
- On the next screen, type the data pertaining to the outgoing server:
- Server: smtp.ono.com
- Port: 25
- always remember that username is email and your password is the same as this one.
Emails