Index:
UPDATED ✅ Want to learn how to customize the Quick Access Toolbar in Word? ⭐ ENTER HERE ⭐ and discover how to do it FROM SCRATCH!
Among the outstanding functions that Word has, as a word processor, is the quick access toolbar, which is a native command center of this program.
The benefits it delivers are great. The user can configure it according to their needsmaking it possible to accommodate any situation, thus increasing task efficiency.
If you want to know what this tool is about, you will have to continue reading the following paragraphs. We will show you how you can configure it to best suit your tastes. We’ll also talk about all the commands you can add.
What is the Quick Access Toolbar in Microsoft Word and what is it for?
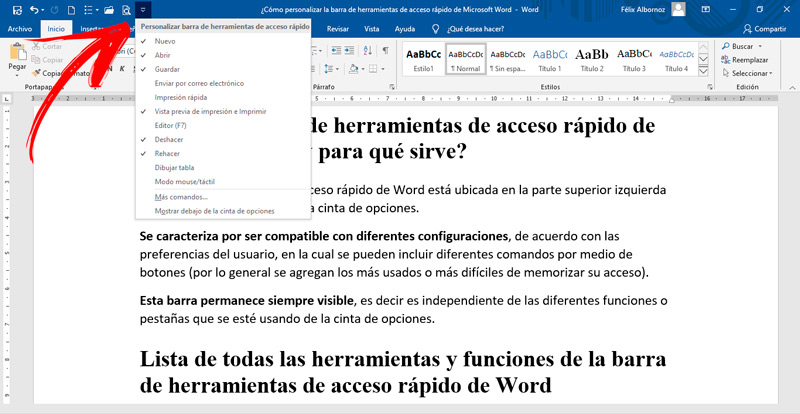
Word’s Quick Access Toolbar is located at the top left of the screen, above or below the Ribbon.
It is characterized by being compatible with different configurationsaccording to the user’s preferences, in which different commands can be included by means of buttons (generally the most used or the most difficult to memorize their access are added).
This bar remains always visiblethat is, it is independent of the different functions or tabs that are being used on the ribbon.
List of all the tools and functions of the Word Quick Access Toolbar

Within the taskbar you will be able to incorporate different functions that will help you to personalize it better and thus you will be able to be more efficient in your work. Let’s see what are all the buttons you can incorporate.
autosave
It is the first function that comes by default in Word. It is a tool that is used to automatically save all the documents while you are working. You can enable or disable it by pressing the button next to it.
Undo
With this tool you will be able to go one step back from each change that they produce in the document. Many people get confused and think that it is a function that is in replacement of the key combination “Ctrl + Z”, which is not true.
If you use the command through the taskbar, you can click on the arrow that is located on the right and choose which action you want to undo. On the other hand, when you use the Word key combination undo the last action, often being a complication since your mistake was not in the last one but in two or three previous steps.
Repeat
It is a command that works in a similar way to the previous one, but which repeats the last action you performed. There is also a difference with the combination of “Ctrl + Y”since it repeats the last action.
However, if you use the tool from the taskbar, you will be able to choose which action you want to repeat.
New blank document
The name of this function says it all. You can save steps every time you need to open a new document just by clicking on the icon of this command.
vignettes
It is a very useful tool if you use bullet points often. You only have to select the text that you want to be found in the list and then click on this command.
Open
When you click on this option you can choose to open some Word document. The advantage of this function is that it will only show you results that have the format of the word processorthis being an important difference when you do it through the Windows explorer.
Preview
It is a command widely used by users who need to permanently print their documents. When they take this option, they will be able to see how the printed paper will look.
This allows you to correct errors., margin details and any other changes that can be made to the document before a sheet is used to protect the environment. It’s also useful when you need to share your document and want to see how the other person will see it.
fast printing
When you have the document ready to be printed, you can automatically take Word in this option. choose the default printer and send the file for printing.
send by email
You will have the option to add a command to the taskbar that It will help you to directly attach the document that you are working to an email as an attachment. With this you will save time and open your email account, click on browse and choose your file.
Editor
It is used to check the spelling that you have in the text that you have open, the grammar and all the writing suggestions that Word makes.
Although this function can be replaced by the tool that is activated by default with the program in which it shows you your errors automatically.
draw table
It will allow you to design a table. With this command you will be able to independently draw the borders of the cells, of a column and of a row. In addition, you will have the option of using diagonals that will help you to better expose your texts.
mouse-touch mode
When you need to have a touch screen and find little space between commandsyou can use this option that will allow you to increase the space that exists between the different functions of Word on the screen.
This option is useful when users frequently use the pointer by means of the mouse or finger, and it is necessary to increase the area when used in the second situation.
More commands
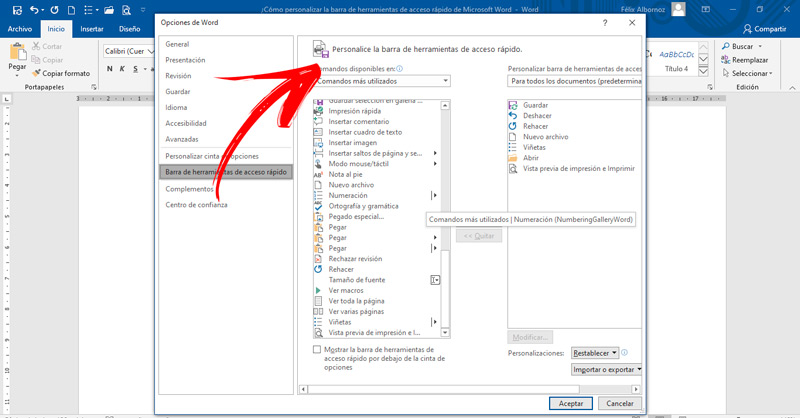
If you want to find other functions that we have not mentioned before, you only have to press the option “More command” and a window will appear where you can choose a significant number of tools that will help you reduce work time.
Some of these functions are:
- Add hyperlink.
- Fit to window width.
- Align to the left.
- Increase font size.
- Search.
- Change list level.
- Center.
- Font Color.
- Text styles.
- Insert images.
- Special paste.
- See macro.
When you have chosen the one that suits you best, you must select it and then click Add.
Steps to customize Microsoft Word Shortcut Toolbar

The steps that you will have to perform to customize the quick access toolbar are the following, according to each situation.
If you want to add ribbon features:
- Choose the tab or group of functions you need to appear in the toolbar on the ribbon.
- Right click and choose the option “Add to Quick Access Toolbar”.
When you need to incorporate a certain command:
- Click on the option “Customize Quick Access Toolbar”, represented by an arrow at the bottom of the toolbar.
- Choose “More commands”.
- go to “Choose commands from”.
- Click on “Commands not on tape of options”.
- Find the function you need.
- squeeze in “Add to end the task”.
In case you want to remove a shortcut:
- Click the right mouse button.
- Look for the option “Customize the quick access toolbar”.
- Choose the command you want to extract.
- Click on “Remove from Quick Access Toolbar”.
To move some command:
- Select the same.
- Move with the mouse without releasing the left button to the place you want.
When you want to incorporate a command separator and be able to group them in another way, you will have to do this:
- Right click on the bar.
- In the menu that will be displayed, choose “Customize the quick access toolbar”.
- Look for the option “Commands available in” and click on it.
- Click on “Most used commands”.
- Choose the option “
” and then press “Add”. - Move the divider with the up and down arrow.
To move the quick access toolbar follow these invitations:
- Click on the right end of the bar (on the arrow).
- Click on “Show below the ribbon”. In case you want to place it in the default location you will have to click on “Show above the ribbon”.
If you’re looking to reset to defaults, do the following:
- Choose “Customize the quick access toolbar”.
- Click on “Reset Defaults”.
- Click on “Reset Quick Access Toolbar Only.”
Word also allows you to export a toolbar so that you have all your Ribbon customizations and can use it on another computer. To perform this task you must follow this step by step:
- Go to the tab “File, Archive”.
- Click on “Aid” and then in “Options”.
- Then tap on the bar.
- Choose the option “Import or export”.
- Choose “Export all customizations.”
In case you want to import you must follow the same steps, but choose the option “Import customization file”.
Computing