Index:
UPDATED ✅ Do you want to learn the Word options bar like an expert? ⭐ ENTER HERE ⭐ and discover how to do it FROM SCRATCH!
the typewriters used before the appearance of the first word processor did not allow adjustments other than margins and tab stops. Currently programs in this category can add various ways to enrich the content.
Since its first appearance on the market in the year 1989, Microsoft Word has added a large number of tools. Currently with the 2019 version of Office, the program has hundreds of utilities on your taskbar.
This quality can be a problem at the same time.. Knowing what each option is for would be inconvenient were it not for this post.
List of all sections of the options bar in Microsoft Word

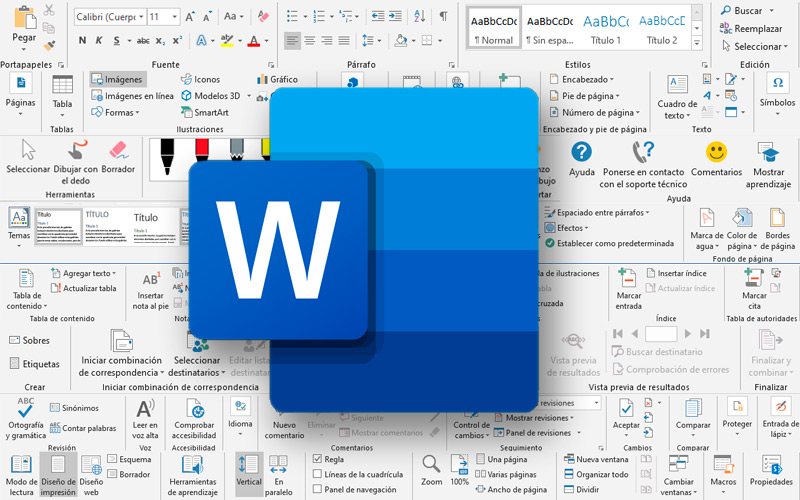
The options bar is by default at the top of the program. The same is classified in tabs. In turn, each of them is made up of sections. They group together a series of tools that share an aspect of modifying the text and its environment.
Let’s see what they are:
File, Archive
In this tab you will find everything relevant to the non-text data and information per se. That is, the file information. It is the only one that is shown in an exclusive window and is made up of:
- Start.
- New. To create a document from scratch or using a template.
- Open a document stored on the computer.
- Information.
- Save. Save the file to the specified location.
- Save as. It does it in the file you choose.
- Record.
- To print.
- Share.
- Export.
- Bill. Here you can check if your Office product is activated.
- Comments.
Start
Here are the main tools that will help us to modify primary aspects of the text. It is the default open tab and has these sections:
- Clipboard. Contains the copy, cut, and paste tools.
- Font. You can change the style of the text between fonts, sizes, colors and other options.
- Paragraph. Tool to change the structure of the paragraph, here are also the utilities for numbering and bullets.
- Styles. Modifies the hierarchy of the selected text.
- Edition.
Insert
Here we can find the elements that can be added to the text document and that are not composed by it. Namelyresources that are not included within a paragraph. These are its sections:
- Pages. Add a cover, a blank page, or skip to the next page with these utilities.
- Boards. This will help you organize comparative text.
- Illustrations.
- Accessories.
- Multimedia.
- Links.
- Comments.
- Header and footer.
- Text.
- Symbols. If you don’t know the keyboard shortcut for certain special characters, you can look them up here.
Draw
It is a group of utilities added in the latest editions of the program. They allow us draw lines freehand and with various brushes. Within this tab are the different stroke styles and ways of drawing.
Design
In this segment of the options bar we find the tools related to the preset color combinations fonts and styles. Within it it is possible to use topics with color combinations. They can also be used formats size and fonts, add watermarks, font colors, background and custom borders.
Provision
This tab contains the sections referring to the page and text layout. With these tools it is possible to organize the content within the established parameters and defined sheet sizes. Is made up of:
- Set page. Choose the margins, layout and size of the sheet. You can also organize the text in columns with these tools.
- Paragraph.
- Organize.
References
In this tab you will find the tools corresponding to the reference text. That is, elements that are not part of the body of the text, such as author quotes, indexes or footnotes. They are usually used for academic texts or books. It is made up of these segments:
- Table of Contents. With this utility you can create the index of a book or extensive work. Work with the hierarchies of the texts.
- Footnotes.
- Research.
- Citations and bibliography. Add metadata referring to the author and publication from which we took a phrase or idea.
- Titles.
- Index.
- Table of authorities.
Correspondence
It is a set of tools used to create letters and envelopes. With them it is possible to write the same text for all, changing only some parameters like recipients. It is made up of these fields:
- To create.
- Start mail merge. In this section you can choose the recipients. Whose names will be changed automatically and replaced in each text.
- Write and insert fields-
- Results preview.
- To finalize.
Check
This section contains the tools that will help us with the writing of a text. Within this tab we can find utilities that they will correct mistakes and in turn will allow us to do the same with other texts. It is made up of these sections:
- Revision. You should not stop using this utility. Don’t let a spelling or grammar mistake ruin your text. Always use it before sending a file.
- Voice. An option that will give you a different perspective of the document.
- Accessibility.
- Idiom. Translate a selected text or change the spell checking language.
- Comments.
- Tracing. An ideal set of tools for correcting work between colleagues and adding revisions.
- Changes.
- Compare.
- To protect.
- Pencil input.
View
In this section of the options bar, we will find what refers to the program interface. All the modifications that we make here will be established for all the documents that we edit. We can modify the way we see the sheet with these utilities:
- Views. Change the way you view the sheet depending on the purpose of the text.
- Immersive.
- Page move.
- To show. You can view two Word documents side by side. This will help you compare texts on the same screen.
- Zoom.
- Window.
- Macros.
- SharePoint.
Aid
As its name indicates, this tab has the tools that They will help us to solve possible problems.. It contains a single section with four buttons that will help us with various situations. One of them is very new and it is “Show Learning” that will teach us how to manage the program from scratch.
What would you like to do?
This last option not a tab on Yes. But it is a search bar that works like assistant for carrying out the tasks that correspond to the program. You can write in this section what you want to do and the software will immediately take you to the tool that performs that task.
Steps to customize your options bar in Microsoft Word

If you find it tedious to switch tabs when performing the tasks you use frequently, we have good news. It is possible to customize the options bar to your liking. With simple steps you will be able to group in a single tab the tools that you consider most useful.
Take note of it:
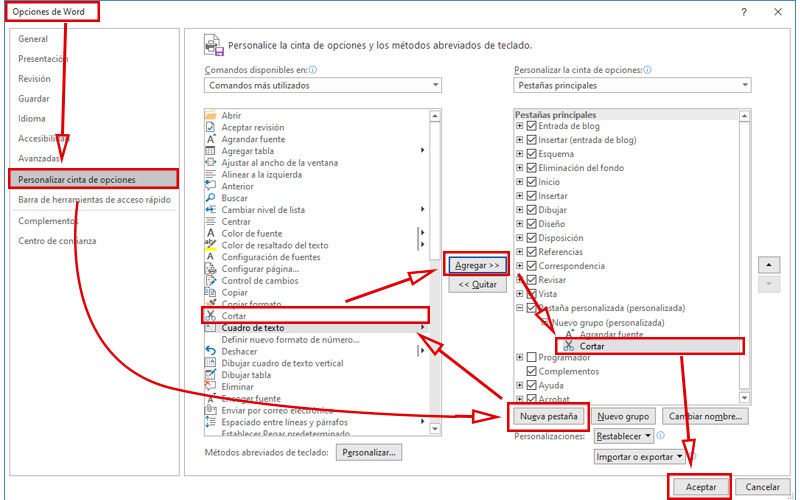
- Once Microsoft Word is open, go to the tab “File, Archive”.
- In the side panel choose “Options”is at the bottom of the list.
- A new window will open, in which you must choose “Customize Ribbon”.
- Two columns of tools will appear in it. On the left are all available commands and on the right the main tabs that we named earlier.
- In the second, press the button “New tab”.
- With this selected, choose which tools you want it to contain. To do this, click on it and then press “Add” which is in the center.
- When you have finished choosing all of them, press “To accept”.
Computing