
Index:
UPDATED ✅ Do you want to install Android in a virtual machine to run mobile applications on your computer? ⭐ ENTER HERE ⭐ and learn how to do it
VirtualBox is a tool that will allow you to find the solution when you want to use a different operating system than the one you have installed on your computer. This will make it possible to run two or more operating systemswithout the need to uninstall any of them.
This will result in applications can be tested, which are native to the Android operating systemwithout the need to spend money or have to buy a mobile for that destination.
If you want to become an expert and know how to create a virtual machinewe will show you step by step, with detailed images how you should install Android in a PC.
What are the benefits of installing Android on my PC with VirtualBox?
We all know that the operating system is the software that is responsible for coordinate the apps that are installed on a device, as well as the actions of the physical components. But not all OS are the same. These programs each run on different computers. On a mobile device we can find Android and iOS. The latter being exclusive for brands of Manzanawhile the first is used in almost the rest of the mobiles out there.
Android cannot be installed natively on a computersince these use operating systems such as Windows, MacOS, Linux and many others. In this way, an inconvenience arises, which is how a system that is original for mobile phones can be executed on a desktop or laptop computer. For this there is a solution and it is the creation of a virtual machine inside your PC. Which means that it is nothing other than creating “another computer” inside a real one.
In this way, it is achieved that the virtual machine can have its own software and applications independently of the one that has the “real or physical equipment”. In order to create a virtual machine, you need to install software that will allow you to perform this task and this is the case with VirtualBox. With this tool you can access all the applications that are native to Android without the need to have a mobile device for this case.
Also, Android is based on Linux which has very variable and extensive functions that allow to generate actions that with a closed system such as Windows or MacOS it can’t be done. This is the case for those people who need to program original apps through AndroidStudio (a platform that uses the Android x86 project).
Within these applications, should also be included those exclusive games for mobile operating system. This will cause the resources of the computer to be used to be able to enjoy or work with applications that are often more inconvenient to do on a small screen and have fewer physical resources. By this we mean the case of RAM lower or a graphics card with lower resources.
To summarize, we can say that the only way to use Android on a computer that has an operating system Windows or MacOS is creating a virtual machine through VirtualBox. With this tool you can get different types of applications that are native to Android using all the resources that our PC has, which are generally greater in capacity than those of a common mobile.
Steps to install Android in a VirtualBox virtual machine easily and quickly
as you know the advantages of installing Android in a virtual machinewe will show you the steps you must follow so that you do not make mistakes and you can have your original operating system without any problems.
The steps you must perform are the following:
Download Android ISO
An ISO image is a file where an exact copy or image of a system is stored. of files and that is used for the installation of software. In our case it will be VirtualBox. You should go to Google and search for the name of the software. We, to make it easier for you, we leave you the following links so you just click on the link to download it. For 64 bits “https://www.virtualbox.org/wiki/Downloads” and for 32 bits “https://download.virtualbox.org/virtualbox/5.2.36/VirtualBoxSDK-5.2.36-135684.zip”
There are two types of installers because each one will depend on the processor and operating system you have, if it is 64 bit or 32. If you want to know which one your computer has, you should open the file explorer and go to “Equipment”then you must right click and select the option “Properties”. A window will appear in which you must look for the section of “System” and read in “Type of system”. It will show you the operating system and the processor.
In this way you will be able to work with any operating system you have on your computer and regardless of the processor you have, either amd either Intel. once you have downloaded the zip fileyou will have to right click and open it with “Extract the data”. You will see a window that will inform you of the progress of the download. You will have to wait a few seconds and when it is ready, you will have a list of 3 files.
You must bear in mind that in Windows Explorer you will see the name of the file, the modification date, the type and the size, all separated by columns. You are going to read what it says “App” and click on it. This means that you have chosen the executable file.
At this time you will have to follow all the necessary steps for the installation. That is, you must accept all the requirements requested by the program so that it can be installed safely. Within these steps, a box will appear that will be checked by default with which you will create a direct access on the desktop so that you can open the program without having to resort to another route.
Create VirtualBox
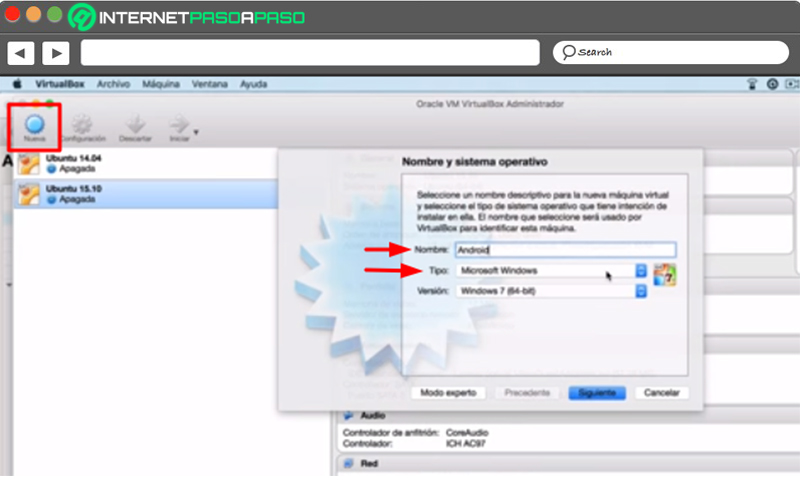
When you have installed VirtualBox, you must open it and go to the option “New”. This option is represented by a light blue icon, which is located at the top left of the menu. When you click on this tool, a window will open in which you will have to name it and choose the operating system.
In our case we can use “Android” in the field of “Name”. And then in the field “Guy”you must choose the operating system you need, in this case Linux. In the last field you must write in “Version” the option “Other Linux”. Once you finish this you will have to click on “Following”.
Configure the virtual machine
Once you’ve done the steps above, you’ll need to set up the virtual machine. This means you will have to select RAM size that allows you to work better with the task you need. It comes default 256 MB, but it is always recommended to increase the maximum you can to have a better performance of the virtual team. That is, if you select 1024 MB, your Android machine will have 1 GB of RAM. Click on “Following” to continue with the configuration.
In case you have a RAM of much more capacityFor example, from 32 GB, you can allocate 10 GB to the virtual machine. In this way, you will work faster and you will make your work uninterrupted. Now it’s time to choose the hard drive. You will have three options. One is do not add a storage element in the virtual machine; the second is create a disk virtual hard and the third is use an existing virtual hard disk file.
What these options mean to you is where the data you will have from your Android will be stored. If you want to do it with a virtual hard disk, that is, it will be stored by default in this type of storage that you will only be able to see when you access the virtual machine. Another option is not to save the data anywhere or to do it in the disk you have on your physical computer.
When you have chosen everything, you will have to select “To create” and choose “Following”, and this will from now on take the disk type by default. Now, you must choose if you want the disk storage to be done with a fixed size or dynamically reserved. This means that if you choose the first option it will take more time to create, but it is much faster for the user.
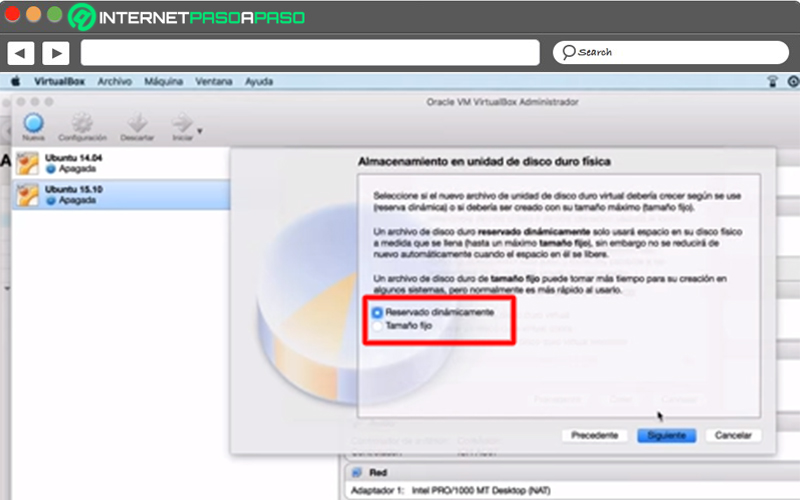
Instead, if you choose dynamically reserved (which is recommended), it will only use physical disk space as it fills up to a maximum limit. So that it happens to the real disc. Once you have chosen the option that suits you best, you must select “Following”. Choose the file location and size. For this you will have to write in the assigned field the name of the file of the virtual hard drive. In addition, you must select the place where you want to save it on your physical computer.
Once you have finished you must click on “Save”. Choose the size that this hard drive will have, which can have a maximum of up to 2 TB, with the default being 8 GB. When you choose the option that suits you best, you must click on “To create”. Remember that the larger the capacity the more resources it will take from your physical machine. To finish you will see on the left of the screen the name you assigned to the virtual machine, in this case Android.
Install Android on the virtual machine
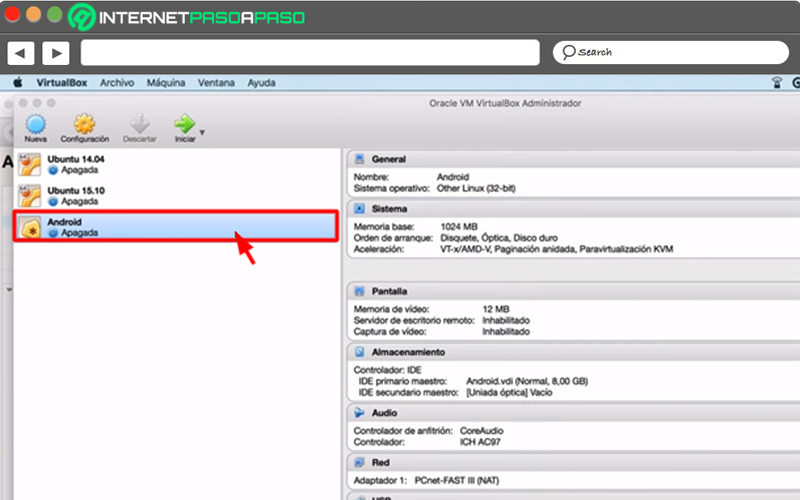
So far you have created the virtual machine, but you have not installed anything on it. let’s start with Android. As you will see in the previous image, the name of the virtual machine will appear on the left, you must click on it to select it. What you will have to do is download an ISO of the software. To do this you will have to enter the “https://www.android-x86.org/download” page and search for the one that interests you the most.
We recommend that you download “https://www.fosshub.com/Android-x86.html”. You will have this file in the folder “Downloads”. Login again to VirtualBox and choose the virtual machine you called Android. squeeze in “Start”, which is represented by a green arrow in the upper control panel. Since you don’t have an operating system, a window will appear telling you to boot into a system.
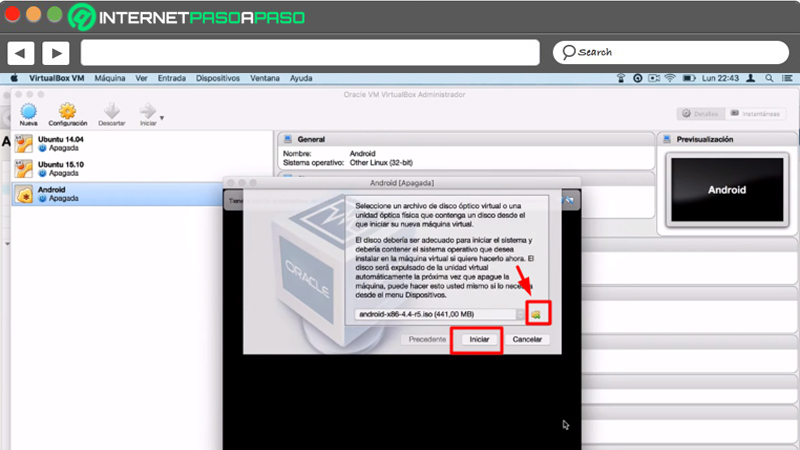
To solve this problem, you will have to click on the “yellow folder” which is next to the field. This will make you go folder of “Downloads” by default (in which is the Android ISO file, which you downloaded earlier).
The next step is to choose this file, click on “Open” and then in “Start”. Different options will appear in the pop-up window, in which you must choose the last one, the option “Installation – Install Android x86 to hard disk”. This last option will allow you to see all the changes you made every time you start the virtual machine.
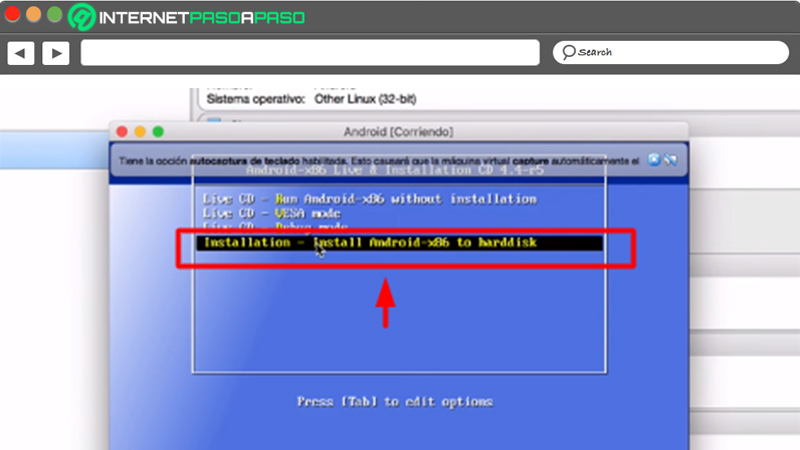
what you owe choose now is the partition, so you will have to choose the first of the three options that will appear. This means that you will install the operating system inside the hard drive that you assigned to the virtual machine. So you will be able to find the name you assigned before. Now, you must prefer how you want the file system to use. We recommend that you choose “ext4”, this will allow you to have a daily record of your modifications. There is no point in going into technical details about what this is.
We will only tell you that it is one of the most used in the distributions of Linux. Before exiting, the software will ask you if you want to save the changes you have generated, so you must click on “And it is”. Next, you’ll need to choose whether the directory “System” you want it to be read/write. Although this is also a technical question that does not make much sense to expand, you must click on “And it is”. Finally, the system will ask you if you want to restart the machine or do it at another time. click on “Okay” to restart it now.
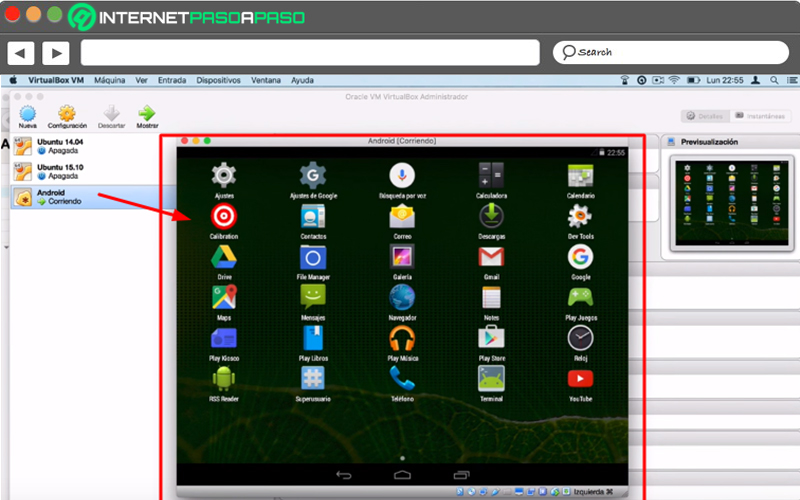
What’s left to do is load the Android configuration assistant as if it were a mobile that you just bought. You will have to choose the language, a network of Wifiadd an account Google And many other things. Every time you want to open your virtual machine, you just have to go to VirtualBox and choose the Android machine.
Operating systems