
Index:
UPDATED ✅ Want to install Kodi on a Raspberry Pi mini PC from scratch like an expert? ⭐ ENTER HERE ⭐ and Learn Everything FROM ZERO!
There is no doubt that Kodi is currently the media streaming application preferred by the vast majority, so it can become the best option to enjoy everything your media content in the microcomputer.
In addition, it should be mentioned that one of the most common uses given to a raspberry pi is to use it as a media PCsso you can get a lot of use out of it.
In this way, here we are going to teach you how can you install kodi on one of these boards and thus begin to enjoy it from your microcomputer easily.
Which Raspberry Pi should I choose to install Kodi according to the use that I will give to the program?
Currently there are many raspberry models available in the market, but not all of them are compatible with the Kodi program, so you will not be able to carry out its installation. At the moment you can enjoy this multimedia suite from the Raspberry Pi 3 and Pi 4 and thus begin to enjoy all its services and functions.
According to this, here we show you a little more about what each of these board versions is about that you can use to make use of the program:
Raspberry Pi 3
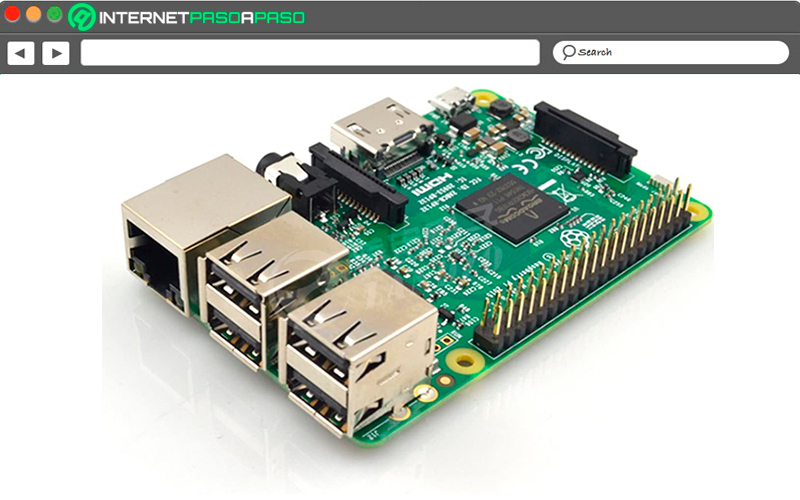
Before the arrival of this board model, its main limitation was wireless connectivity, luckily this was solved with the Pi 3. This is how this version maintains what it is the memory 1GB RAMbut has included a review of the processor to BCM2837 ARMv8which is also 4-core like its predecessor, but this time it works at 1.2GHzmaking it the first version to use 64-bit instructions.
Among so many features, the greatest novelty of this plate has been the inclusion of the Basic WiFi and Bluetooth 4.1 connectivityso adapters will no longer be needed for it, allowing a greater output horizon with respect to previous versions of this microcomputer.
Raspberry Pi 3 Model B+
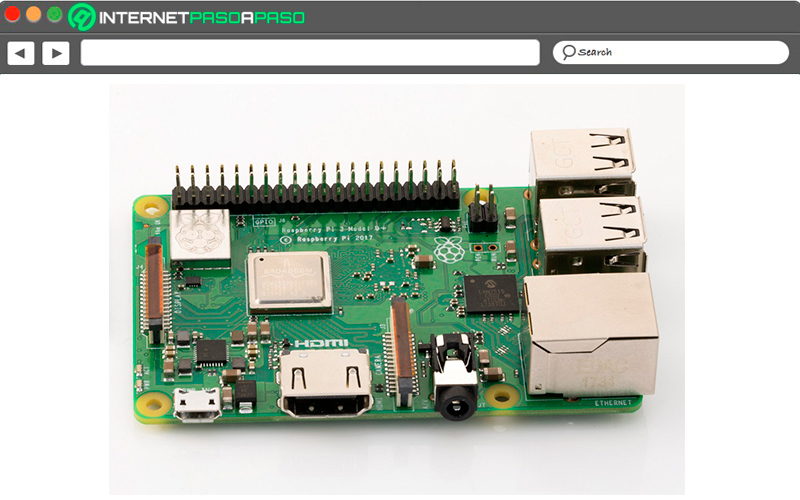
This new model of the Pi 3 arrival on the market when nobody expected it, so it became a surprise for many. This is how this new model presented some changes with respect to the previous board, although it maintained the same size and the same position of the elements as in the Pi 3. However, if it has presented changes in the processor where you have now included a much more powerful one than runs at 1.4GHz.
One of its great modifications was the eliminate the bottleneck of connectivity where I include connections via Bluetooth 4.2, BLE, dual-band WiFi 2.4 GHz and 5 GHzas well as a network card and Gigabit Ethernetwhere it is no longer limited to 100Mbps, but now you can easily reach the 300Mbps when operating over USB 2.0.
Some of the more technical specifications of this new model are the following:
- Wi-Fi + Bluetooth: 2.4GHz and 5GHz.
- CPU + GPU: Broadcom BCM2837B0, Cortex-A53 (ARMv8).
- RAM of 1 GB.
- Ethernet: Gigabit Ethernet over USB 2.0.
- GIO of 40 pins.
- ISD port to connect touch screen.
- CSI port to connect a camera.
- Micro SD.
- Video output composite and stereo audio.
- 4 ports USB2.0.
- Power-over-Ethernet (PoE).
Raspberry Pi 4
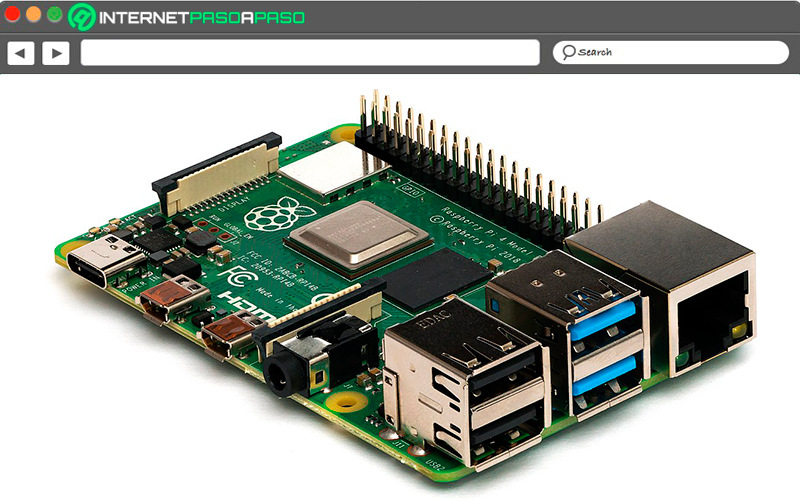
It can be said that it is the most anticipated version by all and which has managed to turn these microcomputers around. This is how this most recent version has a 4GB RAM and allows you to connect up to two 4K monitors at the same time, thanks to the fact that it has two HDMI ports. also has two USB 2.0 ports and 2 USB 3.0 ports, allowing for much faster data transfers through USB connections.
Raspberry Pi 4 Model Bit’s a mini pc just a bit bigger than a credit card, so you just need to connect a computer to it and load your operating system via the microSD card to start using it. This new version still retains several features of its predecessor Pi 3 B+. This is how in this latest version you will also find the pin-out for the 40-pin GPIO. The Pi 4 wireless connections are available at dual bands of 2.4 and 5 GHz and Bluetooth 5.0.
While one of the new features of this model that has attracted a lot of attention is the USB type C connector for power, replacing the mini-B connector. By having more functions and features clearly the Pi 4 tends to have a higher of power consumption than the Pi 3 B+, this means that a suitable power supply is needed for it, so it is recommended that this be at least 3Aas well as a good ventilation and heat sinks since it tends to get hot.
Requirements to install KODI on a Raspberry Pi What do we need to install?
Before starting with installing KODI on the Raspberry Pi, it is important that you make sure meet the minimum requirements To do this, keep in mind that this will be what ensures that the installation can be carried out successfully and that it runs correctly.
Therefore, here we leave you the main requirements that you must have for the installation:
- The first thing will be to have a plate Raspberry Pi 3 or Pi 4 with your power supply.
- Next you should have a micro SD card with USB adapter.
- A USB keyboard.
- A USB mouse.
- A HDMI cable.
- It is not mandatory but it is recommended to have a box for your Raspberry Pi 3 or Pi 4.
When you complete each of these requirementsthen you will be ready to start the procedure Kodi installation on your plate.
Learn step by step how to install Kodi on a Raspberry Pi from scratch and without errors
Taking into account what was mentioned in the previous section and if you want to start enjoying KODI on your microcomputer and thus begin to interact with this tool streaming media and each of its basic functions as a player, then here we are going to explain how you can carry out this easy and fast procedure. This is how here we are going to teach you different ways of install Kodi on your Raspberry Pi.
To do this, follow each of the methods that we will teach you below:
on Raspbian
It is possible that you raspberry pi count on Raspbian, the official distribution and for many reasons you don’t want to move to another distribution, either because you don’t like them or because you only like them Raspbian. The truth of all this is that users who have this official distribution they have a way of power install Kodi on your Raspberry Pi. For this it will be necessary to carry out the process of manually following the same steps as when you want install Kodi in other distributions such as Debian or Ubuntu on a PC.
If you don’t know how to do it, here we explain step by step how to install it:
- The first thing you should do is open your terminal and run the following command:
sudo apt install kodi - When you have done this, the following will perform a configuration file edit, as this will allow you to ensure that the media center software loads automatically every time your Raspberry Pi boots up. To do this, enter the following command:
sudo nano /etc/default /kodi - The next thing is to change the setting ENABLE to 1to do so write the following:
ENABLE=1 - now press the key “ctrl + z” to exit, make sure the changes have been saved correctly.
- Otherwise you can start run kodi with a single mouse click from the desktop or with a single command from the terminal:
kodi - Lastly, the package manager apt will download and install kodi, so you can run kodi from the application launcher.
in NOOBS
Another alternative for install Kodi on a Raspberry Pi is through Noobswhich is a small program available for these microcomputers and which is recorded on a micro SD card. NOOBS also know as New Out of The Box Software, It was created mainly for those users who are just starting with these boards, so they do not yet have the necessary experience to use them. This means that this program will make everything easier.
When you first start in Raspberry Pi with NOOBS, a menu will appear where you must select the operating system you want to install. In this case you can choose Raspbian or LibreELEC and from there carry out Kodi installation easily.
FreeELEC
On many occasions these microcomputers are acquired only for using a specific program, if you want to start having installations as simple as possible, then LibreELEC It will make it very easy for you.
To be able to install Kodi from here you will only have to follow each of these steps:
- Go to the official site of LibreELEC downloads
https://libreelec.tv/downloads/and there you will find the page of kodi download. - now you must select and download the image file available for raspberry pi.
- The next thing is to unzip the .img.tar file into an .img
- After this you will have to run Win32Disklmager, there you will select the disk the SD card, the .img file
- When you have done this you can insert the SD into the Raspberry what’s wrong with it Kodi pre-installed.
This option is ideal for those users who want to have the cleanest OS that allows play contents on Kodi without so many distractions.
Discover how to install Kodi on a Raspberry Pi from an SD card with OSMC like an expert
Another way to carry out installing Kodi on a Raspberry Pi is through CSOMthis being one of the most used distros for this since it offers a quick and easy way to do it.
To execute this you just have to follow each of the steps that we are going to indicate below:
Download OSMC Image
- The first thing to do in this case is download OSMC installer for the operating system of your PC, you can do this by entering the page OSMC official via
https://osmc.tv/download/. - When you run the installer, the first thing to do is choose the language and the device where it will be installed, in this case RaspberryPi. In the next step you must select OSMC version that you want to download and install and click on the date of “Following”.
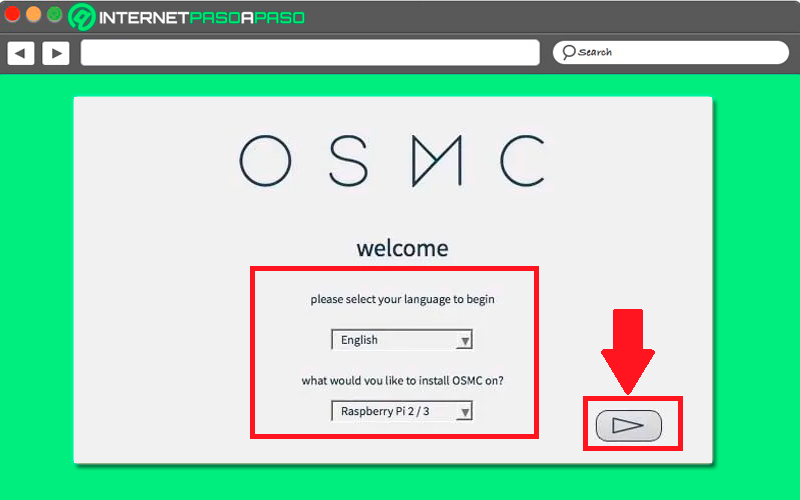
- After this the installer will try to download the version that has been selected, but if in any case this fails then you can try to download the image from a OSMC official website and there you will select the option “User local build on my computer”.
Install OSMC
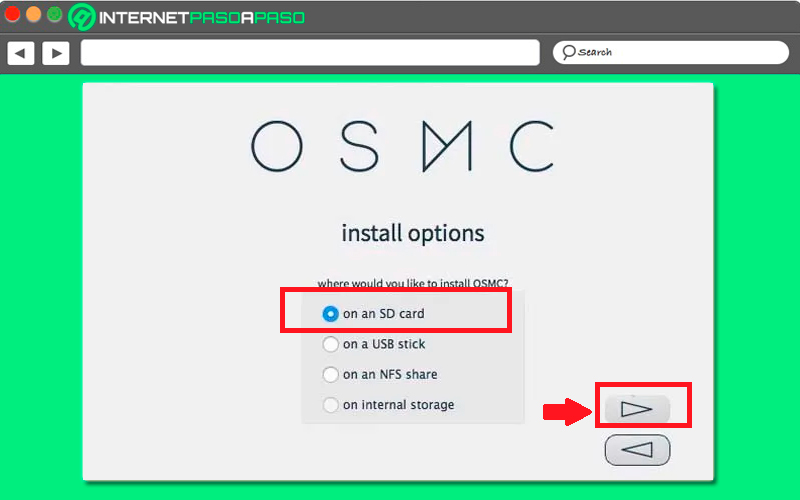
- The next thing is to enter a Micro SD card in the card reader of your PC or adapter so that the installation options appear. In this case you must choose the option “On an SD card” and click “Following”. By doing this you will specify that you want to install OSMC on the memory card that has been inserted into the PC and therefore it will be the one that will be used in the Raspberry Pi later.
- Now the installer will ask you what type of network connection is being used. If you are using an Ethernet cable Then you must select the option “Wired connection”, while if it is being used over a wireless connection like Wifithen you must choose “Wireless connection”. If you are using a WiFi connection, then you have to indicate the network SSID and password.
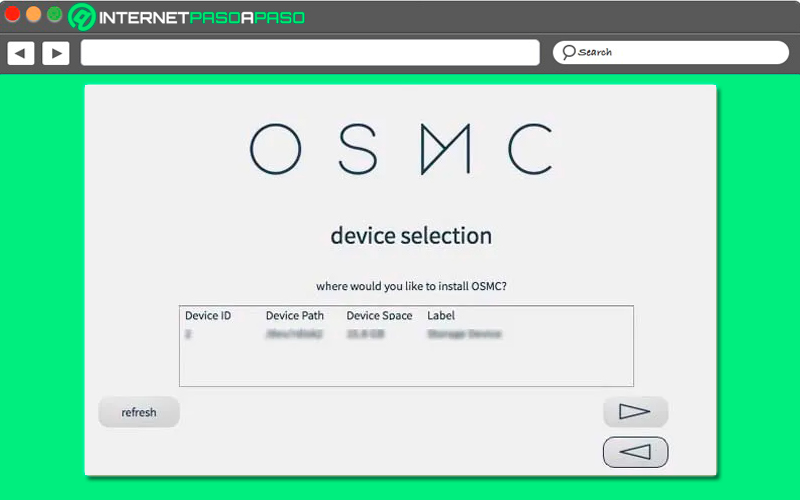
- The next step that must be done is to select the device where you want install OSMC, so it will be necessary to select your card. It is important to note that the fact install OSMC on the cardit will imply that it is previously formatted, which means that if you have something important stored there you must do a backup to prevent you from losing any valuable information or data.
Install Kodi
After this point the next thing to do is “To accept” the license agreement to automatically start the download process and installing OSMC on the card. Keep in mind that this may take a few minutes, so when the process is finished you will be able to remove the microSD card and plug it in right away the Raspberry Pi. In order to complete the entire procedure that allows the Kodi installation on the raspberrypi, you’ll need to connect a monitor as well as a keyboard or power supply.
This way you can see the OSMC loading screen and when the process is 100% completed, From the wizard you can start the configuration of various parameters present there. In this case it is important that you configure the language, device name, the theme you want to apply, among others. After this time it will be completely finished OSMC installation so you will be able to open Kodi in you raspberry pi.
We show you all the steps you must follow to configure Kodi on your Raspberry Pi and get the most out of it
After Kodi installation on your board you will have to configure it, you must take into account that this program is designed to work immediately after its installation, but there are many options that you can personalize and thus begin improve your experience in this media tool.
This is how here we show you what aspects can be improved:
OSMC Control Panel
when you carry out Kodi’s OSMC installation you will have the opportunity to have an additional element in the menu that is called “My OSMC”, here you must use either your keyboard or mouse to select it. Inside the control panel My OSMC you will find different types of icons that you can customize in your Kodi installationhere you can browse each of them and become familiar with each one.
Static IP address
The best thing to do in this case is always to be able to configure a static or manual address for your kodi box. Keep in mind that by default of the installation, Kodi will use DHCP and your router will assign you a form ip dynamic every time the Raspberry Pi is restarted, but in some cases during the configuration and use of the program, a static IP address is required, so it will be necessary to assign it manually.
Keep in mind that the parameters that best go or are related to a static IP are those of remote control and remote access methods, and keep in mind that these will work much better if you know the IP address of the Kodi box. After determining an unused IP address, you should go to My OSMC and there you will open the section of “Network Configuration”.
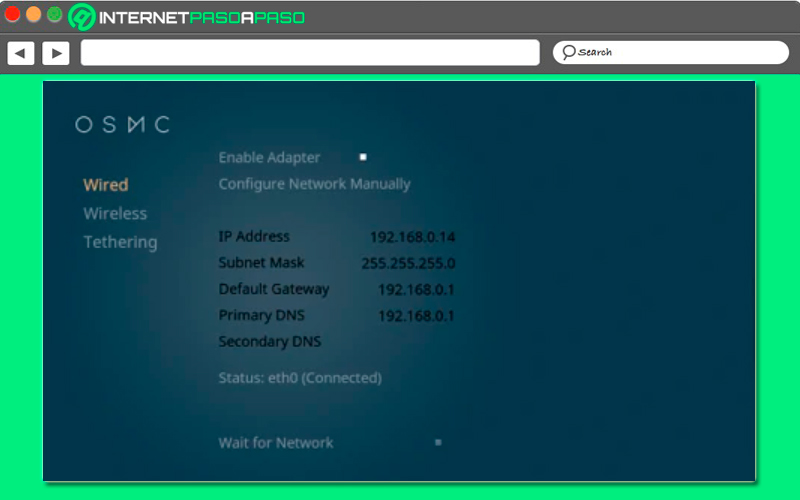
In this case you can see that you are configuring the wired adapter since you are connected to a network via Ethernet cable. But if you are using a network Wifi, then you will find the same options in the configuration of the wireless adapter. As you can see in the following image, the IP address assigned to the media center is shown, as well as some other parameters.
At this point you should select “Configure network manually” and then select the IP address. Here a new editor window will open with a virtual keyboard, which you will have to use to configure the IP address static you want to use. After this click on “Apply” for all changes to be saved.
Kodi web interface
- Surely you do not know but this program comes with a method of built-in remotethat is how Chorus is an interface that is web-based and serves to control kodi and which is executed in each box. In this way this has become one of the reasons why you have to configure the static IP address for your media center.
- Since this will make it much easier to handle Chorus. For this you just have to go to any web browser from a computer have Internet access or be a smart mobile device. There you are going to type the IP address that you assigned to your Kodi box in the address bar of the browser.
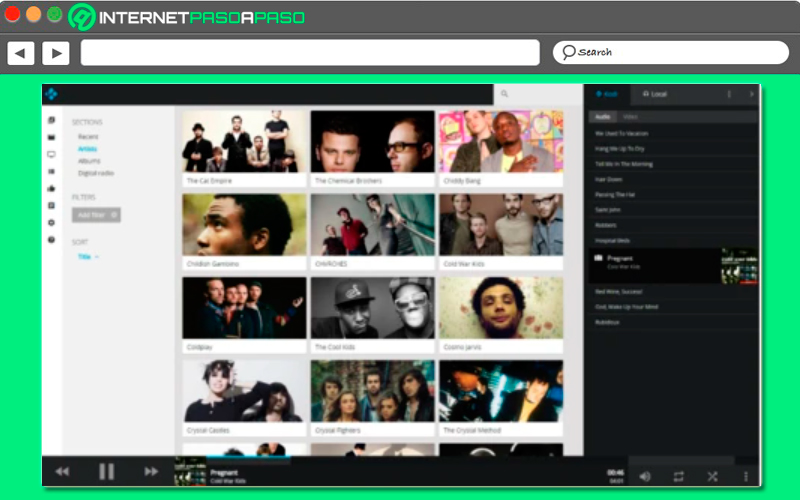
- Here you will see the box of the web page of Kodi Chorus and from there you can control and configure your media center. Note that Chorus This is a very easy method to control this program from anywhere in your home, but keep in mind that its range is limited to the range of your local area network.
Installation of plugins
- If you don’t already know, plugins are a way to add content sources and enhancements to your media center program. currently for Kodi You can find a large number of accessories that you can choose from, for this you can do it through the “Add-on manager”.
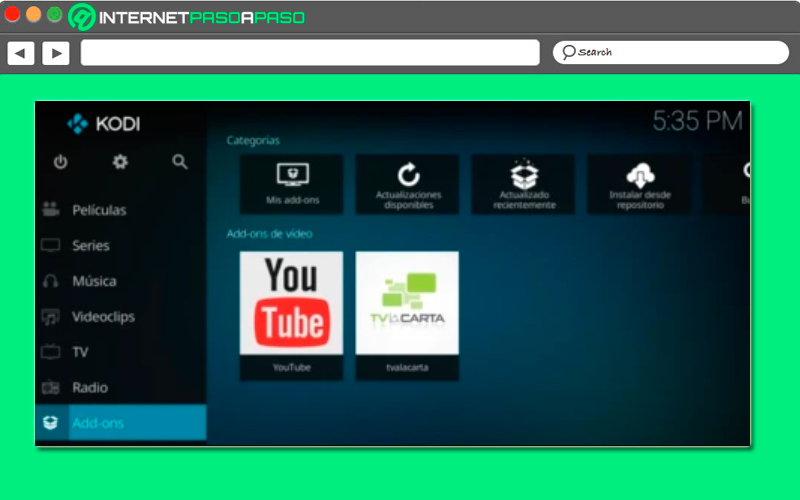
- When you are there you just have to select plugin what do you want to use to install it on your Kodi box. Keep in mind that some add-ons tend to depend on others, so you can see that with one add-on several elements are installed at the same time.
- When it has been installed you can start using it immediately if you want, you can also install as many as you want as the only limitation in this case is the size or space that you have micro SD card.
Kodi – Kodi Official Remote App
Finally, we present this application which you can use either from your tablet or smartphone to control your media center. This will allow you to control the program through the application and thus don’t use chorus. It is a media center official app which can be downloaded both in Android and iOS mobile devices, so you can get it in official stores completely free.
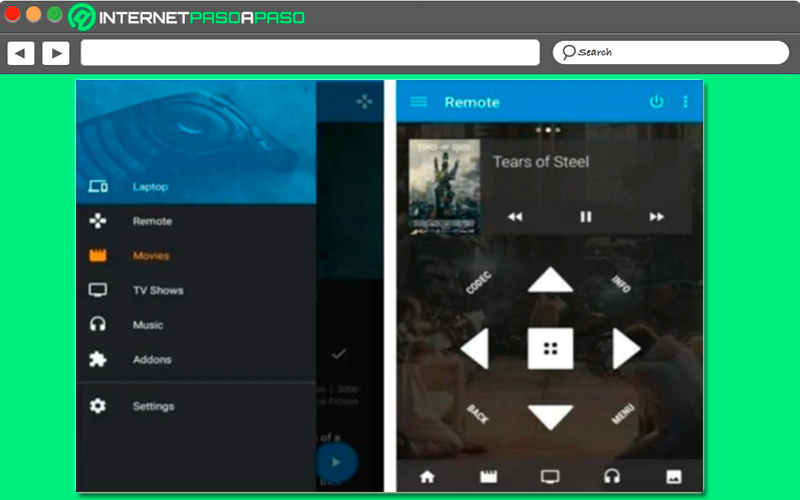
When you use this App for the first time you will have to scan your network in order to find any Kodi installationyou generally shouldn’t have any trouble getting the media center you’ve designed using the raspberrypi, there you will have to follow some instructions to finally be able to access the user interface. There you can start and control the media you want from the program.
Learn step by step how to install Kodi on a Raspberry Pi with an External operating system
Nowadays the raspberry pi it can work with different operating systems, which offers a greater variety of use. This is how you will be able install kodi for different external operating systems in a very simple way.
To do this, you simply have to follow each of the methods that we are going to teach you below:
Linux
In the case of users who install the Linux operating system on their raspberry pi they can download kodi via Raspbian, this procedure was already explained in one of the previous sections of the post, so you just have to take a look and follow each of the steps explained there to start having your own media center on your Linux board.
Windows or macOS
If you want to install this multimedia center on your Raspberry Pi with a specific operating system, either Windows 10 for Raspberry Pi or MacOSthen you will be able to do it through LibreELEC, the which is currently considered one of the best options. As in Linux with Raspbian This procedure has already been explained in general terms. However, here we are going to show you how you can choose the operating system of your choice.
To do this, follow each of these steps:
- The first thing you will have to do is go to the official page of freeelec since
https://libreelec.tv/. - Once there you will have to select the operating system you wantas you can see on the screen you will find the three options either Windows, Linux or Mac, so it is also a valid option for Linux.
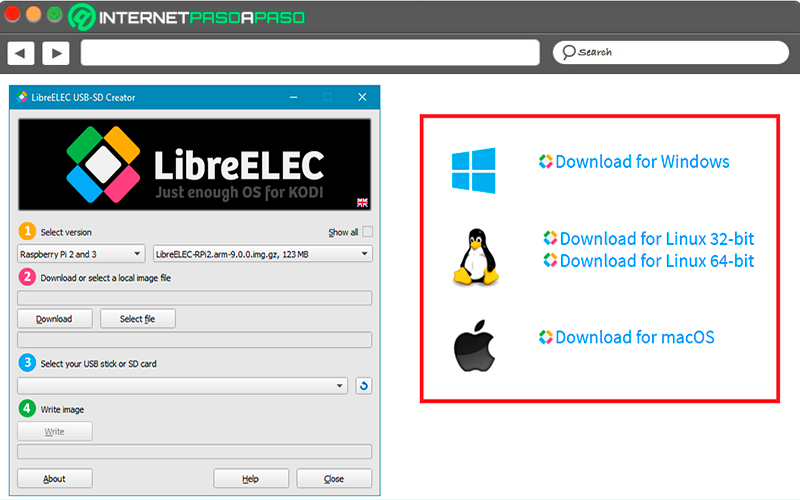
- After selecting the corresponding OS you must install the program. Note that this is installed like any other application on a computer.
- Once installed you must open LibreELEC USB-SD Creatorthere the program will indicate each of the steps that must be followed.
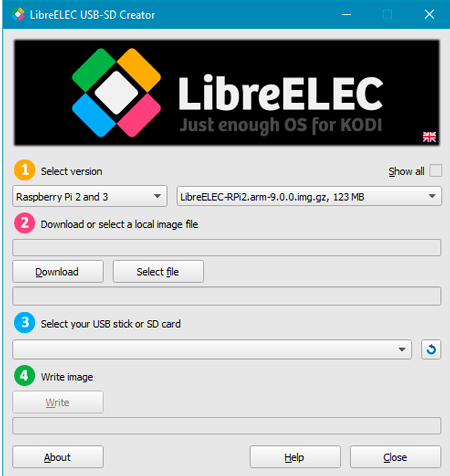
- Now you are going to have to start with the configuration, there you must select the version of your Raspberry Pi.
- By default you will be assigned the latest version of FreeELEC that is available.
- Once here you will have to select the option “Discharge” or select the file in case you already have it downloaded.
- The next thing is to select your USB or micro SD where do you want to install FreeELEC and then select the file where you want to use it. Be very careful to select the correct one for this to work properly for you.
- Lastly, you will need to select write, there you can remove the drive you are using and insert it into the Raspberry Pi.
- After this you will have to make the corresponding connections as it is connect the power supply, HDMI cable and the device for manage the media center.
- When you log in for the first time you will need to configure some basic aspects that will appear there.
The best legal Kodi Addons that you can install on your Raspberry Pi to enjoy the best content
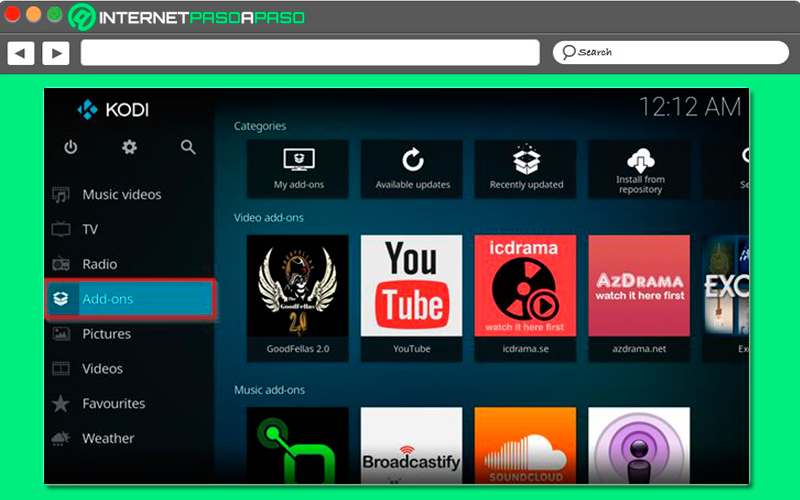
As already mentioned above Kodi has a lot of extensions which you can install completely free on it. They will allow you to get a better experience in the program, since they give you options and functions that are not there. This is how some of them will allow you watch content that is not allowed in your country, join several applications, turn the TV into a cinema platform, among many others.
In accordance with all this, here we are going to show you a list of the best safe and legal addons that you can install for Kodi on your Raspberry Pi and thus enjoy a broader and better quality content:
Youtube
It is a streaming platform that is very well positioned throughout the world, so surely you must already know it and you must know all the benefits that it can give you. So if you don’t have the YouTube apps on your TV, then a way to power turn your TV into a SmartTV is using the extension of YouTube for Kodiwhich will allow you to live this great experience.
Palantir
It is possibly one of the most famous extensions of this media Center, it allows you to see content in Spanish as movies, series or anime, which is ideal for when one of your favorite programs has no tradition. One of its most outstanding characteristics is that its content is very well organized where it has special sections for movies in 4k, those of science fiction, superheroes, soap operas, Disney moviesamong other.
Exodus Redux
It is one of the sagas of addons for kodi most famous in the world, this being its latest version and which includes a wide variety of extensions. It allows you to watch series and movies, television, listen to the radio, it includes platforms such as Netflix, Fox, SkyTV, HBOamong some others.
Here you will have the opportunity to find a lot of international content, so not all the programming will be in Spanish. If you use the addon menus you will get content classified by the highest grossing moviesthe oscar winners, the premieresthe most popular, among other categories present there.
magical dragon
magic dragon is one of the oldest extensions of Kody, but which in turn is still one of the favorites by users. It will offer you a fairly wide catalog where you will find documentaries, series and movies Of all genres. You will also be able to enjoy news and sports channelsas well as from radio programs.
THIS
If you are a follower of the european space agencythen you can start using your official Addon, there you will be able to enjoy each of its missions and a large amount of content that it shares on its official networks.
Planet
This plugin is ideal for all those users who like to see documentaries. Here you will have the opportunity to find a large number of them of all tastes and best of all, you will have an excellent picture quality.
FitnessZone
If you consider yourself passionate about sports and healthy living, then this addon It is a very good alternative for you to start getting in shape thanks to each of the trainings that are created and shared by each of the users of this platform.
But you should also know that there are many professionals who contribute their knowledge to help other members. Therefore, if you want to get enough training videos, how to lead a healthy life and above all fitness food recipesthen this addon is a great option for you.
British Council Film
It is an ideal extension to see what classic cinema is, here you are going to get some of the british classicsmost of them are to black and white, although some of the programming has a bit of color.
X Games
X Games is the ideal complement for all those fanatical users of extreme sports. Previously, this type of programming was presented by TV channels like MTV, but now it’s not like that anymore, so you can start using X Games and enjoy them again.
Plex
To finish this list of addons we present you Plex, a complement that will allow you to have a multimedia streaming system, which will allow your computer I acted as a server. In this case they can house what they are images, audio and video and it is currently one of the best streaming systems that can be found.
Computing