Index:
UPDATED ✅ Do you want to turn your Raspberry Pi into a personal cloud with OwnCloud? ⭐ ENTER HERE ⭐ and Learn How FROM ZERO! ⭐
One of The advantages of using Raspberry Pi is that it will allow you to carry out different types of projectsthis is how this board will also work for you like your own cloud server.
For this you can use the program OwnCloudwhich is quite similar to drop box and offer you the necessary storage space so you can store your important files and data.
Thanks to its compatibility with raspberrypi, has become one of the best alternatives for create your own personal cloud. That is why we will teach you how to carry out this procedure below.
What is OwnCloud and what is this tool for on Raspberry Pi?

If you still don’t know what it is OwnCloud, then you should know that it is a cloud storage service and that offers you a cross-platform file synchronization that can be installed on your server of RaspberryPi. In this way, any user who has an account will be able to upload information and synchronize with other users on any of their devices. OwnCloud It has a big difference with the rest of storage services.
And it is that the same being installed in your own Hosting gives you the freedom to design your own cloud storage system. So you will be able to have absolute control of many aspects that are mainly related to Privacy. So if you have a board raspberrypi, then you can start creating your own personal cloud using OwnCloud and in this way begin to enjoy all its functionalities.
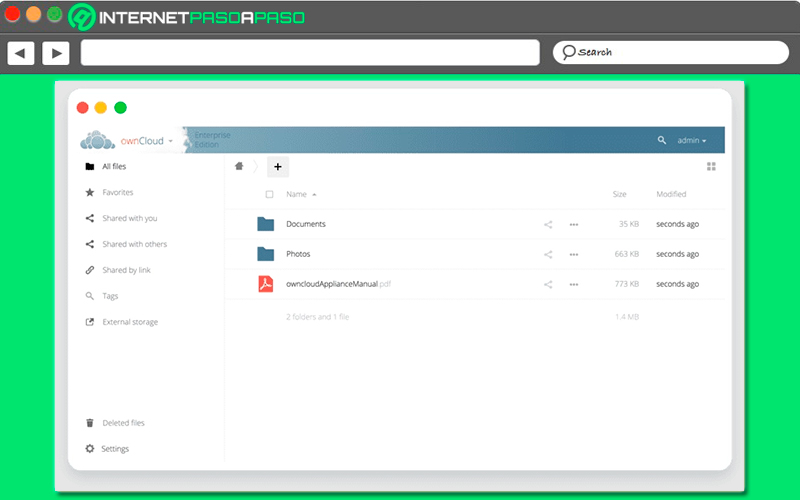
One of its most basic functions is uploading and downloading files. It also has a very well developed interface that will make it easier for you to use it. It is important to mention that OwnCloud It will synchronize all the files and folders with all your devices, so you will have the opportunity to access them in a very simple way and from anywhere.
Likewise it will give you the possibility to connect to other storage services such as Dropbox and Google Drive. Finally, this storage tool will allow you create your own server in the cloud with your Raspberry Pi, so you will be able to have your own space to save all kinds of documents and files, as well as the possibility of sharing files with other users in a safe and easy way. In addition, all this will provide you with a backup of all the information that you handle.
Aspects to consider What should we consider before turning Raspberry Pi into a custom cloud?

Before starting to create your own server in the cloud with Raspberry Pi, it is important that you take into account some aspects that will help you decide if this is what you really want or not. That is why here we are going to show you what they are the benefits that all this offers you and what are they the disadvantages of the same, this way you can put everything on a scale and consider if it is worth it for you turn your microcomputer into a personalized cloud.
Go for it:
Advantage
This file hosting web application allows users to create a personal repository, which they will be able to access from any browser from different devices. Includes a data sync and also offers different functions such as calendar, agenda, music reader, text editoramong others.
In accordance with all this, here we are going to leave you some of the advantages that this offers:
- OwnCloud allows to carry out a customization and configuration within the platform, so each of the system elements can be designed to be adapted to the needs of each user.
- Not only does it directly offer you the storage servicebut also serves as a connection interface with other cloud services such as Google Drive and Dropbox.
- It has different modules. that will allow you to add a great variety of tools and functionalities to your cloud service. While other storage services do not offer the possibility of install modules.
- You will also have the opportunity to share OwnCloud content with public urls, It’s features have become one of the best advantages of this platform, since the other cloud programs do not allow it.
Disadvantages
Installing Owncloud on your Raspberry Pi can also cause some disadvantages that are important to take into account and which we will explain below:
- We can say that the main disadvantage that all this offers is that it is 100% dependent on the Internetwhich means that to guarantee its operation all the time, your raspberry pi must have access to the Internet all the time either through Ethernet cable or Wi-Fi.
- Another disadvantage that can be mentioned is difficulty of its installation which can be somewhat complexespecially for those users who do not have advanced technology skills.
Learn step by step how to install OwnCloud on a Raspberry Pi mini PC from scratch like an expert
If you want to start turning your microcomputer into a cloud server, then you should know that the process of OwnCloud installation it is quite simple. However, as a fundamental requirement for this, it is necessary that you have operating system on the Raspbian board. So if you already have installed Raspbian on your Raspberry Pi boardthen the first thing you should do before starting the installation process is the Raspbian APT package repository cache and package update.
To do this you must apply the following command:
Sudo apt update
After this you will have to update all new software packages that have been detected in Raspbian.
Only for this you will have to execute the following code:
Sudo apt upgrade.
Add OwnCloud package repository
You should keep in mind that OwnCloud is not available in the raspbian Repository, so you will have to add it to your system as follows. The first thing you will have to do is download the gpg key from the repository OwnCloud packages.
To do this, type the following command:
wget -nv https://download.owncloud.org/download/repositories/production/0/Release.key -O Release.key
The next thing will be to add the download key to the system with:
Sudo apt-key add - < Release.key
When you already have the key added to the system, the next thing is to add the OwnCloud repository to our system.
This is going to be added by running the following command:
echo 'deb http://download.owncloud.org/download/repositories/production/Debian_9.0/ /'| sudo tee /etc/apt/sources.list.d/owncloud.list
After adding the repository, the next thing to do is run the package update commands and the repository listing with:
sudo apt updatesudo apt upgrade
In the event that a selected message appears with wpasupplicant you just have to type the letter q, and at that point the installation will have to continue.

When everything is updated and the application is already installed, the next thing you should do is restart the Raspberry Pi by applying the following command:
sudo reboot
Installation and configuration of Apache and MySQL
Keep in mind that OwnCloud is a web application running on the LAMP stack, so you need a configuration of LAMP server fully functional before you can carry out the OwnCloud installation. In this case you can install Apache, PHP, MariaDB and some extensions PHP on Raspbian.
To do this you will have to apply the following command:
sudo apt install apache2 libapache2-mod-php mariadb-server mariadb-client php-bz2 php-mysql php-curl php-gd php-imagick php-intl php-mbstring php-xml php-zip
The next thing will be to execute the following command so that the Apache mod_rewrite module can be enabled:
sudo a2enmod rewrite
At this point, the following will be to log in to the MariaDB console as the root user, to do this you must enter the following command:
sudo mysql –u root –p
By default of the procedure, none will be established. mariadb password.
When you have already entered, then you will have to create the database with:
MariaDB [(none)]> create database owncloud;
Next you are going to create a new MariaDB OwnCloud user and you must set a security password for the user with the following query:
MariaDB [(none)]> create user 'owncloud'@'localhost' identified by 'tu-password'
Here you can replace the password (your-password) and the username (owncloud) by the username and password that you want.
The next thing will be to give the permission to the newly created user by applying the following command:
MariaDB [(none)]> grant all privileges on owncloud.* to 'owncloud'@'localhost';
After this you will have to exit MariaDB using the following line:
MariaDB [(none)]> exit;
Configure Apache
Once you’ve done the steps above, the next thing you’ll need to do is edit the Apache default site configuration file using the following line:
sudo nano /etc/apache2/sites-enabled/000-default.conf
Then you go to look for the line DocumentRoot/var/www/html and this will change to DocumentRoot/var/www/owncloud. Now you are going to have to save all the changes made by pressing the keys “Ctrl + O” and then to close press the keys “ctrl + x”.
Here you will have to execute the following command:
sudo apt install owncloud-files
Subsequently, the Apache 2 service will have to be restarted by applying the following command:
sudo systemctl restart apache2
Configure ownCloud
At this point you will have to configure owncloud, for this you will need to know what your IP address is, for this you must write the following line:
ip a | egrep <inet>
if you will generate an IP, which you will copy and paste into a web browser in the address bar. By accessing there you will be able to configure OwnCloud for the first time. Here you will be asked to create a username for the adminin the same way you must establish your access password.
If you want you can modify the default data directory of OwnCloud/var/www/owncloud/data by the one you want or just leave it like that if you want. Then you must put the username of the database that was created a few steps before. And then you will have to log in with the username of the OwnCloud password that you have created and ready. When you have done this you can start using OwnCloud on your Raspberry Pi.
Raspberry Pi Cloud Security with OwnCloud How can I improve the file security of the space I just created?

Safety has become one of the most important aspects for OwnCloud, which is why being able to install this server in the cloud as your own data center will allow you to manage it according to your policies and configure it to support your processes. It will also offer you a encrypted storage that will guarantee that all your files are protected.
You will also have the possibility to share all your encrypted files with those users who need access. In this case the file firewall will check all access requests, regardless of whether they follow the rules that have been established by the administrator.
This entire protection system is divided into two parts, which we explain below:
Security and encryption
It is no secret to anyone that security is one of the most important points in this type of serverssince a large amount of data and important information will be stored there.
This is how OwnCloud offers several important points in relation to this:
- Leverage existing storage systems (Monitoring, backup and recovery): This web application uses existing storage systems in order to provide additional file management capabilities, including monitoring, recovery, and backup.
- Use of existing processes, procedures and tools: It is responsible for using the entire store of available objects, so the software runs them on the servers in the data center, subject to administrators’ trust control.
- Using existing database: This program needs a database to store the metadata for files and users. Thus, with the support of the SQL Leaders database, customers have the opportunity to choose the database with which they are already familiar with the supervision and administration.
- Adherence to existing security policies: If you have an on-premises solution, there is no need to redefine your security policies and governance processes from scratch as they can be easily integrated into your existing IT framework. In the event that data requirements increase, the solution will be scalable and can be extended by the IT department. In this way OwnCloud will not access your private information and will not be able to influence your existing processes and regulations.
- Integration with existing infrastructure security: OwnCloud is characterized by leveraging existing security infrastructure, MDM, DLP, monitoring, event logging and backup system. They can also integrate with any object store such as S3 or SharePoint, and use APIs to easily integrate with tools.
Security controls
Security controls are other important aspects that must be taken into account, this is how we are going to show you which are the most important:
- User admin permission: Note that user-level or file-level permissions are used to specify when and where files can be swapped. In this way, access to files will be able to be controlled at multiple levels through password protection and the configuration of an expiration date.
- firewall: It serves as the policy engine for the OwnCloud instance, denying access to files in the event of a violation of established standards. The administrator configures rules and operators based on the attributes of an access request. This way the results of a rule check can be stored in the web application’s log file for reporting purposes.
- encryption: This cloud application is characterized by providing encryption in two levels, one of them to transfer data and the other to store data on the server. In this way when transmitting, clients can encrypt data using SSL and have the ability to manage your keys in the company’s own keystore, as well as read and write access to files in OwnCloud.
- Key management / Choice of algorithm: Most cloud programs tend to manage their keys in the cloud, which can increase the security risks of the cloud itself. In this case OwnCloud has the ability to manage your keys in the corporate key store. In the same way you can create your own key manager as well as create an application that allows you to use your internal encryption solution.
- File integrity check: This is done to prevent transmission errors and thus ensure the integrity of uploaded and downloaded files, where they are automatically checked by comparing their unique checksums before and after transmission.
- Registration / Audit: Not only will you have the opportunity to control the access rights of individual users, but it also supports a full audit trail. This way you can understand exactly how, when and where your data is accessed and with whom it is shared. Using an app, administrators can log account-level activities, such as the number of logins to OwnCloud or use of server files.
So all this It will provide administrators with all the information necessary for reporting compliance and being able to audit cloud usage. Likewise, it allows monitor all file sharing activities.
Computing