Index:
UPDATED ✅ Do you want to learn how to create your own labels in Microsoft Word? ⭐ ENTER HERE ⭐ and discover how to do it FROM SCRATCH!
word tags are one of the most unknown functions that the word processor has. It allows you to have, with a few steps, all the data of a contact and send them to print.
Users can save a lot of time with this feature. who need to work with people’s names every time they want to send personalized information.
If you want to know how you should use this tool, we invite you to continue reading this article. We will show you step by step how you should create labels in a simple way.
Advantages of tags Why should you start using them in Word?
The advantages of using this tool is that you don’t have to go to Outlook, find the name of the contact, copy the data and then paste it into the Word document. All this can be done by creating a label with the name of the person in a simple way.
with smart tags you can schedule a meetingopen the contact to find out who it is, what the address is and many other functions that can be performed with a single click.
The document can be closed without any problem and when opening it they appear previously. This way any user who opens the text will know about the existence of smart tags.
Steps to create your own labels in your Microsoft Word documents

The steps you will need to take to create your own labels in Word are as follows:
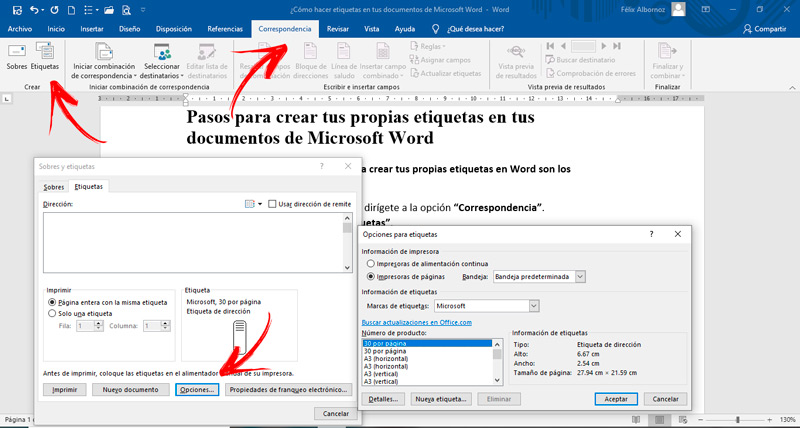
- Open your word processor and go to the option “Correspondence”.
- Then tap on “labels”.
- Choose “Options”. At this time you will have to choose a supplier and a product that you can use in your labels.
- When you have chosen the best option for you, you will have to click on “To accept”.
- In case you want to make a personalized label you will have to click on “New label…”.
- Address and all the data you need to have. You must bear in mind that it will only have to be text, so you cannot include images or any other additional element.
- If you prefer, you can search for a contact’s address using the option “Insert address”. This will cause the status to be opened with all the users that they have registered in Outlook.
- To customize the font style, you will have to click on the right button and choose the type of paragraph or letter that you want to configure.
- When you have finished you will have to click on “To accept”.
- Choose the option “Entire page with the same tag” and click on it.
- Click on “To print” when you have everything ready.
In case you need to deactivate a tag you will have to go to “Tools”then you must click on “AutoCorrect Options” and to finish click on “Smart Labels”.
If you are looking to hide the labels so that the purple dots do not appear, you will have to go to “Tools”then “AutoCorrect Options” and click on “Watch”. You will notice a box called “Smart Labels” under “To show”you will have to enable or disable it so that you can have the action you want.
When you want to save or discard a label you will have to go to “Tools”, “AutoCorrect Options” and click on “Save”. Then choose “Options” when saving to enable or disable the Embed Smart Tags checkbox. If you want to do it in XML format, you will have to follow the same process, but activate the box “Save smart tags as XML properties in web pages”.
Another of the functions that you have is when you want enable or disable labels for emails. For this case you will have to go to “Tools”, “AutoCorrect Options” and select “General”. Click on “Email Options”choose “General”later “HTML Options” and active or not “Save smart tags in email”.
Lastly, you will be able to remove the URLs from the tags. For this you will have to go to “Tools”select “AutoCorrect Options” and click on “Security”. Then choose “Privacy Options” and enable “Remove personal information from this file on save”.
Computing