Index:
UPDATED ✅ Do you want to know more about how to activate draft view in Microsoft Word documents? ⭐ ENTER HERE ⭐ and learn everything FROM ZERO!
It is no secret to anyone that, for many years, Microsoft Word has been considered the most used word processor in the world, due to its remarkable recognition and all the functions it facilitates. Well, thanks to the improvements it has adopted in all its versions, it can be estimated as a very complete program.
Thus, it is the main tool that people use to create, edit, personalize and manage your digital documents. Especially because they know they can get quality results. Like, because of the functions available for simplify the processes of creating texts.
That is why it has a section known as “Document Views” that brings benefits to all its users, depending on what they need to do. One of the most useful view types is known as “Eraser” and it’s worth knowing what it is, plus how you can activate it in Word.
What is draft view in Word documents and what are the benefits of turning it on?
First of all, before proceeding to explain each of the steps that need to be carried out when activating the draft view in Word, it is important to know what does it refer to and what are its main benefits for the writer.
In that sense, just as its name indicates, it consists of a view of the document that allows you to observe it as if it were a physical sketch or draft. For this reason, it is also known as “project view” and, of course, it offers the possibility to quickly edit or modify the text.
In this way, the draft view is responsible for hiding the vast majority of the elements of the document in Word, with the main objective of simplify quick edits and at the same time, avoid being distracted by those design featuressuch as: headers and footers, borders, background colors, images, the left ruler bar, etc.
Thus, the draft view in a Word document provides excellent advantages when making changes to the text and/or checking its quality. Which are mainly:
- Guarantees greater comfort at workdue to an increase in the size of the characters and thus, you will be able to better visualize the exposed content to edit it.
- In addition to comfort, it also allows ensure notable time savings when carrying out any editing process. This, thanks to the disappearance of several elements that can lead to distraction, by default.
- Given that it facilitates the interpretation of the document, it allows exhibit greater professionalism in the samebecause it will be easier to strengthen its technical aspect.
Steps to turn on draft view in Microsoft Word documents

Now, if during the preparation of your digital writing in Word, at the time of editing it or for verification before printing it, you want to make use of this type of view in the program; you need to know how to activate it correctly. Reason why, in this part of the post, We proceed to mention each and every one of the steps to be carried out for this:
- To start, you have to find and enter the Word document you need to edit via draft view.
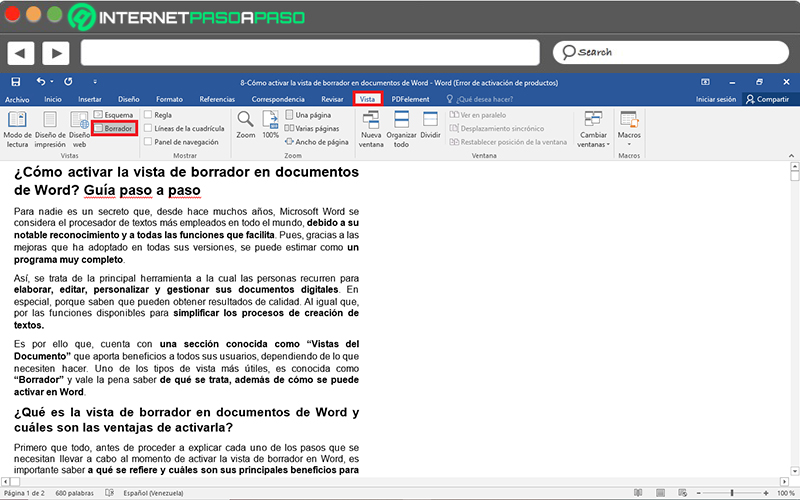
- After that, from the main window of the program, go to the options bar at the top and click on the tab called “View”.
- Once you do the above, they will show you several groups of options and among those, locate yourself in the Views part (the first box you see).
- At that point, you’ll see every single type of view there is in Word, and in this case, You must select the option that indicates “Draft”.
- Now, automatically, your document will be displayed in draft form and there you have the possibility of use all available functions to edit it.
Computing