
Index:
UPDATED ✅ Do you want to use your Raspberry Pi as a Wake on LAN server and why? ⭐ ENTER HERE ⭐ and Learn How FROM ZERO! ⭐
Yes you are one of the users who likes to access their computers remotely from Raspberrythen you can start doing itall this thanks to Wake on LAN.
In this way you will be able wake any PC that is linked to your Raspberry Pi remotelyyou can do this from Internet or from the local network. So you won’t have to keep your PC on to access files remotely.
It’s like this here We are going to show you how you can carry out this project and start using your microcomputer as a Wake on LAN server. in an easy and fast way.
What is a Wake on LAN server and what is this tool for?
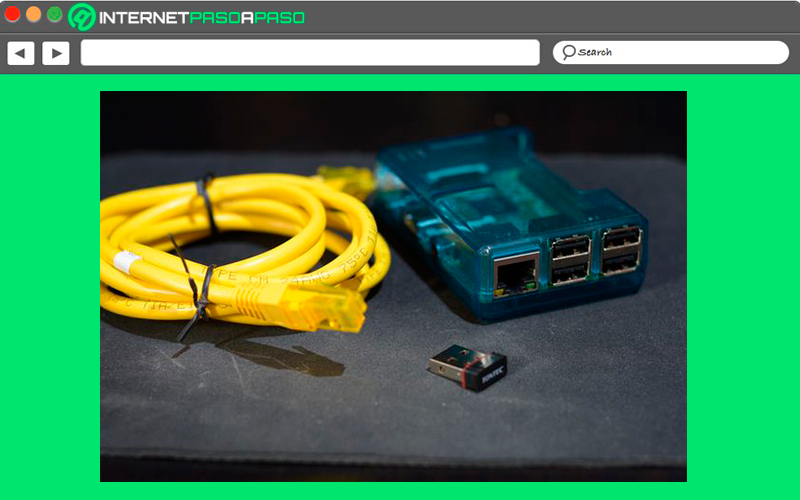
Today not all users are aware of these types of servers, but they refer to a technology that will allow you to turn on a computer remotely by local network. All this has become something really useful for most of the users, since they have the opportunity to turn on a computer from anywhereas a requirement for this is that both are connected to a local home or professional network.
All this has allowed those people who have a raspberry pi they can turn it into a Wake on LAN server and in this way begin to control the other nearby devices and your local network. It is a function that provides great utility both for companies and for any user in particular. Currently you can find a large number of tools that will allow you to control your PC from a mobile device, a tablet or a Raspberry Pi from anywhere in the world.
To be able to achieve all this, you only need one Internet connection. It is important to mention that in order to achieve all this it is necessary that the computer is connected to the electrical network, since if the equipment is turned off it will not be possible to control it from anywhere. This is where the operation of the Wake on LAN server. Therefore, Wake on LAN allows you to turn on a computer remotely, with the requirement that the computer be on the same local network.
here you will need send a packet to the network card of the computer to wake upfor this it is necessary that the operating system as the BIOS/UEFI of your computer support Wol, if not, then can’t turn onsince at opening the package will do absolutely nothing about it.
In this way the power on the computer It can be immediately or with a program, so it will be programmed to turn it on. Finally, this server helps you control the power on of any of your devices that are connected to your local network. raspberrypi, so this microcomputer can become your best Wake on LAN server homemade you can have.
What do I need to set up a Wake on LAN server on my Raspberry Pi?
if you’re thinking about turn your Raspberry Pi into a Wake on LAN server, then you must keep in mind that you will need to have several requirements to be able to carry out this setting.
Luckily, these requirements are quite simple to meet, which we show you below:
- The first thing is to have a computer that is always on with Linux in your local Internet network that will generate the scheduled packets.
- That the target computers have the option to power on via Wake on LAN and enable this option in BIOS of those teams.
- A Raspberry Pi with a Ethernet port and WiFi connectivity.
- An image of Raspbian Jessie.
- A Ethernet cable.
- A computer that has a LAN port and what support Wake on LAN, currently most of these machines comply with it.
- Finally, you must have between 10 and 20 minutes of your time to carry out this configuration.
When you meet all these requirements, then everything will be ready for you to start with the configuration of your microcomputer to turn it into a home Wake on LAN server.
Learn step by step how to configure your Raspberry Pi as a Wake on LAN server from scratch like an expert
If you already have everything you need to start with this settingthen all you have to do is start following each of the steps that we are going to explain below so that you can create your own server from scratch like an expert.
To do this, follow in detail each of the steps that we are going to indicate during the procedure:
Setting
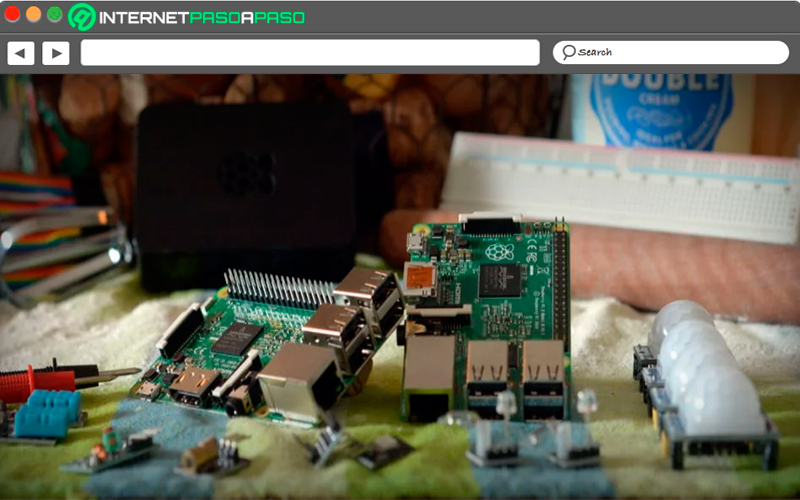
The first step to be done is the setting, In this case, it is about developing both a physical and software configuration.
To do this, just follow each of these steps:
Make the physical configuration
It is a fairly simple procedure to do, keep in mind that the lan cable It has two ends, so one of them must be connected to the port LAN of your PC with WOL supportwhile the other will go connected to the Raspberry Pi. After this you should turn everything on.
Perform software configuration
If for some reason you have never connected a raspberry pi to the computer, then you can do it by following each of these steps.
Prepare the computer
If what you are looking for is share your internet connection with the Raspberry Pi, then you will have to be a bit more strict with the IP selection. If for example, your local IP is 192.168.1.7then your address will start with 192.168.xxx.xxx- then you must go to your Internet connection adapter, select the properties and then you must click on “Share”.
Here you will have to share this connection with the one you will use your Raspberry Pi. Next, a message will appear indicating the IP address that will be assigned to the ethernet port. This is going to be something to start with 192.168.xx. In the case that your IP has not been assigned automaticallyyou will have to go to the network and sharing center, then click on “Change adapter settings.”
Here you must change the properties of the adapter and select the network protocol version 4 (TCP / IP) and then select the manual configuration and write the IP as follows:
Dirección IP: 192.168 . 137,1 subred máscara: 255.255. 0.0
Prepare the SD card
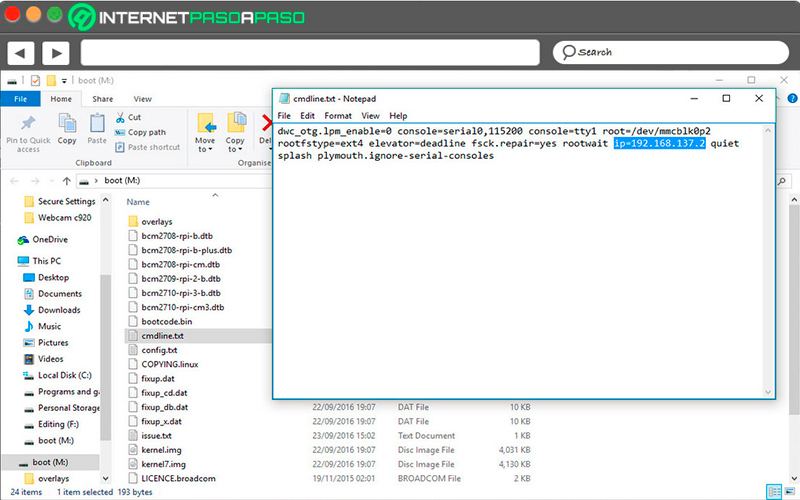
Necessary force an IP when the microcomputer is loading for the first time. To be able to do this it will be necessary to open a file in a boot partition of the card, then you are going to connect it to the computer and open the partition and then look for the file “cmdline.txt”.
Here you are going to add the following line to the cmdline.txt:
192.168.137.2
It is important that you make sure don’t create a new line when doing it. The entire file must be kept as a single line. Then you must save the file and remove the team card and connect it to the raspberrypi, Then you will save all the changes. This way you will be ready to start.
Connect
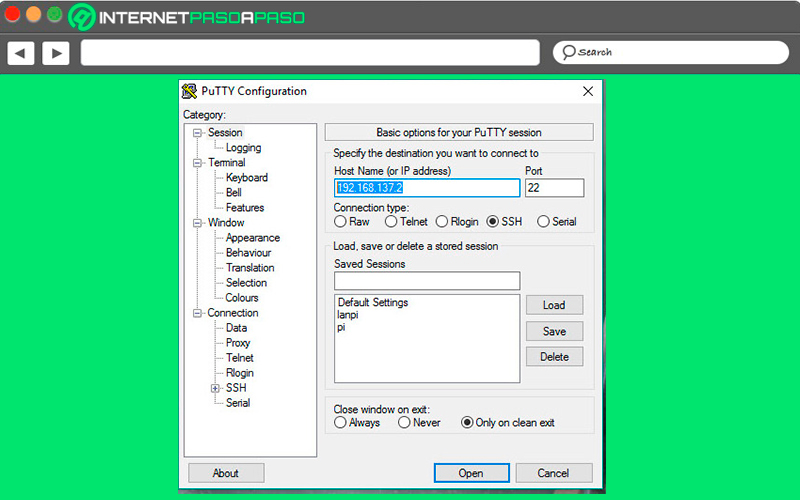
At this point you will have to connect the Ethernet cable to the Raspberry Pi and your PC, then you must turn on the Raspberry Pi and wait until the network stops identifying it. When the connection has been established you will have to open Putty. There you will enter the IP address used in cmdline.txt and then you will have to connect to the port 22. This is if it is the first time it is connected to the board and everything is configured by default.
The next thing is going to be to insert the credentials of the board:
inicio de sesión ( predeterminado ): contraseña Pi
( predeterminado ): frambuesa
When you have all this done, it is best to assign a static IP to both Wlan interfaces and Eth0. So if you already have the Raspberry Pi and static IP wlan and eth0then continue to the next step.
Wake on LAN – Enabled
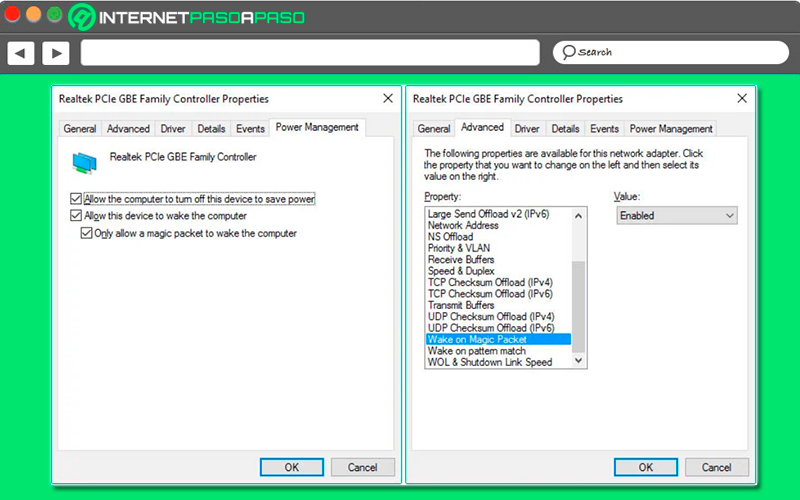
Here it will depend a lot on the network card that your computer hasthere are some ways to verify that the option is enabled, for this you must do the following.
BIOS
When the machine starts you will have to press the key “Delete”, this way it will start BIOS mode, this is where some of the network cards have some additional settings. For this you must check BIOS for Wake on LAN settings if you can’t turn it on from Windows.
network adapters
You are going to open the network configuration and there you must go to the list of “Network adapters”, then you are going to select your LAN adapter and then click on “Properties”. Inside the tab “Power Management” you will find some options to allow Windows to wake or put your computer to sleep and to be able to enable Magic Packet, It is important that before closing you make sure that everything has been enabled.
Advanced
It is possible thatFind some additional settings of the network card in the advanced tab. You can also find options regarding Wake on LAN and Magic Packet. It is important that you make sure they are enabled.
Raspberry Pi Side of Things
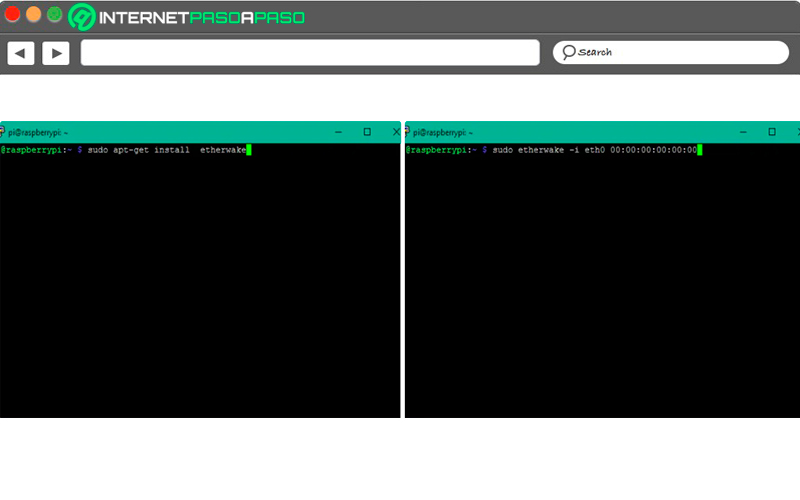
For the RPI configuration You will have to do it as indicated in this link: http://www.notenoughtech.com/raspberry-pi/raspberry-pi-static-ip/. In this way your microcomputer will have a link via LAN with the computer, but it will use a wireless connection to connect to the Internet. This is very important since you have to force the magic pack to go through eth0 instead of Wifi.
The best way to be able to do that is by using etherwake through the following command:
sudo apt-get install etherwake
When it is already installed, the next thing will be to go to the computer and write down the MAC address of the LAN adapter to which it is connected RPI. Here you will have to click on the details of that connection to reveal the IP and MAC which will be numbered as AA: BB: CC: DD: and so on.
In this way, the command to reactivate the computer is as follows:
sudo etherwake -i eth0 AA: BB: CC: DD: EE: FF
Note that this method requires sweat, but it will allow you to specify the interface, which is what is wanted. So you will need to issue this command via SSH or write to the terminal every time you want to wake up the computer.
Only if you want you can save it as a bash file (save it as Wol.sh):
#! / bin / bash <br> sudo etherwake-i eth0 AA: BB: CC: DD: EE: FF
And then open the file with the following line:
sudo bash /path/to/file/wol.sh
Internet boot
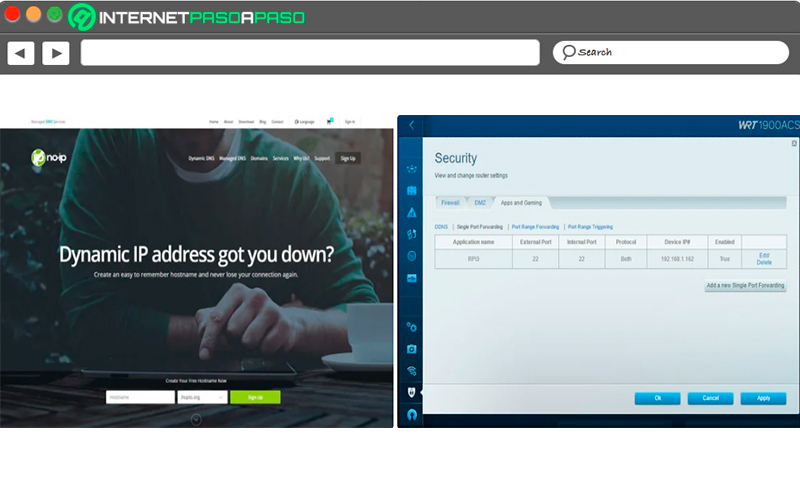
In the case that you do not need to wake your computer from outside your local network, then you can move on to the next step. On the contrary, you will need to perform the steps that we are going to indicate below. Previously it was mentioned that the most advisable thing was to have a static IP for Wi-Fi and LAN. By having this like this you can expose the SSH port on the router and forward it to the RaspberryPi.
It may sound complicated, but it really is very simple to do:
router
You’ll need access to your routercurrently most of them have the port forwarding option. So you’re going to have to log in on your router and once there you should go to the settings for port forwarding.
If you want to forward port 22 and forward it to the WiFi IPthen the most recommended is reserve IP in DHCP configuration to ensure that other devices cannot take your IP when your RPI is offline. This option can be found on most routers.
Now if your external IP changes frequentlythen it is necessary to have a DNS server in order to speed up the process. will allow you to assign a Fixed name to IP address. This means that if your address changes, DNS will update the IP automatically or manually and that way it could connect.
Activate everything by means of a button (Optional)
There are two ways to speed up the activation processin this case we are going to submit the hard way and one a little more complicated.
To do this, follow the steps that we will indicate below:
the hard way
For this case you’re going to have to open a terminal type SSH clientmay well be putty for PC and JuiceSSH for Android, among others available. There you will send the command to reactivate the PC or to open the bash script.
an impressive path
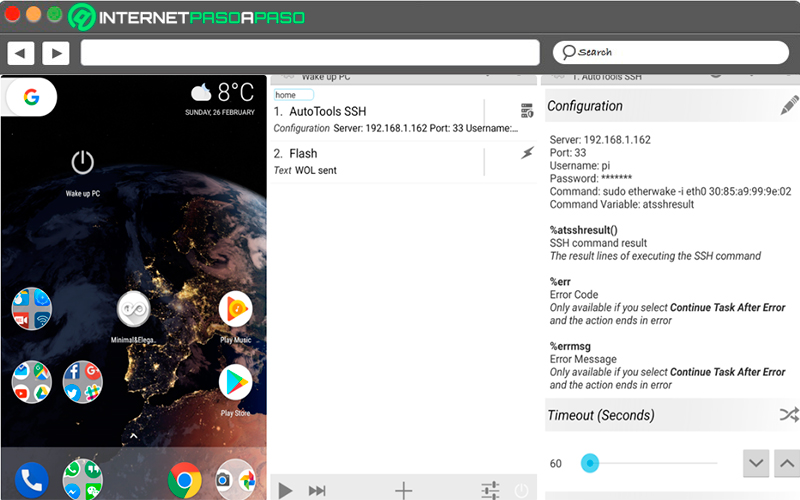
In this case it will work with tasker, an application that will allow you to do the things that are most difficult automatically. Here you can create mobile buttons, create voice controls, among others. There is a plugin known as Auto Tools which will allow you to send the SSH command to the Raspberry Pi.
Therefore, to create a task in Taskeryou must add an action, in this case a plugin AutoTolls SSH. Now on the configuration screen you are going to add the details. If you want to use the WOL in the local network, then you must use the local IP, otherwise you will use the DNS.
Here is the description of the task:
Despierta PC (24)

A1: AutoTools SSH <br> [Configuración: Servidor: yourdns.ddns.net <br> Puerto: 33 <br> Nombre de usuario: pi <br> Contraseña: ******* <br> Comando: sudo etherwake -i eth0 00: 00: 00: 00: 00 <br> Variable de comando: atsshresult <br> Tiempo de espera (segundos): 60]
Here you don’t have to worry about the IF condition unless you are comfortable with it. Tasker, don’t add it. When you have created the task (Create one for the local network and one for the Internet), then assign the icons to each task and then you can choose a Widget (Tasker Task shortcut) so you can add the button to the screen. After you have done you will have finished with this procedure.
What is the best Raspberry Pi board to use as a Wake on server? LAN?
Nowadays, different models of raspberry pi boards available on the market, it can be said that the best today are their last two models, the Pi 3 and Pi 4, since both have much more power than any of the previous versions. However, the best of all for obvious reasons has been the last board released last raspberry pi 4, which is ideal to be used as a server.
In this way, here we are going to explain a little about what the Raspberry Pi 4 consists of and why it is the best for you to use as a Wake on LAN server:
Raspberry Pi 4 Model 4B
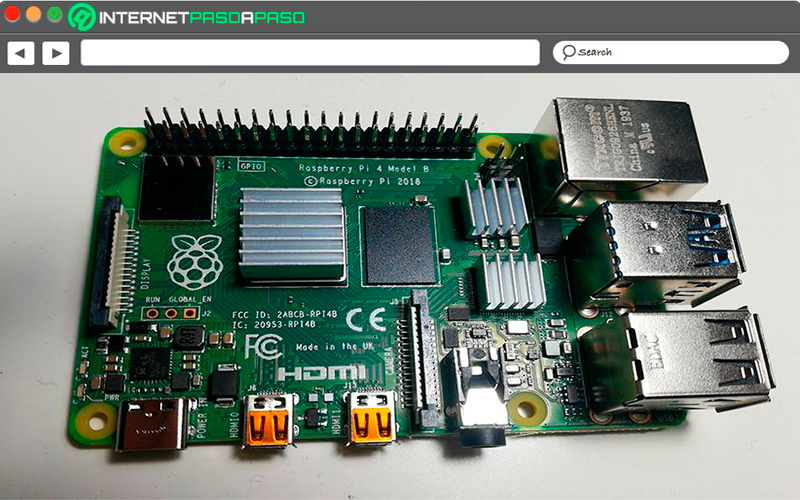
This plate model has become the most recent of all and in turn the Raspberry Pi More powerful. It offers higher performance than any of the previous microcomputers, all thanks to the specifications offered by its processor and its random access memory options, which can reach the 8GB.
All this allows this microcomputer to be used with more demanding programs in terms of RAM, such as the desktop computer format or to be used as a server, either a web server, Wake on LAN server, among others. One of its main innovations are its ports, since this new model has USB 3.0 AND 2.0 portso now this microcomputer will have a standard that offers greater data transfer.
In the same way it comes with two hdmi, which allows the doors to open to the support multi monitor. As for its graphics processor, it allows video output at 4k and 60 Hz refresh rate. And finally, it should be mentioned that this Raspberry Pi 4 Model 4B will have Wi-Fi AC networks and in turn has a Bluetooth 5.0 support.
Computing