
UPDATED ✅ Do you want to Burn a DVD with movies on Windows or Mac and don’t know how? ⭐ ENTER HERE ⭐ and discover how to do it ✅ EASY and FAST ✅
If you like to save moments or events to remember, apart from having the Images or videos on your mobile, computer or tablet, it is a good idea to keep everything in a safer place and thus not run the risk of losing your favorite moments forever. Although CDs or DVDs are no longer as common as they were some 5 years ago, They are still very useful for saving all kinds of files in digital format on a physical disk..
Despite the fact that many do not know it, saving images, photos, music, videos, documents or anything else on these disks is very simple. So if you have a computer with a DVD input and the files on your computer or camera, you can do it very easily regardless of the operating system.. In addition, CD’s and DVD’s can be recorded or burned either without downloading programs or in cases that require greater detail and configuration using a professional application.
in this walkthrough We are going to explain how to burn files to a DVD, quickly and easily, since, on many occasions, doing so is quite useful for work, fun or simply to keep a memory. You will see all the possible popular shapes so that you can choose the one that suits your needs.
Steps to Burn and Make a Movie DVD on Windows
While is true that Burning CDs or DVDs today is not as common as it was a few years ago. when it was necessary to watch movies, listen to music, deliver professional papers or study assignments, it’s still something a lot of people do. Perhaps you have wondered how to do it and because it is not something popular there are not so many tutorials on the Internet.
The truth is that on a computer with a Windows operating system of any version it is possible to do this easilybelow we explain methods with or without the use of third-party applications.
no programs
If you don’t want to download and install third-party programs on your computer to prevent it from causing problems or because you’re just going to make a recording, you can take advantage of using Windows Media Playerthe default file player in the Windows operating system.
This software in addition to playing music, videos, movies and other has a movie duplication and transfer system for playback from which you can easily burn the files to a disc. The process is somewhat long, but after doing it once, it is easier. Learn with the steps that we show you below.
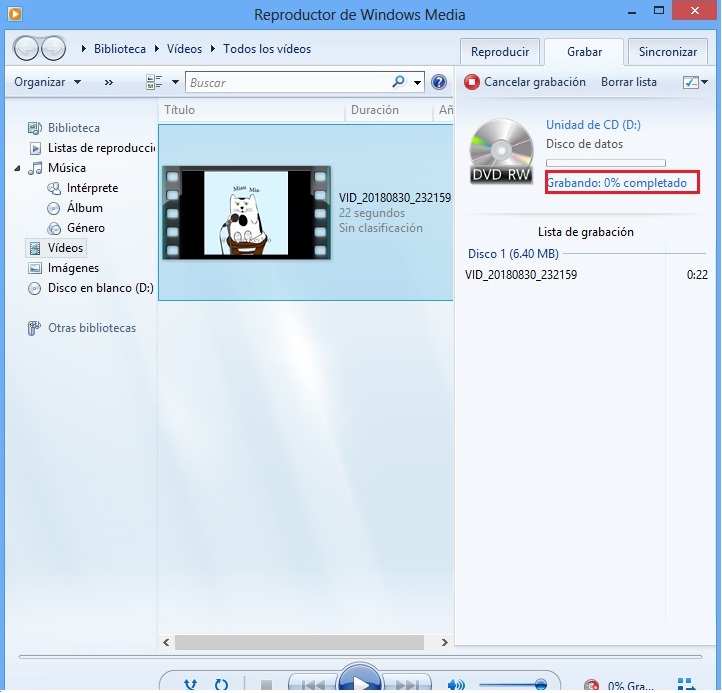
- Copy the file. Find the video and Images you want to “burn” to disc, select them inside the folder, right click and choose copy and then go to the windows videos folder and paste it.
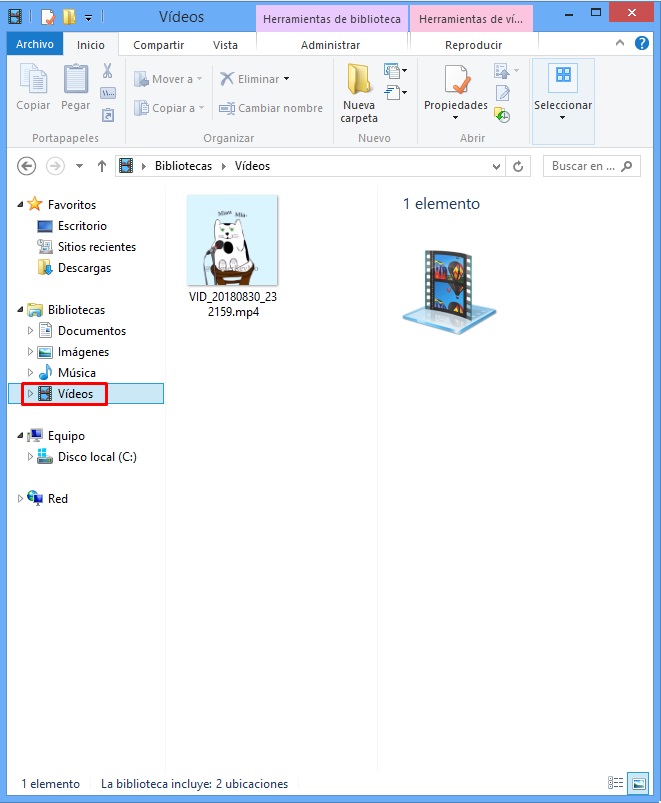
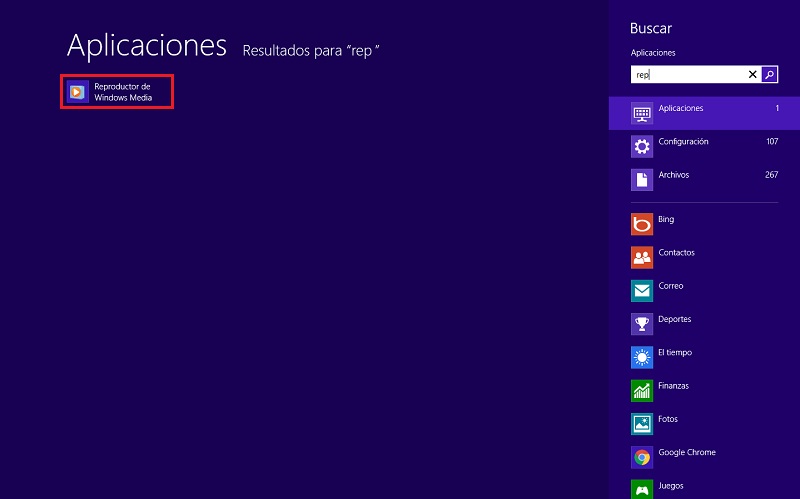
- Open Windows Media Player. Depending on the operating system and where you have the applications located, go to WMP, if you don’t get it look for it in the Start and open it.
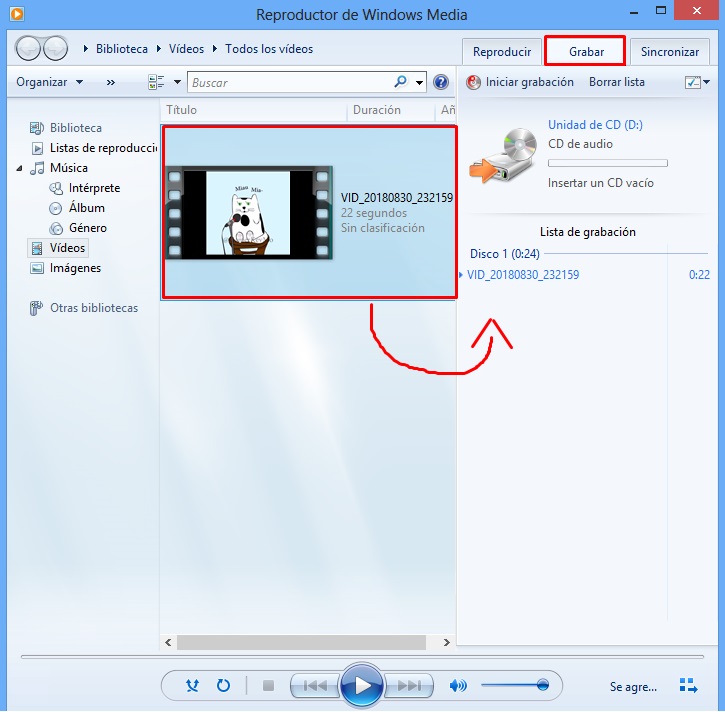
- Look for the category. On the left side you will find several categories between music, videos and images. Choose “Videos“, select the video you want to record and drag it to the record list.
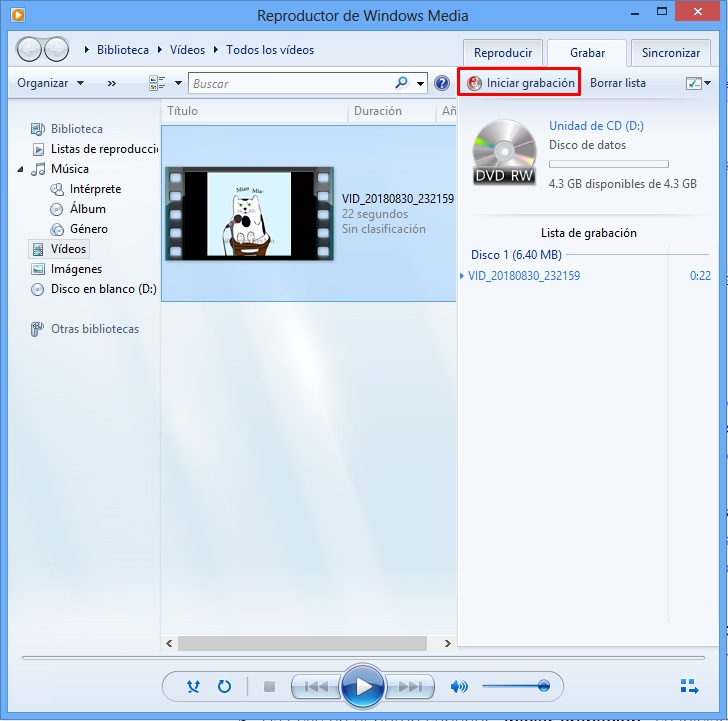
- start the recording. When the list is ready, click “Start recording” on the right side of the screen, it will ask you to insert the disk into the drive if you haven’t already.
- Ends. When the recording is finished, you remove the disc, test it to verify that it has worked and you can play it wherever you want.
With Nero Burning Rom
Nero Burning Rom, is a star application for many years. Since its inception it has accompanied various users providing good results and functions. Basically, this software is a data disc burnerthat is, an application that allows us to record CDs, DVDs, and Blu Rays. These types of media have been abandoned and have been replaced by thumb drives, large hard drives and cloud storage.
Nevertheless, has been able to respond to these changes by updating its platform and functions to go beyond being a disc burning tool and become a complete multimedia suite.. That is why this software is ideal not only for those who want to record images or videos on a disc, but also for those who want a more specific and professional job.
In Nero it is possible to record, edit and play all kinds of multimedia, it also seeks to centralize home content to make backup copies at home easily.
You can easily download and install the program on your computer and start using it. Once you have it, the steps to burn discs are as follows.
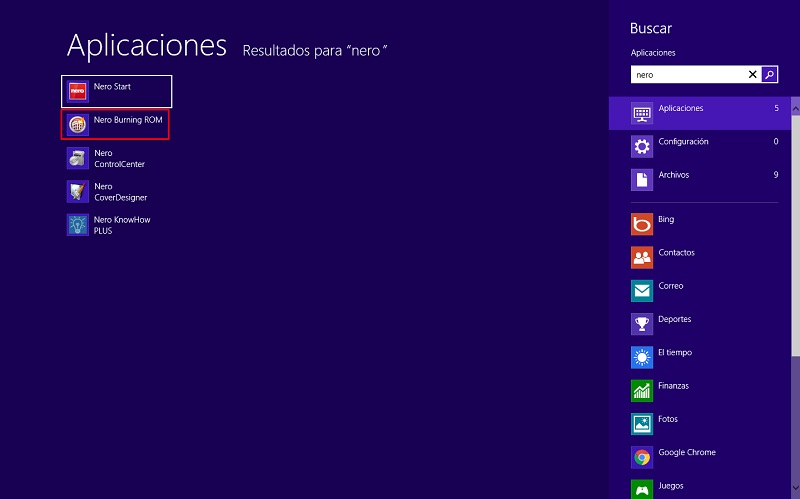
- open the program. Find Nero in Start or in the folder where you have it saved and launch it.
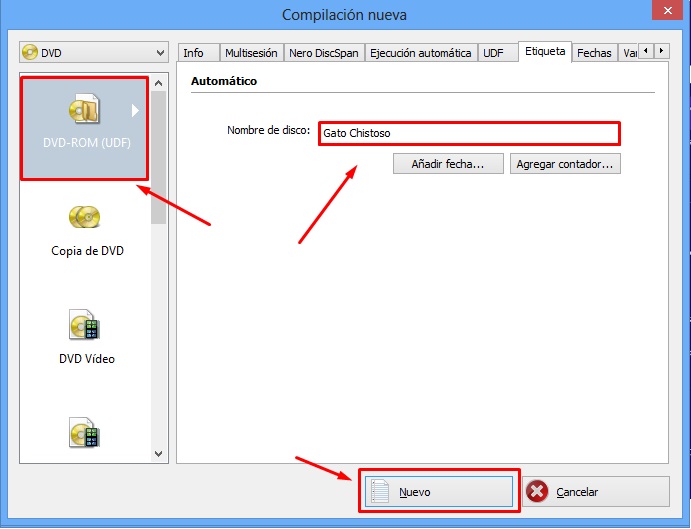
- Configure. When you open the program you can choose what type of recording you will make between CD, DVD or Blu Ray, you must also choose a name and finally click on the “New“.
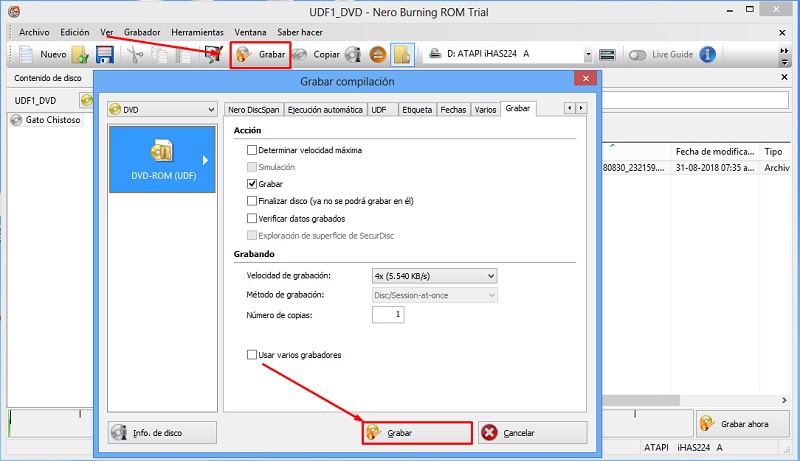
- Add the file. Press Select the file, find it and click to then choose “Engrave” at the top left of the screen.
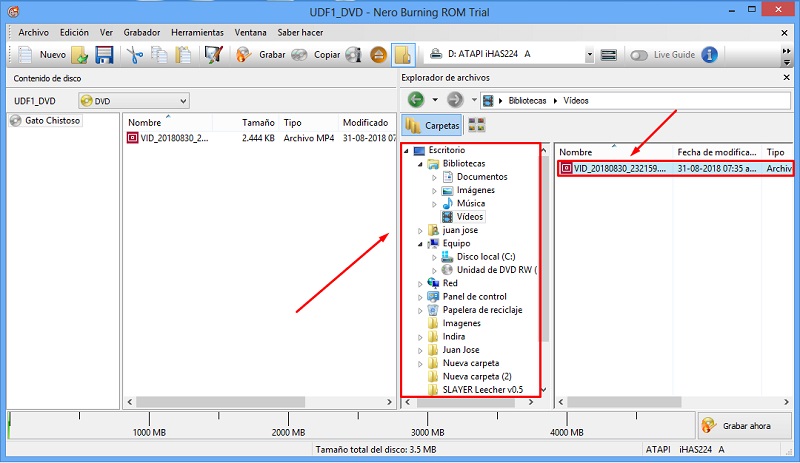
- Start recording. You will get a small window where you can apply certain settings, but in general leave the default ones and choose “Engrave“.
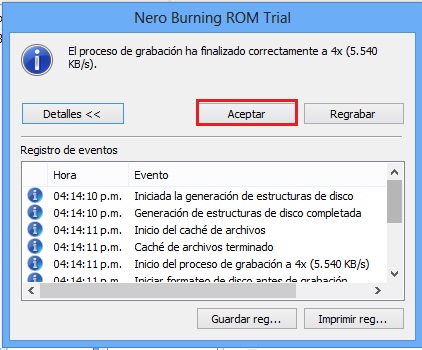
- Wait for the recording to finish. Now all that remains is to wait for the process to be carried out automatically and when it is finished the system will notify you with a message in which you must click on the “To accept“.
With ExpressBurn
Apart from Nero, which is the most recognized software for these things, we can recommend ExpressBurna recording tool with a free version that allows you to burn audio or data CDs quickly, as required. The result can be in MP3 or video versionsupporting several sessions on the same disc, rewritable CDs, no pause between recordings, using pause between tracks and normalizing the sound.
Secondly, the plus version allows you to burn DVD, Blu Ray, HD DVD and generate DVD video from files. Because of this and because of its good interface, it is an excellent method for this type of task. If you require its use, you just have to download it, install it, and follow the steps below.
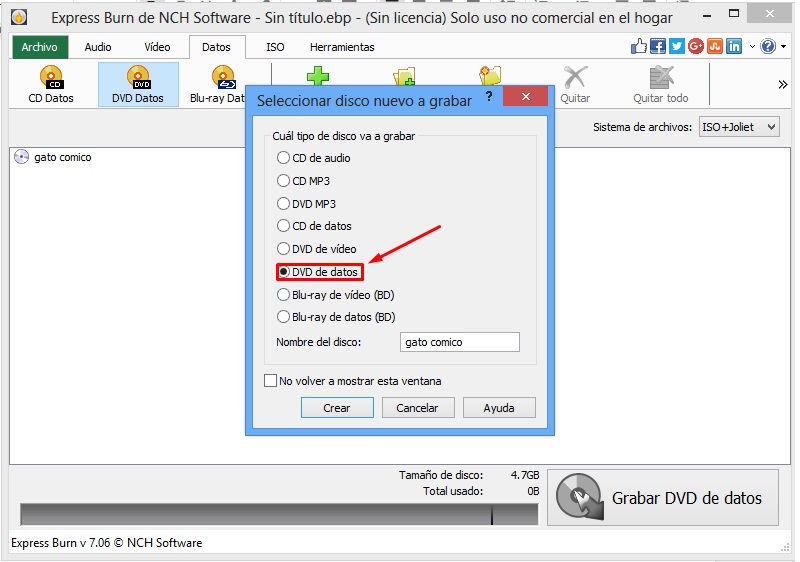
- open the program. Open and run the application, you will get a window like the one in the image and you must choose the data DVD option and press “To create“.
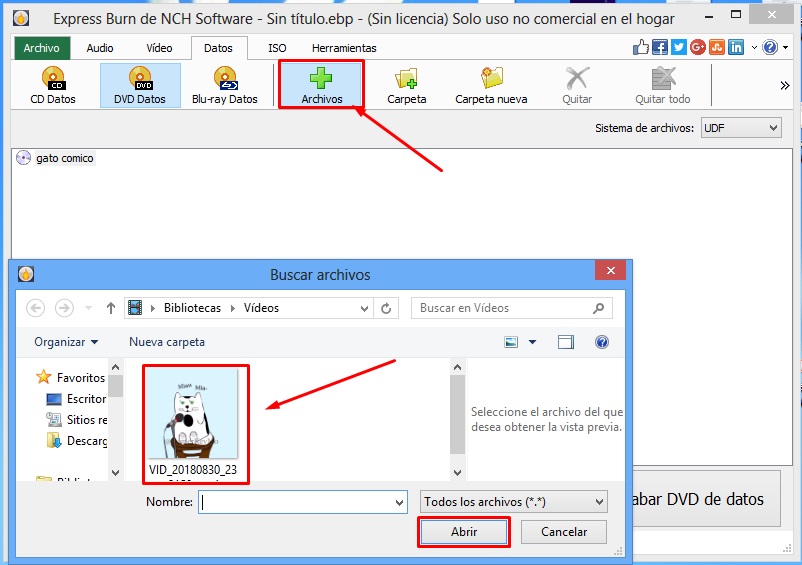
- Add and select the route. Click on “+ Files”select the path of the video you want to record and press accept.
- burn the disc. Press on “Burn disc” and on the screen that appears, leave the default settings, to continue click on “Save“.
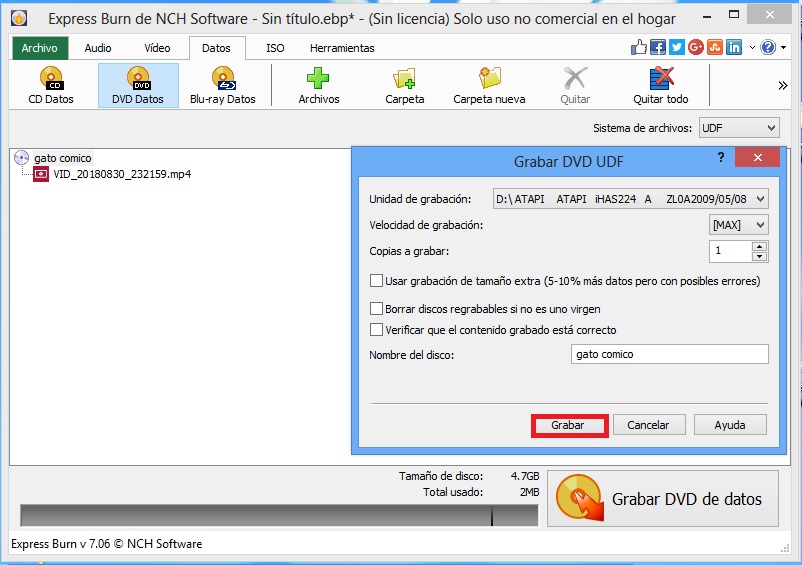
- Wait. A tab will appear on the screen with the loading process, wait for it to finish and it will be ready.

Steps to Burn and Make a Movie DVD on Mac
Apple computers work quite differently from Windows, and in the same way the programs and applications available also vary. So for those of you who have a Mac and want to record or burn a CD or DVD they must use modes other than those explained for Windows.
usually many search the internet for application options to do thisbut it is best not to install any that have not been tested, since it could malfunction or bring harmful consequences to the PC hosting a virus or malicious program.
Just like on Windows, this operating system incorporates a method for recording data on discs without using third-party programs, however there are also some pretty good programs with more functions. Here we show you how to do it both ways, so you can choose the right one for your purpose.
without using programs
To burn discs to CDs and DVDs on your Mac, all you need is your computer, the data you want to store, and your external DVD or optical drive. This built-in data recording operating system also allows you to share files in the cloudcreate backup copies and of course the result can be viewed in any other operating system. Just follow the steps below.
- Open the DVD. Insert the disk into the drive and open it with Finderthen copy all the files you want to burn.
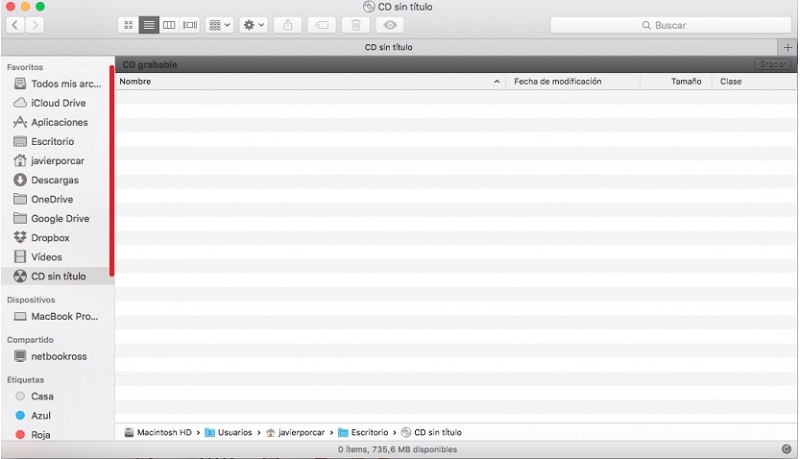
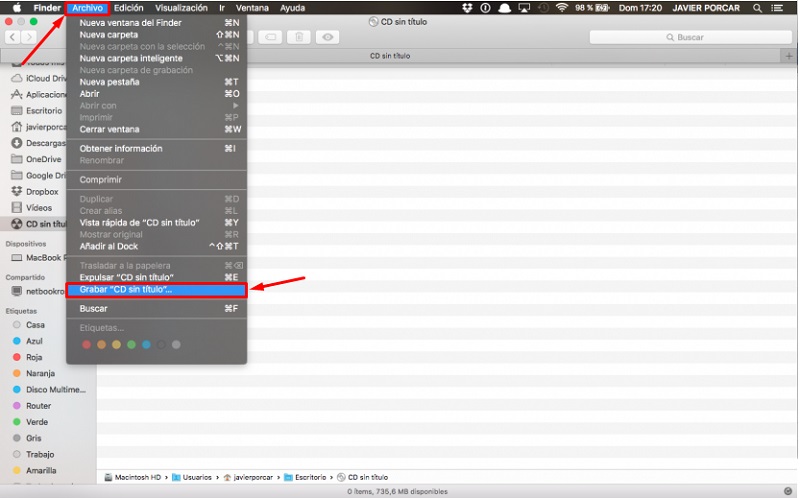
- Burn disc. When you have selected all the files, go to burn disc, press accept, wait for the process to finish and that’s it.
with Burn
The leading app for burning on Mac is Burn, is a complete multimedia recording and editing suite in which we can easily create a DVD from the cover designthe menu and add the videos or photos you want.
Despite the number of functions, this software is practical and simple. When you download it, the user interface is very intuitive and everything is reduced to a selection window, to choose the type, the format and finally the selection area of the files to add.
One of the advantages of this program is that it is open source and free, ideal for those who do not want to spend money, want a professional job and want their PC to be healthy. Here’s how to burn a DVD in Burn.
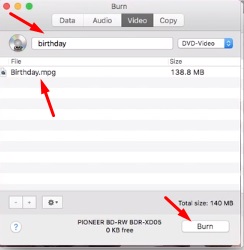
- Open the Program and choose the type of recording. Run Burn and go to the “Video“, located at the top. Within it, choose the type of file, in this case we choose “DVD“, then you must choose a name.
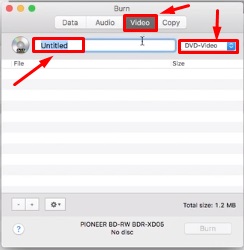
- Add the files. To do this, copy and drag them to Burn and when they are all click on Burn.
- Configure. Choose the speed, in which disk to burn and press Burn again.
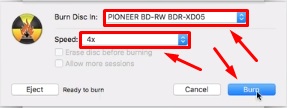
- Wait. Now you just have to wait for the burning process to finish to remove the DVD and use it anywhere.

Multimedia