Index:
UPDATED ✅ Do you want to know more about how to change the size of a table in Microsoft Word? ⭐ ENTER HERE ⭐ and learn how to do it FROM ZERO!
As everyone knows, Microsoft Word is a program par excellence for writing texts. But also it is possible to use table tools. While this utility is more powerful in the other program Office called Excelwe can use these tables for simple tasks.
The tables, are necessary and very useful tools when it comes to managing and categorizing content neatly and efficiently. However, it can sometimes be a bit complicated to modify.
If you need to know more about this tool and handle it like an expert, you should not miss this post. Here you will learn how make changes to the size of tables.
What aspects should I take into account before modifying the size of a table?
Before you start making changes to our board, it is important that you know a couple of key issues. One of them is that, just like text, boxes are always contained by the margins of the sheet.
Another thing to keep in mind is that the size of it is defined by the lines and not by the volume of the words or numbers they contain. That is, even if we have a cell large with a short word, the size will still be defined by the box.
In this sense, we must also say that, table lines can be invisible. As we mentioned before, the size of it will continue to be governed by the lines and not for its content.
Finally, we can add that, if there is outside and back form text to the table, this one will go “displacing” according to the modification. That is to say, that will behave as if the table were a paragraph. and to delete a rowa space will be removed whole document.
Steps to increase the size of a table in Microsoft Word
It may happen that when creating a table, notice that it is too small. Or the opposite of he has plenty of space and takes up too much of the document. For both cases there is a solution. And it is that Microsoft Word allows you to modify several parameters from the same. Between them, the size.
To learn how this modification is done, follow these steps:
Adding rows and columns
It is perhaps the easiest way to increase the size of your table. As long as you have content to fill in the blanks.
The steps to follow are those:
- Inside the documentgo to where the box is located.
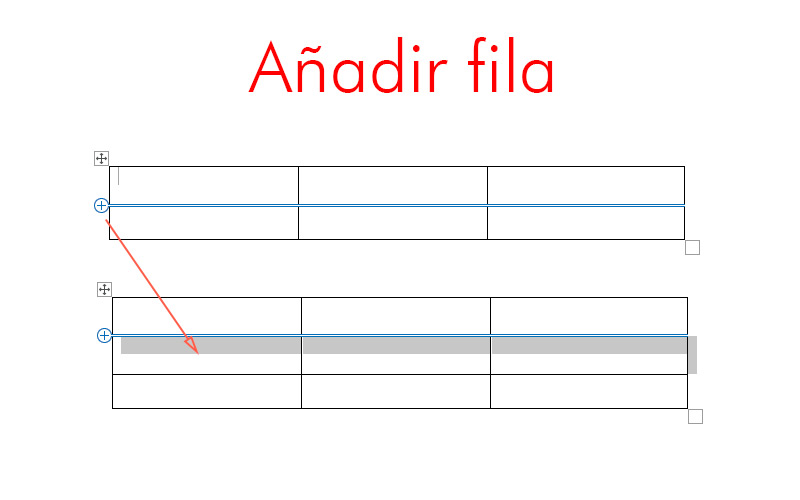
- If you need add a row plus, position the cursor on the outer edge of some of them.
- When you do you will see a circle with a “+” sign inside.

- clicking on it an entire row will be addedjust under.
- With this method you can add both inner and contiguous rows.
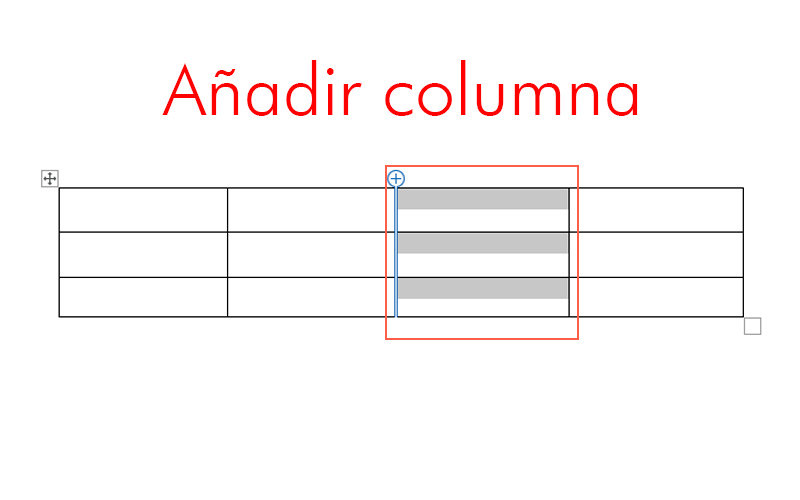
- In the case of whatever you want them to be columns the ones that join, do the same on the vertical lines.

If you think you do not have enough pulse to perform the previous methodcalm down, what there is another with the same result.
Next:
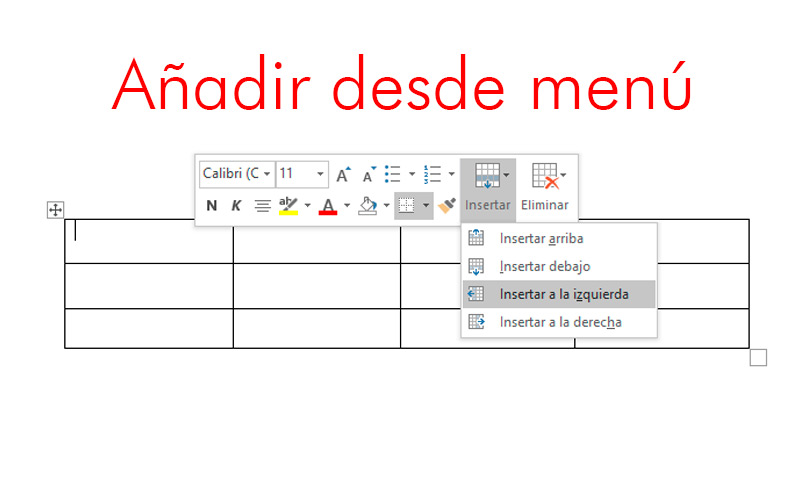
- Press the right mouse button on cell located at the end you need to add boxes to.
- When you do, they will appear two menus. The first is the traditional and contains text-specific functions. The seconda little smaller you will find the options of “Insert” Y “Remove”.
- Click on “Insert” and choose the corresponding option, which can be add columns or rows on both sides respectively.

It is important that you know that you are two alternatives they can only add new rows one at a time. That is, if you want add severalyou must repeat the operation as many times as rows and columns are necessary.
Increasing the size of the cells
If you need it, too you can specify a specific height and width to the cells. This as a whole will change the overall size of the table. Before continuing with the pstep by stepit is important that you know that the unit of measure used in the dimensions of these elements will always match that of Word.
To modify this, you will have to use the advanced options of Menu file. The changes made will also affect the margin rules.
Going back to the size, you must follow these steps to change the dimension of the cells:
- Create a table. You get this from the menu “Insert”section “Boards”.
- Define the amount of rows and columns.
- add content it’s optional as you can do it later.
- Click on one cell.

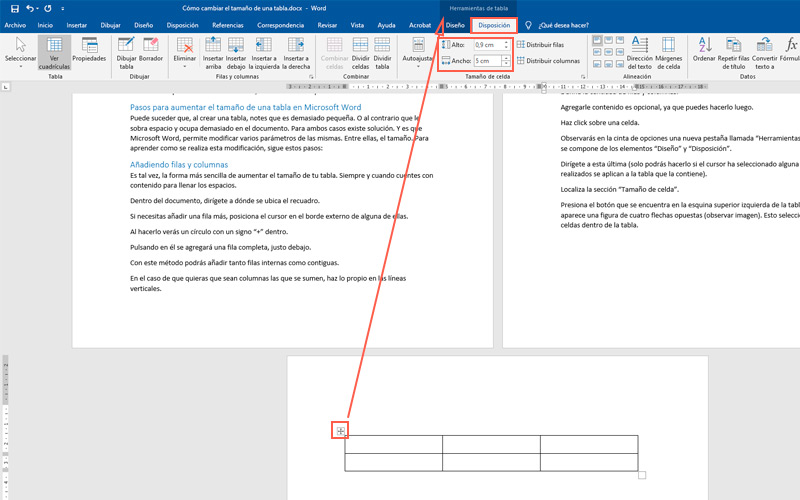
- You will see a new tab on the ribbon called “table tools”. It is composed of the elements “Design” Y “Provision”.
- Go to the latter (you can only do this if the cursor has selected any cell. And the changes made apply to the containing table).
- locate the section “cell size”.
- Press the button located on the upper left corner of the table. In it appears a figure of four opposite arrows (see image). This will select all cells inside the table.
- Change the height and width values. These parameters refer to the individual cellsbut having all selected apply to the whole table.
- If you want to assign the changes a specific column or rowchoose one of the cells included in it.
Software