Since the launch of its last console, Nintendo has changed the account system to adapt to the current times . The company launched what is known as “ Nintendo Account ” to create an ecosystem in which users can interact with each other, in addition to unifying all the services and products they have launched to the market through a Unique and valid identifier for each and every one of them.
In this way, anyone who plays any current video game of the Japanese company or even uses any of the apps that have been launched on mobile phones, can connect to their user profile through this method. It is something quite more comfortable than the old Nintendo Network ID and which, in addition, seeks to lay the foundations for future proposals. In fact, their own managers have claimed that they intend to provide discounts for movies or even those attractions they are preparing in theme parks in Japan and the United States.
For all this, and for a few other reasons, any current player has shown interest in knowing how to create an account in Nintendo Network ID , in addition to doing so in the Account system Nintendo . The truth is that it is something that does not require too much time, nor much knowledge of computer science or video consoles, but it never hurts to review so as not to leave room for doubt when getting to work with it.
Index:
Register a new Nintendo Network account
In this little guide we will explain it with total clarity and without overlooking any detail. And not only that. We will also explain other functions that allow these Nintendo accounts and other quite interesting tasks for those users who have been playing with the consoles of the Japanese company for some time.
The Nintendo Network account system is the method by which the Japanese company allows to keep track of its users and by which they can connect with the current consoles of this company in the market > (Nintendo 3DS, Nintendo Wii U and Nintendo Switch).
Thanks to these accounts, you can access the digital store available to users, the Nintendo eShop , in addition to enjoying online gaming and promotions and offers such as those offered My Nintendo . We will explain below the steps you must take to register a new Nintendo Network account . It’s easy, without too many complications, but mandatory.
1 – Enter the Nintendo account registration portal
Open your trusted web browser and, in the address bar at the top, enter the URL below: https://accounts.nintendo.com/register . This is neither more nor less than the page where to start the registration process. Once written, press the Enter key and continue.
2 – Registration begins
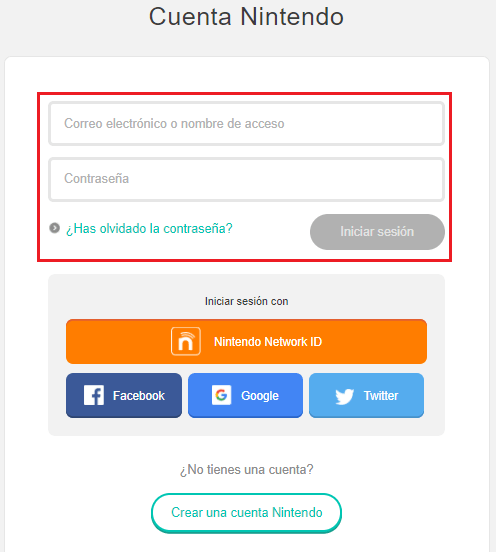
Before you start entering data of any kind, it is important to note that Nintendo offers the option to link accounts on social networks to connect directly. You can use your Facebook account , Twitter or even Google for it or, if you want, use a Nintendo Network ID that you have for it. These four options appear at the top of the window that appears when you enter the address from the previous step.

In case you don’t want to use any of that, you must continue with the form that is right under these four buttons. This is the option that we will follow in this tutorial.
3 – Fill in the form with your data span >
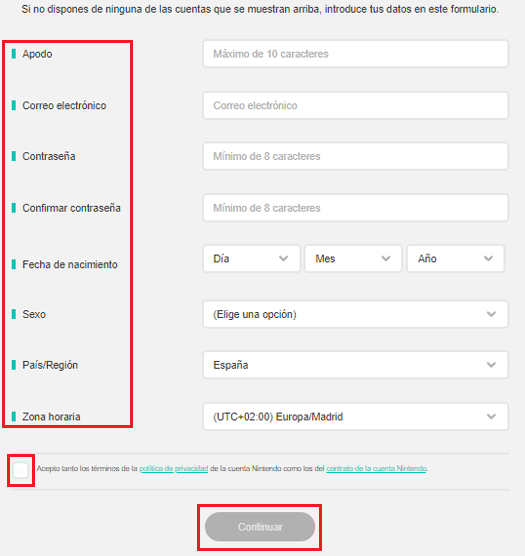
There are several fields to fill in this registration form. You must start by entering a nickname with a maximum of 10 characters (unique, to identify yourself), in addition to an email account to link, a password with a minimum of 8 characters (along with your confirmation), a date of birth, sex, country and time zone.

Fill in the relevant information and, once done, fill in the box below to accept both the privacy policy of this service and the Nintendo account contract. Now, also finished this step, click on the button with the text “ Continue ” to move on.
4 – Do you want to receive emails?
Before moving forward, Nintendo will ask you if you want to be aware of news about games, free trial versions or offers of all kinds. In addition, it also informs of the possibility of receiving bonuses in the points system My Nintendo , access exclusive draws or special discounts.

If you agree and want to enjoy these advantages, leave the “ Receive emails and exclusive benefits ” box checked. Otherwise, mark the one that is accompanied by the text “ Do not receive emails ”. After this, click on the green button where the phrase “ Confirm and create account ” is registered.
5 – Account confirmation
Now, you should look at the inbox of the email account entered in the registration form. There will be an email from Nintendo with a code needed to confirm your identity and avoid any possible impersonation. Copy this key and enter it in the field enabled for this in the account creation process (if you have not received it, you can click on the “ Resend code ” option).


6 – Nintendo Network account created!
After doing all of the above, your Nintendo Account has already been created . Now you can access it to modify any data of your profile that you consider necessary or even link to social networks or any Nintendo Network ID (the latter, recommended in case you had a console with this ID above).
FAQ: Questions about new Nintendo accounts
The Nintendo Account system is relatively young . Before this, what was used were the Nintendo Network ID ; But, since March 2017 , the company has been renewing and making the leap to this much more versatile and social media compatible option.
It is this youth that makes doubts quite frequent as to what can be done with this proposal or what advantages it entails. To clarify everything, we have selected the frequently asked questions about new Nintendo accounts and have solved them. Here are the answers to these unknowns.
What is a Nintendo account identifier and for What is it really for?
The Nintendo account identifier can refer to two different aspects . On the one hand, it can be the old Nintendo Network ID and, on the other, it can be the username of the new account system. Therefore, we will separate both to proceed and clarify:
- Nintendo Network ID: the account system used in Wii U and Nintendo 3DS until recently. The identifier, in this case, refers to the username of these old accounts, an identifier with a format set by a limit of between 6 and 16 characters. It is an alphanumeric sequence introduced by the person in question to identify the rest and identify their profile in online games or even Miiverse , the old social network that the company launched for players.
- Nintendo Account: In the case of Nintendo Accounts , the identifier is exactly the same, only applied to it new domain In this case, the name has a maximum margin of 10 characters, but returns to the same function as the old one, only that it is the predominant option due to the obsolescence of the NNID .
How to link the old Nintendo Network ID?
To link the old Nintendo Network ID to your new Nintendo Account , you can do so at the same time you created the latter. To see it exactly, we recommend you take a look at point two of the new account registration tutorial to see how to do it.
Otherwise, if you want to link it to an account already created , you must first enter your user’s panel. To do this, go to the Nintendo Account website: https://accounts.nintendo.com and log in by entering this user’s email and the corresponding password. Once inside the panel, go to the “ Link accounts ” section and click on “ Change ”.

Now, what you should do is click on “ Nintendo Network ID “. The website will redirect you to a form in which to enter this identity and your password. Do it, click on “ Login ” and you will have been able to link your old NNID to your current Nintendo Account.
As we had previously indicated, this option is the most recommended if you had previous consoles and used this system . And it is the only way to keep the purchase history to be able to download games or software that already belongs to you without having to pay again for it.