
Index:
UPDATED ✅ Want to learn more about how to create SmartArt graphics in Microsoft Word documents? ⭐ ENTER HERE ⭐ and learn everything FROM ZERO!
It is no secret to anyone that Word is the most complete word processor that exists, to date, in the office environment. Which, by default, is considered the main tool for create, edit, personalize and manage digital documents.
In this sense, the vast majority of people attend this program of microsoft to enrich your texts and get truly qualified results. Taking into account that, offers endless options and functions ideal for ensuring quality writing.
That is why, it allows you to add different elements and illustrations that can easily attract the attention of readers. Among those, are the famous SmartArt graphics that have become so relevant over the years and it is worth knowing what they are about, what their types are and how they can be created from Word.
What are all the types of SmartArt that can be created in Word?
Mainly, it should be noted that a smart art illustration is defined as a representation of visual type that allows to express data and ideas, in an optical waylike illustrate processes effectively. Reason why, they are very useful elements during the creation of a document in Word.
Taking into account that, in order to adapt to the requirements of each of its users, this word processor has several types of SmartArt that can be freely selected, depending on the demands of the text.
Thus, below, we mention and detail all the SmartArt classes that can be chosen in this program:
Ready
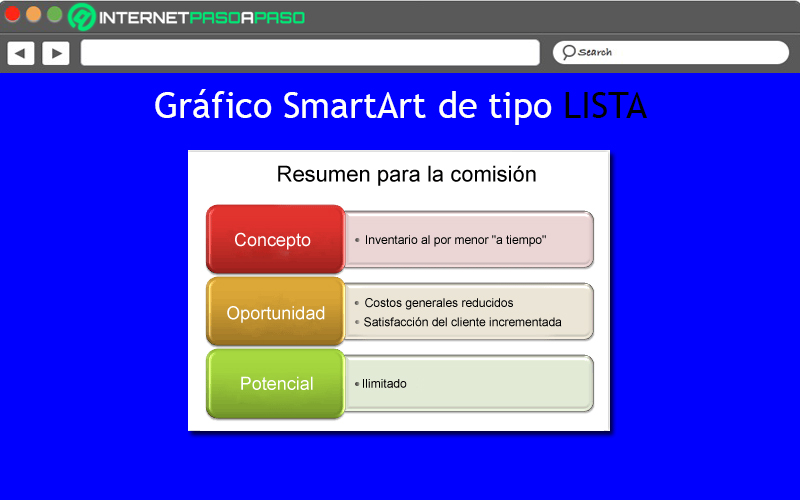
As its name indicates, it is a graph which employs a list-type layout and thus keeps the idea of the list vertical. In this way, it separates the general concepts (shown on the left) from the details (located on the right). Consequently, when using this SmartArt class, the main points of the document gain greater impact and visibility.
It should be noted that, in general, they are optimal designs to group all the information that does not follow a step-by-step or sequential process. Thus, some List layouts allow add image shapes to accentuate text with an illustration or drawing.
Process
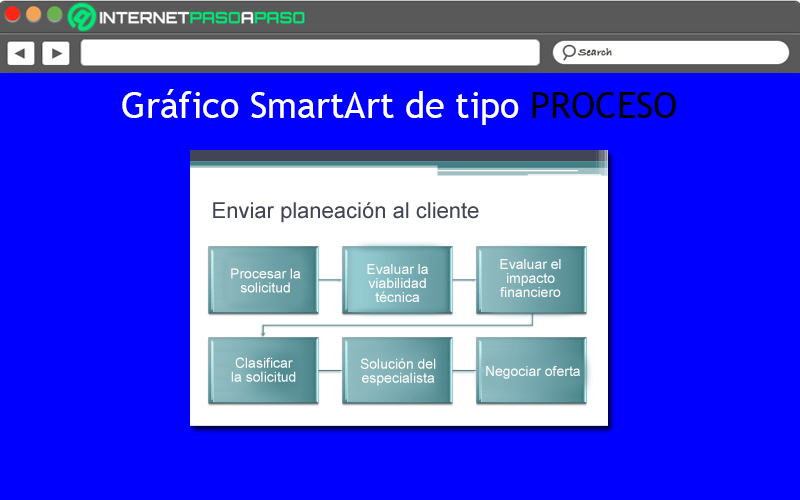
It refers to a graph that contains repeating shapes and a long winding arrow with which it is possible to connect each step. That is to say that, normally, they are elements that have a directional flow and are used to present the stages of a process or a sequence of steps.
Consequently, they are SmartArt graphics used mostly for show the evolution of a certain process or explain its phases, in order to reach a certain result. It is worth noting that, there are more than 30 types of process layouts in Word (in steps, vertical, horizontal, curved combination, etc.).
Hierarchy
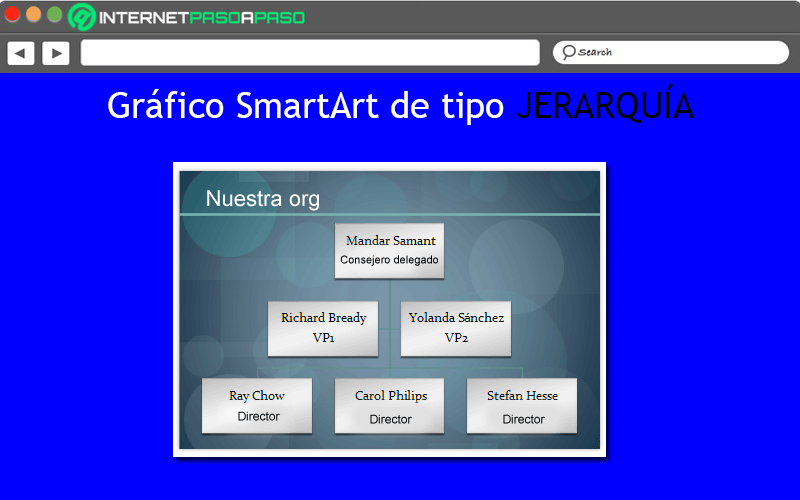
Another type of SmartArt layout in Word, are those that facilitate the presentation of the scale of charges of a companyfor example, which is why they are called “Hierarchy”. Therefore, they can be used to make a company organization chart or show decision trees, just like a family of products.
In this sense, there are several subtypes of the hierarchy SmartArt elements and among them we find:
- architecture design
- Organization chart with semicircles
- Hierarchy with images in circles
- Hierarchy List
- horizontal hierarchy
- Labeled Hierarchy
Cycle
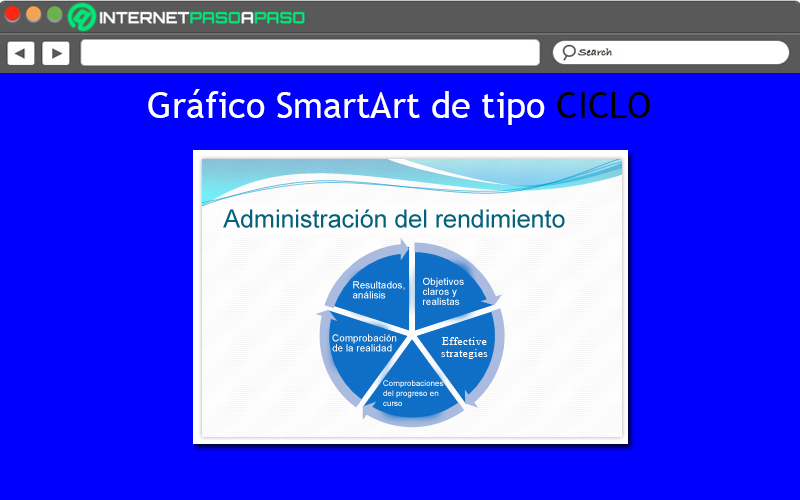
Basically, it is a design that usually illustrates a circular or repetitive process. Thus, just as a Process SmartArt element is used to communicate step-by-step information, a Cycle communicates sequential information that is constantly renewed.
So these graphs are mostly used to show the life cycles of animals or productsteach learning cycles, present an ongoing process, explain an employee’s performance review, and demonstrate the goal-setting cycle per year, among other uses.
Relationship
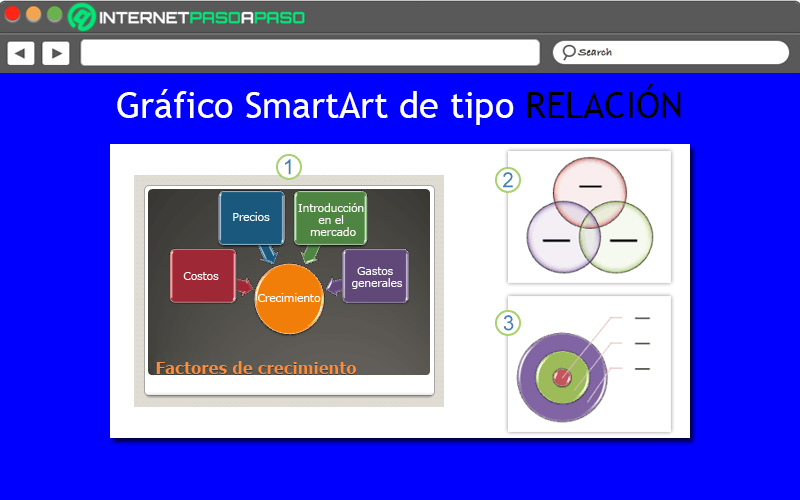
They usually refer to the illustrations that show non-progressive and non-hierarchical relationships between parts. Since, usually, they represent links between two or more sets of things, as well as conceptual relationships. Considering that thus, they cover several types of diagram, according to the exposure of the information.
As a clear example of the Relationship type SmartArt elements, we find venn diagrams that, are those that show how the concepts overlap and come together in a central intersection. Like, the basic Destiny design which is used to display gradations or contentions.
Matrix
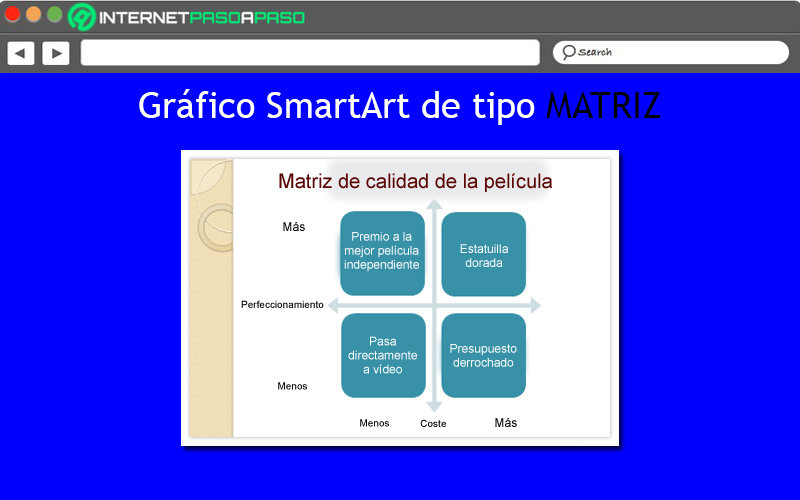
They consist of those graphical representations that, commonly, they classify the exposed data and are two-dimensional. Since, they exhibit the relationship between the components with a whole and, through axes, they manage to symbolize more complex relationships. Thus, they are used to show the link of various parts with a central concept.
Thus, they are an ideal alternative for communicate a large amount of text in the document and also when you need to expose four key points, basically. Taking into account that, although some graphs of this type already include quadrants and axes, you can add the necessary labels outside the axes.
Pyramid
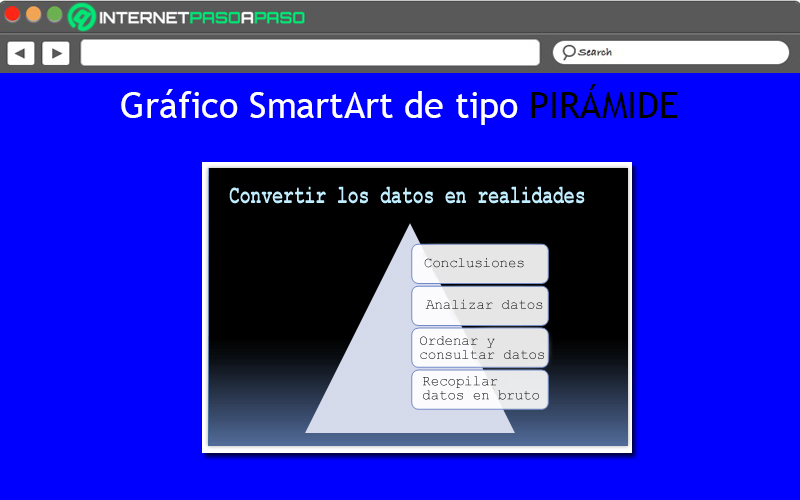
They are also known as Pyramid type designs and allow to show relations or equal processes, of base or hierarchical and ascending, that is, they grow or build upwards normally. Whereby, they are ideal illustrations to explain information from top to bottom or vice versa.
In addition to that, they are designs that allow conceptual information to be transmitted effectively. But generally speaking, this type of SmartArt consists of a visual representation designed to offer more space for the text, as the pyramid is girded.
Image
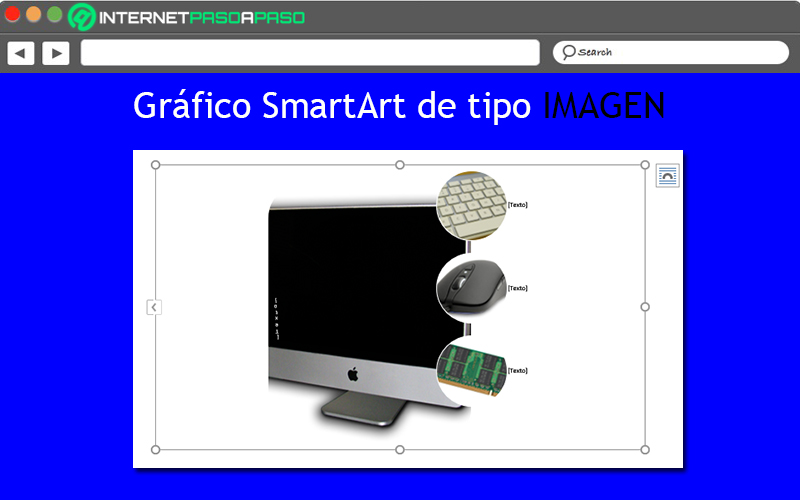
There is also a design SmartArt by Image type that, in most cases, It is used to convey a message with or without explanatory text, in order to capture the reader’s attention in a purely visual way.. Likewise, they are managed elements when you want to use an illustration to complement a certain process or a list.
That way, allow to show a central photographic idea with related ideas, as well as a series of top-down images, an illustration with multiple levels of text, a group of images with interconnected information, etc. Taking into account that, there are several subtypes in Word.
What to consider before creating a SmartArt graphic in Word?
In general terms, it can be stated that a SmartArt graphic element in Microsoft Word serves for display a hierarchy efficiently, present the flow of a procedure or event, simplify data enumeration, and create an organization chart.
They are also ideal items for present cyclical or repetitive informationcreate a matrix illustration, explain proportional data in a pyramid illustration, present a relationship between parts and symbolize any information through images.
Now, before creating any SmartArt graphic element in WordIt is important that you wonder about what you want to convey through it and also check if you need the data to appear in a certain way, in order to correctly select the graphic you should use. Once you set the appropriate SmartArt type, you can choose which design to use to better illustrate your message.
Thus, in order to help you during this process of choosing the SmartArt class to insert in your document, We proceed to mention the main uses of each of them, in a summarized way:
|
Principal function |
Guy |
| Show non-sequential information | Ready |
| Present stages in a process or on a timeline | Process |
| Create an organization chart or decision tree | Hierarchy |
| Exhibit a continuous procedure | Cycle |
| Illustrate any connection | Relationship |
| Convey or emphasize explained content | Image |
On the other hand, once you make the selection of the smart art type and opt for a truly timely design, you can proceed to change your appearance quickly and easilymaking use of the tools that Word offers for that.
Either for change the fill of your shape or text, add effects (shadows, edges, highlights, reflections, etc.) or even, add 3D effects (such as turns or bevels).
Steps to create your own SmartArt graphic elements in Microsoft Word
As you will see, all types of SmartArt illustrations available in the Microsoft word processor, are very useful to enrich the documents, give them a higher quality and, especially, to better expose the information. But to achieve these goals, it is essential to know how to create them correctly.
That is why, below, we proceed to explain each and every one of the steps to make use of these graphic elements in any Word document, inserting them quickly and easily:
- First of all, look for the document of Word to customize in this way and access it.
- Followed by that, place the cursor in the specific area of the document where you want to add this illustrationto click there.
- Next, go to the ribbon at the top of the program and select the “Insert” tab.
- Now, directly from the Illustrations group, click on the “SmartArt” option.
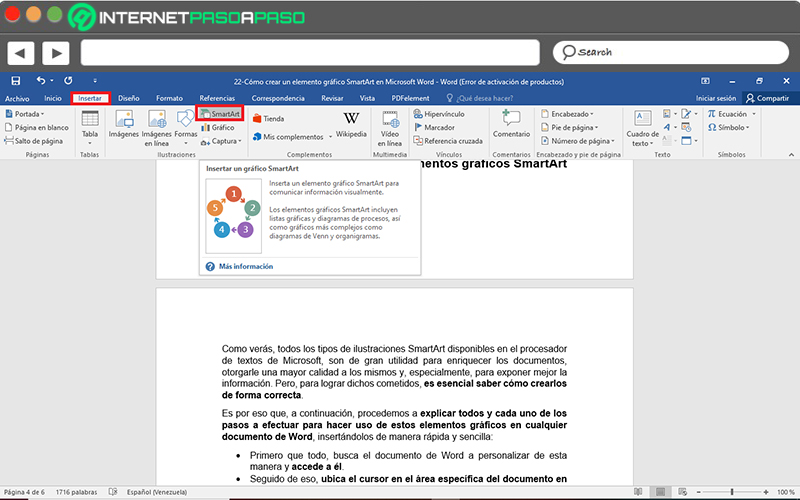
- Once the above is done, a dialog box will appear automatically and there, you can choose the type of SmartArt to use, from the left sidebar where each of them is displayed.
- Later, once you click on the type of illustration, you have to choose the design you prefer in the right part of the boxto proceed to click on the button “To accept”.
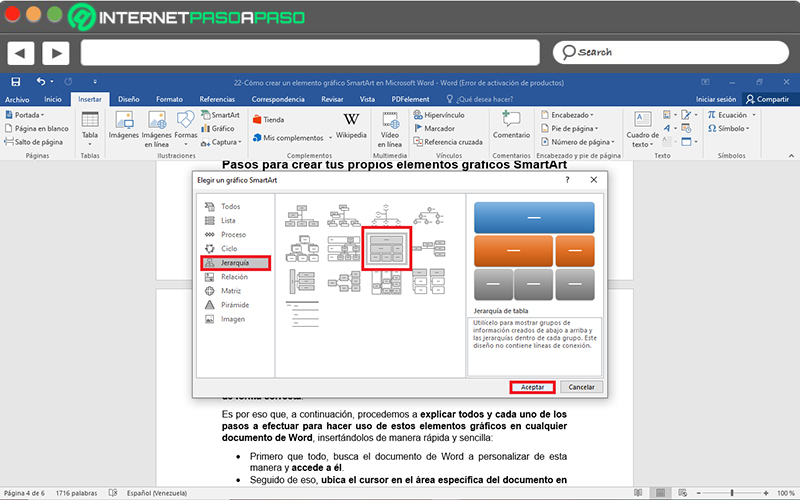
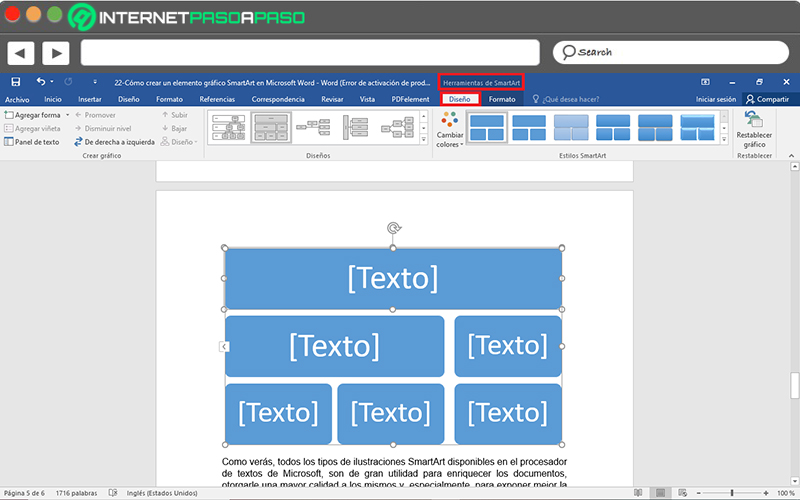
- Then you can start enter the text to display in the graph in questionfrom two available ways: (1) Clicking on “[Texto]” to write there or (2) Copying the text from another program, to press on “[Texto]” on the panel and paste it using the mouse or with the keyboard shortcut “Ctrl + V”.
- Lastly, you can customize your SmartArt graphic from the “SmartArt Tools > Design” tab at the top of the main window. Whether it’s to add shapes or bullets, change colors, layouts or styles, and reset the chart.
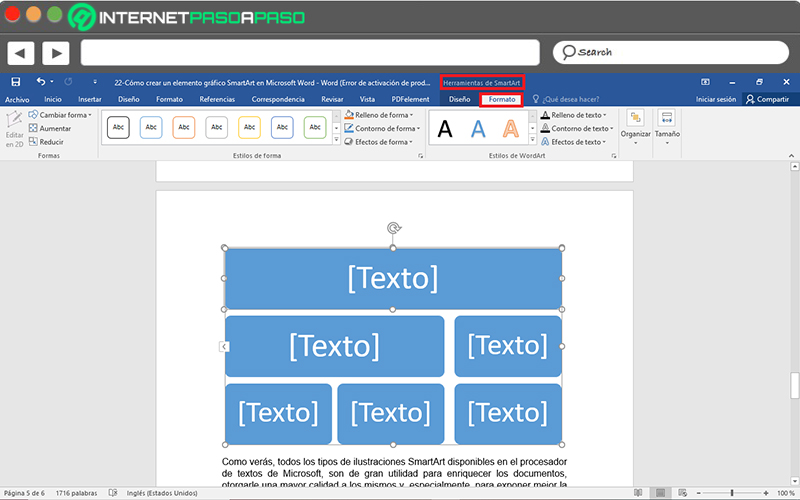
- Also, directly from the “SmartArt Tools > Format” tabyou will be able to customize shapes, add fill, outline and effects to shapes and text, resize words, adjust them, align them, change their position, etc.
Software