Transport is another sector that has noticed, and in what way, the implementation and evolution of technology. Not only for what it has meant in the improvement of manufacturing processes, in the purchase and sale of travel tickets or even in the refinement of vehicles, but also in the way of traveling.
With the internet through and the massification of applications and smartphones, services like Uber have been born to offer something different from the traditional . This popular app is designed so that anyone can find someone to take it where they want and, in turn, so that someone with a vehicle can share their trip or generate some additional income transporting people .
Its usefulness is something that is totally linked to the comforts it offers. Travelers do not need to carry money on them and drivers should not worry about carrying change, all payments are made automatically when the trip ends .
Index:
How to register an account in Uber as a passenger?

For this reason, and for many other reasons, the question of how to create an account in Uber is quite common today. And it is precisely at that point that we want to help you. With this guide that we bring you, you can register an account in Uber to be a passenger, as well as learn how to use Uber Driver to register as a driver . The processes are tremendously simple if you have something to help you do them, and here we are going to make it very easy for you.
Since this service is 100% mobile, we will explain the account creation process for mobile devices, whether it’s Android or iOS , although from the Uber website > You can also perform the same steps. If you need to open a new Uber account as a passenger , we take the steps to follow so you can do it quickly, easily and without getting lost. Because the way we move is changing, we have to adapt to new technologies as long as they give us true utility and make things easier for us.
1 – Download the Uber app
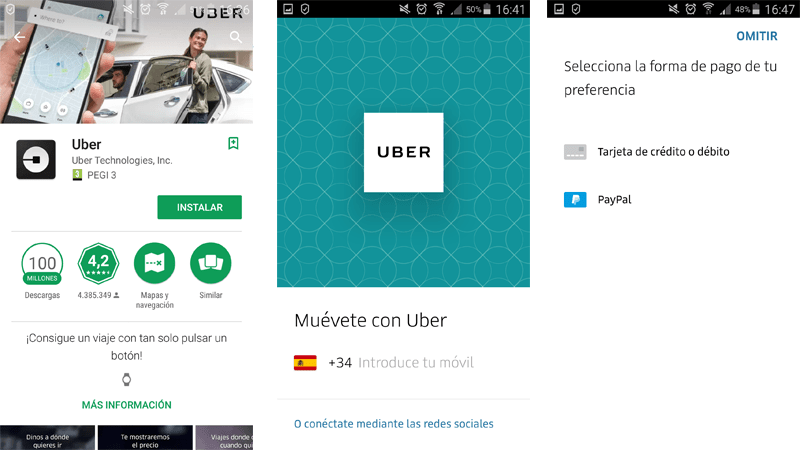
If you don’t have it yet, start by downloading the Uber application on your mobile or cell phone. Enter your terminal’s app store (Google Play Store on Android or App Store on iPhone) and, in the search bar, enter « Uber «. Choose the first result that shows you.
Now, click on the install button so that the app is downloaded and installed automatically on your mobile. It is a step that requires very little time and in which you do not have to do anything but wait. It is advisable to download while we are connected to a Wi-Fi network , so we will save data from our cell phone.
2 – Start the Uber app
Whether you have done the previous step or if you already had the Uber application previously installed, it is time to open it. Find it among the apps you have on your phone and click on it to start.
You are likely to be asked for permissions to access different functions and data on your mobile. Accept to move on.
3 – Account registration begins
If this is your first time with the app, it will ask you to enter a phone number to link (we recommend that it be the same one you are using it on). In doing so, you will receive on that phone an SMS with a code to enter to validate your identity. It also gives us the ability to connect through our Facebook profile or our Google.
account
If you have accepted our recommendation and entered the number of the same terminal you are using, will be automatically detected and you will not have to write anything , going to the next step, if it has not been detected in a way automatically, access the SMS they sent you and enter the confirmation code they show you.
4 – Enter an e-mail and a password
The next step is to enter the email account with which you want to link your Uber account and also a password with which to restrict access and identify you later >. It is essential that you do not reveal it to anyone and that it has a high complexity, as well as that you memorize it to avoid problems in the future. It can include uppercase, lowercase, numbers and special characters.
5 – Fill in more personal information and accept the conditions of use
Now is the time to enter both your name and your surname . Since Uber is something that encourages interaction between users, it is recommended that they be real to avoid inconvenience in the future with the use of the application.
Then the next step only requires you to click on the button with an arrow inside it to accept the terms of use and the privacy policy of this service . If you do not accept them, you will not be able to proceed with the account creation and registration process.
6 – Your passenger account is ready
You will then be asked for a payment method, using credit or debit card or via PayPal , this step can be omitted and filled in later. You have already done everything necessary to start to use Uber as a passenger . From now on you can search for vehicles that lend themselves to take you from one place to another and share a trip so that transportation leaves you much cheaper in your city. Easy, simple and, what is better, at a reduced price and with all the comforts of the world.
How to open an Uber account as a step-by-step driver?

If what you want is to belong professionally to the Uber company and be part of authorized drivers to be able to perform their work through this service, this offers you an application different from that of users designed for professional drivers, to do this follow the steps below.
1 – Download the Uber Driver app – for drivers
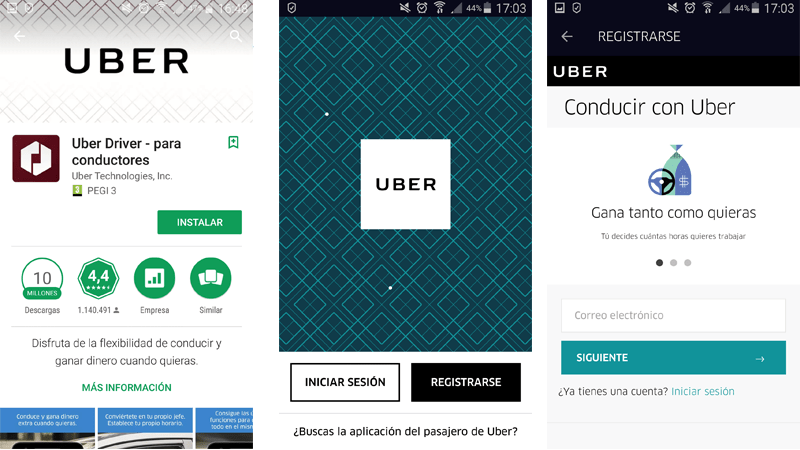
The application needed to enter Uber as a driver is different from that for passengers. Enter the app store, Google Play Store or App Store according to your terminal, search “Uber Driver – for driver” and download and install as you would any other application. Remember to have enough free space on your cell phone.
2 – Run the app and grant permissions
Open the app as you would with another and, once it starts, grant the permissions to access the device location you are requesting. Now, start with the user account registration.
3 – Start registration
Within the Uber Driver app, press the “Register” button that appears in the lower right to start the whole process. Once this is done, the next thing the application will ask you to do is enter an email account . Use the one you want to link to your user and press “Next” to move on.
4 – Enter your personal information
Now is the time to enter your name, your last name, your mobile phone, your password and the city where you usually drive so that Uber users can contact you. The key, in addition, must be something that you do not reveal to anyone in order to avoid phishing problems.
If you have been invited through a code, enter it in the section that is enabled . Now, click on the “ Next ” button to continue.
5 – Choose the type of association
At this point, you must choose the type of service you want to offer through Uber . You have 3 options to choose from:
- UberX, with a minimum age of 21 years, driving license and insurance against all risks, in addition to own vehicle
- Deliver by bicycle, if you are 18 years old and at least one bike
- Motorcycle, if using a motorcycle for transport
The most common is to use the first option, although everything depends on the type of user and what you want to do. Select the one you consider most appropriate for what you are looking for and move on. In the next window that appears, press the “Continue registration” button to continue.
6 – Enter your vehicle information
In this section you have to enter a series of data of vital interest. You have to choose the brand of your car, its model, the year it went on sale and the registration number it owns . In this way, Uber can guarantee both driver and passenger safety. Fill in the information and click on “ Continue ”.
7 – Last details
Your driver account has already been created. However, Uber will ask you for some more details to finish profiling your identity in Uber Driver . For example, you can take a picture to link it to your profile and that travelers recognize you better when they contact you.
Now, the process is completely over . Now you can start using this popular app to take people from one place to another with your vehicle or share a trip to save a little on fuel and even generate extra income or live off it.
Is it possible to pay cash without a card in Uber?
Uber is designed to facilitate the use of its service and trigger the comfort of both parties, both passenger and driver. Because of this, the option to pay cash without a card is completely ruled out.
The only forms of payment with this app are either using a credit or debit card, or through PayPal . In this way, they eradicate the need to carry money on them, as well as possible inconveniences that may arise because there is a need to pay something more from the account due to an inaccurate estimate of the price of the trip.
However, if the user wishes (for good treatment, speed or efficiency in transport), you can leave a tip to the driver . In that case, it can be done with cash, without resorting to Uber payment systems and with total freedom. Of course, this is not mandatory at all, although it is always a good way to express gratitude for a service performed in the best possible way.