The device you use does not matter. It doesn’t matter if you are with an Android smartphone, an iPhone or even a computer with the Windows operating system. There are always applications and programs that need to download and install new versions , as there are always improvements to the system that come with their updates.
The user is faced with a situation in which he has to be aware of numerous aspects. You have to check that all the software is renewed with the latest versions of the market and, on the other hand, that the OS itself it uses is always up to date . Only in this way can you be sure that you are getting the most out of your devices and, also, the certainty that the possible errors of these will be remedied.
Luckily, all these devices have the possibility that updates are downloaded and installed automatically . Through its configuration panels, or certain software that is always preinstalled, certain adjustments can be made to allow all these processes to be done without having to interfere or so that, otherwise, yes have to do it.
Index:
How to enable and disable automatic updates in Windows 10?
If you’re wondering how to enable and disable automatic updates on any of your devices , this is the definitive guide to find out. We will explain everything you have to do in both Windows 10 and Android and iOS so that your devices are always up to date or, otherwise, you can restrict these downloads so that Only be done when you want. The best thing for you to have full control over the software on both smartphones and tablets and computers.
In Windows 10 you can limit both automatic application updates and those of the operating system itself. To do this, you have to go to two different parts: Microsoft Store and Windows Update.
Microsoft Store

Here you can access to activate or deactivate the automatic updates of the programs installed on your PC. What you have to do to configure this parameter is follow all the steps that we are going to indicate below:
- Open the Microsoft store . To do this, go down to the taskbar of your device and look for the “Microsoft Store” icon
 . Click on it to enter.
 - Now, go to the three ellipses next to Your user photo Click on them and a drop-down menu will open with several options to choose from. You have to click on “Settings”.
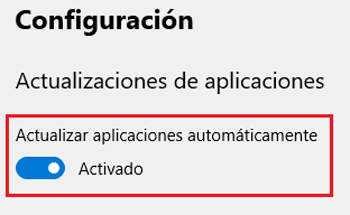
- After having done this, you will be taken to the settings panel of this digital store. The next step is to look for the “Application updates” section and within it you will have a unique field that cites the possibility of doing them automatically. You just have to press the button to activate or deactivate them. ¡Ready !.
Windows Update

In the case of the Windows Update Agent , its function is to manage the new versions for your operating system. This is what you have to do to configure them as automatic or not:
- Click on the button “ Start ” from bottom left and, within the whole drop-down that appears by screen, click “Settings” (gear icon on the left).
- In the new window that opens, go to “ Update and security ” and click on it to enter your window of settings.
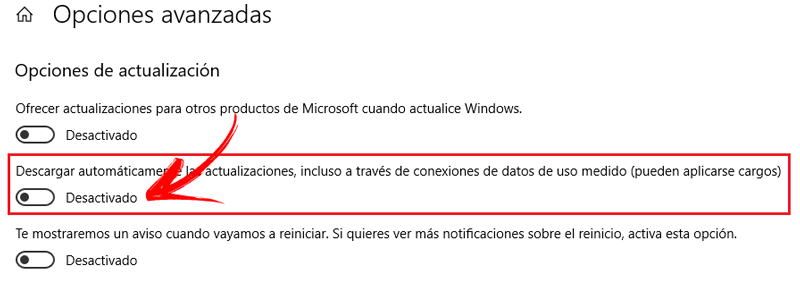
- Now, an indicator will appear indicating whether all updates are installed on your system or not. A little further down, you have the “Advanced options” section. Click on it to continue.
- Within these more extended settings, there is a specific option that meets what we are looking for: “ Automatically download updates, even through data connections from measured use (charges may apply) ”. The button below serves to activate or deactivate it . Use it depending on how you want to manage updates of your OS. Done !.
How to enable and disable automatic updates on Android?

In the same way as with Windows, Android also offers the possibility of activating and deactivating automatic updates of both its applications and its operating system. Next, we will explain how to proceed only with the OS Next, we will explain how to proceed only with the OS In the case of the new versions of Android , its automation or not something that is configured through system settings. This is what you should do:
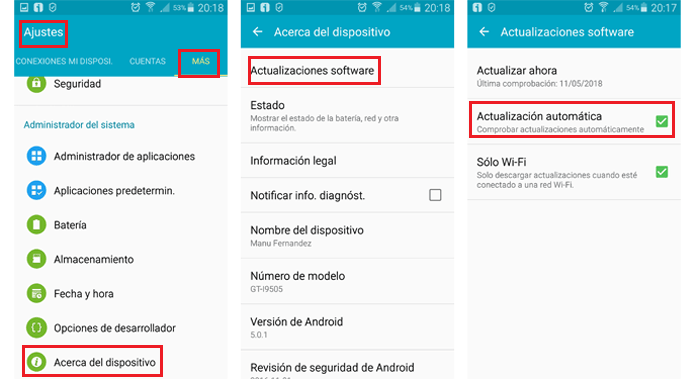
- Enter the section of “ Settings ” . Find the icon with a gear and press it to access.
- Now, scroll down to find the “Update software” section and enter it. It is possible that on certain devices you have to enter “ Phone information ” and then “ System updates ”, or first on the “ tab More ”and then“ About the device ”to find the option we mentioned.
- After this, and within the option of “ Update software ” you will be on the screen where you can enable or disable automatic update searches .
How to activate and deactivate automatic updates in Play Store?

As we said before, automatic app updates are something that can be managed through the Google store . To do this, you just have to follow all the instructions that we are going to give you. Everything is processed through the Google digital store , which we all know as Play Store . So you have to do the following:
- Open Play Store
 . Find your icon and click on it to enter.
 - Now, on the home screen, go to the bar where you enter the search terms and press on the three horizontal lines > on the left.
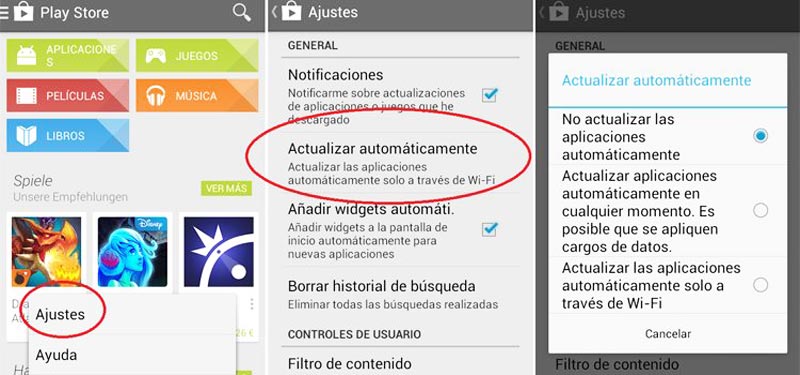
- In the drop-down menu that appears, scroll down to find “Settings” and press it.
- The screen that appears allows you to configure various aspects of the applications. Go directly to the “Update applications automatically” section.
- When you click on it, there are three options that you can use depending on how you want them to work updates:
- “Do not update applications automatically”
- “Update applications automatically at any time. Data charges may apply. ”
- “ Update applications automatically only over Wi-Fi ”
- Choose that that best suits what you want to do right now , if you decide to activate the updates, you can opt for the two options below, if you want to completely disable updates , select the first option.
How to enable and disable automatic updates on iOS?
On devices with iOS operating system , the only fully configurable plot for the automatic download and installation of new versions is that of applications . If you want to know how to enable or disable automatic updates on iOS, you just have to keep reading and, above all, follow the steps below:
- Go to the iPhone settings panel . To do this, you just have to look for the menu icon “ Settings ” and click on it. It’s on the home screen.
- After this, you have to review the list that appears on the screen and press “iTunes Store and App Store” . In doing so, you will go to its parameter configuration screen.
- The first thing that appears is what we are looking for, the “ Automatic downloads ” section, which is located under the zone with your Apple ID . Within it, go to the point of “ Updates ” and enable or disable depending on what you prefer to have. It’s that easy!