
Index:
UPDATED ✅ Do you want to increase the size of the virtual memory of your Windows 10? ⭐ ENTER HERE ⭐ and discover how to do it FROM SCRATCH!
Today, Windows 10 is the most recent version of Microsoft’s operating system and other than that, It is classified as the most used OS in the world. Which is because it provides an optimal user experience at the level of security, capacity, performance and customization. Therefore, it is useful to manage any type of action.
Now, if you have a high-performance computer (a lot of RAM, a powerful processor, an SSD instead of a hard drive, etc.), surely your W10 computer will work very quickly at all times. But, if your PC is more modest, it is likely that the operating system reveal some sluggishness over time, the more apps you run.
However, to avoid minimizing the user experience, Windows 10 offers a functionality that consists of increase virtual memory to make the computer work more effectively, that is, it helps to optimize the performance of the equipment. To learn more about what it is, how it is done and other tips of interest for good PC performance, we invite you to read this post.
What is virtual memory and how does it affect the performance of my PC?
While it is true, by nature, computers make use of RAM memory to save data and files that are required both by the operating system and by the programs that run on it. This is why, if it has a high yield, will ensure optimum performance.
But, sooner or later, it ends up filling up with the passage of time and at that moment, This is when Windows must resort to virtual memory. In this sense, virtual memory is defined as a technique for managing used memory. by operating systems in order to access a larger amount of memory than is physically availabletaking advantage of part of the PC’s storage space as extra memory.
Which means that, you have the ability to resort to other alternative storage solutions, once installed RAM runs out. Whereby, choose to “borrow” a few megabytes of the hard drive or SSD in order to free part of the RAM memory when it runs out. As a consequence, virtual memory influences the operation of a PC with respect to its performance.
Since, it corresponds to a solution that deals with moving data from RAM to a space known as “page file”, once the RAM is low. Thus, he manages to free her and simultaneously, helps the computer’s processor perform its functions appropriately. Thus improving the speed of execution of the different instructions and data that must be processed in the system, to respond to user requests (such as when opening a certain program).
Therefore, the use of virtual memory in Windows 10, guarantees various benefits for users. Among the most important of them, we highlight the following: optimize memory usageoffers the ability to perform effective multiprogramming, provides virtually more extensive with the same real memory, guarantees faster in system performance, remove certain restrictions to design programs and applications easily, etc.
Learn step by step how to increase virtual memory size to optimize your Windows 10 PC
By default, when the system uses all RAM available, W10 proceeds to take advantage of virtual memory, automaticallyin order to provide a temporary expansion of resources through the hard drive or SSD.
However, although Windows takes care of managing the size of that file for all units of the team, users can increase it to optimize their PC. In this sense, the fact of increasing the virtual memory in Windows 10 will give a boost to the performance of your machine, that is to say, will allow your PC to work better and faster by running any process on the system.
Therefore, it is recommended to increase the virtual memory to improve the performance of your computer and this can be done as follows:
Access the “System”
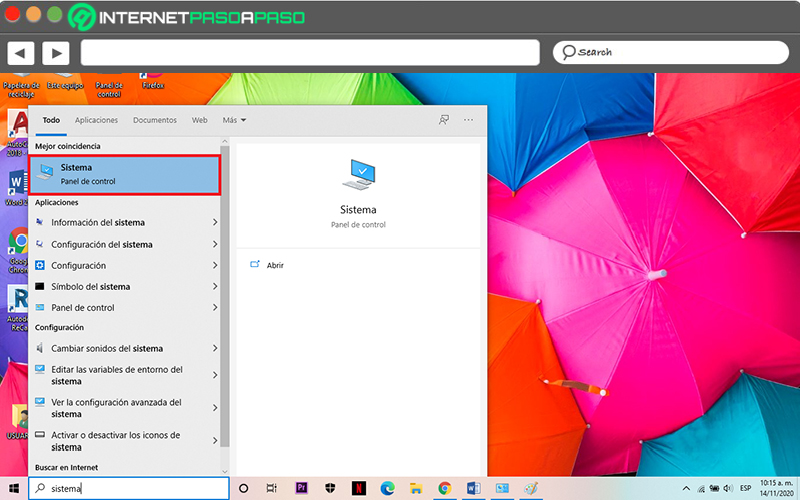
The first thing you have to do to carry out this adjustment, is to enter the System menu.
Which, it is possible to do it in three different ways, such as:
- pressing the start button of your PC, for type “System” in the search bar and choose the corresponding option.
- Using the keyboard shortcut “Windows + X”with which a menu will open from the lower left corner and in it, you can click on “System”.
- Opening the Control Panel, to select the option that indicates “Security system” and in that window, click on “System”.
Select the option “Advanced system settings”
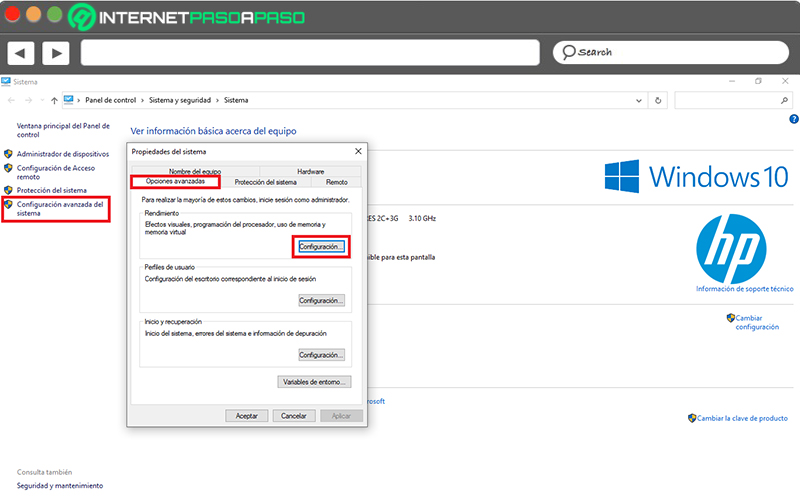
Once you enter System, Automatically, a new window containing different options will be displayed. In it, you must Click on “Advanced System Settings” located on the left side of the panel. After that, a box will open that corresponds to the “System properties” and in it, you have to Click on the “Advanced Options” tab. Next, through the Performance section, it is time to Click on the button that says “Settings…”.
Click on the “Advanced Options” tab
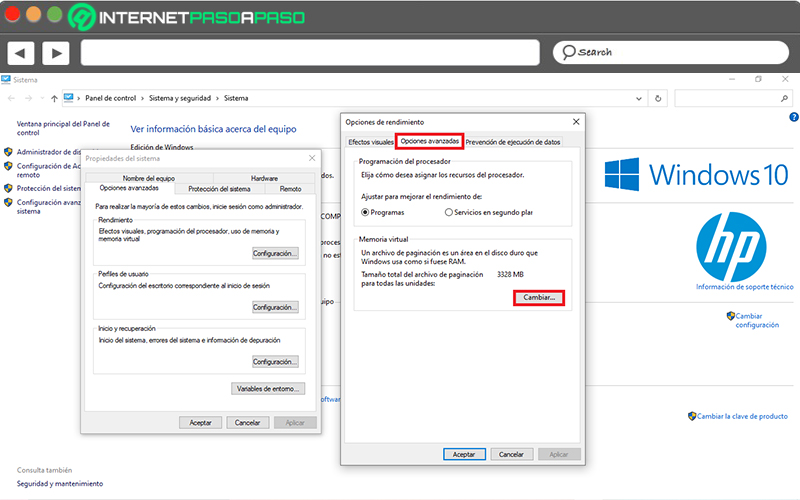
Once you press the button Setting, the system will provide you with a new box that provides more options based on system performance. Through it, you must begin by Click on the “Advanced Options” tab on top.
Next, go to the Virtual Memory section at the bottom, indicating the total paging file size for all drives. There you will find a button that says “Change…” and this, of course, you must select in order to increase its size.
Start managing your new virtual memory
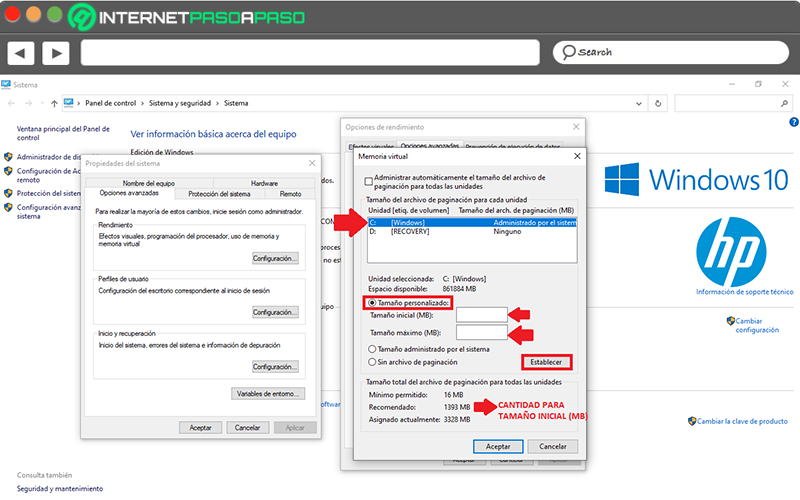
When you access the Virtual Memory window, it’s time to uncheck the box for the option that says “Automatically manage paging file size for all drives”. Since, only in this way, you will have the possibility to modify its size in MB.
Once the above is done, proceed to select system partition from the Paging file size box for each drive. Thereafter, click on “custom size” and enter the amount of MB you want to allocate both for initial size as well as for the Maximum size.
In this case, it is recommended to do the following:
- In Initial Size (MB): Enter the amount that appears in “Recommended” for your PC, at the bottom.
- In Maximum size (MB): Use a formula that will help you obtain this value for efficient performance. This formula is: 1024 x Amount of RAM in the computer x 2 (for example: 1024 x 8 x 2 = 8192).
Once you have allocated space in available MB For each of these options, It’s time to click the “Set” button. For later, restart your PC and with it, test its new operation that, surely, it will be much more optimal.
Tips to improve the performance of your Windows 10 PC and make it go faster
In addition to increasing the size of the virtual memory on W10 to improve the performance of the machine, users can also resort to other solutions so that your computer run faster and smoother. Taking into account that, the causes for which a PC tends to become slower and slower can be different. That is why, in order to optimize the performance of your computer, we want to let you know some of the the best recommendations that will help you achieve it easily.
Next, we mention what they are:
Remove unnecessary startup programs
By default, many programs or applications are designed to start automatically when Windows 10 boots, and with this, it is possible that the computer tends to run slower at startup or, what increase the time it takes for Windows to boot.
Consequently, it is useful remove or disable all those programs that run when you turn on the computersince this will allow you to achieve some speedup in Windows 10. Now, to do it, you have to open the Task Manager and in the Startup tab, click on each of these programs that you want to stop running automaticallyto proceed to choose the option “To disable”.
Be careful with viruses or malware
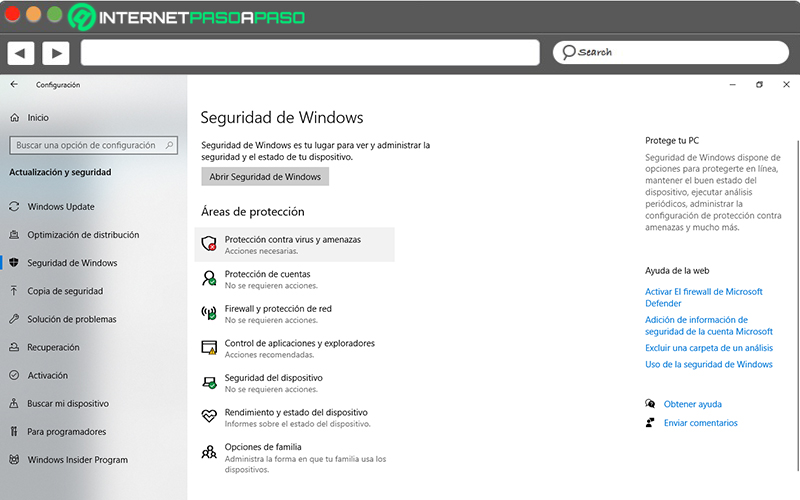
Another reason why a PC shows inefficient operation is because of the presence of malware or malicious software causing this slowness. But, to avoid it, you can make use of a anti-virus and anti-malware program that it is kept up to date and presents an optimal operation.
Taking into account that, W10 allows you to freely install any software you want of this type. Added to that, you can make use of Windows Security which is included in W10 and, by default, guarantees the protection of your PC.
In this case, to search for viruses in the system, it is necessary to perform the following procedure:
- Via the Start menu, Click on the “Settings” option and in that menu, select “Update and security”.
- After that, on the left sidebar, click “Windows Security” to press the button that indicates “Open Windows Security”.
- Next, it’s time to select “Protection against viruses and threats” there, in Protection against viruses and threats, choose “Check for updates”.
- Now click on “Search for updates” on the screen of “Protection Updates”. With this, you can ensure that you have the latest updates to increase system security.
- After that, click on “Protection against viruses and threats” to choose the option “Quick test”.
- Once the Windows Security scan for viruses and malwaredepending on the results, you will have to perform any of the following actions: Run the recommended advanced scan, contact the Microsoft Support for help or restart your computer.
Always keep drivers, applications and the system itself up to date
There are still many users who do not know The importance of having correctly updated PC drivers, as well as installed programs and applications and even the operating system itself. Which, happens thanks to the fact that the updates reveal the advantage of improve Windows 10 performance and speed up system properly.
Otherwise, if there are incompatibility problems or an outdated driver, for example, computer performance will be lousy. Therefore, it is essential that you periodically evaluate that these updates have been installed correctly in the operating system in general, in the installed applications and in the drivers. So it will be easier get the best performance from your machine.
Enable the High Performance power option
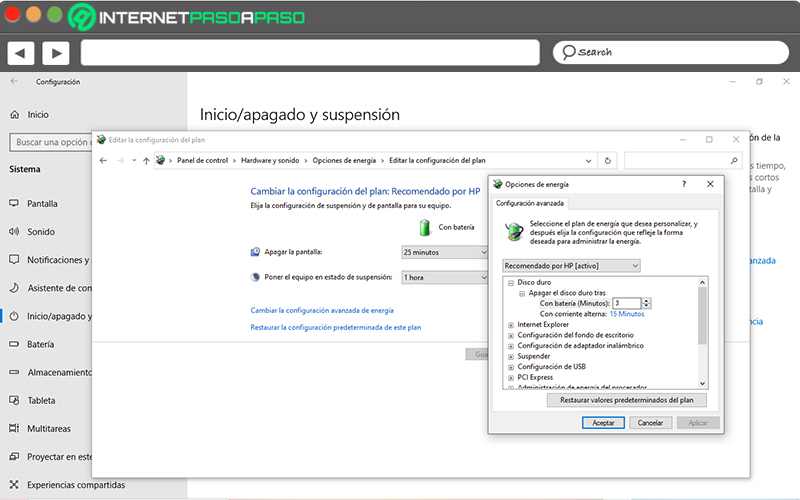
Fortunately, Windows 10 provides various power plans so that users can select the one that best suits your requirements or, the one that best suits them in each case.
Apart from that, it offers the possibility of create a custom power plan in order to decide or fix how the system will have to behave in certain situations. In that sense, for speed up pc with w10 and to get the most out of it in terms of performance, it is recommended activate and use the High Performance power option.
To achieve this, you need to do the following:
- Initially, enter the Settings menu, via Home. In said menu, you have to Click on the “System” option.
- Second, go to the left sidebar and choose “Start/sleep and sleep”with which new options will appear.
- Now, go to the right side and there, click on the link that indicates “Additional advanced settings”.
- Subsequently, they will show you a new window that corresponds to the Energy options and there, it is possible to Choose or customize a power plan. Appreciating that, you can get more information in the link about power plans.
- Next, if the High Performance plan will not appear, you have to perform a little trick which consists of opening a Windows PowerShell window with administrator permissions to Introduce
powercfg -duplicatescheme e9a42b02-d5df-448d-aa00-03f14749eb61at the command line and press Enter. - Then, if all goes well, you can return to the Power Options window and at that point, check if the plan appears High performance between Windows power plans from “Change advanced power settings” to select it and save the changes, finally.
Pause OneDrive sync
Generally, when choosing where to save files by default, many Windows 10 users choose to store information in OneDrive by default and even decide to synchronize files between it and the computer.
With which, they will be able to access their files from anywhere and even make backup copies to avoid loss. However, although this solution is of great help to keep files safe, the truth is that sometimes such synchronization can noticeably slow down the PC.
Therefore, to improve the performance of your computer, it is also advised to pause OneDrive sync temporarily and you can do that as follows:
- Through the taskbar, specifically next to the notification area, find and access OneDrive.
- Next, in OneDrive, click “More” and select the option that says “Pause Sync”.
- Now it’s time to choose how long you want to pause file sync in the system.
- For save changes made successfully, you must restart your PC and then check if any performance issues have been improved.
Disable W10 visual effects
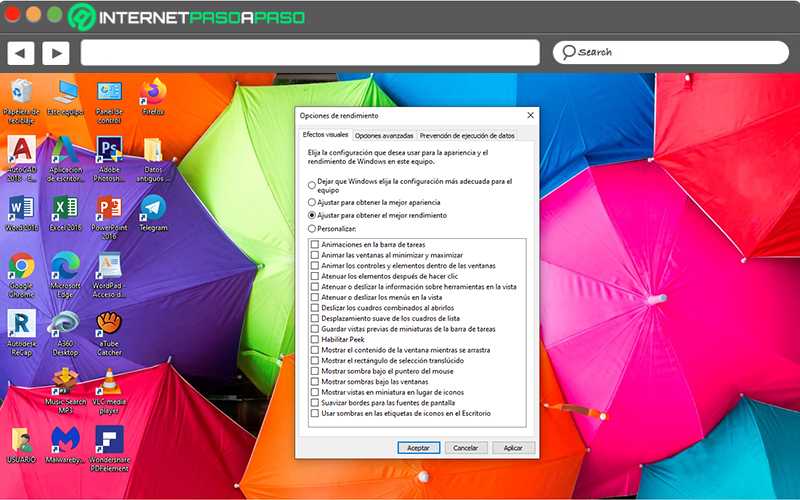
To get more out of PC performance, it is also effective disable system visual effects which automatically speeds up Windows 10. Which, since they operate in windows, tabs, and menus, constantly consume more OS resources. In this way, if it is a computer with tight hardware and few features, could lead to poor performance.
As a consequence, another method that you can use to optimize the execution of processes on your computer is to disable the visual effects of Windows 10 by carrying out the following procedure:
- Go to the Start menu of the computer and in the search bar, enter “Adjust the appearance and performance of Windows”.
- Once you select the result obtained, a small window will open in which you can find the tab that indicates “Visual effects” to click on it.
- Subsequently, check the box that says “Adjust for best performance” and automatically, the different utilities of this function will be deactivated. To do so, press the button “To accept”.
- On the other hand, you can Click on the “Customize” option to uncheck all the effects you want specifically, in order to speed up your PC with W10.
Computing