
Index:
UPDATED ✅ Do you want to know more about how to convert an Excel list into mailing labels? ⭐ ENTER HERE ⭐ and learn everything FROM ZERO!
Microsoft Excel It is the program par excellence for create spreadsheets, charts and graphs. However, there are a lot of different tasks that can be done with this software.
In this sense, it is also a good complement to other programsexponentially increasing their profits.
In this post, we will see how through simple steps, we can create a series of labels for various uses. If you want to know more about it and use this method in your tasks, we recommend the following content.
How do labels work in Excel and when is it convenient to create them?
This is a very useful tool when you need to create a sequence of prints or other individual files. The same uses an excel sheet to generate an autocomplete record. That is, you can fill a document with several sheets from another program with a list made in a table .xlsx.
This process is known as mailing labels, but it does not work exclusively for that purpose. As we can use it for multiple purposes. For example, if we have already created a price list of a wide variety of products and we need to label them, we can do it with this method. Another opportunity to use it is when we have to prepare certificates or awards. This way we only need to create two files: one Excel table with the data of the winners and another document with the design. The only thing we will have to tell the program is where to place each element.
Steps to create printable email address list labels in Excel
As we mentioned before, there are different uses for this utility. However, they all agree that must be from an excel file. Let’s see how to make this document and then transform it into printable labels.
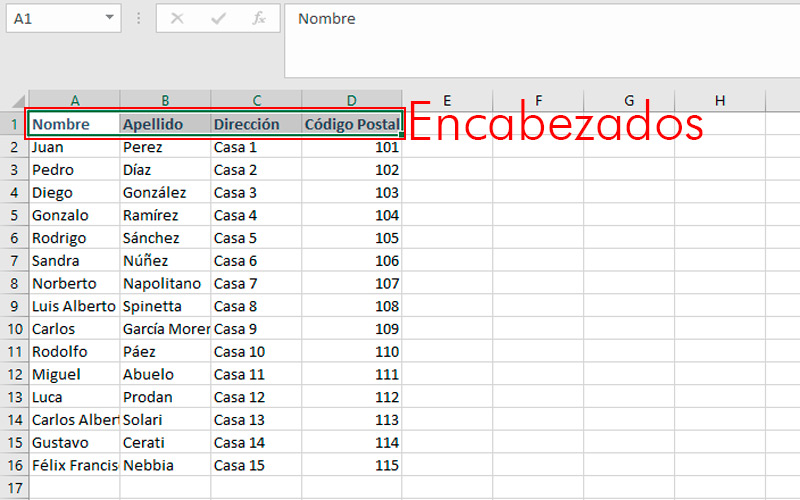
- Create a blank book with Excel.
- In the first row place the headers. In the example we use “Name, Surname, Address and Zip Code”. But you can use whichever you prefer. Keep in mind that each cell in this row will serve as a reference when distributing the elements in the other program.
- Fill in the fields that correspond to each category, the number of rows completed will be equal to the labels that we will create.
- Guard the document in a file and close Excel.
At this point, it is important to mention that this list can be used by different programs to create documents in sequence. For example, CorelDraw use excel files .csv extension to generate sheets with the same design. However, in this case we will use microsoft wordwhich is included in the same Office package as the program we are dealing with.
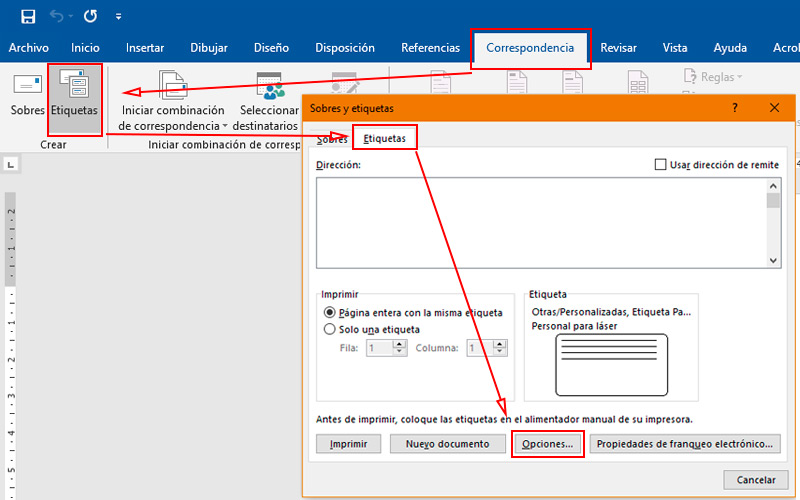
- Opens a new text document.
- Go to the tab “Correspondence”.
- locate the section “To create” and choose “labels”.
- A small window will open, in the tab “labels”Press the button “Options”.
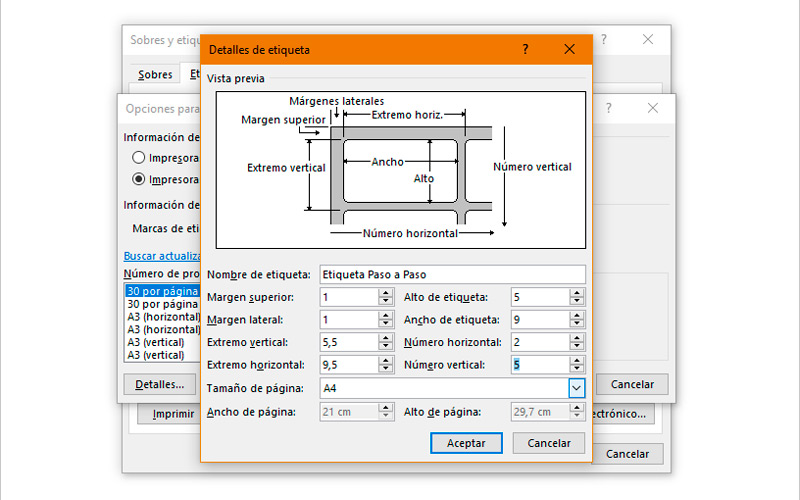
- At the top of this new pop-up, choose the type of printer you have, usually they are “Page Printers”.
- Once chosen, press “new label”.
- Here you must determine the size of each one and on which sheet format you will print them. In the example you will see that it is a size of 5 x 9 cm, distributed in two columns and five rows. All this with 1 cm margins, 0.5 cm spacing and on an A4 sheet.
- In the first frame, add a name to this provision for later use.
- Enter the dimensions you need and press “To accept”. Always keeping in mind that the quantity and size of labels does not exceed that of the sheets.
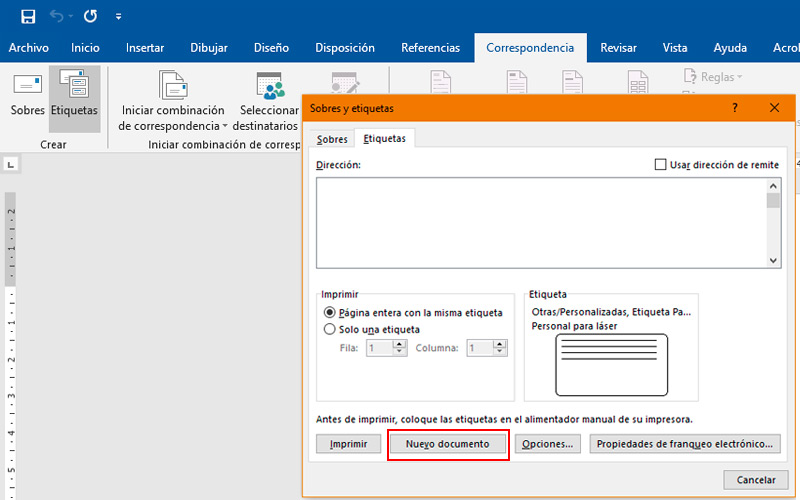
- Back in the first popup, select “New Document”. This action will create a new file, in which you will be able to observe some dotted lines that delimit each label.
- Go back to the tab “Correspondence”.
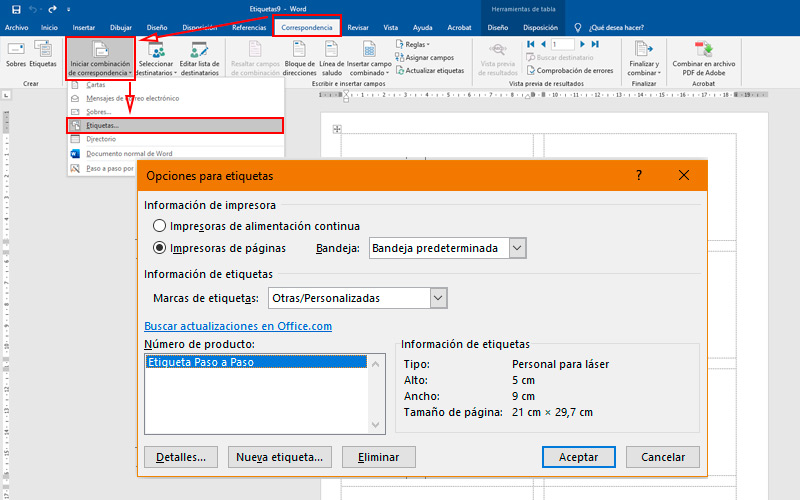
- Press the button “Start Mail Merge” in the section of the same name.
- Choose “Labels…”.
- Select the created layout and press “To accept”.
- Then press “Select recipients” and right there “Use an existing list”.
- Here you will need to locate the Excel file that you created at the beginning.
- Once this is done, make sure to select the check box. “The first row of data contains column headers” and press “To accept”.
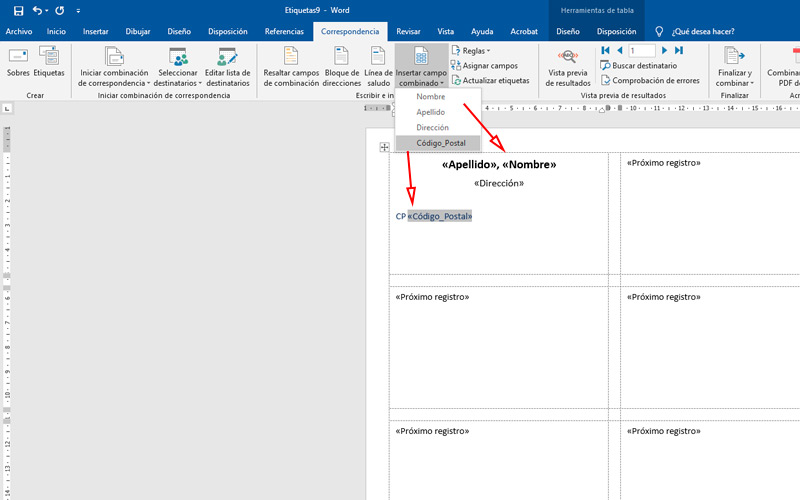
- Back on the Word sheet, it’s time to place the elements. For this you will use the button “Insert combo field” which is in the section “Write and insert fields”. You only have to do it in the first box.
- As you can see in the image, it is possible to change the order of the elements, as well as their size and other features. It is also allowed add text. These will apply to all tags.
- Press “Update tags”.
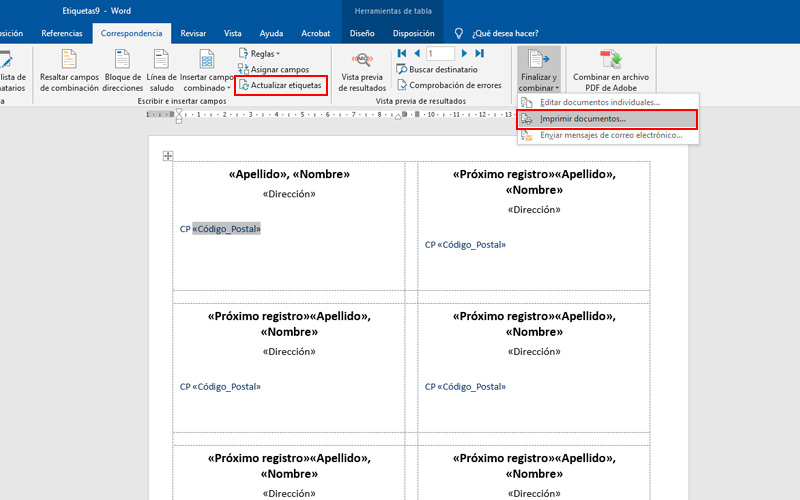
- on the button “Finish and combine” choose “Print documents” if you decide to take the labels to paper. Or if you have Adobe Reader installed you can convert it to a PDF document.
Computing