Index:
UPDATED ✅ Do you want to know more about how to put background images in Microsoft Word documents? ⭐ ENTER HERE ⭐ and learn everything FROM ZERO!
In case you need to create a template to make a special invitation, you can use a background image that will personalize your design. This will make your work have a result as if it had been done by a professional.
To incorporate an image in Word and write on it, you will have to do simple steps. You can do this using the Insert Image tool.
This function has tricks, which we will teach you in this article. Once you finish reading all the paragraphs, you will be able to know the step by step so that you do not make mistakes and your design is perfect.
What aspects should we consider before putting a background image in Word?
One of the most important aspects to keep in mind when incorporating a background image in Word is that the font color has to contrast with the element you just added. This is important that you put it into practice, since otherwise it will not allow the reader to have a normal experience.
The size of the image is another issue that you should consider. If the size is too large, it can complicate the editing format of the rest of the document. The same thing happens when she’s little. In addition, you must calculate that it does not have to exceed the margins of the page, since in this way the wording would not be neat.
It is recommended that the image contribute positive factors to the text. Otherwise, it will be convenient to leave aside the use of uncommon backgrounds and use white as normal. Accordingly, it is preferable to use image backgrounds only for certain templates and not in common text.
Steps to put an image as the background of a Word document

The steps you must perform to put an image as a background will be the following:
- Choose the tab “Insert”.
- Choose “Images”Within the group “Illustrations”.
- The file browser will open. Find the image you want to put as background and click on “Insert”.
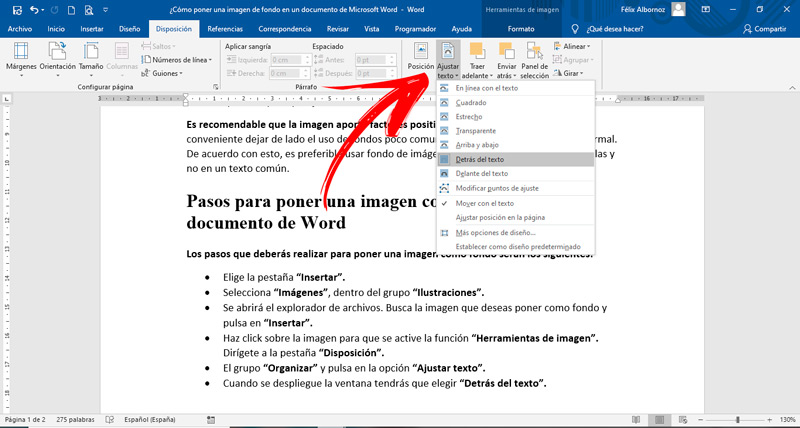
- Click on the image to activate the function “Image Tools”. Go to the tab “Provision”.
- The group “Organize” and click on the option “Adjust text”.
- When the window is displayed you will have to choose “Behind the text”.
In case you want to delete the image, you only have to select it and then press the key “Delete”. If you want to change the margins, making the photo bigger or smaller, you will have to move the extreme circles of the photo with the mouse.
If you want to rotate it, you can use the arrow located in the center and move it with the pointer. In case you want to give it a different effect, you will have to right click on the image and select the option “Image format”. A menu will be displayed where you can use 3D spins and many other artistic aspects.
Software