
Index:
UPDATED ✅ Do you want to know more about removing a page break in a Microsoft Word document? ⭐ ENTER HERE ⭐ and learn everything FROM ZERO!
When a document written in Microsoft Word you have the opportunity to have a function series that will allow the management of the program is much simpler and more completeno matter what type of data is being supplied to it.
It’s like in Word you can get what it is the page break tool, which is also known as printer endpoints. They are the ones that tell the printers where finish one page to start printing on the other, so to have Unwanted page breaks could become a big problem.
Although the function of this tool is better organize the documents and their pagination when working on them. On many occasions these are automatically inserted what can generate inconvenience. That is why we are going to show you below how to remove this function from microsoft word.
Why is it convenient to remove a page break in Microsoft Word?
As we mentioned before, page breaks Its main function is to indicate to the printer where one page ends and another begins. This means that for each page break that exists will be a sheet that will be printedwhich can become a problem if some of these elements are in the wrong place or have been inserted by mistake.
Mostly this function is add itself to documentsthis happens because on many occasions when working in Word the user copies and pastes a lot of information from other sourceswhich can generate that in said information These jumps are included.
Being able to eliminate this function without a doubt will give the possibility to reorganize your document, this will prevent there are complications in it, especially when it is printed. In agreement with all this, next we are going to teach you the main steps so you can start removing this tool from your Word documents.
Steps to remove a page break correctly in Microsoft Word
Currently they can find two types of page break in Word documents, one of them are the jumps that are added automatically to mark the end of each page, and the others are the ones are added manually to the document.
In this case only those that you add manually can be deleted, that is those that are added automatically cannot be deleted. However, these can be adjust where they occurthis way you can relocate them in the position you wantpreventing the organization of your document from affecting you.
To remove and adjust these page breaks you must follow these steps:
Remove a page break
- To remove a page break from your word document you should go to the “Options” and there select the tab “Start”.
- Then you must go to the section “Edition” and click on “Search”.
- Here you will see two options, in this case you must select “Advanced search”.
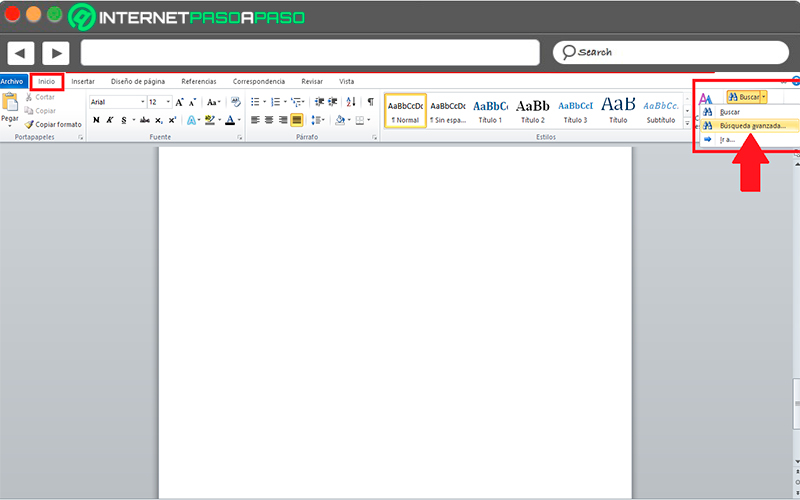
- A new window will open where you must select the tab “Replace” and then in “Plus”.
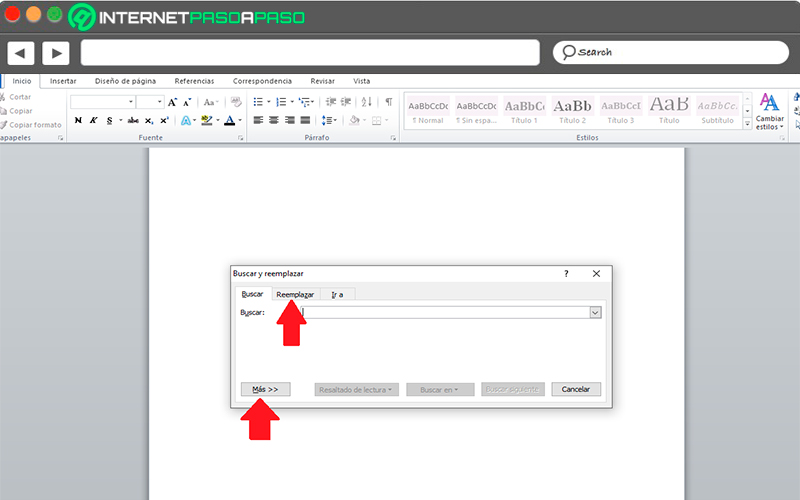
- In the new window that appears, you must click on the option “Special” located at the bottom left of the window.
- There a menu will be displayed with several options, in this case you must select “Manual page break”.
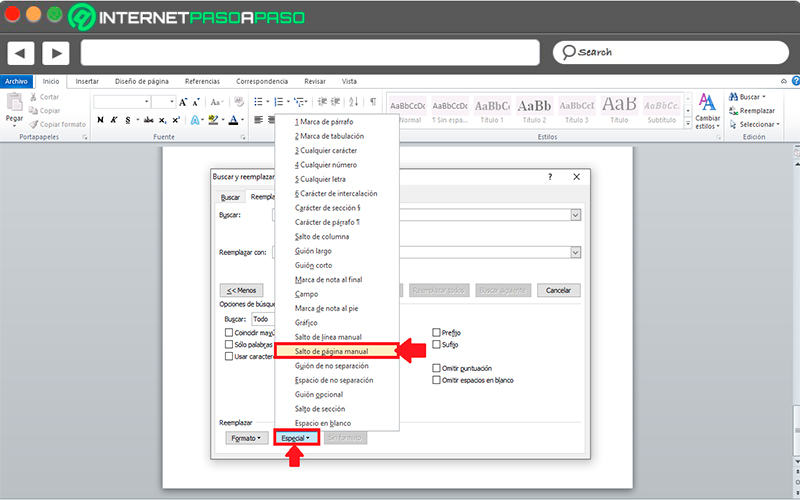
- Once selected, in the box “Search” the symbol will appear “Manual page break”.
- Now in the box “Replace with” must be leave blanksince what is sought is to eliminate them but not replace them.
- The next thing is to click on “Replace all” and in the window that appears there click on “To accept”.
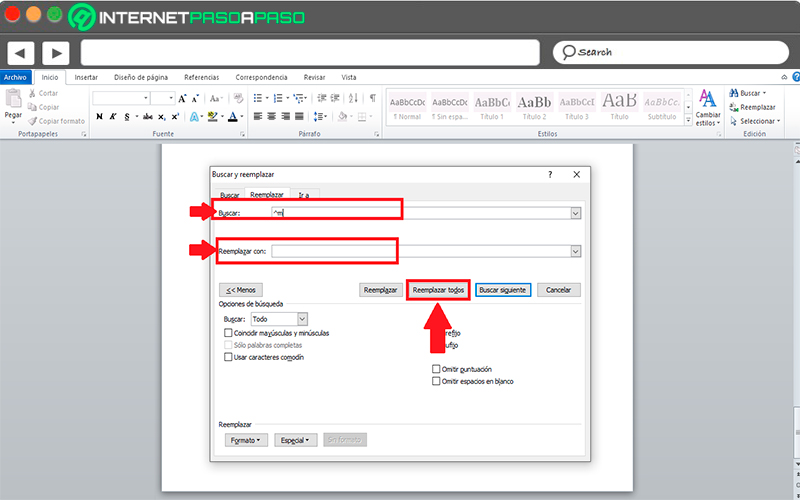
- This way you can remove each of the special elements that appear in the list. Once this is done, you just have to close the page and return to your text document.
Adjust automatic page breaks
As we mentioned before automatic page breaks they cannot be delete from wordbut if possible adjust them to change them of location in case these appear where they should not.
In order to adjust this configuration you must perform the steps that we will teach you below:
- The first thing is to select the text paragraphs to which you want to apply the configuration.
- Once selected, you must go to the “Options” and there you select the tab “Page design” and then you go to the section “Paragraph”.
- Now you must click on the arrow that appears in the lower right corner to open the options window.
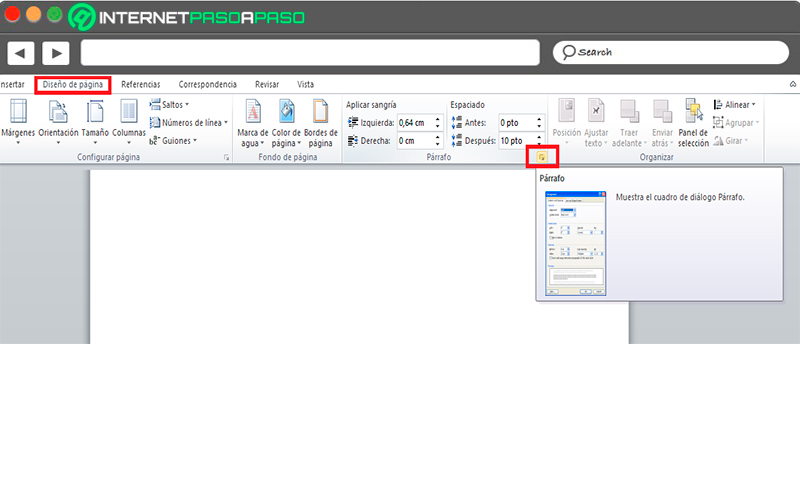
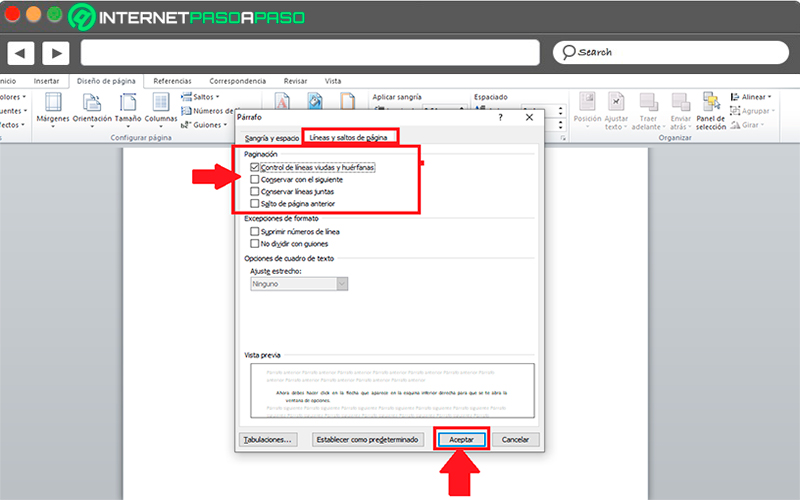
- When the window appears “Paragraph” on the screen you must select the tab of “Lines and page break”.
- Here you will find four options where you must choose those that you think are necessary.
- Once selected, click on “To accept” for the changes to take effect. This way you can start configure these jumps automatic in your Word documents.
Software