
Index:
UPDATED ✅ Do you need to optimize the CPU of your Windows 7 computer to the maximum? ⭐ ENTER HERE ⭐ And discover how to do it step by step with this tutorial
In general, all new equipment is usually very fast the first days, even weeks and months, but the opposite happens when it comes to equipment used or several months old where its operation begins to be a little slower. The same thing happens when you install a new operating system to the computer, the first weeks or months it works very quickly but with the passage of time this decreases causing the equipment runs slowly.
This is undoubtedly something that bothers every user, since it is uncomfortable to use a machine where your operating system is running very slow, especially when using a program that requires good speed or has to be used for important things. This ends up becoming a problem when you want to use the computer, thus reaching a point where you prefer to put it aside.
The good news of all this is that it is possible to correct this problem in several ways, some of them more complex than others, but they are all really effectivewhich will help your computer to have the speed you want again and you can use it without any inconvenience, that is why we will teach you here some tricks for you to fix this problem in Windows 7.
Steps and tricks to improve the performance of your Windows 7 computer
Despite seeming like a difficult problem to repair, it turns out quite the opposite, this is something that you are going to be able to solve from home and also without the need to spend a euro on it. For this there are different tricks that you will be able to perform and which will help you the speed of your windows 7 computer It is much faster and in this way it is easier for you to use it.
Windows 7 over time has been considered one of the best operating systems on computers. However, many of the users today have put it aside due to the new versions that have been released but, for all those users who still have it, here we will show you the main tricks so that you can improve the performance of your computer.
Disable automatic start of programs when turning on the PC
This is usually one of the main problems when the operating system begins to boot. Automatic program start turning on the computer will make the system opening much slower, therefore the equipment takes time to load all the programs and it will start working in a very delayed way from the first moment.
It is very likely that some of these programs do not need to be start automatically, therefore, we are going to be able to manage and solve this. Some of the programs that are considered necessary to start automatically are anti virus, but the others do not, it would be only by preference of the users.
In order to solve this problem you just have to follow the steps that we will explain below:
- In the bottom bar of your desktop on the right side you will find a arrow upyou’re going to click on it.
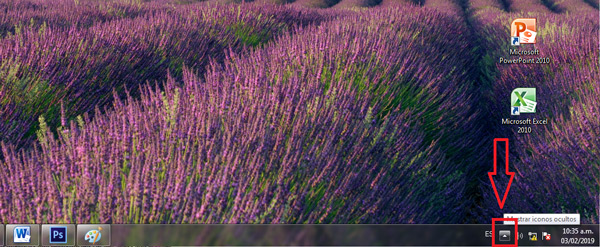
- There you will be shown a series of icons, these are the programs that will be start automatically when turning on the equipment.

- In order to manage these programs you will have to enter “Start”.
- Then go to “Task Manager” there you will find a list of the programs that run when you start your computer.
- Once you are on the list you simply have to right click on the program you want to remove and select the option “To disable” and automatically in the column “Condition” will appear “Disabled”.
Defrag computer hard drive
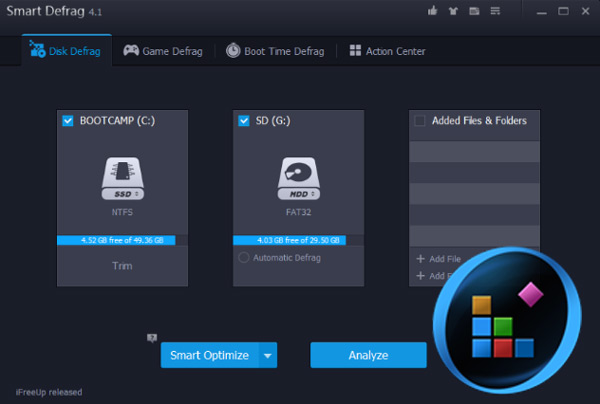
It is important to mention that this is a feature that newer versions of Windows defragment it automatically. However, it is important that you know this basic tool that will help you improve the speed and performance of your computer.
Another important aspect to mention is that the systems used Windows to defrag the hard drive is not the best on the market. Therefore, it is recommended to use other programs that are capable of carrying out this function and give us better results, one of the most used currently on the market is O&O Defragbut we also recommend programs like Smart Defrag 5 which you will be able to get for free and will give you very good results.
When we talk about defrag hard drive we refer to delete all those empty spaces that are created in the HDD, which end up causing problems in the speed of the computer and this is something that these programs can solve very quickly and easily.
Once you have eliminated all these empty spaces you will be able to get a better optimization for your Windows. But, it is important that you know that you will only be able to apply this method as long as your computer has a mechanical hard drive. If your equipment is more modern and you already have a SSD do not do this method. Now if you have both drives, you just need to defrag the hard drive.
Disable Aero theme
For those who don’t know yet, Aero is the default theme that comes with the Windows 7 operating system. so i can enhance visual effect on computer. With it come several built-in tools such as transparent windows, animationsamong other visual effects. However, it is important to mention that these effects are not productive at all, on the contrary, they end up becoming junk files that slow down your computer.
One way to fix this problem and make the device performance better is deactivating the Aero themefor this we do the following:
- The first thing you are going to do is go to the “Desk” of your team.
- The next thing will be to right click on it and a window will be displayed, there you select “Personalize”.
- Now select the section “Window Color”.
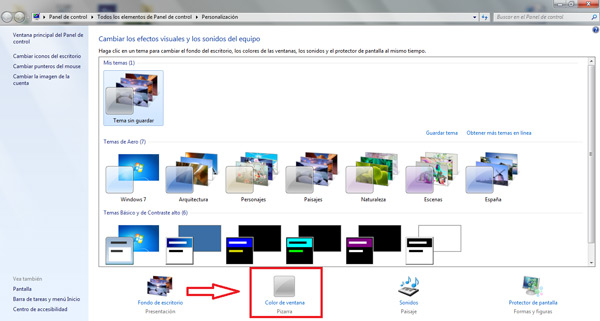
- Next, a list of colors will appear and at the end an option of “Enable Transparency”.
- You just have to disable that field in the box and save the changes.
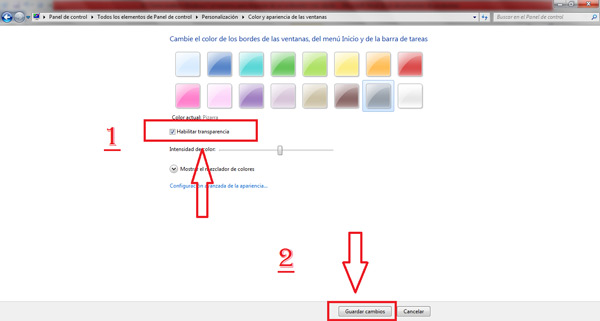
- Once this is done, you return to the previous tab and we are going to select “Windows Classic theme”. And finally “Save changes”.
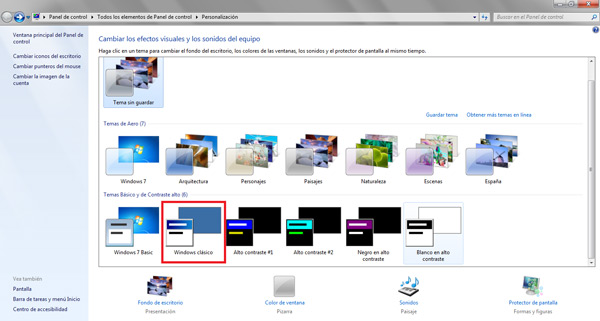
Once this is done you will disabled Aero theme and you will be using the classic theme which will offer you better performance than the previous one, which will help you in the same way to improve the speed of your operating system.
Disable services in Windows
All operating systems include services to constantly execute common tasks, this causes it to be used more memory and more resources for the CPU Thus, the speed of the computer will be much slower.
Disabling this feature will allow your computer to improve its performance as well as its speed, and this is because less service, less consumption, which will give you better results. It is important to mention that this applies to all operating systems.
To be able to deactivate these services in your Windows 7 you just have to follow these steps:
- The first thing you are going to do is click on “Start”.
- In the search box you have to write “Services.msc”.
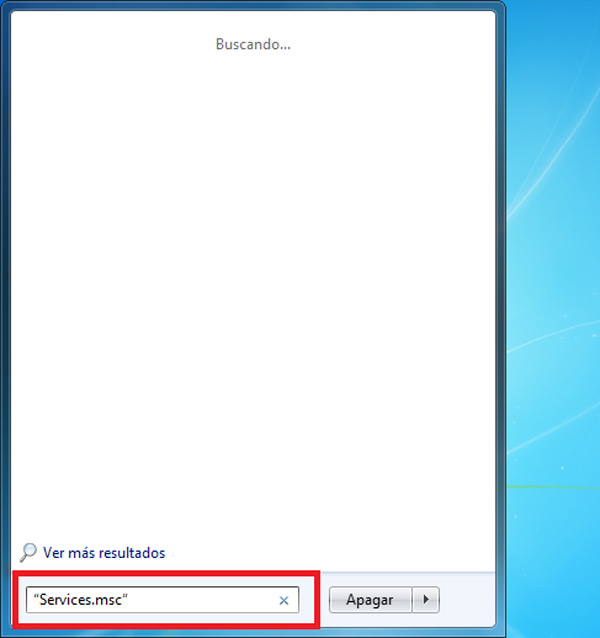
- There will appear a list with a lot of servers which you can disable.
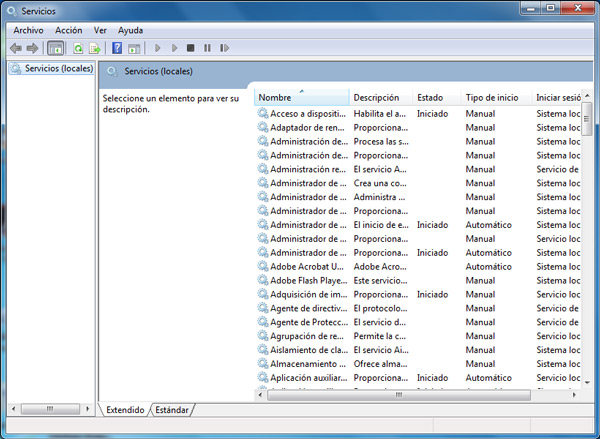
- Once you have deactivated the services you will select the option of “Save changes” and finally “You reboot the system.”
Keep in mind that these services are usually not used, they just end up taking up space on your computer and affect performance. However, if you see that some kind of inconvenience is beginning to be generated, you can reactivate them at the time you want.
Check that your computer does not have malware
It is always advisable to perform some type of scan on your computer, this with the aim of being able to determine that it is not affected by any malware that may be affecting your performance. In this sense, it is important to take precautionary measures to protect yourself from any of these software that can harm your computer. Especially today when these types of programs can be installed just by opening a link or downloading a file.
If in your case you use the program Windows Defender In order to protect your computer you must follow these steps:
- You have to go to the dashboard “Windows Settings”.
- There you select the option “Update and security”.
- Then you will select “Open Windows Defender”.
- Next, a new window will open where you can choose what type of scan you want to perform, either a:
- “quick scan”
- “Full scan”
- “Custom Scan”
- It is always recommended to perform a complete scan so that we can see everything that exists on our computer.
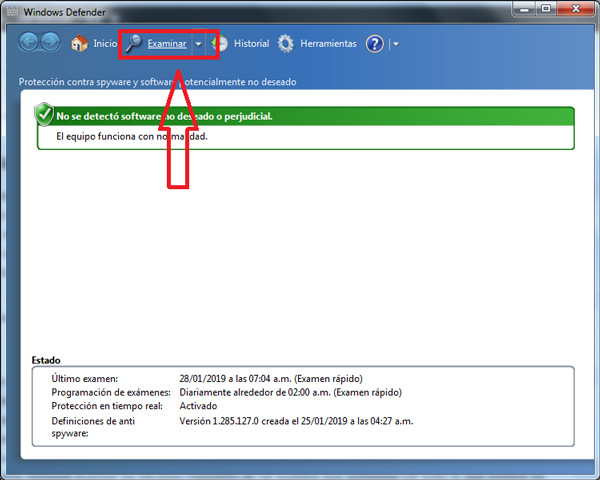
- Once you have chosen the option you have to click on the option “Browse Now”
- In the event that any found malicious software on your computerthe program itself will tell you how you can remove it.
- It is important to always have your equipment well protected with antivirusso that your operating system is not affected and the performance of your computer is always good.
Configure Windows virtual memory
This is one of the simplest tricks to be able to increase the speed of your computerit is important that you keep in mind that Windows uses virtual memorywhich makes it possible for your operating system to have a larger amount of memory.
In order to adjust this, and make your team have a better performance and speed If you are older, you have to do the following:
- For them you need to enter “Control Panel” there you choose the option “Security system” and then “System”.
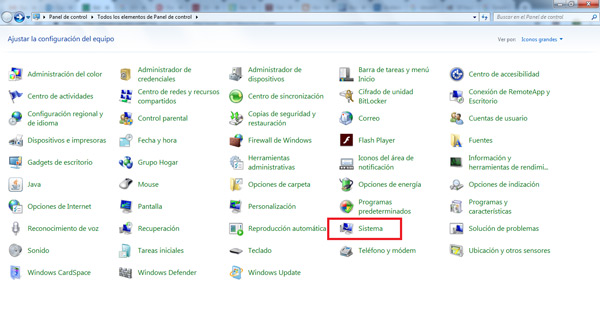
- Now a window will appear, on the left side you will click on the “Advanced System Settings”.
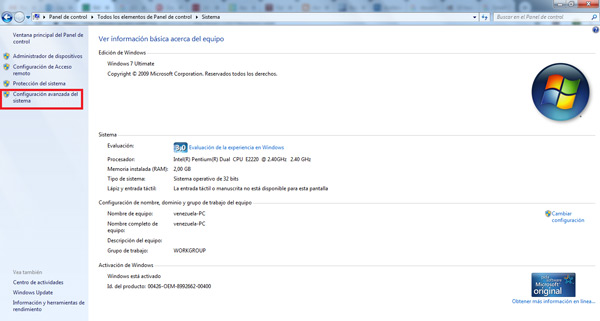
- In the new window that will appear you have to have the section of “Advanced Options” selected, if so, you’re going to click “Setting”.
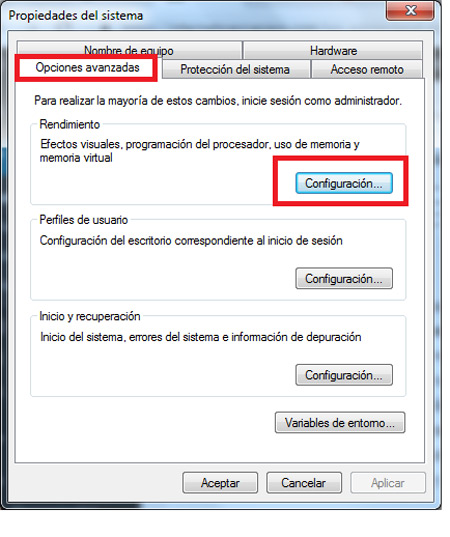
- Now a new window will open and the section of “Advanced Options” selected, and you’re going to click the button “Change”.

- The next thing you are going to do is uncheck the box “Automatically manage paging file size for all drives” and check the box “custom size” it is important that you choose the MB, it is recommended that it be the option of 1000 or 2000 of virtual RAM that you want to increase and finally you are going to choose “To accept”.
reinstall windows
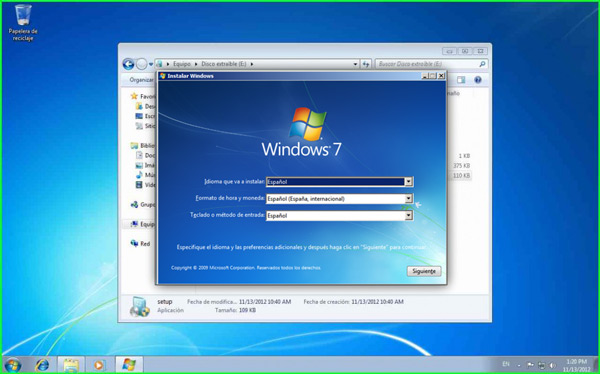
This is another way you can improve the speed of your Windows, it may seem like a fairly complicated job but no, it’s just reinstalling. This will remove all those software you don’t use and they only take up space on your computer. In addition, it also serves to eliminate those malware if you have any installed on your computer and they may be affecting you.
In order to carry out this process it is necessary that you have at hand a windows 7 installation disk. To do this, all you have to do is insert the disk into the cd drive and follow all the instructions that are indicated to you.
It is important that you make a backup of all your files when doing this step, you can do this through a CD drive or a USB stick.
Once you have reinstalled Windows your computer It will be as good as new, which will guarantee a faster and better performing computer. In the case of having Windows 8 or 10 the thing will be much easier since you can do it through the option of “To update”.
Turn off visual effects
maybe one of The problems with Windows 7 is that it has a lot of visual effects that in the end they are useless and despite the fact that they can attract the attention of many of the users, this will only make your computer work much slower, since it ends consuming the resources of the RAM memory and the CPU.
If you aim to be able to speed up and improve the performance of your operating system it is essential that you deactivate all these effects as you like them, so that you can optimize its performance.
To be able to do this you just have to follow these Steps:
- For this you need to open the “Windows File Explorer”.
- Then you have to select “Equipment” and then in “Properties”.
- Now you’re going to click “Advanced system settings”. And there will appear a new window.
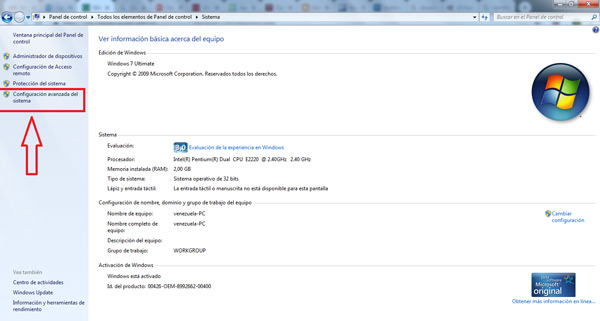
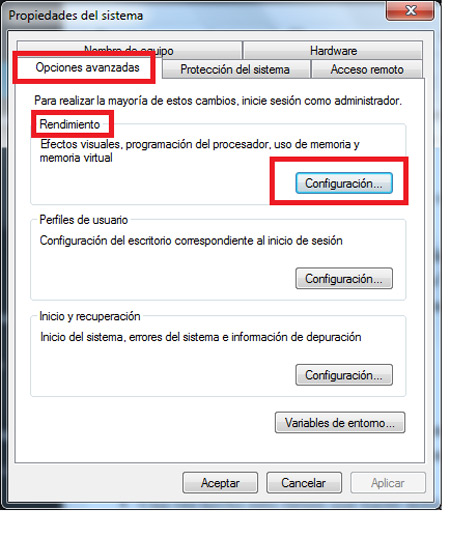
- Now you’re going to click “Advanced Options”.
- The next thing is to double click on “Setting” which is right under the tab “Performance”.
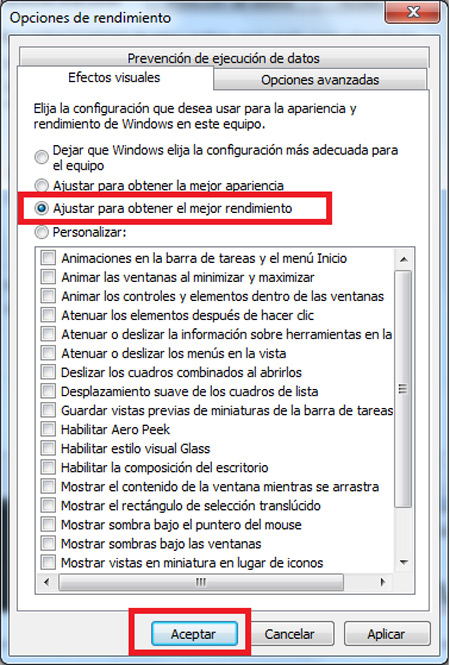
- Once this is done you have to double click “Tweak for best performance.”
- Click on accept and finally restart the computer so that the changes are saved.
Increase RAM memory with the help of ReadyBoost
This program of ReadyBoost gives you the option to add more memory to your RAM in your operating system which will help you have a larger capacity, but this memory will not be added at the hardware level.
This does not mean that you will have to buy one. extra ram memorybut on the contrary, you have the possibility of using a USB stick as an extra RAMa.
In this way you have the option of expanding the resources of your Windows 7 in order to improve both your speed like computer performance. In order to use this program ReadyBoost Your team must meet the following requirements:
- A Flash memory and one USB 2.0 memory
- And a space of at least 256MB.
Once these two requirements are met, you can move on to activate ReadyBoostfor this you will do the following:
- The first thing to do is start the “Windows Explorer”.
- The next thing is to double click on “Equipment”.
- Now insert the USB memory into the computer.
- Then on my PC search the USB drive you have connected and right click.
- There a menu will be displayed where you will select “ReadyBoost”.
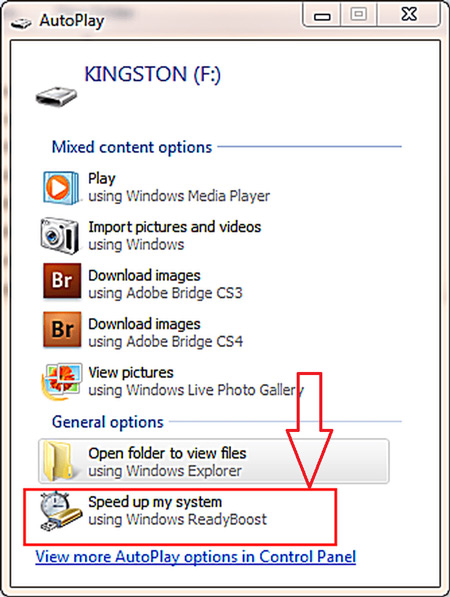
- The next thing is to select “Use this device.”
- And finally you choose how much memory you want to use as a RAM which will help you improve the performance of the team.
Disable the UAC of the operating system
The UAC has been the system created by Windows 7 to protect all computers with this operating system of being attacked and affected by a malware. However, what this UAC system has been creating are problems because it is a fairly heavy program.
Today there are thousands of programs that can fulfill this function in an excellent way and are characterized by being very light. Because of this it is important to disable this system to ensure a better fdevice operation, For this we will perform the following steps:
- The first thing you have to do is from the desktop click on “beginning”
- then in “Control Panel”.
- Now you’re going to click “User accounts and child protection”.
- After in “User account”.
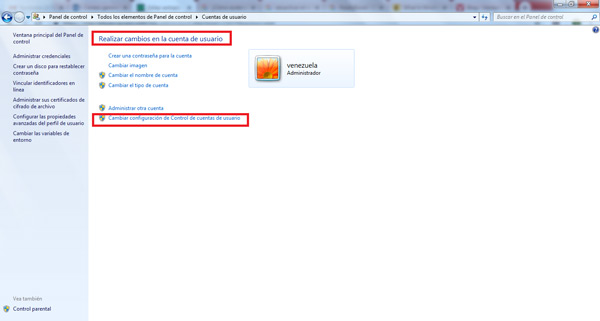
- There you have to select the option of “Change control settings in user account”.
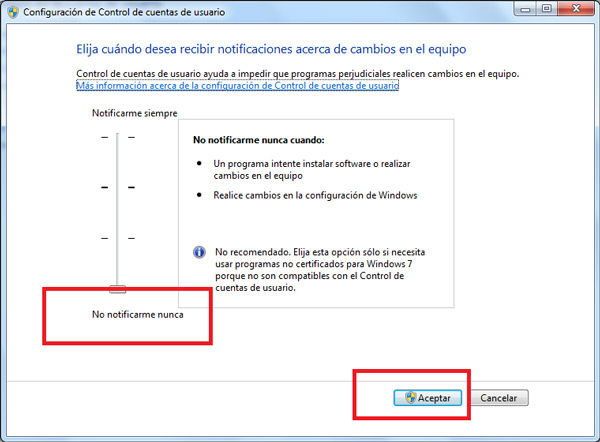
- Finally, a new window will appear which you must select “Never notify me.”
Disable content indexing on the hard drive
This operating system is characterized by save the contents so that later they can be found in a more fast in searchesin order to slow down the system.
You will be able to select this function from the hard disk, for this you have to do the following:
- You must enter the section “Equipment”.
- Then you are going to right click on the unitl “Hard disk”.
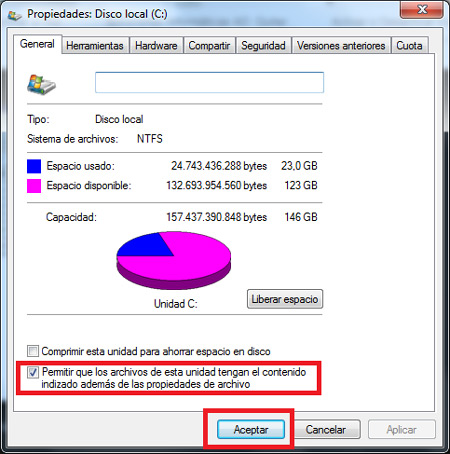
- There a menu will open where you choose “properties”.
- Now you have to uncheck the option of “allow so that the files on that drive do not have the content indexed as well as the properties of each of the files”.
Hibernate instead of shutting down
Something that is recommended when using computers is not to turn it off if it is going to be used constantly, for this it is mainly recommended to place it at “Hibernate” or “Sleep”. In this way, the operating system will not have the need to be restarting every moment, which over time could end up causing some kind of problem.
To place your team in “Hibernation” you need to perform these steps:
- You must enter “Control Panel”.
- Then you will select the option “Security system”.
- Now you have to choose “Energy options”.
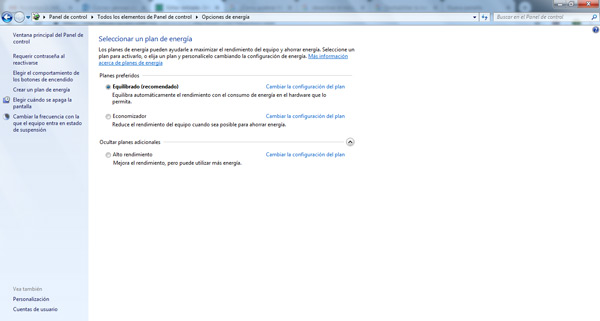
- Finally you have to choose the “Lid Behavior”there we are left with the option of “Hibernate”.
Once your team is done, it will be configured so that you can place it at “Hibernate” that way it won’t be necessary to turn off the machine completely if you have the need to use it in a short period of time.
Operating systems