Index:
UPDATED ✅ Do you want to know how to subtract dates in Microsoft Excel documents correctly? ⭐ ENTER HERE ⭐ and learn everything FROM ZERO!
Excel is software developed by Microsoft and included in the Office Suite. the same is designed to organize data in tablesbeing able to perform hundreds of operations Y formulas in the. In addition, it has a lots of tools and utilities that facilitates the analysis, categorization and updating of information.
One of the most used operations in this program is addition and subtraction.. They are used in budgets, summaries, data analysis, etc. But on many occasions, we need compute or analyze time periods.
And in this case, perform operations of this type can be confusing. Therefore, we present the following post, where you will learn all about subtracting dates.
When is it convenient to subtract dates in an Excel document?
Yes ok add years to a given dateis a simple task to solve, since the decimal method, like any other integer. In the case of the months and days can be a little more cumbersome. Above all, if we must add a big number or do we have to do it with various dates.
For example, if you want to postpone multiple events for three weeks, you would waste time doing the calculations manually. Instead, through simple functions, you will be able to do it in a very simple way, even if it were hundreds of dates.
In addition to add weeksit’s possible subtract themthe same happens with the days or even years.
Learn step by step how to subtract dates from an Excel spreadsheet
As we mentioned before, these are very simple formulas to apply. They will serve you in all kinds of projects.
You just have to follow these steps:
- Open Microsoft Excel with the shortcut on the desktop or from the start menu.
- create a new spreadsheet or go to the one where you have the dates.
- in a columnmay be the first place those dates to which you want to add or subtract time.

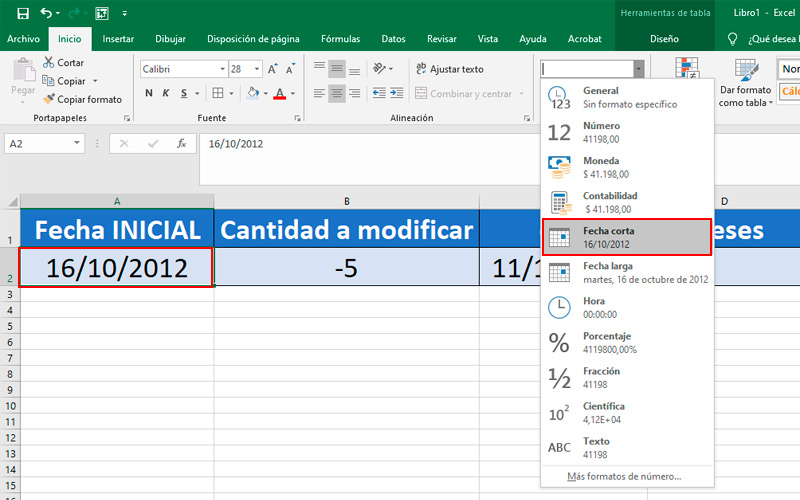
- Although it usually be automaticmake sure that all the ones you entered are in the format of “Date”It doesn’t matter if it’s long or short.
- If it is not with this provision, you can replace it from the tab “Start”in the section “Number”change “General” by “short date” or “Long date”.
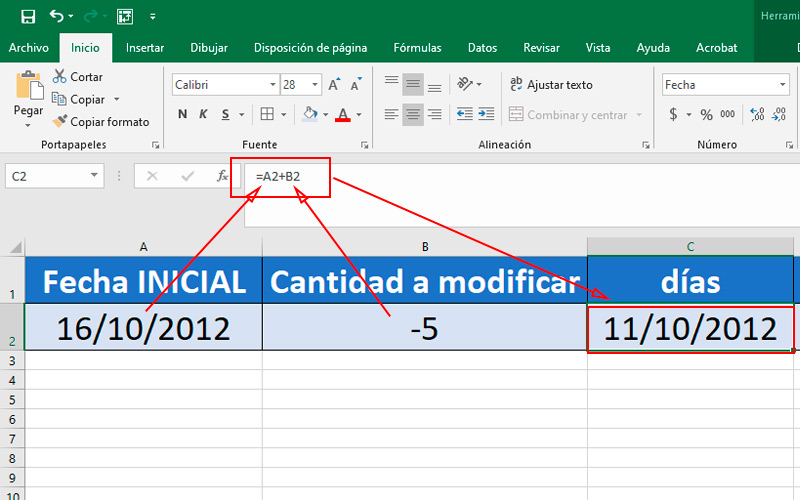
- in the second column enter the number of days, months or years that you want to modify. If you are going to subtract them add a minus sign before the number, if you are going to add leave it like that. The format of this column should be kept in “General”.
- In the third column is where we will enter the function. It must have a date format.

- For the days, you’ll just have to add the cell in the first column plus the cell in the second. In the example of the image it looks like this: “=A2+B2”.
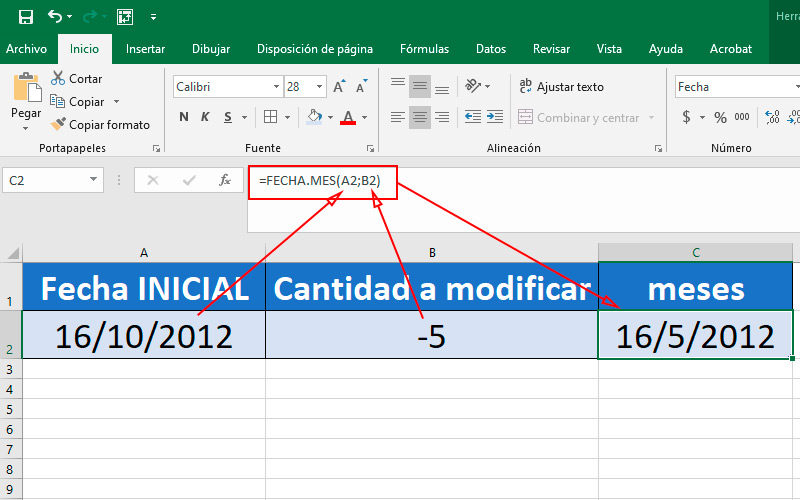
- If you need add or remove months we will use the argument DATE.MONTH which will tell the program that we want to change the referred segment.

- To do this, write in the cell “=DATE.MONTH(the cell that includes the date to be modified; the one that contains the figure to be added)”. In the example it looks like this “DATE:MONTH(A2,B2)”.

- In case you want change the year of a single date, we recommend doing it the traditional way. But if it were many you can use the example function “=DATE(YEAR(A2)+B2;MONTH(A2);DAY(A2))”. In which A2 is the start date and B2 the figure to be added.
As you can see in this last action, the function separates into three segments cell A2 and add the value of B2 only the one that represents the year.
Computing