
Index:
UPDATED ✅ Do you want to have a much newer and more current operating system than the old W7? ⭐ ENTER HERE ⭐ And do it quickly and easily
Windows 7 has proven to be a very robust and highly effective system for many years; However, the time always comes to take the leap and give in to the generational change with one of the other proposals that Microsoft puts on the table. W7 basic support has been inactive since January 2015. Therefore, from that date, the best option is to upgrade and launch to Windows 8, 8.1 or even 10.
After that system so popular and loved by users, the American company launched a totally renewed and improved version, Windows 8. With it, he completely changed the user interface using the Metro system and, in addition, took the opportunity to also approach smart devices such as smartphones and tablets with a platform compatible with them. Pretty good in terms of performance.
Then, how to upgrade from windows 7 to windows 8 or 8.1? As time goes by, it is more complicated to do this procedure, since Microsoft always tries to take those interested to its most modern operating systems. Nevertheless, there are options that work and serve to achieve this purpose. Here, we are going to talk about all of them.
Upgrade and install the new version of Windows 8 or 8.1 from Windows 7
This guide is for perform this upgrade from W7 to W8 or even W8.1. By following all the steps that we are going to explain later, you will be able to install this version on your computer in a matter of minutes and without having to resort to overly complex procedures. Let’s go!.
Although the most modern trend is to take the leap to Windows 10you also have the option to upgrade to the new version of Windows 8 or 8.1 from Windows 7. To do this, first of all, you need to have a USB drive with a minimum of 4 GB capacity. If you have it, follow the steps below:
1 – Download the updater
First of all, you need the windows 8 updater. Microsoft grants it in an easy and accessible way through its support web pages, so you just have to enter its portal and get hold of it.
Download Windows 8.1 Assistant
The only thing you have to do in this regard is download the official installer from the links we provideDon’t worry, they are totally reliable. Or you can also access the official download website from here. Once inside, you have to scroll down the page a bit until you find the button “Download the tool now”. Click on it and the download of the Windows 8.1 setup program for your computer will begin.
2 – Run the Windows 8.1 installer
When the file is finished downloading “mediacreationtool.exe”, look for it in the folder that you assigned to the browser when downloading and open it. It is very important that right click on the file and click on “Execute as an administrator” to avoid any type of conflict.

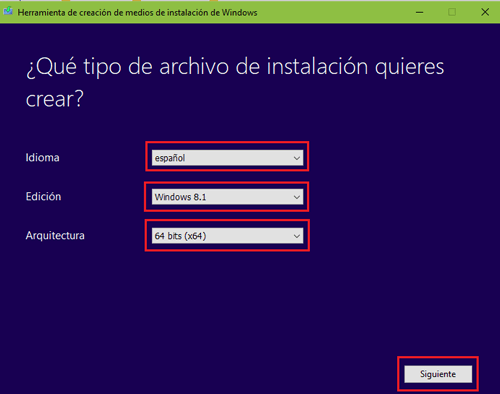
The installation media creation tool window will open. Choose the appropriate language, edition and architecture. In our case, “Spanish”, “Windows 8.1” and, in the last section “32-bit (x86)” either “64-bit (x64)”. When you have done it, click on “Following”.
Then you will be prompted where to save the installer. You can choose “usb flash drive” either “ISO file”. In the first case, it is necessary to have a device with at least 4GB free; In a second, a DVD on which to burn the disk image. Whichever one we choose, we will have to have previously connected a USB for the first case, as well as a DVD on the computer for the second.
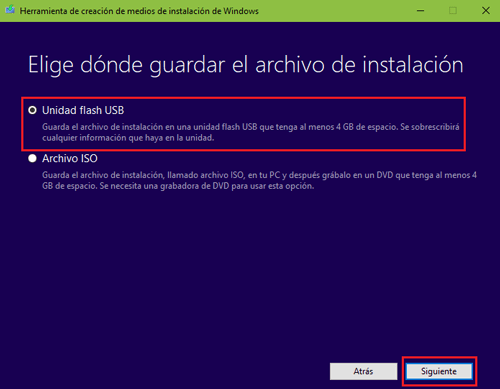
Since the USB format is currently the most widely used, it is better to choose the first option and click on “Following”. Although, be careful, everything on that drive will be completely erased if a previous backup has not been made. Windows will warn you that the files on the pen-drive will be deleted. Click on “To accept”.
3 – Change the startup of your PC
When you are done doing the whole process. You must restart the PC and enter the BIOS pressed: “delete” either “F2” as soon as you turn on the PC, to change the boot system. It is usually set to read and access the hard drive first.
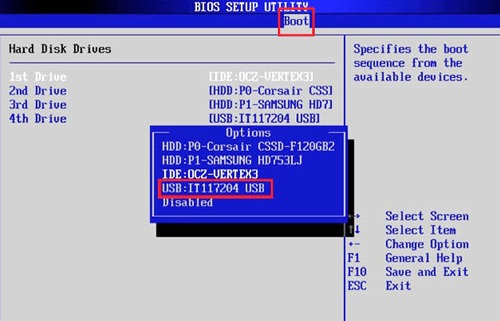
You must enter the section “start” either “Boot” Y choose USB as first device. In this way, the computer will enter to read this first to see if it can use it at boot time. When you’ve done it exit bios and save changes. The computer will restart again.
4 – Installation begins
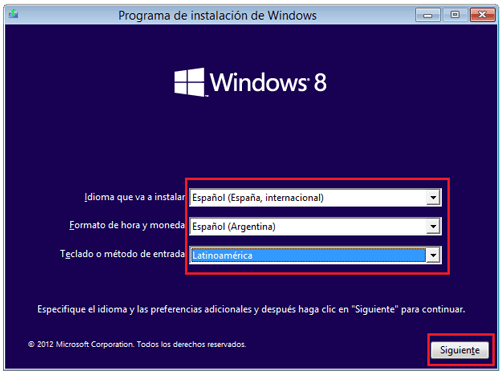
Leaving the USB inserted in the corresponding slot, the next start of the computer will take you directly to the Windows 8 or Windows 8.1 installer. The first window asks you to choose a language, a time zone and the type of keyboard, mark the corresponding fields in the drop-downs that appear and, when you finish, click on “Following”. On the next screen, there will only be one button to press. Click on “Install Now” to start the upgrade from W7 to W8.
5 – Password and agreement
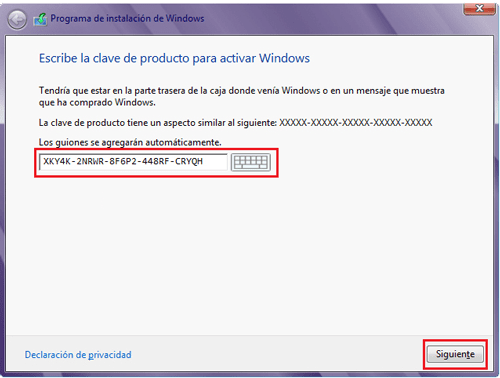
Automatically after doing this, Windows will request that enter your license code. Since it is the only way to have a legal version of the operating systemyou must have previously paid for it. Write the 25-digit code (without entering the hyphens) and click on “Following”. This step is mandatory, so if you can’t do it, you won’t be able to continue.
When you’ve done that, the next thing is accept the Microsoft agreements. To do this, you just have to check the box “I accept the terms of use” and then press the button “Following”.
6 – Update or installation?

This point is key since it depends on him that the update to Windows 8 is done well. The installer will ask you if you want to upgrade or do a clean install. If you choose the second option, you will lose everything and, instead of renewing, you will be doing the process from scratch. Therefore, choose the first option, “To update”.
7 – Finish the update
After the previous section, it is likely that you have to choose the hard disk or the place for the files to be installed. Since we’re upgrading, it shouldn’t happen; but if so, always choose the hard drive that is set as primarywhere you had Windows 7 installed before.
Now, just wait for the files to be installed on your computer and, when this process is finished, which can take up to half an hour, click on the button “Restart now”.

8 – Last configuration
After this restart of the computer, Windows 8.1 will already be installed on your computer; however, it will take considerably longer than usual to finish setting up. Wait for it to finish and then specify the last details to be able to use your newly renewed operating system.
- Processor: 1 gigabyte (GHz) or faster, compatible with PAE, NX and SSE2
- RAM: 1 gigabyte (GB) (32-bit) or 2 GB (64-bit)
- Minimum hard drive space: 16 GB (32 bit) or 20 GB (64 bit)
- Graphic card: graphic device
- Microsoft DirectX 9 with WDDM driver
Operating systems