
Index:
UPDATED ✅ Want to insert labels and text boxes in a Microsoft Access report? ⭐ ENTER HERE ⭐ and Learn Everything FROM ZERO!
When you are working with a database it is very important to be able to count on all the necessary tools in order to guarantee a complete and above all successful job. Especially when you are handling a large amount of information that can reach complicate the execution of some actions.
Fortunately, Access stands out for being a program that provides a wide variety of functions with the aim of make work easier on its interfacethis being the reason why it has become one of the most important software when having to work with databases.
This is how here you can find what they are labels and text boxestwo very important tools when working on this program, since they allow represent fixed values and represent changing values. That is why here we are going to explain a little more about what are the labels and text box and how they workfor this, follow in detail everything that we will teach you below.
What are labels and text boxes and what are they for in an Access database?
Access tags are used to represent what they are fixed values such as field titles and headerswhile text boxes are used to represent a changing value, Usually it is the content of a data source field. In the case of the tags the property that indicates it is title, Meanwhile he text box is indicated by the control source.
It is also important to mention that the text boxes can be used for display calculated fields. For this it is necessary write in the source of the control the expression so that the system can calculate in this case it is preceded by the equal sign =. In order to understand all this in a better way, it must be said that the Text Box is the standard Access control used to view and edit data on a form.
In these cases, several different types of data in text boxes and which can also be used for run calculations as already mentioned. In the case of the labels,Access is responsible for offering different options for creating them, which contain data stored in tables. In the same way, labels can reach contain data that is stored in tables or data contact lists that is imported or linked from other sources.
Therefore, the labels can be create as an Access report, or in that case combine the data with a Microsoft Word document and print them in Word. According to all this, later we will show you how you can start create these labels in Microsoft Access in an easy and fast way.
What are the benefits of using labels and text boxes in Microsoft Access?
Being able to use these Microsoft Access tools will certainly offer you some Benefits that you cannot fail to take advantage of, mainly because with them you can greatly simplify measure your work in the program.
Therefore, here we show you the main advantages that you can obtain when using Access labels and text boxes:
- The text boxes you are allowed view and edit data easily in the forms.
- The use of the tags will allow you to easily work with fixed values in the data table.
- The use of the text boxes allows you to easily work with values that change in a database.
- By using the tags you will have the opportunity to send or print the data of a table.
Learn step by step how to create a label in Microsoft Access from scratch like a professional
It is important to mention that labels are created as a report which has the format with a size of small page which enables adjust label that is desired. These elements are very important to apply when working with a database in Access, mainly because they allow send and print data in a label format for a great variety of effects.
In accordance with the importance of this tool and how fundamental it is to use it, here we are going to teach you cHow you can start creating them like a pro.
To do this, follow each of the steps that we will explain below:
Create labels using the Microsoft Access Label Wizard
The most basic way to creating these tools is through the Tag Wizard.
A very simple and easy method to perform which you can execute by following each of these instructions:
- In the pane of access navigation you should select the object that has the data you want show on tag. Typically, you select a table, query, or linked table, but you can also select a report or form.
- Now you must select the tab “To create” in the ribbon and there you will have to go to the section of “Reports” where you are going to select the option of “Labels”.
- automatically the label wizard will start that will appear on the screen.
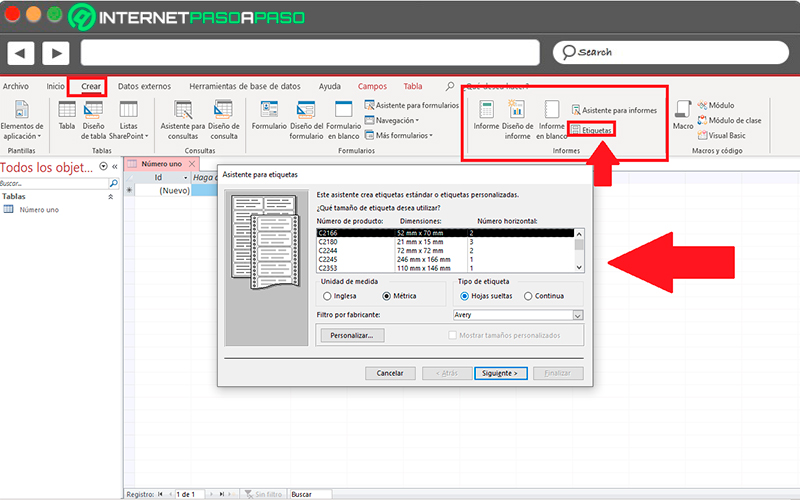
At this point you should take into account if it is known the product number and the manufacturer of the labels.
To do this you need to follow these steps:
- The first thing will be to select the manufacturer, for this you must click on “Filter by manufacturer”.
- Now you must select the size of the label that you want to use, you are going to do this from picture. Otherwise you can try look for a product where the values coincide in the dimensions and horizontal number columns.
- If you have not found a similar tag, then you should click “Personalize” and then in “New” So you can create a new tag.
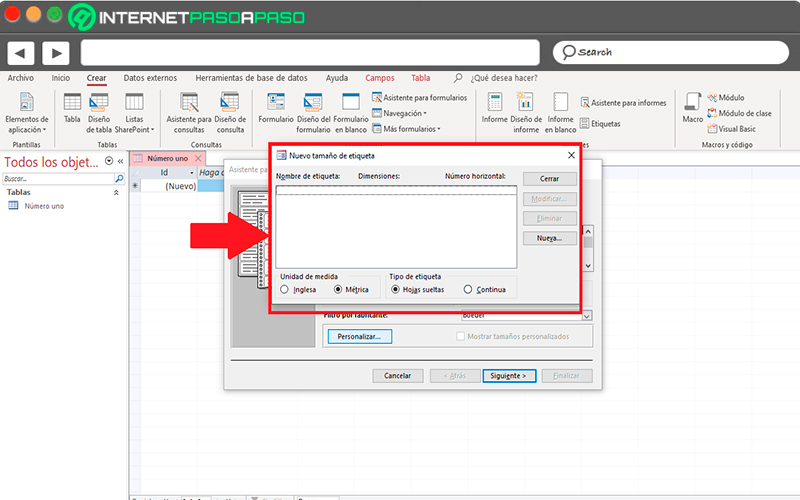
- In the box that appears on the screen you can create the fully custom label depending on your needs.
- Here you should measure the labels and write the measurements in the pictures that appear in the box “New label”.
- Then you must write the name for custom labels in the text box “label name” and then select the type of label and orientation what you wish. Once this is done, you must select the option “To accept”.
- when you already have custom label and created to select it you must click on “Show custom sizes” and there you select the label you created.
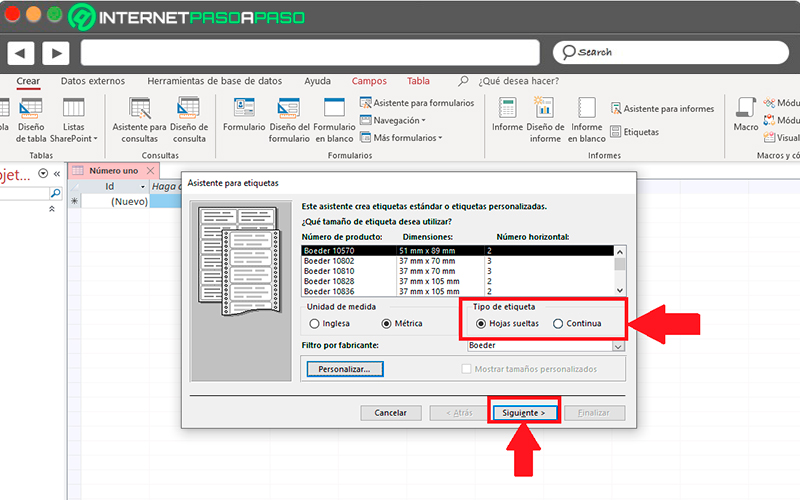
- The next thing is to select “Loose sheets or Continuous” bass “Tag Type” and click “Following”.
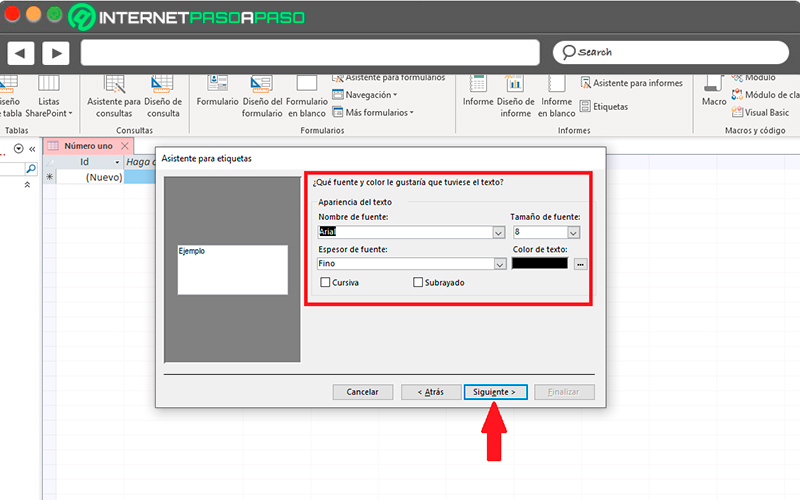
- In the new window that appears on the screen you must select the font type, size, color, the thickness of the font and finally click on “Following” when you have defined each of these parameters.
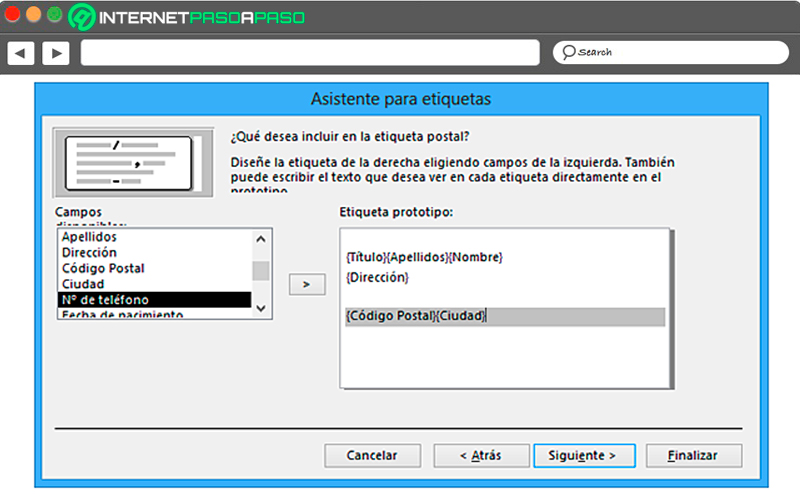
- A new window will appear called What do you want to include on the mailing label? Here you will have to select the fields you want in the labels of the list of “Fields available” and click on the options you want to add to the box “Prototype tag”.
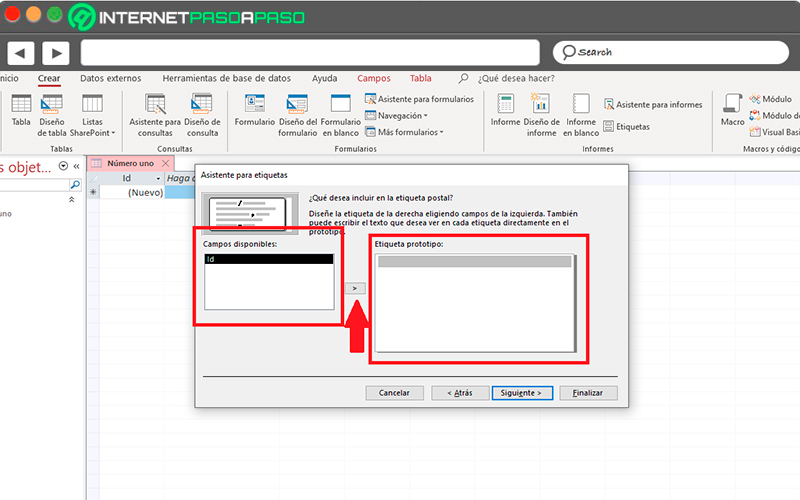
- In order to add the spaces between the fields of “prototype label” you must press the space bar on your keyboard.
- If you wish create a new line then you must press “Enter”.
- To move between lines and fields you must use the arrow keys.
- If you want to remove a field from the box then press the key “Recoil”.
- In order to add another field you must click to place the mouse cursor where you want it to appear the text and there begins to write. The text entered there will appear the same in each tag.
- once all the fields of the label are arranged You must select the button “Following”.
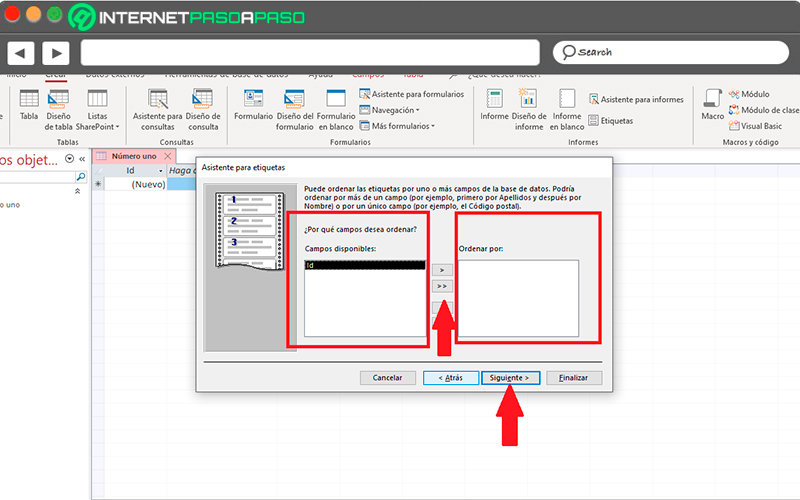
- Now in the next window that appears on the screen you must select the fields you want order label. In case you want to order by Postal Code for a large distribution, you can select the fields in the list of “Fields available” and double click on them to add them to the box “Sort by” and finally when you have finished ordering the labels you must click on “Following”.
- In the new window that appears you must write a name for the labels and then click “To finalize”.
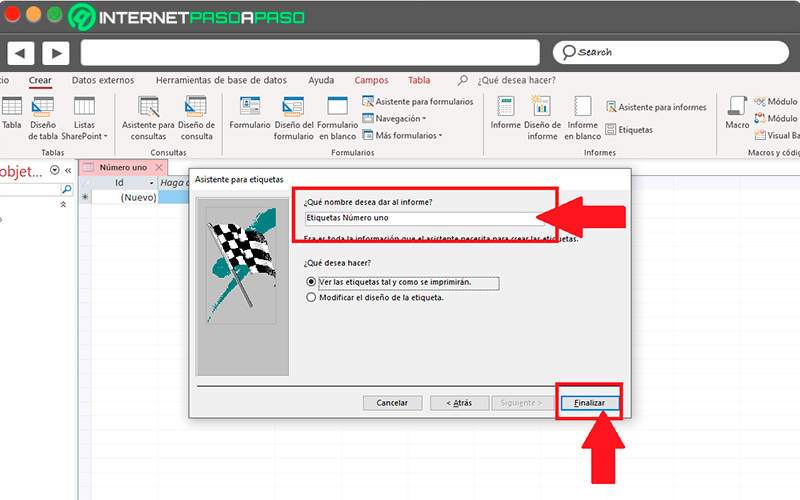
- If you select the option “View the labels that will be printed”, then Access will show you the labels in print preview. You can use the option zoom in the status bar to zoom in and out.
- Now if you have selected the option of “Modify the design of the label” then you will be shown the label report in the “Design View”.
Learn how to create text box controls in Microsoft Access forms and reports
The text boxes of Access they can add in different wayseither from dependently, independently, or is a calculated text box. The procedure for these three methods is very simple and easy to achieve.
To do this, you simply have to follow each of the steps that we are going to teach you below:
Add a text box dependently
- The first thing will be to open the form in Presentation view or Layout view, to do this you must click with the right mouse button on the navigation pane and then select the view you want.
- Now in the tab “Design” you should go to the section “Tools” and there you select the item of “Add existing fields”.
- In the pane of “field list” you must select the table that contains the field you want link to text box.
- Then you have to drag from the Field List panel to the form.
Another way to be able to add the dependent text boxes to a report is by first adding a separate text box and then setting property of “control source” from the text box to the field you want to bind.
Add a separate text box
It should be mentioned that the independent text box is not connected to any field in a table, they can be used to display the results of a calculation or for accept unwanted input store directly in a table. Also, these text boxes independent can be easily added from the layout view.
To do this, follow each of these steps:
- The first thing you should do is open the form in design viewYou can do this by following the steps mentioned in the above method.
- Once this is done, you must go to the tab of “Design” and there select the category of “Controls” and then the item “Text box”.
- Here you must place the pointer in the field where you want the text to be placed. text box in report and then click in “Insert text box”.
You can too add these separate textboxes otherwise, in this case it consists of first creating a text box dependent by dragging a field from the panel “field list” in the report and then delete the value in its property “Origin of control”.
If this procedure is performed from the Design Viewit will be displayed “Independent” instead of Field Name. While if you use the Presentation View, then the text box will not teach no data typeso it will be blank.
Add calculated text box
Finally you can find what is a calculated text boxThe procedure to apply it is very simple.
To do this, follow these instructions:
- As in the previous cases, you must open the form through the Design View through the navigation pane.
- Again from the tab “Design” you should go to the section “Controls” and there you select the option “text box”
- You must now place the mouse pointer where do you want it to be placed text box in the form and click to insert it.
- Once this point is reached, you must follow one of these procedures, the first is hover over the text box and then write the expression that calculates a total. The other is about selecting the text box and press the F4 key on your keyboard to display the property sheet and there you must write the expression in “control source”. In order to use the expression generator you must click on the three points located next to “control source”.
- then you must save the form and then change to Form View or Report View so you can check the results.
- If you need more space to write a expression in the box of properties “control source” you must press the key combination “Shift + F2” to open the zoom box.
- Now if the report is based on a query then you should put the expression in the query instead of a calculated control. since this will improve performance and if you are going to calculate record group totals the process It will be much easier to use calculated field in an aggregate function.
Software