
UPDATED ✅ Do you have the message Runtime Broker the group or resource is not in the correct state and you don’t know what it is? ⭐ ENTER HERE ⭐ and discover how to solve it ✅ EASY and FAST ✅
There are times when our computer works very slowly, this is due to a process called Runtime Brokerin some cases the consumption of resources of your CPU and RAM causing the system to slow down significantly.
This problem for inexperienced users can make them believe that the process is a virus or malware that is affecting their computer. When it’s the opposite, it was integrated into Windows systems since its Windows 8 version and currently still works. This exercises the functionality of controlling all the universal applications that comply with their permissions and do not carry out other activities on other components of your computer.
If you want to know more about it, in this tutorial we will explain step by step, how can you avoid excessive consumption of Runtime Broker on your computer? And what exactly is this process? So that in this way you know how to solve this problem, and in turn you can stay calm, since you will know that this is not about any malicious program that is affecting your computer.
What is the Runtime Broker process on my Windows computer?
It is a process created by Microsoft, which was integrated into its operating systems since Windows 8 and is now working on Windows 10. This element It has the functionality to control that the applications you have installed comply with the permissions that have been assigned to them. and do not perform tasks other than the permissions granted.
For example, a program asks for permissions to be granted to use your microphone, but for some reason it tries to access your webcam, The Runtime Broker detects this abuse and blocks the application from doing so.
Steps and Tricks to Fix Excessive RAM and CPU Consumption Caused by Runtime Broker
There are a series of steps that you can follow in order to solve the problem caused by Runtime Broker, by generating excessive consumption of your computer’s processing capabilities.
There are different methods, some more effective than others and which in turn can be more complex to perform. In this case, you will only need to pay close attention to each process so that you can do it correctly.
End the runtime broker process
Although it is somewhat contradictory to end it, since it is part of the fundamental processes of Windows, in many cases it is the only solution, because the excess consumption of it in our computer prevents us from performing some basic or very important task.
To finish the process you just have to do the following:
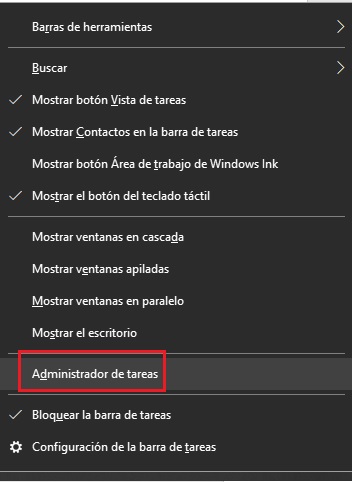
- You have to enter the “Task Manager”. To do this you will have to right click on the taskbar, this is the one at the bottom of your desktop.
- Once you have clicked, you choose the option “Task Manager”.
- You will click on the tab “Processes”, in this you will see each of the processes and applications that Windows is running, in this you will search “Runtime Broker”. If you wish, you can organize all that are shown alphabetically. To facilitate your search, you just have to click on the arrow that is on the option that says “Name”.
- Now you will select the process that you are going to end and then you will have to click on “To finalize”this is in the bottom right.
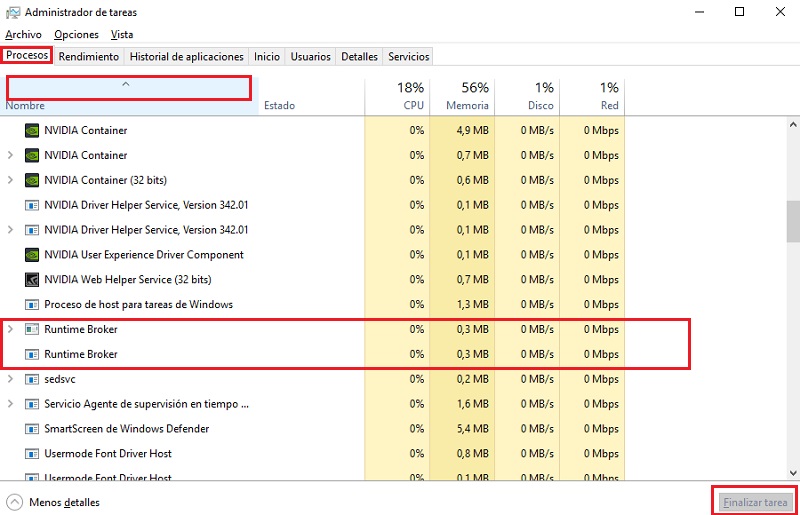
In this way the process will be closed in a forced way and in a few seconds your computer will recover speed. It should be noted that this solution is temporary, because any program or application that needs or requests permissions to work will activate the process again.
Detect which applications affect the Runtime Broker
It is a somewhat complicated and tedious process to carry out, this because it takes a lot of patience to do it. But if you want to try it, you just have to do the following.
- First of all restart your computer. In this way you make sure that there is no program using the process that generates the problem.
- Once you have turned on the computer, open the “Task Manager” and find the process “Runtime Broker”, see how much is the consumption of RAM and CPU. It should be noted that this should not exceed 15%, should be null or less than 1%since your computer has just been turned on.
- Once you have seen the natural behavior of it, proceeds to open the programs or applications that you use on a daily basis.
- Visualize in detail the potential increase of RAM and CPU What does the process do when you open and close each of the programs and applications.
- If a program generates a very high raise in the process after a few minutes, said program is the one that is affecting your computer.
- Evaluate if it is important to make use of your computer, if not, proceed to eliminate it. If said process is important, try removing it and reinstalling it.
- Finally look again at the behavior of this. Because it may be due to some failure to run the program. It also checks that it can be updated.
Disable W10 Tips, Tricks and Tips
This is a very easy procedure to use and can help apps and programs from running in the background, or that if you decided to end the RunTime Broker process, it will not be activated again.
To disable tips, tricks, tips and more on W10 and W8 just do the following:
- You will have to enter “Settings”the easiest way to do this is directly from your keyboard using the following method. “Press home key + i”, once you have done this Windows will send you to the configuration screen.
- In it you will choose the option “System”.
- After this you will choose “Notifications and actions”in it you will preferably deactivate all the options.
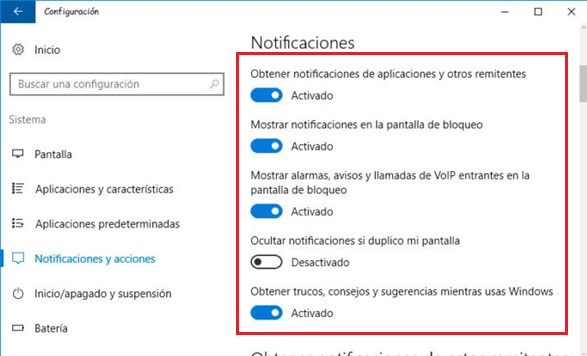
Once you have Once this process is finished, just restart your computer to make sure it has been configured correctly.
Limit the use of applications in the background
Applications that work in the background can cause problems with the process that we already know, since they will continually ask for confirmation from the system and this can cause that little by little more is consumed RAM and CPU processing power.
In order to limit which apps work in the background you must do the following:
- Enter in “System”, To do this you just have to press the start key + i.
- When you are on the system screen, you will choose the option “Privacy”.
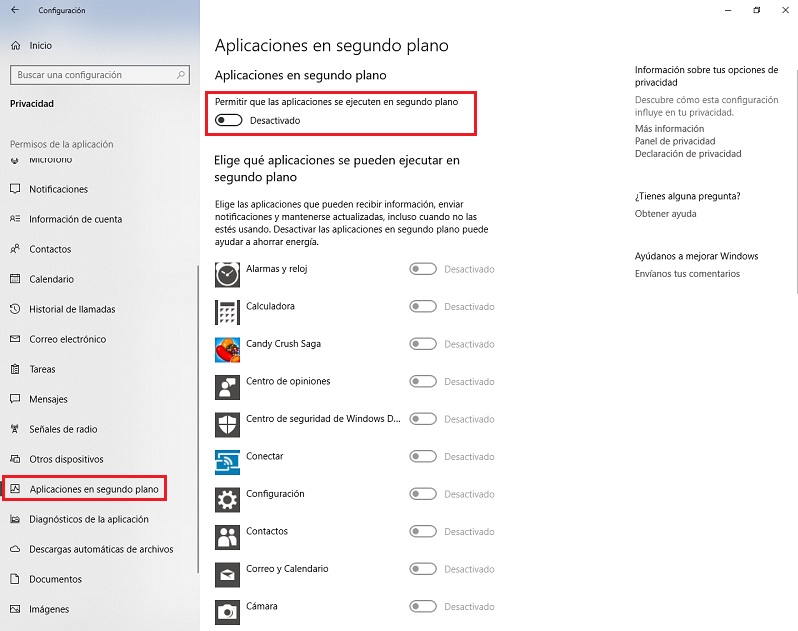
- Now you will choose the option that says “Background apps”, there you will deactivate what it tells you “Allow apps to run in the background.”
The ideal in this case would be to choose which apps you do not want to run in the background, you can do it only in cases where you know which ones are affecting the operation right from your computer.
Check for viruses on the system
There are viruses and malware that can affect your system and slow it down, To check if the system process has not been infected, just perform a few simple operations, the first one is the following:
- Enter the “Atask manager”.
- Locate and select the process “Runtime Broker”.
- Right click on it and select the option “Open file location”.
- A folder will open where it will show you the location of the file, the path of this must be the following “C:WindowsSystem32”.
If the file is in another folder or address, it is a sign that it has been modified by a virus or malware. In this case, try to perform a scan with the antivirus program of your choice or with Windows Defender which has W10/W8 operating system.
The other process is similar to the previous one, you just have to perform an in-depth analysis of your system, The antivirus you use can detect if your computer is infected with malware or a virus, and if it is possible to correct it. If everything is correct your computer will be able to work without problems after completing these tasks.
hack the registry
This option allows you to make changes where the registry is stored, to do so you just have to do the following.
You must enter the application “regedit”, There are two ways to do this:
- The first is to press the following keys on your keyboard: Home + R this will open a small window, in it you will write “Regedit”.
- The other option is to position yourself in the search bar and write “Regedit”.

- Once you have entered the app you will look for the following access route: HKEY_LOCAL_MACHINESYSTEMCurrentControlSetServicesTimeBrokerSvc
- In this you will look for the record with the name: “Start REG_DWORD”, you will double click on it and you will modify the registry data by placing the number 4.
- Then you will click on “To accept” for the changes to be saved.
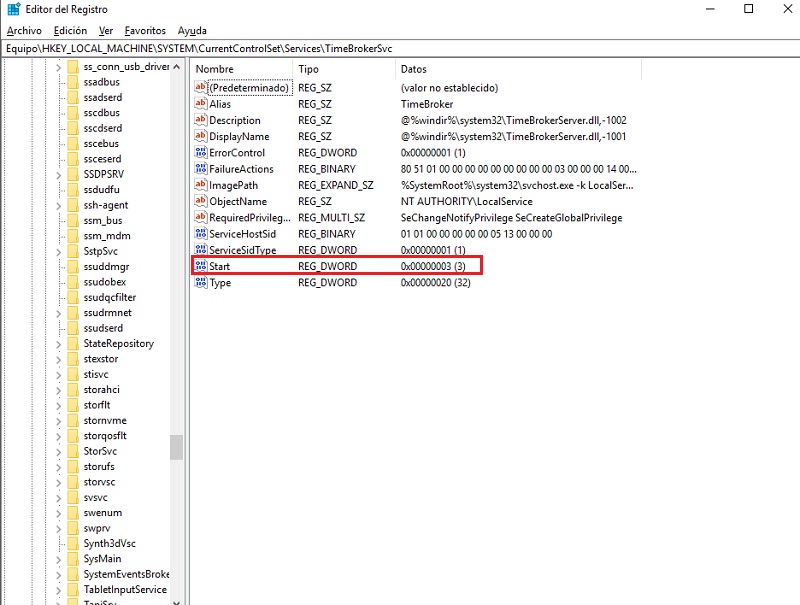
- restart your computer for the changes to be saved correctly.
Modify the background of the screen
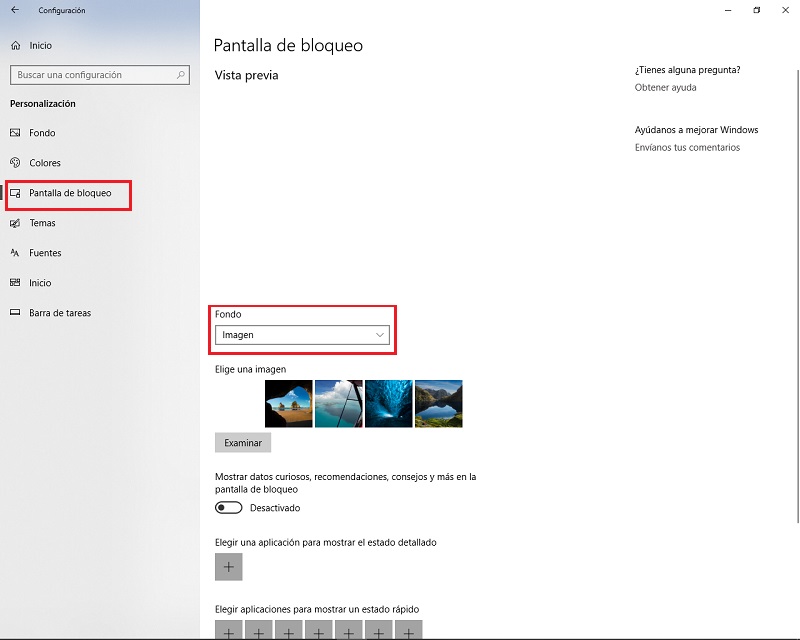
Performing this action is very easy, you just have to do the following: Press on your keyboard the home key + iyou will be sent to the screen of “Setting”. In this option you will do the corresponding steps that we show you below.
- Choose the option of “Personalization”.
- In this part you will choose “Lock screen”, there you will activate the parameter “Image” in the option that says “Background”.
Delete OneDrive and Groove Music
Being universal applications and being among the most used by the system, these same ones can generate problems with the process that is generating slowness in our computer, To remove them, do the following:
For Groove Music:
First you will enter “Windows PowerShell” as administrator and you will execute the following:
- Get-AppxPackage -name “Microsoft.ZuneMusic”
- Remove-AppxPackage Get-AppxPackage -name “Microsoft.Music.Preview”
- Remove-AppxPackage
In OneDrive you will do the following:
Enter the command prompt as administrator and run taskkill /f /im OneDrive.exe to end any OneDrive process and press Enter, then type and press Enter the following:
- %SystemRoot%System32OneDriveSetup.exe /uninstall (on 32-bit systems)
- %SystemRoot%SysWOW64OneDriveSetup.exe /uninstall (on 64-bit systems)
Remember know the version of your operating system before performing this task.
Operating systems