
Index:
UPDATED ✅ Want to learn more about Microsoft Access select queries? ⭐ ENTER HERE ⭐ and Learn Everything FROM ZERO!
When working with this type of programs it is very common that users look for tools that allow them to facilitate the work at all times, for this Microsoft Access offers what they are selection queriesa tool that will help them work with specific data within a table.
Therefore, with this function the user will have the opportunity to work only with the data that really interests you, leaving aside those that you don’t need at the moment. This will help you work in a faster and easier wayallowing so increase work performance in this software.
Undoubtedly Access queries have become one of the most necessary tools when working with a large amount of data in the program, That is why here we are going to teach you a little more about what are select queries and how you can start creating them in your database, To do this, follow in detail everything that we will teach you below.
What are select queries in Microsoft Access databases?
These types of queries are used when you want select specific data from one or more sources, that is, this tool allows you to work only with the data you really need and to combine data from multiple sources. You also have the opportunity to use tables and other select queries What Data Sources to consult a selection.
As already mentioned, this function is used in those occasions that you do not want to work with all the content available in the worksheetbut only you want or need to have some of them. This means, if you are working with a car sales tablesurely you are only interested in working with a specific registration or with the brands and prices of automobileswhile the others data will not be necessary.
It is worth mentioning that queries do not store data, but they show those who are contained within a table or multiple tablesas they are the criteria that have been previously established or in such case a join between tables. All this undoubtedly offers a series of advantages to the users.
Some of them are the following:
- When using a query the user will have the opportunity to see only the fields that interest himso it is a very good alternative to save a selection of fields.
- allows to use expressions as fieldsan example of this would be to use the date function as a fieldor use the format function on a field to control the data format of the query results.
- It will permit you combine data from multiple sources. Usually one table only show stored data. But in the case of a query it allows to select fields of different origins and specify how combine the information.
- You may view records that meet a specific criteria.
- Consultations become an excellent option for save a selection of records.
Learn step by step how to create select queries in Microsoft Access
There are different ways to create a select querythis can be done from Design Viewfrom a Access web app or from the Query Wizard. It should be noted that some of design elements are not available when it’s used the query wizardbut which can be add in Design View. It is also important to mention that the design view and the wizard they are both main methods to create these queries.
According to this, below we will teach you how to execute each of these methods that we have named, for this, follow everything that we will teach you in detail:
With the Query Wizard
The first method that we present to you consists of use the Query Wizard, a very basic method which you will have no problem executing.
To do this, follow each of these steps:
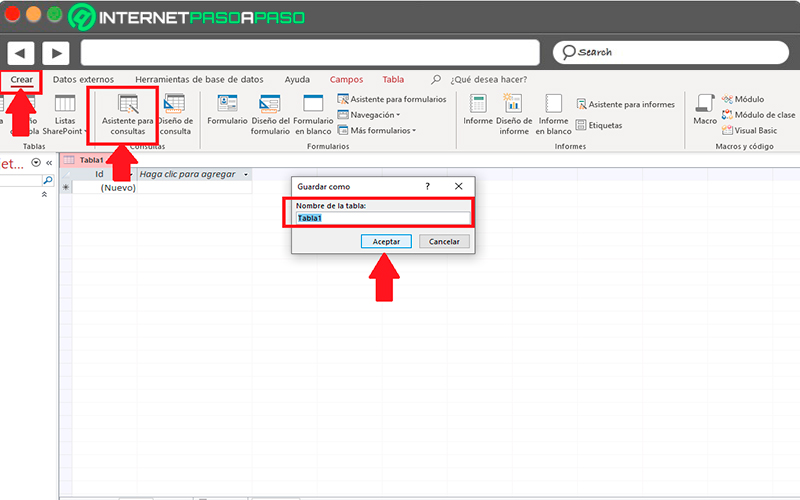
- The first thing you should do is go to the “Options” and there select the tab “To create”, in section “Inquiries” You must choose the option “Query Wizard”.
- Next, a window will appear where you will be asked the data in table 1 in If you haven’t stored it, you should place a table name and click the button “To accept”
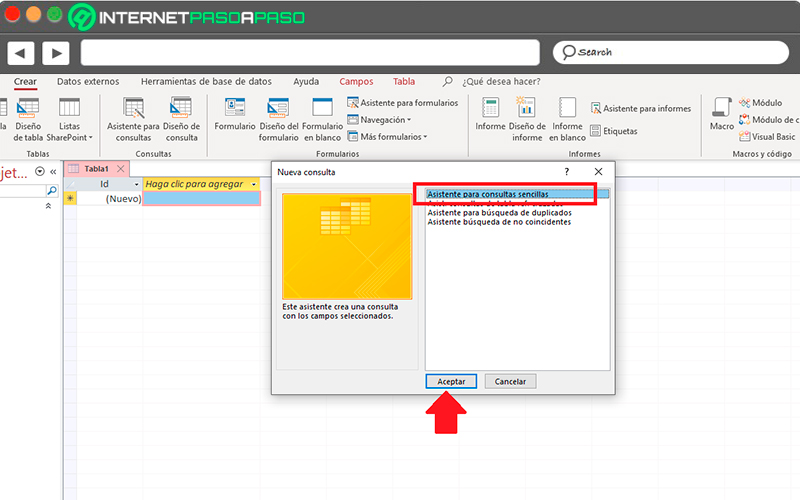
- Now a window will appear with the dialogue box “New query”, There you must select the option “Query Wizard simple” and click the button “To accept”.
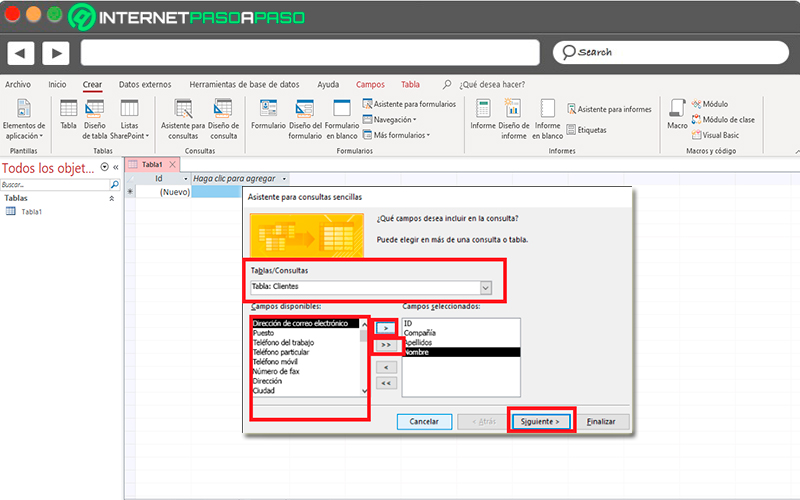
- In the new window that appears you can add the fieldshere you can add up to a total of 255 fields from 32 tables or queries. For the field of table/query you can click on the table that contains the field. In “Available Fields” you must double-click the field to add it to the list of “Selected Fields”.
- In case they want add all available fields you must click on the double right angle bracket >>. And finally when all the fields have been added you must click on “Following”.
- In case you have added any countryside numeric the wizard will ask you if you want the query returns details or summary data. In case you want to see individual records, you must select the option “Details” and then “Following”. Now if you want to see numerical data summarized as an average then click on “Summary” and then in “Summary Options”.
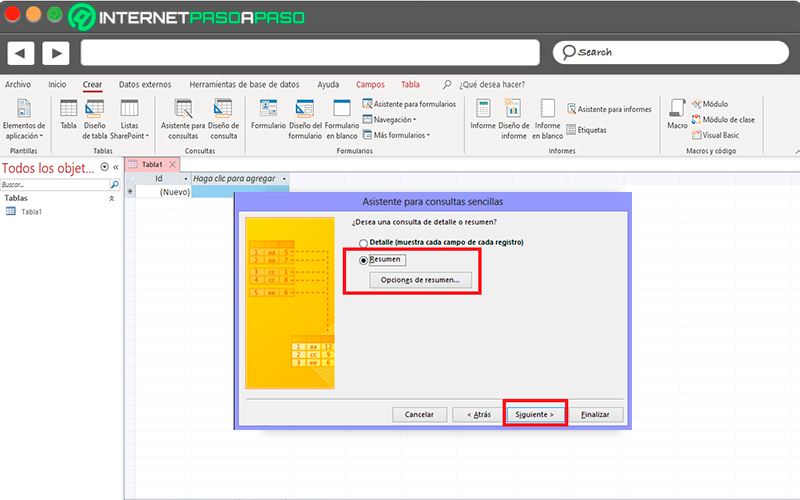
- In the box “Summary Options” You must specify the fields that you want to summarize and how you want to summarize the datain this case only numeric fields are displayed.
- For numeric fields You can choose some of the following functions: A) Sum: the query returns the sum of all values in the field. B) Average: In this case the average of all values in the field is returned. C) Min: the query returns the lowest value of the field and A) Max: the highest value of the field is returned.
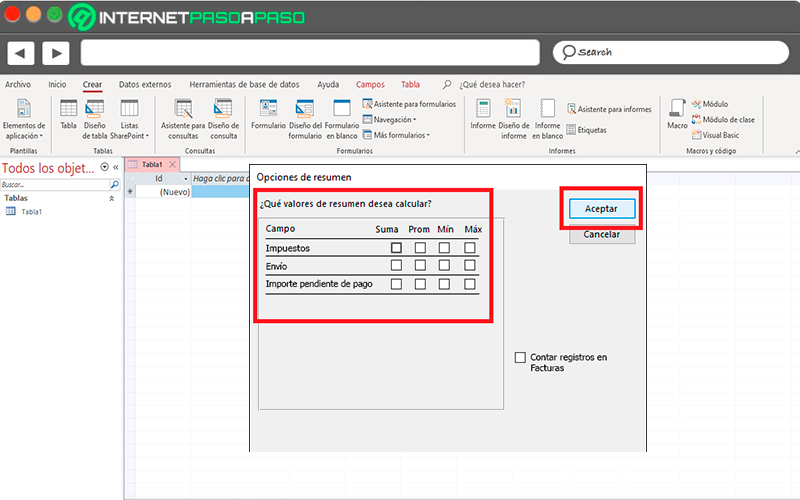
- If you want the query result to include a count of records from a data sourcethen you need to check the box “Count data source name records.”
- Then you must click on “To accept” to close the box “Summary Options”.
- If you have added a datetime field, the wizard asks you how you want to group date values. An example of this would be adding a number field (Price) and a countryside of date and time (Transaction time), in this case it has been specified in the table “Summary Options” that you want to see the average value of the number field (Price).
- How to include a date and time fieldsummary values can be calculated for each unique datetime valuealso for each day, month or for each quarter, semester or year.
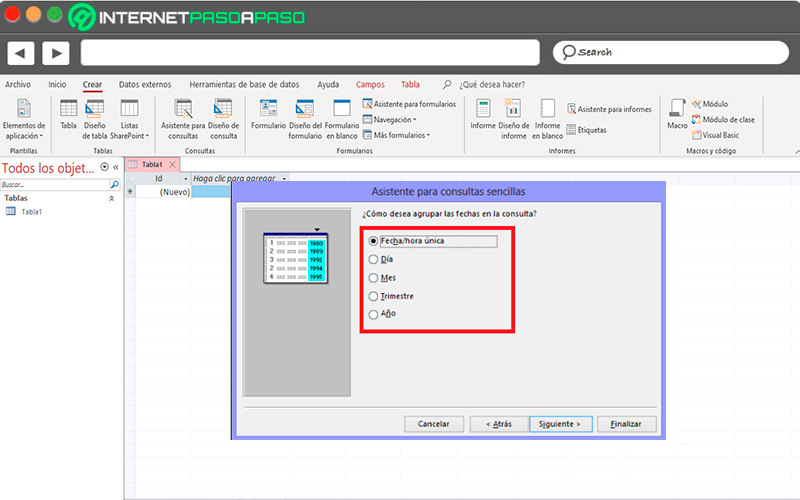
- So select the time period you want to use for grouping datetime values and click “Following”.
- Finally you will reach the end of the wizard, here you must enter a title for the query and specify whether you want to open or modify it and finally click on “To finalize”.
In Design View
The other available method is to use the “Design View”, for what are you going to Manually create a select query. When you create the query using this method you will have the opportunity to have a more control over the details of the query design, but to power control more details the risks of making a mistake are greater and the procedure can take much longer than when created via wizard.
However, here we show you the steps you must perform through Design View:
Add data sources
The first step you must execute is to add the data sources and fields in different stepsin this case we use the box “Show table”. Note that you can also add data sources later if necessary,.
To start this procedure follow these steps:
- in the tab “To create” you will find the consultation section and there the option of “Query design”.
- In the box “Show table” you will find the tabs of “Table”, “Queries” or “Both”, double-click all the data sources you want to use, and then click “Add”.

Combine related data sources
In the case that the data sources you add to a query are already related, then the access system will automatically create an inner join for each relationship. If referential integrity is applied, the program will teach you a 1 over the combination linethis will indicate the table of the side one of a one-to-many relationship and a Infinity symbol to indicate the several side table.
Now if you decide add query to query Y you haven’t related it, then the program will not be able to create a combination between these queries automatically, nor between queries or tables that are not related. If the system does not create the joins when the data sources are added, then you should do this procedure manually.
In these cases, the data sources that are not found combined with other origins they can cause problems with the final results of the query. There is also the case that you want change the type of join from inner to outer join for the query to be able to include more records in the table.
Therefore, to add a combination you need to perform these steps:
- To add a combination you must drag a field from a data source to the corresponding field of the other source. Thus Access will show you a line between the two fields to signal that a join has been created.

Now if what you are looking for is to modify or change a combination then you must do these steps:
- double click in the combination you want to change.
- There you will see a dialog box “Properties of the combination”.

- Here you should review the three options of the dialog box “Properties of the combination”.
- Then click on the option you want to use and on “To accept”.
Once all these combinations are complete, it is necessary to add the output fields. That is, the fields that contain the data that will be included in the final results.
Add output fields
To add an output field you can do it from any of the the data sources that you added in step 1.
To do this, follow these steps:
- For add a field you need to mouse drag it down from a top panel data source to the row “Countryside” of the grid bottom panel design in the query design window.
- By following this method Access will automatically fill the row Table of the design grid that allows to reflect the origin of the data of the field.
Use an expression as an output field
If you are interested in using calculations or a function to generate query results, then you can make use of a expression as an output field. In the expression you can use data from any of the query sources, you can also use the functions “Format” or “InCad” where can they be contain constant and arithmetic operators.
To do this, perform these steps:
- You must click on one query layout grid empty column, there right click on the field row and select the option of “Zoom” in the dropdown menu.
- Now in the box “Zoom” you may type or paste the expression. Here you must put the name you want to use for the output expression followed by two pointsAn example would “Final Updates:”.
Specify criteria
It is important to mention that this step is optional, here you can use criteria to limit the records returned by the querythis depending on whether the values of the fields comply with the defined aspects.
Specifies criteria for an output field
- In this case the row “Criteria” of the field that contains the values that you want to limit, you must write an expression that the values of the field must satisfy so that these can be included in the final result. That is, in this case you must specify what value you want the fields to have so that they are taken into account, if it is city fields, then place as a criterion “Madrid”.
- You must specify alternative criteriabass the criteria row. In the case of specify alternative criteriathe value of a field can meet any of the criteria in the list and thus be included in the final result of the query.
Criteria for multiple fields
Here they can be used specific criteria for multiple fieldsin this case all criteria in a row must be true so that these can be included in the registry.
Specify criteria through a field that you want to add to the result
You also have the opportunity to add a field to the query design without including its data in the result.
To do this, perform these steps:
- Add the field to the layout grid of the data table.
- Here you must uncheck the box of the field in the row “To show”.
- now you must specify criteria as you would for an output field.
Summarize data
It should be mentioned that this step is also optional, since the user may want summarize the data or not, this is done especially when they are numerical dataso you probably want see the average price of total sales. To be able to summarize the data in a query it is necessary to use the row “Total” By default, the row “Total” it is not displayed in design view.
In this case follow these steps:
- Once the consultation is open in the “Design View”, in the section “Show or hide” in the tab of “Design” You must select the option “Totals”. Here Access will show you the row “Total” in the query design grid.
- For each of the fields that you want to summarize, you must select the function that will be used in the list of the row “Total”, the functions available will depend mainly on the type of data that appears in the field.
See the results
In order to get the results of the query, you need to click on the “Design” and there in “Run”, this will show you the results of the query in datasheet view.
Now if you want to implement other changes in the query then you must go to the tab of “Start” and there you select the section of “View” and then in “Design View” to return to design view. There you must modify fields, criteria or expressions you think is necessary, and then rerun the query until it returns the data you want.
In an Access web app
The last method with which you can create a select query is a access Web App, The procedure with this tool is very similar to the two methods explained abovebut this one has a few extra steps.
To make use of it you must follow each of these steps:
- The first step will be to start the Access web app.
- You must then access “Start” and there you select the option “advanced” and then “Query”.
- In the box “Show table” on the tabs “Tables”, “Queries” or “Both” you must double-click all the data sources you want to use or select them one by one by clicking “Add”. Once this process is finished, you must click on “To close” to close the dialog.
- now you must drag fields down from the top panel data source to the field row from the bottom pane grid in the query design window.

- next thing will be add any criteria to the fields you want.
- With the mouse you must right click on the query tab and there you select the option “Save”, the next thing is to write the name for the query.
- In order for you to get the results of the query, you need to right-click on the query tab. “Query” and then in the option Data sheet view.
Once this is done, the results of the query should be available in the explorer View, but in order to see them you must add a view based on the query in the table selector.
In order for a new view to be added to a table title in the table selector you must follow these instructions:
- The first thing will be to click on the name of the table title in the table selector. Then you must click on the option “Add new view”.
- in the window of “Add new view” you must write a name for the view in the view name boxthen you must choose a type of view and then select the name of the query in the Record source box.
- Now you need to click “Start” and then in “Start application” to start a view in the browser.
- Then you have to click on the name of the table and then in the name of the view to add, modify or delete data in this view if you query with compatible with updates.
Software