Index:
UPDATED ✅ Do you want to know more about the tables of contents in Microsoft Word documents? ⭐ ENTER HERE ⭐ and learn everything FROM ZERO!
With Word there are two ways to add an index to the document. One is to do it manuallywhich will take a lot of time, since you will have to go back and forth through the writing. This does not guarantee that the work will be error-free.
The other way to do it is automatically when using the “Table of Contents” tool. With this function you will carry out the work quickly and easily.
You should know that you will not need any other step to have the summary of the document on one page. But this tool has some tricks, which we will show you now.
What is a table of contents in Microsoft Word and what is it for?

A table of contents is a feature of Microsoft Word that allows you to view a summary of the document in a simple way.. With this element it will be possible to see in a table the structure of all the titles and the page number in which they are located.
It is characterized as a tool quite useful when working with long textssince just by pressing the key “ctrl” and select the title the program automatically sends the user to the beginning of that title. In addition, these types of documents display a sophisticated, professional look when printed.
You must take into account that for a table of this type be efficient it must be updated manually Y you have to create styles to the different titles of the document. In case you do not do any of these two steps, this tool will cease to be functional.
What are the benefits of using tables of contents in my Word documents?
There are many advantages to using a tool like this in Microsoft’s word processor. For example, you will be able to see the structure and all the content of the document in 1 or 2 pages. This will allow you to correct some errors, if you have forgotten to assign a style to a certain title.
Another benefit that you will have with this function is that you will quickly know where a certain topic is located. This means you won’t have to flip through the pages one by one until you get to the section you need.
When you use a content box, you generate a much more serious style in the writing of your document. Also, It will allow you to save the work of copying each one of the sheets when you need to create an index for a thesis, a report or even a book.
While it is true that these tables do not update automatically, you should not have a problem matching the number of sheets with the title. This is because, every time you add content in your document the titles could move from page to pagebut just by pressing automatic update the content box will be functional again.
This kind of tools It will allow you to quickly know the work extension of a third party. You can also use this feature to display all the topics you have covered in a given essay. When you need to highlight an image or video within the document, and you don’t want to waste time finding it, you can give it a title so that it appears in the content box.
Steps to Insert and Set Up Tables of Contents in Microsoft Word Like a Pro
Next, We will show you the secrets that you must know so that you can become an expert and be able to work quickly with Microsoft Word’s tables of contents:
Insert

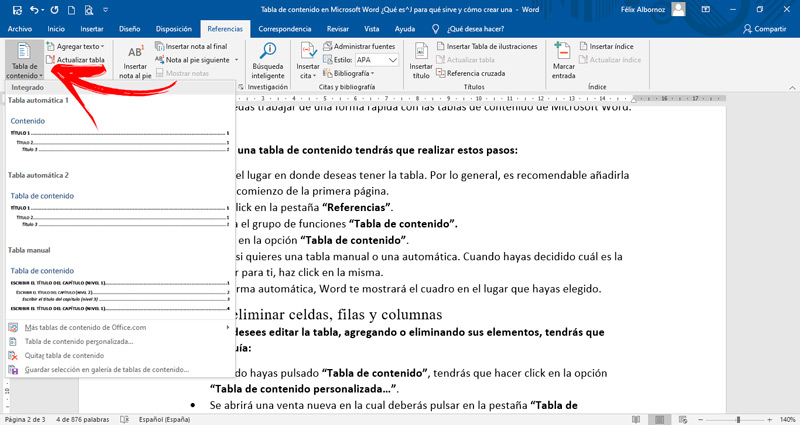
To insert a table of contents you will have to perform these steps:
- Choose the place where you want to have the table. In general, it is advisable to add it at the beginning of the first page.
- Click on the tab “References”.
- Find the function group “Table of Contents”.
- Click on the option “Table of Contents”.
- Choose if you want a manual or an automatic table. When you have decided which one is best for you, click on it.
- Automatically, Word will show you the box in the place you have chosen.
Add and delete cells, rows, and columns
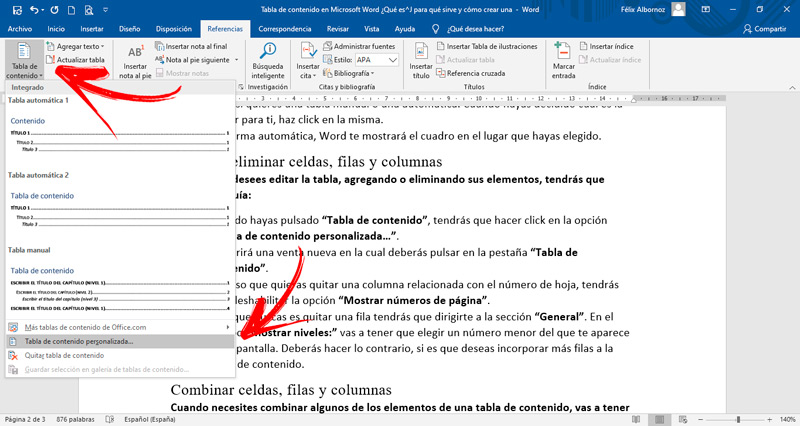
In case you want to edit the table, adding or removing its elements, you will have to follow this guide:
- When you have pressed “Table of Contents”you will have to click on the option “Custom table of contents…”.
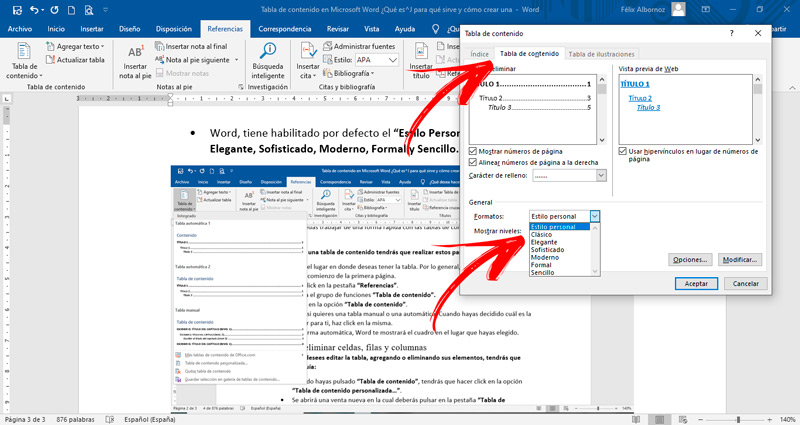
- A new window will open in which you must click on the tab “Table of Contents”.
- In case you want to remove a column related to the sheet number, you will have to disable the option “Show page numbers”.
- If what you are looking for is to remove a row you will have to go to the section “General”. In the countryside “Show levels:” you will have to choose a lower number than the one that appears on the screen. You will need to do the opposite if you want to add more rows to the table of contents.
Merge cells, rows, and columns
When you need to combine some of the elements of a table of contents, you will have to follow this step by step:
- Click on the option “Table of Contents” and then tap on “Custom table of contents…”.
- To combine rows and cells, you will have to click on the tab “Table of Contents” and then you will have to click on “Options…”.
- Choose “Schema levels” and enable this option. If you want to combine the columns, you must check the box “Table Element Fields”.
Therefore, with the steps we have shown you will be able to use hyperlinks and replace them with the numbers of the sheets in which the titles are found. You will also have the possibility to align the numbers to the right or to the left of leaves and you can choose mode to join the page number with the title.
table style

If you want to change the table style predefined by Word you will have to follow the steps that we will show you below:
- In “References” click on “Table of Contents”.
- Then select the option “Custom table of contents…”.
- Click on the tab “Table of Contents”.
- head to the field “General”.
- Click on the arrow to activate the drop-down menu.
- Word has enabled by default the “Personal style”but you can choose Classic, Elegant, Sophisticated, Modern, Formal and Simple.
Software