
Index:
UPDATED ✅ Do you want to know the tricks to get the most out of Google Drive? ⭐ ENTER HERE ⭐ and find out what they are ✅ EASY and FAST ✅
While it is true, cloud storage tools have gained considerable power over time and today, they have a large number of users around the world. However, although there are a variety of such tools, the truth is that Google Drive is considered the most famous of all.
Thus, Drive emerged at the beginning of 2012 as a file hosting service which was introduced by Google. Since then, it is estimated as one of the applications of this American company best received among its users and especially, for the great features and tools it offers for storing digital documents and filesin order to have access to them from any device with Internet.
Well, despite the fact that it has many users, not all of them know how to manage this storage service in the best way. Therefore, we believe it is necessary to point out the most optimal tricks to get the most out of Google Drive and so, below, we indicate a list with all these. Also including, its advantages and tools.
Why use Google Drive to store your documents in the cloud? Advantage
To start this post, it is very important to detail What are the main and best benefits that you can enjoy when using Google Drive. Since, given that it is one of the services of this type most chosen by the public when saving documents in the cloud, guarantees excellent advantages and here we detail what they are:
- It is a completely free tool: Both Google Drive and all its integrated tools are free and thanks to this, you won’t have to pay anything to take advantage of all its available functions.
- It is a cross-platform service: Luckily, this tool works with all platforms, thanks to its web-based nature. So, you only need to have an Internet connection on your device to work on your documents from wherever you want.
- Provides auto save: Another of the greatest advantages of Drive is that it has the ability to save all your work automatically. Because of this, you won’t have to worry about losing what you’ve done in case your computer or mobile crashes, for example.
- Allows you to send large files: If you need to share files of considerable size, Google Drive is the best tool you can go to to send them to your family, friends or co-workers. Which is often complicated if you do it from your email account.
- Supports collaboration between multiple users: Fortunately, through this service you have the possibility of working on the same document with several people, simultaneously. In other words, it makes it easier to collaborate with each other and insert comments.
- Provides a very efficient built-in search engine: Google Drive contains an added search engine that makes it easy for you to locate different types of files, such as: folders, images, videos and Word documents. Additionally, you can start the search from keywords.
- It is ideal for opening and editing various types of documents: In case you are using a computer that does not contain specific software from which to open a certain type of file, Google Drive solves this for you. Well, regardless of the device, the service has the ability to open any existing file (Word documents, spreadsheets, Adobe files, etc.).
- It has optical character recognition: It works as an optical character recognition technology with the ability to scan the search for the word or a given name, through the documents stored by other users. If you are doing research on a historical topic, Drive can be very useful for it.
What are all the Google Drive tools?
With respect to the tools that you get in this service, it is opportune to limit which ones are treated and what each of them consists of. Those that, as we already indicated, you can also use for free and Drive allows you to access them very easily, from the same application. In this way, we detail all the Google Drive tools, below:
Google Docs
Basically, it refers to a word or text processing toolwhere you have the opportunity to create text documents with total simplicity and onlineso you don’t have to install any software for it.
In this sense, it is a similar option to the well-known Microsoft Word. It is necessary to distinguish that, in Google Docs you can create your text files right from the start through a blank page or also making use of different templates what you will find there
Google Slides
It is considered an alternative tool to services such as PowerPoint or Prezi, since it offers the possibility of create documents in the form of presentations. That is to say that, through it, you will be able to make a slide presentation and in these, present various concepts and ideas in a precise and graphic wayat the same time.
Google Sheets
When you use this tool, in addition to create and edit text documents like in Google Docs, you can also create spreadsheets and different templates, without any complications. With this, it stands out for being a totally effective and essential Drive tool for users who work with formulas, numbers and are usually organized.
Google Forms
This can be defined as a Google Drive tool that simplifies the creation of different types of encounters or forms. In such a way that it is a very useful option when collecting information through the Internet to later use it in order to carry out an analysis of the data obtained.
Google Drawing
You also have this Google Drive tool at hand, which consists of an application with the necessary functions to create various types of graphs and draw pictures with different shapes or even freehand. It is worth mentioning that Google Drawing is very similar to the Windows Paint application.
Finally, based on the tools offered by this Google storage service, it is important to highlight that you can add more, in case these basic tools are not enough for you. In other words, the service allows you to obtain a much higher level experience and make this a super multifunctional tool.
In this sense, you can visit the browser of applications and tools that contains Google Drive, from the following procedure: Access “My Drive”, click on “More” and then click on “Connect more apps”. With this, you will locate countless options to add to your virtual drive, such as: video editors, audio editors, design tools, PDF creators, note applications and online reminders, among others.
List of tricks to get the most out of Google Drive
Now, we have reached the section of the post where you can learn the best tricks there are, to date, to manage all your files hosted on Google Drive in the most optimal way and well, get the most out of this cloud storage service.
With that said, let’s get started:
Move and manage files as if they were on your computer
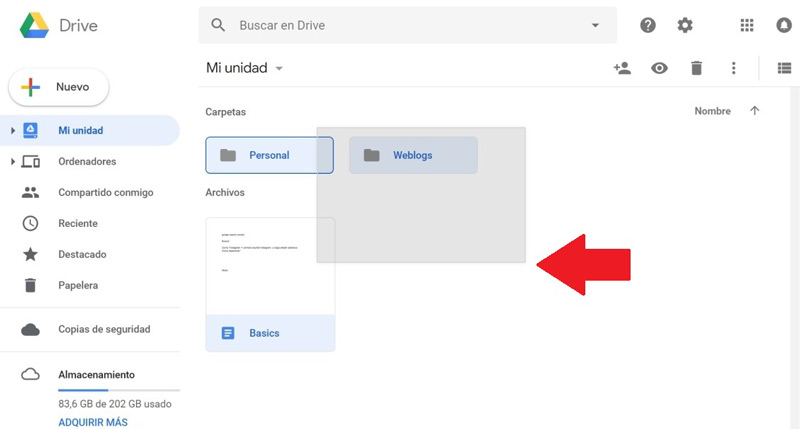
It is possible that you did not know it, but in Google Drive you have the possibility of moving and managing all your folders and documents just as if you were doing it from the file explorer of your operating system, that is, with the same gestures.
That way, you can hold down the left click to select multiple files and these will not open immediately, it is also possible to press the right click to display context menu or double click to open any stored file. Likewise, it will be possible to use the keyboard to delete the selected folders and well, everything will be managed the same as you do on your computer.
Generate a link to share a document
To easily share a document with as many people as you want; you can make use of this trick. which is based on generate a code with whom you are going to share the document and send it to the users you want, the process to follow consists of:
- Access Google Drive and find the file to share.
- Once the file in question is located, right click on it and a pop-up menu will appear, among all the options that are displayed, click on the one that says “Get link to share”which is in fourth position.
- Now, a window will be displayed with the link that you will have to share with other people so that they can see the document. which, you can copy it and redirect it wherever you want to send it.
Edit shared document link permissions
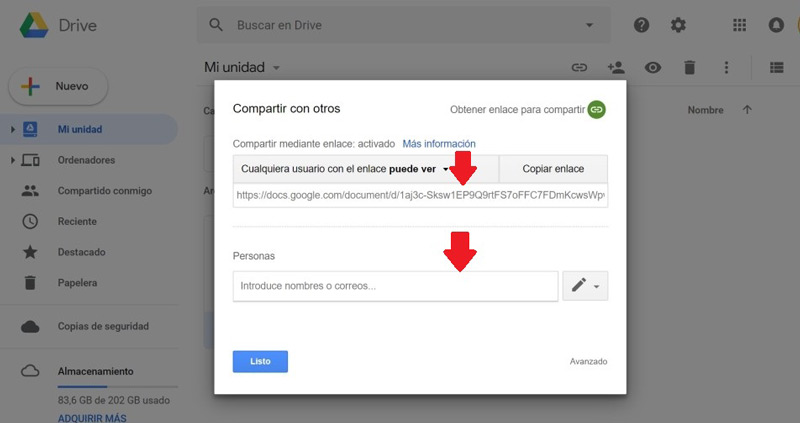
In case you want to get some privacy regarding the link you have already shared, you can adjust to what extent you want the document in question to be managed. So, it will be possible to define if you want the person who received the link to be able to only see it, comment on it or edit it.
Here’s what you’ll need to do to specify these parameters according to your preferences:
- Within the cloud hosting service, locate the document whose link you have shared and right click on it.
- Then, among the options that are displayed, press the one that says “Get link to share”.
- In the window that will now appear, you have to click on “Permissions”.
- Following the above, in a new window, you can enter the emails emails from the specific people you prefer to have access to the file.
Additionally, you will also be able to use the selections found in the drop-down menu of “Any user with the link can”; in order to define who has the right to:
- Edit.
- Comment.
- Watch.
- If you click on “Plus…” you will have the possibility to mark the option “Deactivate” so that the link does not work for users who are already invited.
Change the color of your folders
Whenever you create a new folder in Drive, you have the possibility to customize it to your liking through colors. Since, in general, when creating it, it will appear in gray automatically. So, to modify the color of each of them and apply a color code To improve the organization of the content you save on the service, you will need to do the following:
- Locate the folder whose color you want to change and right click on it.
- Then press the option that indicates “Change color”.
- In conclusion, select the color you want from the list that you see and immediately, that color will be displayed.
Use Google Drive searches
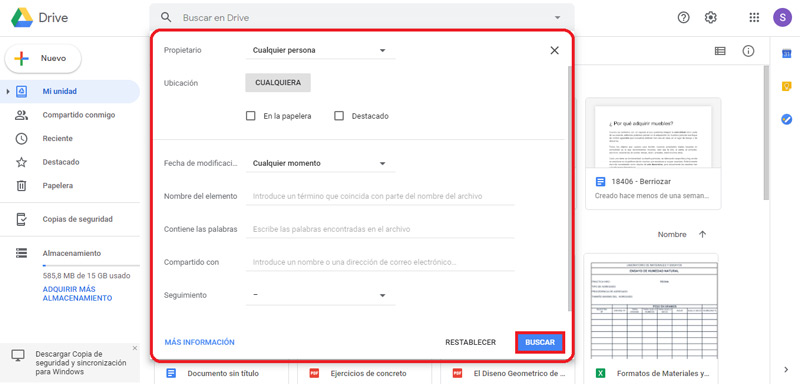
Although it is true, the Drive interface has a search bar at the top, from which you can quickly find the documents or folders by indicating their name or even a keyword. But apart from that, you can also make use of the advanced search engine of this service.
Thus, you can enhance your searches in this application by using the advanced search engine that allows you to save much more time when trying to locate any file hosted there.
What you have to do to be able to use it consists of:
- Located in the Google Drive search box, press the arrow down that is displayed when you hover the mouse over that box, where it is indicated “Search options”.
- After that, A new window will open which belongs to the advanced search menu.
- Then you can start search for a certain file through certain parameterssuch as: of type, owner, location, date modified, name, keywords, shared with, or tracked.
- Once you fill in the fields you need, simply click on the button “Search” and ready. In case you want to start a new search quickly, you can click on “Restore”.
Create a public document and embed it on a website
In case you still didn’t know, with Google Drive you can simultaneously create public documents, embed them on your website. This, by generating an embed code that you have to paste in it, which is achieved from within the same document. Notably, such a public link type is also useful for easy document sharing.
However, the step by step to follow for it, try:
- Find the file in question within the service and access it.
- Followed by that, when you are inside the document, click on the “File” section which is in the top bar of options.
- Now, among all the options that show you, click where it says “Publishing on the web…” and to make the document public, simply click on “Post”.
- Then, to share the document, go to the “Link” tab and select the option “Insert” to get the embed code to add on your web page.
It is appropriate to indicate that this is done in conjunction with the Drive tool called “Google Docs”that is, with the service’s word processor.
Leave comments and chat while you collaborate
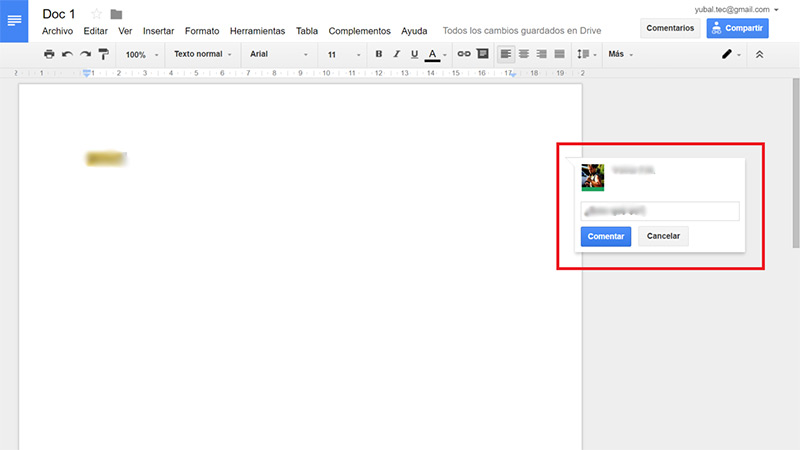
This trick is considered a great advantage that the service offers when several people are connected to the same document and are editing it. Thanks to, the app has enabled a chat window and an option that allows you to leave comments on the document and even, at certain points in the text to be more specific.
In this sense, said chat will be displayed on the top right hand side, with an icon of a speech bubble and well, it only appears when several users are connected at the same time. On the other hand, regarding comments, you can make them wherever you want and even in non-shared documents and to make them, the procedure consists of:
- First of all, select a text in the article in question.
- After, an icon will be displayed through which you can insert a comment; just to the right of the writing sheet.
- Once you write the comment you want, you only need to click on the button “Comment”.
Convert PDF and images to text
Many users go through the tedious task of using a third-party application to convert a PDF file to text, but by making effective use of Google Drive this is not necessary. Since, the cloud storage service shows the capacity of do file conversions, easily and quickly; because its automatic character recognition. Which, it also does with images.
If you want to try this trick, do the following:
- Locate the uploaded PDF or image file in Drive and right click on it.
- Next, they show you a pop-up menu where you have to press the option “To open with”. For later, choose the option that indicates “Google Docs”.
- Now the Google Docs tool will start recognizing the content of the image or PDF and will convert it to your text format.
However, in some cases, it is possible that some tables or aspects of the original document are lost.
View the history of edits for a given document
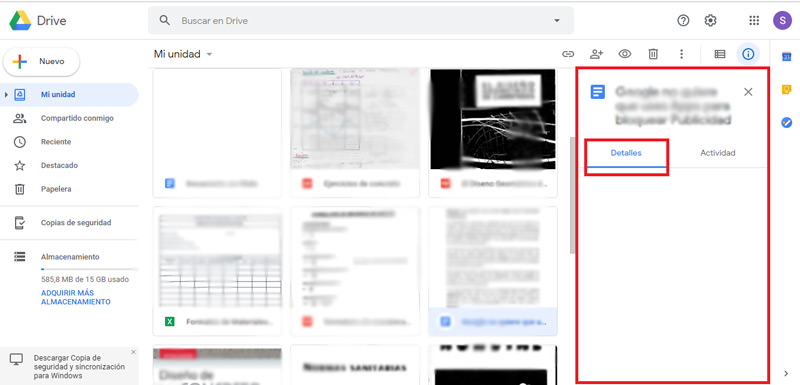
Like most Google services, Drive is also save a history of activity where you can see all the dates on which a document stored on the platform has been edited or modified. Even in said history, you can also see when other options have been used, such as sharing the document, for example.
For its part, you will wonder how you can get to that history and Fortunately, it is very easy through the following steps:
- Find the document in question and right click on it to click on the option “See details” within the dropdown menu.
- Once the above is done, the details window will open in a column located on the right hand side of the screen.
- Finally, in said details window, click on “Details” to view the change history.
Find the document that a specific user has shared with you
Another of the most useful tricks to execute in Drive is to quickly search for the document that a certain person has shared with you. Which is managed from the folder “Shared with me” that contains the Google service in question and in case you collaborate with many projects, it may be saturated.
Well, in order not to waste so much time doing this search, Google has added an effective search engine there. So that, when using it, you can locate documents or folders by the name of it And in case you don’t remember, you can do it directly with the name or email of the person who has shared it. Thus, simply insert some of said data and that’s it.
Delete synced apps and games
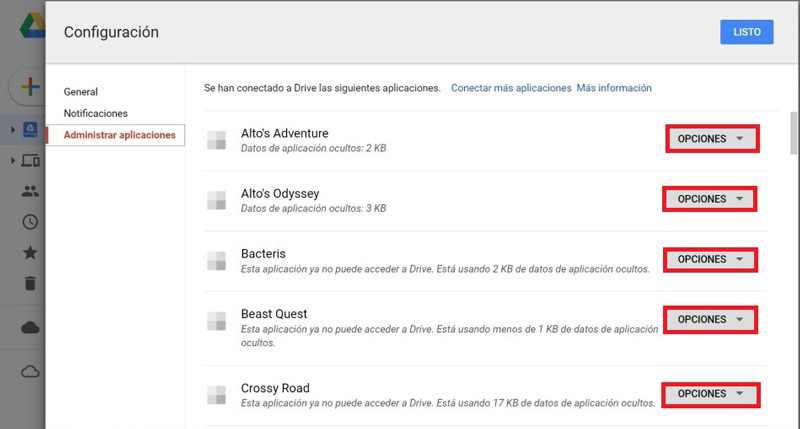
While it’s true, installing third-party apps on Drive is completely easy, but when you want to uninstall them the same does not happen. Since, in order to find said selection, it is necessary to resort to a hidden options menu. So, in order to quickly carry out this uninstall.
We recommend you execute the following step by step:
- Within the cloud hosting service, press the Settings option.
- With the above, they will show you a new window with all the adjustment options and in the column that is seen in the left side section, it will be necessary that click on “Manage applications”.
- Then, in order to remove an application, press the “Options” button which is next to your name.
- Among these options, you will find the one that prints “Disconnect from Drive” and of course, you have to click on it to uninstall it.
- Finally, for delete all game dataalso go to the Options menu of the application and click on “Delete hidden app data”. To save all changes, press the top button that says “Clever”.
Create forms and view responses
Because Google Drive contains a native application that makes it easy to create forms, you can do this directly from the service.
In this way, using “Google Forms”, you will have to execute the following process:
- To find the app, go to the create a new file menu in Drive and click on the “More” option.
- Now, you can access this application and creating the form is extremely easy ever since. Well, you just have to enter a title, description and start to point out the questions to addchoosing their possible answers.
For its part, we indicate that it is also possible include images, videos and as many questions as you want in the same form. In addition, the service offers you a tab in the form document itself to view a summary containing the answers.
Make your documents available without an internet connection
Surely, the idea of taking all your files with you anywhere and managing and using them from your laptop or mobile device seems perfect to you. no network connection. Well, Google Drive has an ideal function for this, with which it is possible and very simple to download all the files to use them whenever you need.
What you have to do for this is:
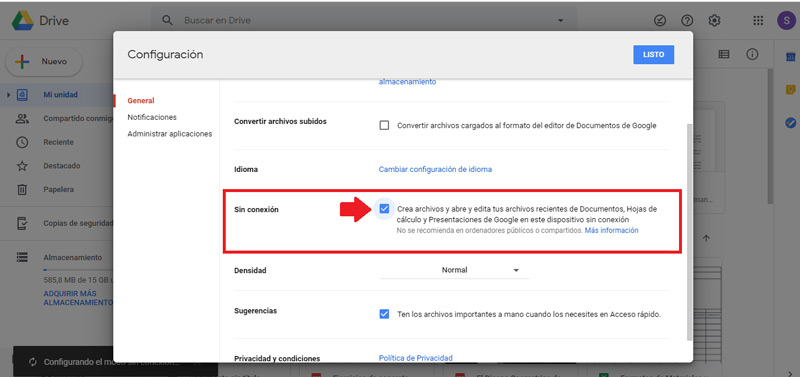
- Access the main screen of Google Drive and enter the Settingswhich you can find from the gear icon located in the upper right corner.
- Later, located in the Settings menu, go to the General section which is in first place.
- After the above, go to the section “Without connection” and check the only box contained therein to use all the files when you do not have Internet (as shown in the image).
This function is also identified as the “Offline mode” from Google Drive.
Upload files by dragging them from the computer
When uploading files, Google Drive works as if you were managing these items locally on your computer. Thanks to this, pressing the option “Upload files” on the button to create a new element, it is not the only alternative that exists to upload files.
In this sense, Drive also supports a “drag and drop” system to store your documents in the application. For which, you simply have to open the file explorer of the operating system, locate and drag the file you want to add in Drive, then move it to your web browser and with it, Google Drive will recognize it immediately and thus proceed to upload it.
Make Google Photos content visible in a folder
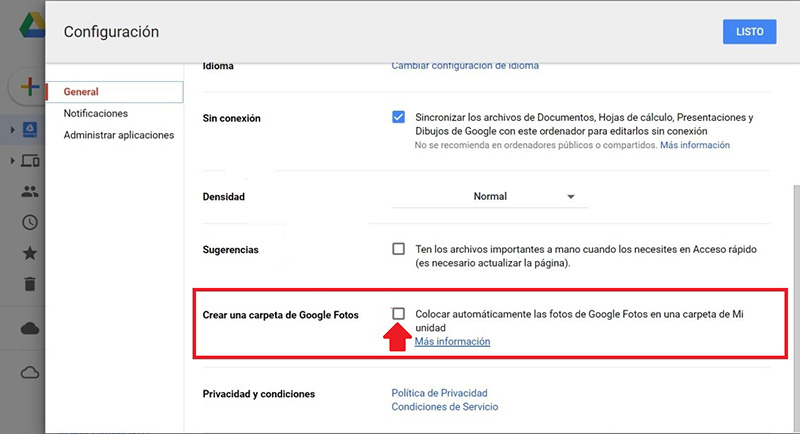
Even though Google Photos keeps taking up a lot of Google Drive space, unfortunately, you cannot access a copy of your photos and those photos from this cloud storage service. However, we have found a trick that will allow you save a folder that becomes visible in Drive and that contains all the images hosted in Google Photos.
If you want to use this tactic, follow these steps:
- Located on the main screen of Google Drive, click on the gear icon and press the selection “Settings”.
- Followed by that, locate yourself in the General section of this menu and proceed to look for the section that says “Create a Google Photos folder” and check the box that is there. For later, press at the top in “Clever”.
Note: Any changes you apply, going forward, to photos within this folder in Drive, they will be saved directly to Google Photos as well.
Fix bugs from revision history
In case you have made a mistake or made a change in one of your documents, which you regret; there is a trick to improve this and with which you can rest easy. Since, thanks to the history where you can view the different points edited and saved in the files that Google implemented, it will be very easy to go back to a point before having made the mistake in question.
In that sense, to proceed to correct it, you will need to perform these steps:
- Find the document you want to modify and within it, press the option that prints “All changes saved to Drive”; which appears at the top of that document.
- Subsequently, you will be redirected to a new window that contains all the different points saved in a document, on the right side of the screen.
- Afterwards, you will be able to click to navigate between all the changes, get the error and when choosing them, each one will indicate an option to return to the previous point, which is called “Restore this review”.
Receive notifications via email
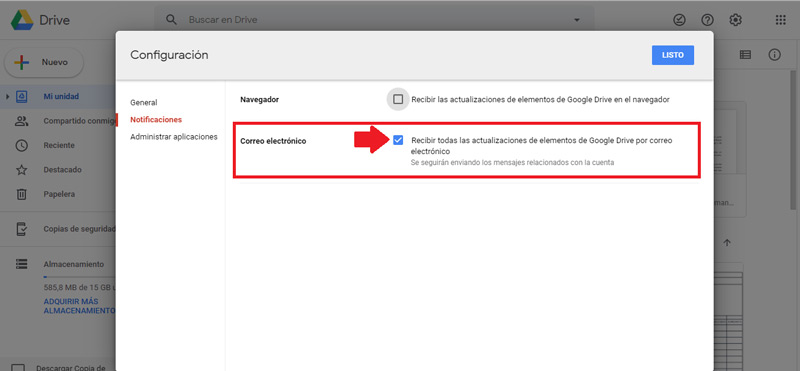
In addition to making comments, making suggestions, and adding emails to the documents you share, you can also receive notifications via email of the service in question. This, to be able to observe all the updates and comments made in your documents, in real time; where, moreover, it will not be necessary to open it to be able to see all this.
So, if you like the idea of receiving notifications from Google Drive directly to your email, we recommend perform the following steps:
- Enter Google Drive and on its main page, in the upper right corner, look for the gear icon to enter the “Settings” section.
- When you are inside this settings menu, look at the options that you see in the left column and press the one that says “Notifications” and is in second place.
- To conclude, look at the section “Email” and activate the box that is observed there so that you start receiving notifications.
Buy extra storage for all your files
Through its free version, Google Drive offers a total of 15 GB of storage to save your documents and, although for many users this space is enough, for others it could be too little because of how they use the service day after day.
Whereby, it is possible to extend the space of Google Drive whenever you want, when buying storage in the following way:
- On the main page of Drive, locate yourself in the left column and access the section “Storage” to see how much you have consumed.
- Next, press the option “Buy more storage” and with it, they will show you a new browser tab that will take you to the buy more space for Google Drive or Google One.
- Finally, select the rate you want for your Drive, cancel the total price and start enjoying your new storage space.
Scan a document with your smartphone
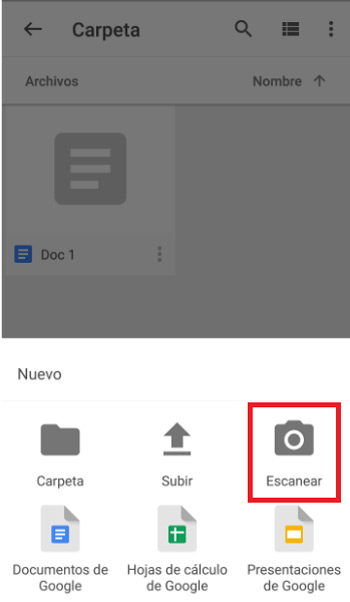
this is a trick related to the mobile version of Drive, which offers you the possibility of scanning documents and even exporting them to PDF format. Thus, the tactic is to proceed to create a new document from the “+” iconto then enter your options and click on the one that says “Scan”.
Once you press this selection, the Google Drive application will proceed to recognize the borders of the document, automatically and will save the capture in question in a PDF file. In addition to this, the text of the PDF obtained can also be converted to a text or document format, with which you will have the power to edit it, either for copy text fragments or add new elements.
Some interesting keyboard shortcuts
Luckily, in Google Drive you can use a wide variety of keyboard shortcuts to save yourself a few clicks and move around the entire platform with great ease and speed.
Next, some of the best:
- arrows: Navigates in any direction between items.
- Shift + A: Select all items.
- Shift + N: Deselects all items.
- Shift + F: Create a new folder.
- Shift + T: Create a new text document.
- Shift + P: Create a new presentation.
- Shift + S: Create a new spreadsheet.
- Shift + D: Create a new drawing.
- A point “.”: Share the selected item.
- “n”: Change the name of the selected item.
- Shift + z: Add the selected items to an additional folder.
- Space key: Play or pause.
- “g + n” and “g + f”: Go to the navigation panel or folder list.
- “g + d”: Go to the details panel.
- “g + t”: Go to the top of the app or Google Toolbar).
- “Yo”: Show or hide the activity panel.
- “d”: Show or not show the details panel.
- Enter key or “o”: Open the selected item.
- “s”: Highlight or not highlight the chosen elements.
- “a”: Enter the More Actions menu.
- “t”: Access Drive Settings.
- “r”: Sort the saved folders.
Applications