Index:
UPDATED ✅ Do you want to know how to make your own agenda to organize everything in Microsoft Excel? ⭐ ENTER HERE ⭐ and learn everything FROM ZERO!
If you need to carry control of your day to daywhere you can organize all the activities pending to doas well as the schedules of each one, it is best to prepare an agenda where you specify all the details of your days.
inside the package Officeyou may create a personalized schedule according to your needs. In this opportunity, we will teach you how to do it directly in Microsoft Excel.
Broadly speaking, there are two ways to create an agenda. You can do it in the form Handbook or through the templates that are already included in Excelor that you can download on the Internet. Here we explain how to create an agenda in Excel easily and quickly!
Steps to create an agenda that allows you to organize your days in Excel
Hold your day to day organizedcan help you optimize your work time and any other type of activities that you do day after day. With the help of Excelyou may create agendas and calendars to have everything under control.
Here’s how you can achieve it:
with a template

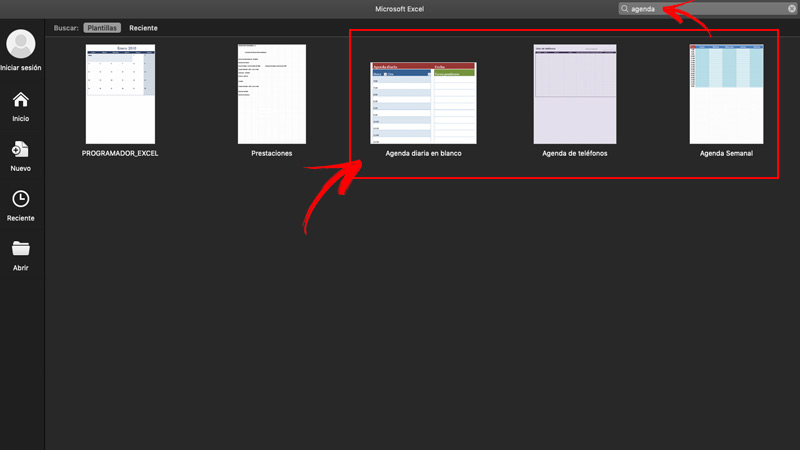
The easiest and fastest way to do it is with the help of pre-designed templates and with which you only have to fill in the information. The use of them may vary a little depending on your computer and the office version with whom you work.
In this sense, the steps to create an agenda in Excel with a template are:
- Enter in Excel.
- Click on “File, Archive” within the toolbar.
- click on “New” in the menu of File, Archive. A menu of options next to the spreadsheet of the document.
- Choose “My PC” in the options menu.
- Go into “Template” and take a look at all templates available.
- Choose the template that you prefer
- Click on “Okay” and fill in the information what you need
- save and print in case you want it.
Apart from that, keep in mind that if the templates defaults of Excel are not to your liking, you can download other models on the Internet.
manually

There is another way by which inexperienced users with design programs can create your personalized agendas according to your needs. It consists in doing it with the help of Excel. You may meet some limitationsbut we will explain step by step how create an agenda manually with excel No problem.
Then follow these steps:
- Open a new spreadsheet in Excel.
- Go to the tab Layout/ Margins and click on custom margins. When the box opens, enter the window pages and choose the orientation Horizontal.
- Then in the same frame go to margins and in the section “Center on page”, select both Horizontally and Vertically. Also in the margin measurementswrite “1cm” In each one. In Header and footerwrite “0” (zero). Click on “To accept”.
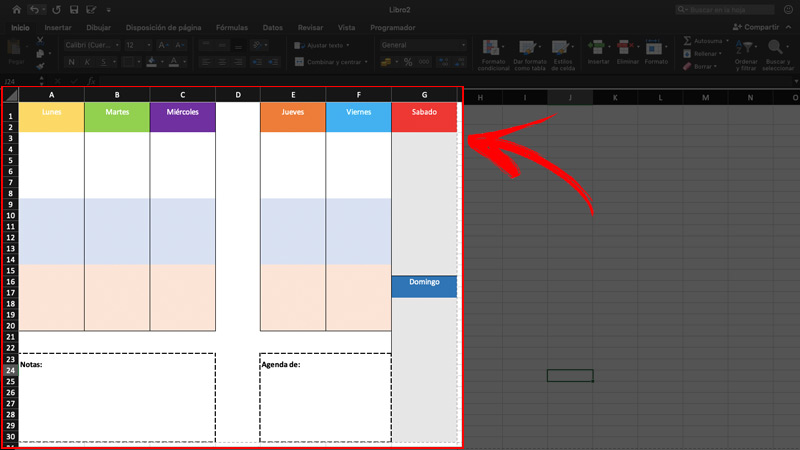
- The sheet will be delimited with lines indicating the dimensions of the diary.
- In the spreadsheet, select columns A, B and C, right click and “Width of the columns” write “4cm” and click OK. Do the same with columns E, F and G. In the case of column D, don’t change anything yet.
- Select the first and second cell of each column Y customize it with the color you want entering the tab Start and then clicking on the paint pot.
- Select the first cells of each columnright click and modify the height in the option of row height. Write the value “1cm”.
- In the first cell of each columnWrite the different days of the week. In the case of Sunday, you must do it in the row G, cell number 19 and 20.
- Select the other rows and changes their height back to a value of “0.5cm”.
- to start design the boxes where the tasks are written, you have to select in each row the number of cells that you consider necessary to write the activities. For example: (A3:A8).
- Once selected, go to the section “Format” of Excel, in the option “Cells” and choose the filling in the section “Fill out” in case you want it that way. You can also just change the colors on the Home tab.
- Do the same procedure in each section, that is (A9:A14 and A15:A20). When you already have the design of an entire row, you can copy and paste in the others to apply the same Format.
- In the case of the last rowthat is row G, you must select three cells above “Sunday”, right click, press Insert and choose the option “Shift cells down”. This way the Sunday sign will go down a bit.
- After copy the layout of the other rows from cell 2, to 20 and paste it in row G. If you notice that there is an extra space, just right click on that cell and delete it.
- Recopy the layouts from cells 3 to 20 Y paste them under the sign corresponding to Sunday. How you can see, cells protrude from the dotted box in the spreadsheet. The ideal thing to make everything fit is to go deleting cells on Saturday and Sunday until they fit.
- You will appreciate that spaces for Saturday and Sunday they will be a little reduced compared to the other days, but the whole design goes back into the initial box. We recommend that for these days, you put the same colors in cells with the aim of differentiating them from the rest of the week.
- In each of the days, select the whole row and put outer borders on it.
- Select the entire row D and go to Formatand in cells choose the format you want for the entire row.
- in the others cells that are left under the days of the weekyou can place other boxes like “Grades” and else. Remember that everything depends on your needs.
- One point to consider is that spreadsheet lines do not print. Only those in which place borders. However, if you want to get a better idea of what it will look like, you can choose those cells and fill them with white color.
- Finally, copy all that formatting and paste it just after the guide lines to have two faces.
- print and ready.
Remember that throughout your designyou may customize fonts, size, colors, borders and much more according to your tastes. You can even Add pictures, boxes, etc.
List of the best templates to create personalized agendas in Microsoft Excel

There are many schedule classes that you can use in your day to day organize different activities that include your work, lifestyle, health, food and much more.
For this reason, we share a list with the best templates to create personalized agendas in Excel:
weekly agenda
It’s from simpler and more common agendas. with her you can organize all the tasks of the week day by day. Have gaps in every hour, to write appointments or meetings in every hour.
Download Excel Weekly Agenda Template
blank daily calendar
With this template, the day is divided into half-hour chunks. In this way, you will be able to keep a record of tasks, appointments, calls and others that you have pending in a day.
Download Excel Daily Calendar Template
idea organizer
Is a excellent alternative if you are going to undertake a new project and do not want to overlook any detail. Through this template, you can set daily goals, add tasks, due dates, write notes, among others.
Download Ideas Organizer Excel Template
Training plan
It’s a ideal type of agenda to record your meals, training routines, food supplements, among others aspects related to monitoring your lifestyle.
Download Excel Training Plan Template
payment journal
With the help of this template, you can divide your expenses into up to 10 different categories and are separated as the user’s registry checks are paid.
Download Excel Payment Journal Template
Personal monthly budget
It’s perfect for control the entry and exit of money What do you have each month? It is a very complete template in which you will have a record of what you spend in relation to what desire.
Download Personal Monthly Budget Excel Template
Priority task list
It is very beneficial for prioritize your different daily tasks, organized by order. It is very simple and is available in format PDF for to print Y fill by hand.
Download Task List Template with Priority Excel
Computing