
Index:
UPDATED ✅ Do you want to install a new library in the Arduino development environment? ⭐ ENTER HERE ⭐ and Learn Everything ✅ FROM ZERO ✅
If you have been using this platform for some time to develop and program electronic projects, then most likely you have already heard about the Arduino library and how necessary they have become to carry out some specific tasks. Keep in mind that as you use the platform and take more experience all this becomes much more ambitious.
This is how the possibility exists that at the time of purchase a new Arduino Shield or in that case a new sensoryou may have to use a special bookstore to be able to use it, since this is the way to activate it on the platform. However, many users are still unaware what are the Arduino libraries and how you can install them.
That is why here we are going to teach you how to install these libraries in the development environmentthis will allow you to work in a way much more professional and thus achieve better results, for this, follow in detail everything that we are going to teach you next in the post.
What are the Arduino libraries and what are they for in the programming of the boards?
When you talk about bookstores, you probably think of a store where you can buy books or any other type of informative articlebut the truth of all this is that the Arduino libraries have another purpose, in this case it is a code file which aims to group similar functions that help to do a specific task.
In the same way, it can be said that they are code collections that facilitate the interconnection of electronic modules, screens, sensors, among others. Also, these libraries are distributed in ZIP format. Based on all this, you may be wondering how a Arduino library and what is its purpose the programming of the plates.
Currently in the environment of this platform you can find different types of bookstores that will make it easier for users to perform certain tasks such as displaying LCD text. Here you can find different collections developed by third parties that will allow you to connect practically any device with Arduinoeither to communicate through sensors, connect integrated circuits, among others.
According to everything mentioned in the post, a library is nothing more than a code that can be join the program in order to Add new functionality to projects. It should also be mentioned that you can find two types of bookstores as it is the standard library and the non-standard library.
So that you can understand a little more each of them, here we explain them below:
standard library
- The standard libraries were the first to be developed by the Arduino team, they come pre-installed in the Arduino IDE and the easiest way to identify them is by looking at the language reference. On the platform you will find a section where it says “Bookshop”.
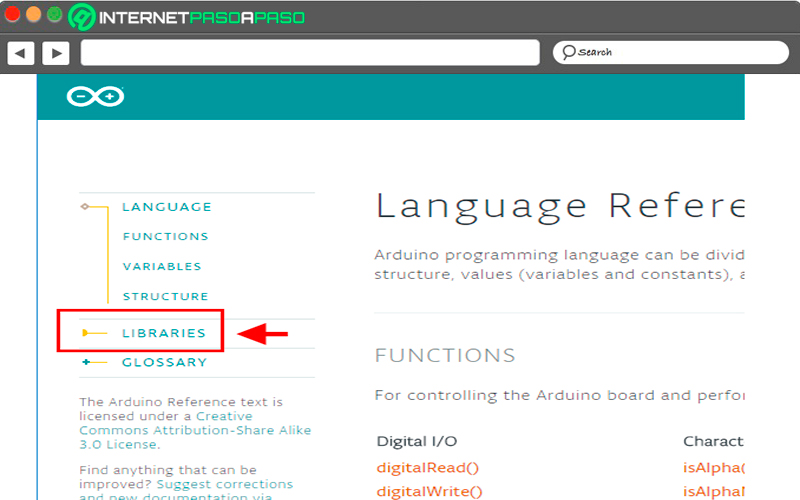
- The reference of a programming language It is considered as the user’s guide, since it is responsible for informing how the user can use the Arduino language. By accessing the reference you will find all the standard Arduino libraries such as Ethernet, LiquidCrystal, Signature, EEPROM, among others that you will find there. Keep in mind that the platform is in English.
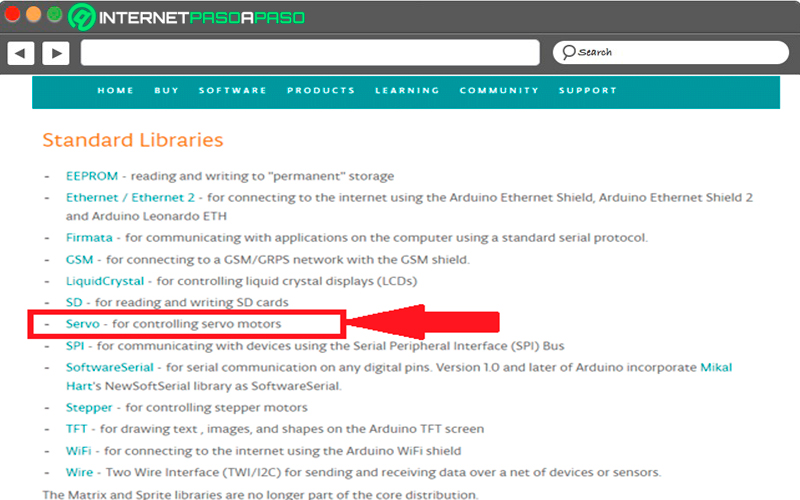
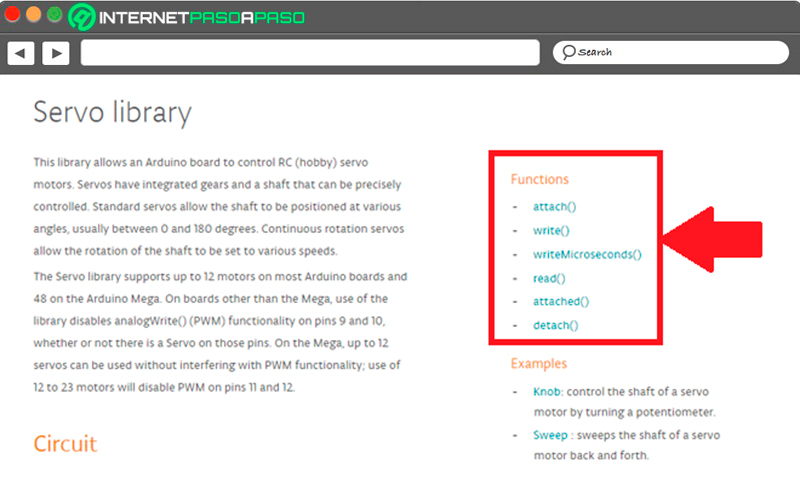
- So that you can understand all this a little better, you can enter the servo collectionit has been created to handle a servomotor in a very simple way within the programswhen you access its documentation, all its functions will appear.
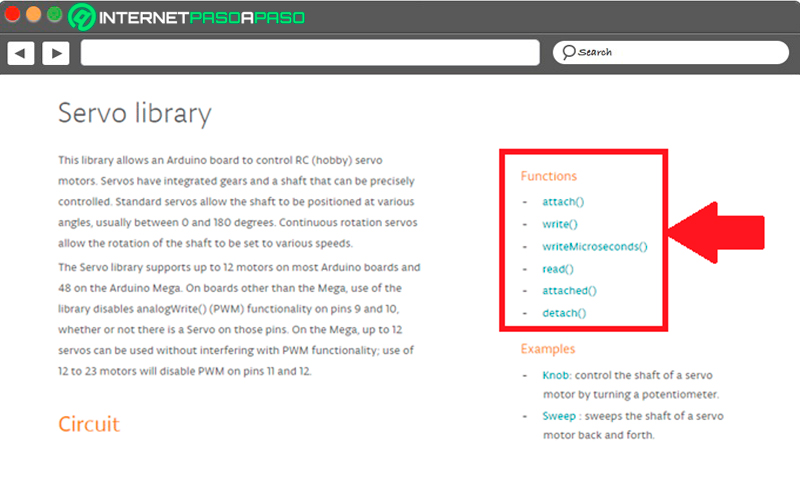
However, users can also add their own functions to control a servo or to manage the memory of the EEPROM library. But doing this can take you a lot more time so it will give you a lot less work. This is because you must find out for yourself how these components work.
Finally, it should be mentioned that bookstores are a double edged sword, since if you don’t investigate what is necessary to know the code behind it, you can have problems. But it should also be mentioned that they facilitate work on the platform, allowing save a lot of time and it always allows you to enter the code and see what you’re doing.
non-standard library
The non-standard library is the same as one standard Arduino librarythe main difference between the two is who has created it, since the standard libraries have been developed by the Arduino team Y non-standard ones are developed by people outside the Arduino team. Despite this, both do the same task. This means that both provide extra functionalities, which can be found in the language reference itself with the name of Contributed Libraries.
Here you will have the opportunity to find several Arduino libraries for different calculations, components and much more. You can also access the Arduino references to check if some of the collections do what you want to do in your program. It should be mentioned that in said list does not find all non-standard librariessince there are many that you will not find on this website.
To solve this you must go to the site of Google and there use the arduino keyword what you want to do and at the end put library, so that you can get positive results it is preferable that write it in English as it works better. For you to understand all this better you should do it in the following way: “I want to use a library to read the temperature and humidity of the DHT11 sensor”.
The following results will be generated there:
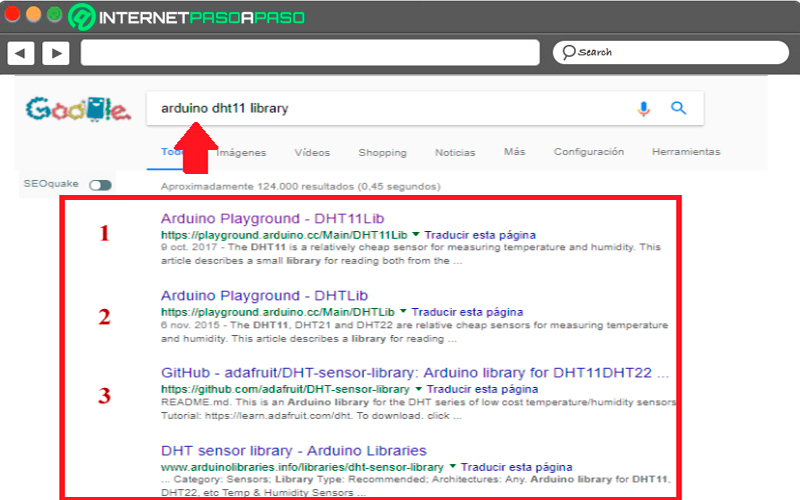
- As you can see in the image the first two results send you to “Arduino Playground”, it is a repository of tutorials to execute various tasks, by accessing the first link you will find a tutorial on how to use the DTH11 sensor with Arduino. In the third result you will find a link to the “GitHub repository” from there you can download the code and install the library manually.
- You must bear in mind that in the case of non-standard libraries they do not come pre-installed in the Arduino IDE, so you will have to install it yourself. When it is already installed you must go to “Program > include library in the Arduino IDE” and then you can make use of it. When you open it you can see three very well differentiated blocks.
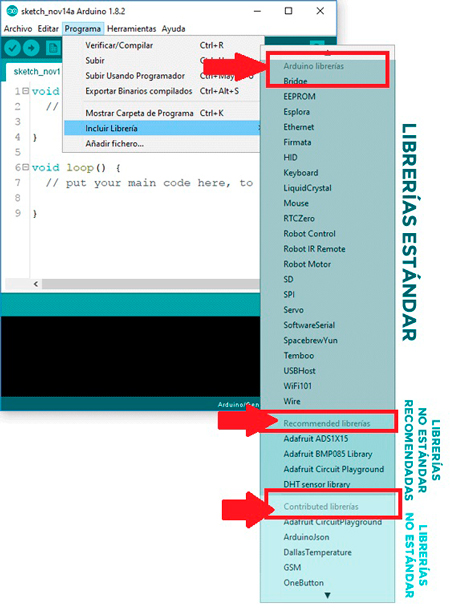
- The first block is the one seen in the standard Arduino library, the second block “Recommended bookstores” are the standard libraries that have been supervised by Arduino, while the third block “Contributed bookstores” are the non-standard libraries that have not been supervised by Arduino.
Structure of an Arduino library What is the architecture of these software elements?
You should keep in mind that the Arduino libraries have a structure, all must have two mandatory files, one of them with .cpp extension what means C++ containing the source code, that is, the definition of the functions. While the other file has a .h extension which comes from the header in English and means Headboard. All this is as if it were a list of the functions that are inside the source code, in the .ccp file. It tells the program which functions to use from the library.
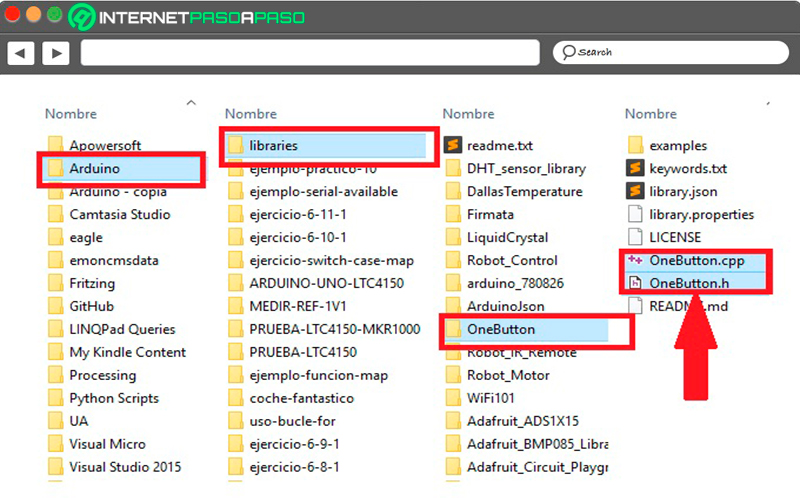
So that you can understand all this in a better way, here we leave you this example: You want to use a OneButton library.
To do this you simply have to go to the program and say what you want to include in this notebook:
#include <OneButton.h>

Void setup()  {

// put your setup code here, to run once

}

Void loop ()  {

//put your main code here, to run repeat

}
In this case the header file is telling the program where to go. find all the functions you have to use in this library. Bearing this in mind, you must be clear that these libraries must have these two files, one with the extension .cpp and another with .h. Although in the case of .h file and .cpp file are requiredthe folder containing the library can also contain another file and folder that are not required.
Examples folder
The most normal thing in these cases is that each of the libraries contains a folder with examples to show how each library is used. Continuing with the library OneButtonit has a folder called Examples in Spanish “Examples”.
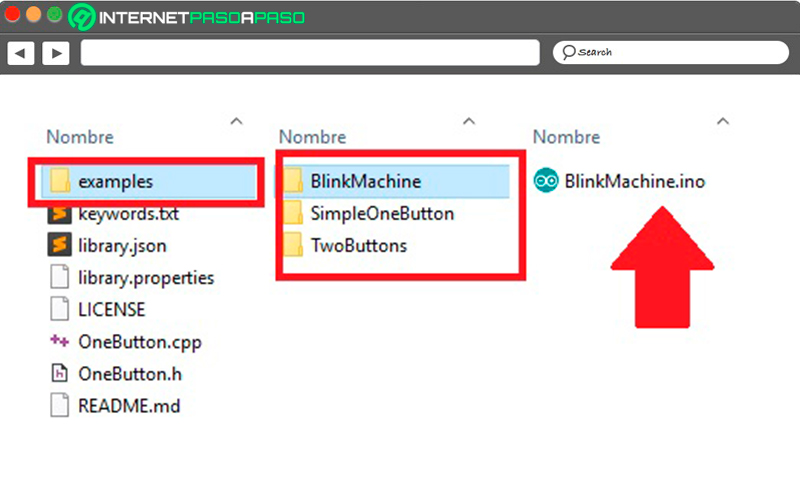
In the case of this collection it has three examples, if you access the folder of some of them you will be able to see an Arduino program with the .ino extension. In addition, you must bear in mind that you have access to all of them through the Arduino IDE. So if you go to “File” > “Examples” > “OneButton” you will find three examples. When you open any of these examples, it will automatically open the code it contains and you can test the library. Please note that these examples are very important and useful.
keywords.txt file
This is another of the files that is usually mostly in all the bookstoresit is known as keywords.txt. It’s about a Text file containing the keywords of the Arduino library. Its usefulness is in tell the Arduino IDE to color that word each time they are written in the editor.
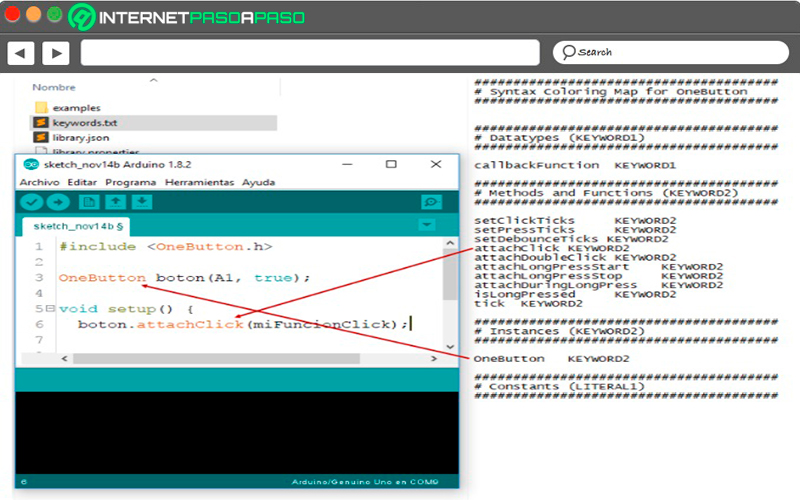
for what it is OneButton different keywords can be found, the numbering KeyWord1 and Keyword2 will determine the color it will have in the development IDE.
What should we take into account before installing a new Arduino library in the IDE?
Before carrying out installing a new Arduino library It’s important to put attention on there are three methods that can be run for it. Note that this process mainly refers to integrate within the Arduino IDE the structure of files, folders and paths of an Arduino library. You must bear in mind that the folder where it is installed will depend on the operating system you are using, this folder can be seen from the options of the file menu and then preferences.
As it was mentioned to you, there are three ways to carry out this installation, one of them is through the bookstore managerbeing one of the most common, through a .zip file or installing it manuallyany of these methods is completely valid and that is why here we are going to explain how to perform each of them.
However, it must be remembered that there are two types of Arduino librarieswhat they are standard and non-standard libraries. The first of them are those developed by the Arduino team, so no need to install theminstead non-standard ones are created by third parties and they are the ones that need to be installed, therefore, the non-standard ones are going to be installed.
Learn step by step how to install an Arduino library in the development environment
Taking into account everything mentioned earlier in the post, here we are going to teach you how to how to install non-standard Arduino librariesfor this you will have three methods for its execution and in addition to a bonus for your installation. According to this, we start with the simplest and most popular method to carry out this process is the library manager.
To do this, follow in detail each of the methods that we will teach you below:
From the library manager
- This is the simplest method to carry out said installation, as well as through the “Bookstore Manager” you will be able to execute all this in a very easy way, for this you only have to execute the manager and then go to the following location “Program > include library > Manage library”.
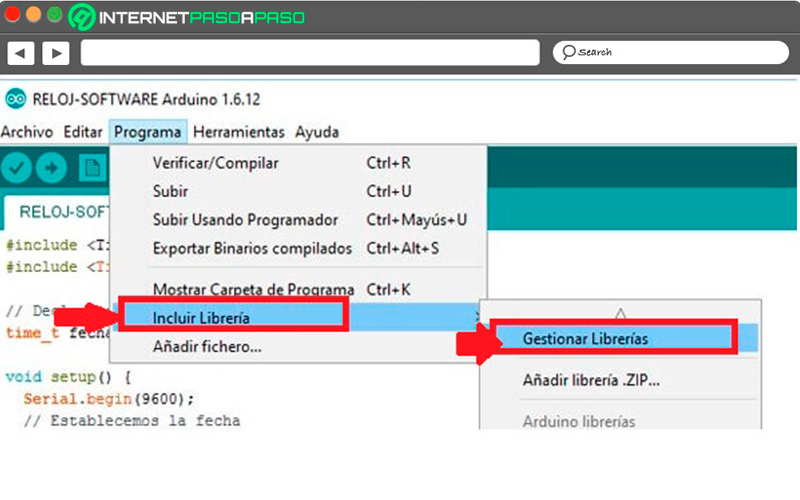
- Here a new window will open where you must place the “Library Manager” this window gives you the possibility to search for and install the libraries that have been Arduino Approved but they are not standard, this means that they are third party libraries that have not been developed by the Arduino team.
- In this way you can find different hardware manufacturers What Sparkfu or Adafiit, as well as another amount of library to carry out different types of tasks. For this it is important to examine the following window in detail:
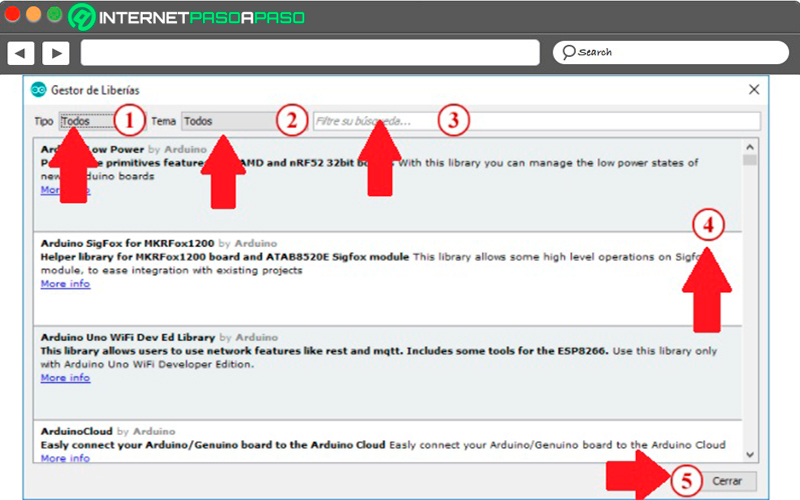
Filter by type
This is the first tab that you will find in said window, for this you simply have to click there so that the following drop-down menu will be displayed where you will find the following categories:
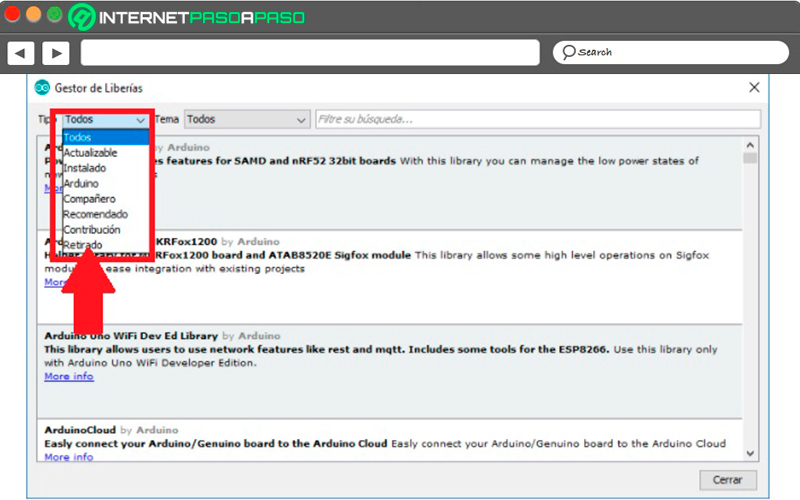
- All: Here you will be shown all the libraries.
- Updatable: The library has an update available, it is very useful to know which library has one. new version and thus be able to update each of they.
- Installed: It shows the list of libraries that you have installed in your development IDE.
- Arduino: This is the standard library that your development IDE has installed.
- Co-worker: refers to a bad partner translation, these types of libraries are non-standard associated with or affiliated with Arduino. Where companies like SmartEverything or Microsoft they are of this type of companies that reach an agreement with Arduino in order to offer services to their boards.
- Recommended: It is the list of recommended non-standard libraries that have been reviewed and approved by Arduino.
- Contribution: The list of non-standard libraries.
- Retired: All those libraries that have been withdrawn or that were not further developed. Here you can find so many collections standard and non-standard.
filter by topic
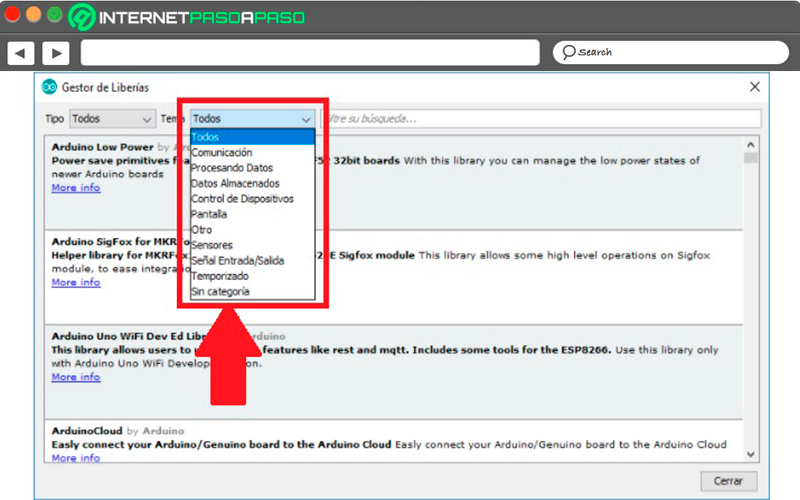
This is the second tab that you will find in that window, in this case you can make a filter by theme with any of the 11 categories that appear there available in the drop down menuYou just have to select the one that suits your needs.
Search by word
You also have the opportunity to filter a keywordfor this you must select the box that appears next to tab two and there you can write any word and the library manager It will take care of filtering all the libraries that match the keyword you have added.
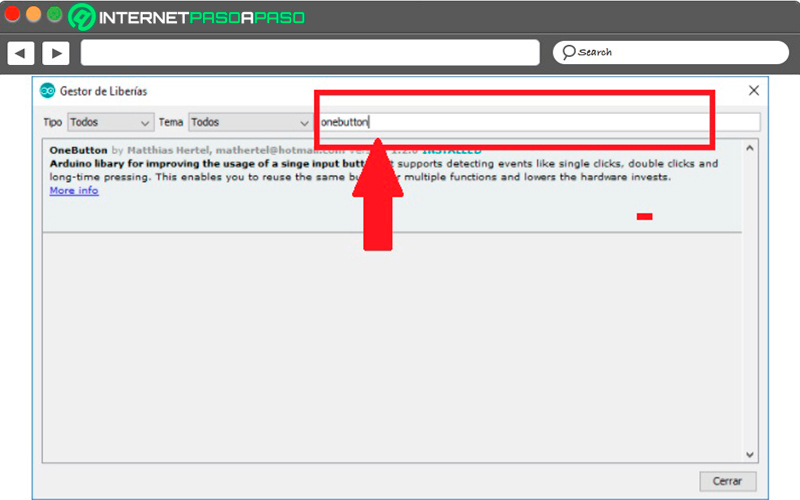
bookstore listings
- Within this area, the library list will appear according to applied filtersthe bookstore can be found at three stateseither not installed, installed or pending update. Depending on this state, one information or another will be shown to you. If it’s a uninstalled library It will only allow you to perform one action which is to install it. If you select one in that state, then a selector will appear for you to choose the version and the button to install.
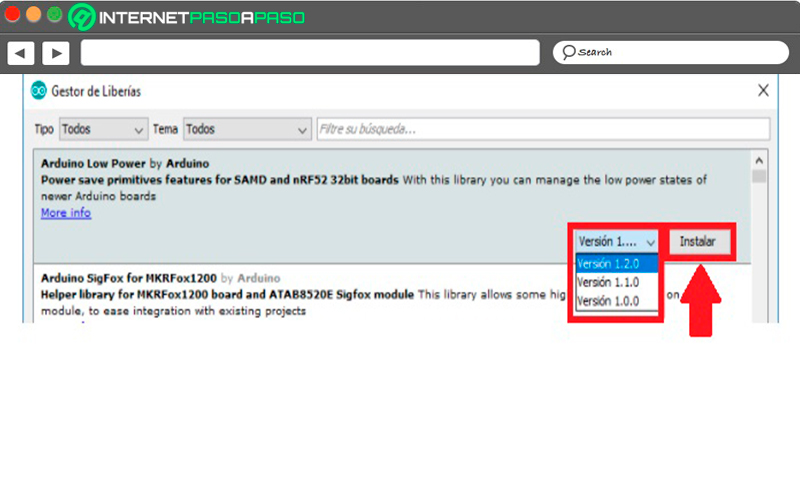
- The best thing to do in this case is to select the latest versionby default it is the one that is selected. An installed library it will only allow you change version. When you click on it, you will only find the same options to select the version and install, but this time located on the left. A note will also appear telling you that it is installed.
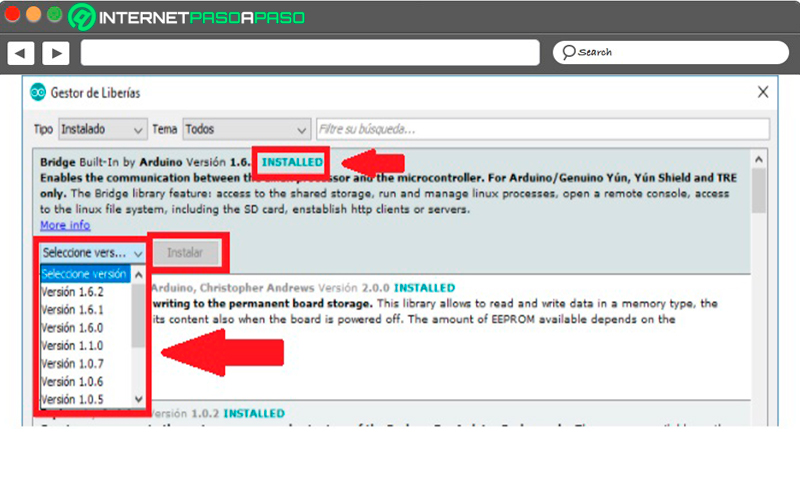
- The install button is only activated when a different version than the one currently installed is selected. Finally in one library that is pending updating An update button will appear and you will also find the options to change the version.
close button
When it’s over manage the libraries the only thing left to do is select the close button to close said window and in this way the procedure will end from the bookstore manager.
From a Zip file
Another method available to do this is through a Zip file. mostly in the official Arduino repositoryin the bookstore manager Not all libraries are found, which is why this platform follows a strict policy that allows a library to be part of this repository.
Therefore, it is possible to carry out the installation of a arduino library in two ways, either through the zip file or manuallyin this case we will carry out installation from a .zip file. All this will take place from the Arduino IDE itself and the most important thing about this is being able to know where you can Download the Arduino libraries. The most common way to do this is by searching the Internet.
An example of this is the following:
- A library created by any author who is a contributor to the podcast, the bookstore is named WiFilocation and it allows geolocate an Arduino board over a WiFi connection. Therefore, this library only works with boards that have a connection to a wireless network, in this case it would be boards like NodeMCU or MKR1000. These collections are not found in the official Arduino repository.
- Here you will not only have the opportunity to find codes and librariesbut you also have the opportunity to find a multitude of codes for other languages.
Perform a search in your favorite search engine
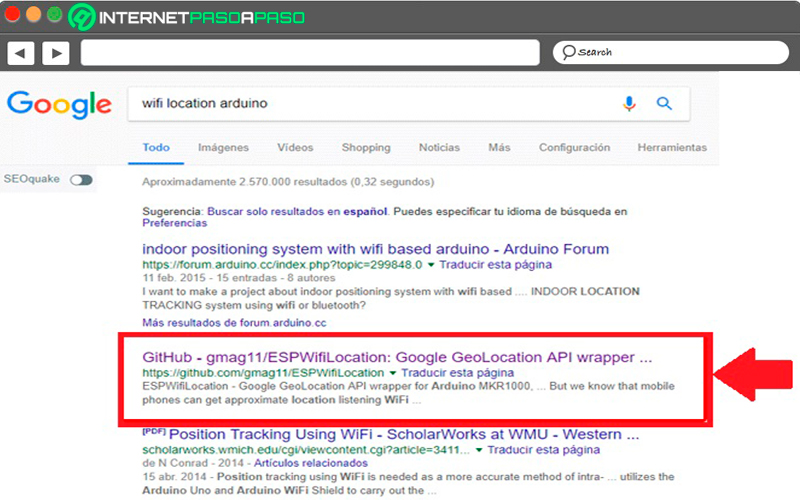
- In the event that you have the purpose of geolocating a license plate through a WiFi connectionthen you should search the Internet for the Wi-Fi location. In order for you to be successful in this, the search must be done in English. If you don’t master the language in English you can simply use the Google translator To do this, in this way you will be able to obtain in English that sentence or phrase that you must look for.
- When you already have what you need in English, you simply have to copy it into the google search and press enter key. Always remember to add the word Arduino at the end, it would look like this: WiFi location Arduino.
- As can be seen in the results, it has been shown that there is a library with these conditions and is on GitHub.
Download the .zip file
- Once found, the next thing to do is access the website to download the Arduino library. Here you just have to select the button clone or download and then click “Download ZIP”.
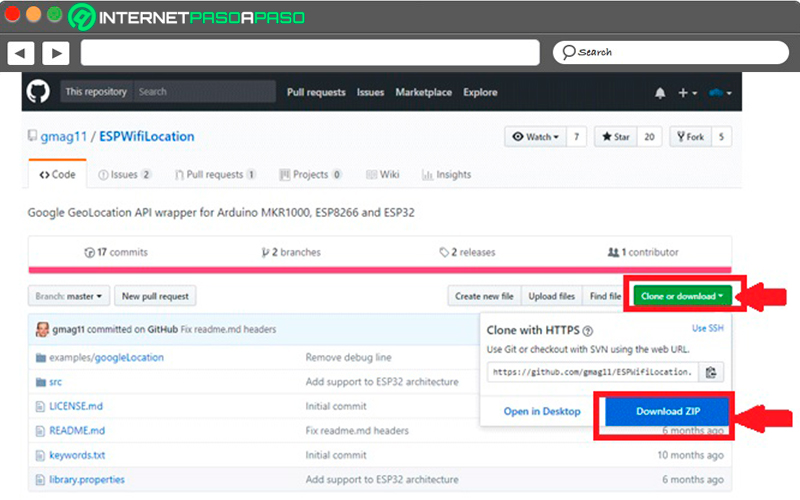
- The location for save the file It is not so important in this case, simply remembering the location where you stored it for when you need to use it will be enough.
Upload the ZIP file from the Arduino IDE
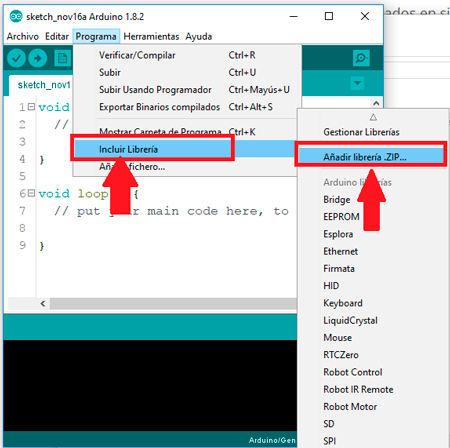
- The following in this case will be start the Arduino IDE and in the program menu option select the option to include library and then add ZIP library.
- Here a new window will open where you must select the option to File, Archive ZIP that you downloaded, and then click “Open”.
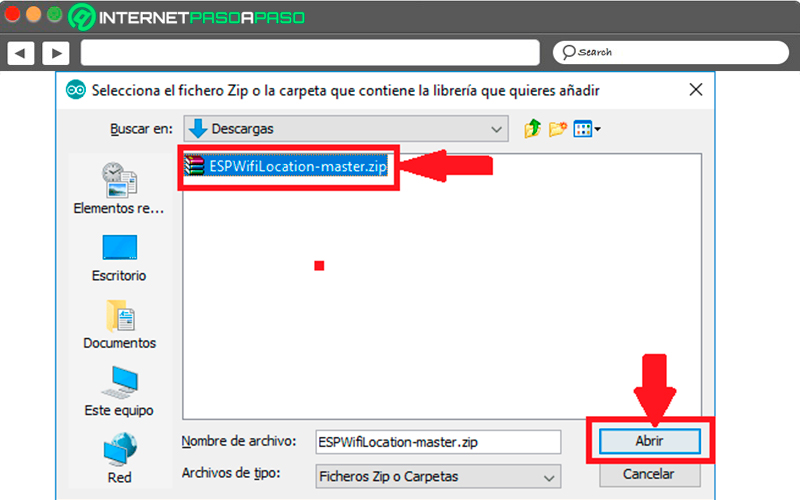
- At the end of all this it may seem that nothing has been done, but for this you can check in the IDE for the Arduino library that has been installed and in the library folder you will find the source code files.
- In this case what you have done the Arduino IDE below is unzip the file in the library folder and adds both examples and access to the collection.
manually
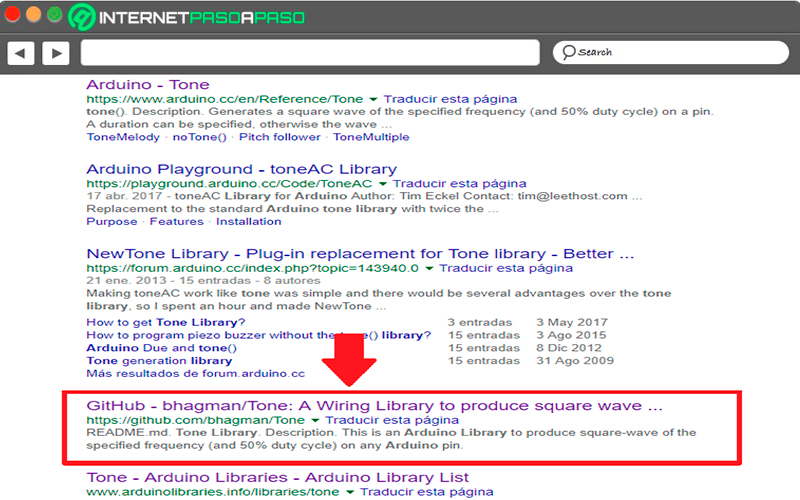
- This method consists of doing all this manually without having to rely on the intervention of the Arduino IDE. To do this, install a new bookstore of the platform. The first thing you should do is create an internet search, Remember that it is essential to do it in English as it has been mentioned. Also, you should use Google Translate in order to do the translation.
- After searching this “Arduino tone library” several results will be obtained in Google among them one of GitHub which can be very useful for what you are looking for.
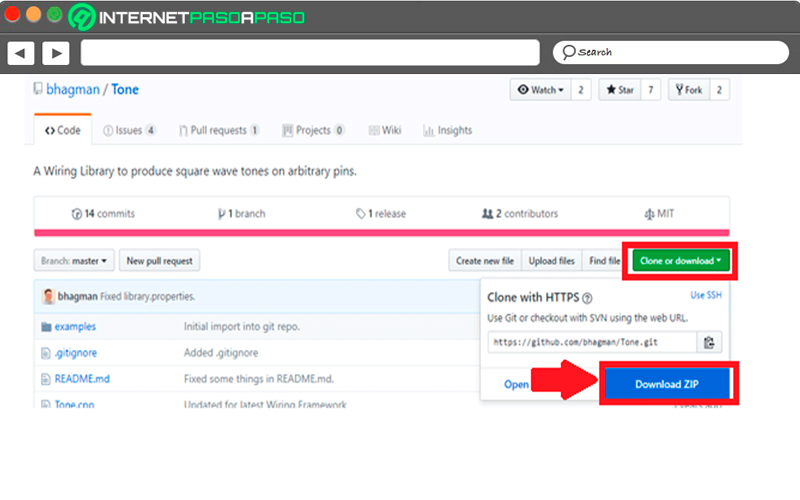
- Here you must access the GitHub website and download the compressed library in a .ZIP file. In this case, it is best to save the download in the Arduino library folder.
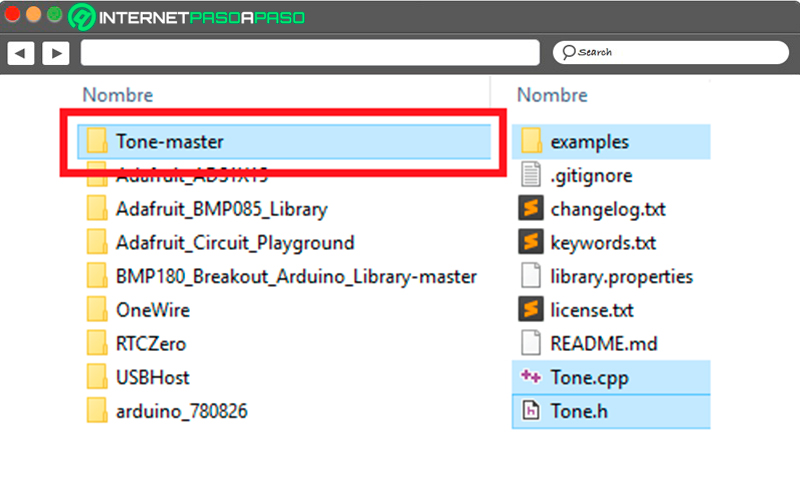
- Now you must access the folder and unzip the file inside the folder Arduino libraries. This will generate a folder named Tone-master. The best thing to do in this case is to change the name to tone, Although leaving it as it is will not cause any inconvenience, but this will be clearer for you. When accessing you will be able to see that it has the .h and .cpp files mentioned at the beginning of the post, as well as with a examples folder.
- If you access the development IDE in the option of “Program > Include library” you are not going to find the collection you recently installed. Keep in mind that when installing it manually, you must restart the Arduino IDE for it to appear in said library, otherwise it will appear empty.
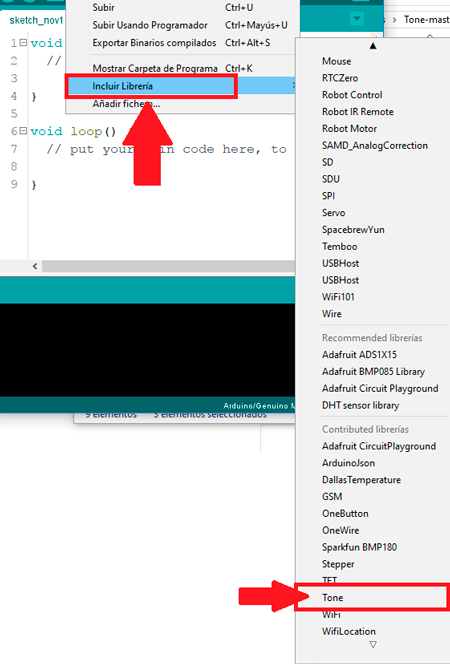
- After this you can load an example of this arduino library and so see the code.
- As you can see this procedure is quite simple to carry out, this way you can start install non-standard libraries to help you develop some specific functionality.
Bonus: Install library in a program
We have already mentioned the three methods for carrying out installing an Arduino librarynow as a bonus we are going to teach you how to how to perform this procedure in a program. This will allow you to use it in a program but for this it will be necessary Include it in the source code.
In this case you must perform these steps:
- The first thing you should do is go to “Program” and then select the option “Include bookstore” and finally select the option “Library Name” as can be seen in the following image.
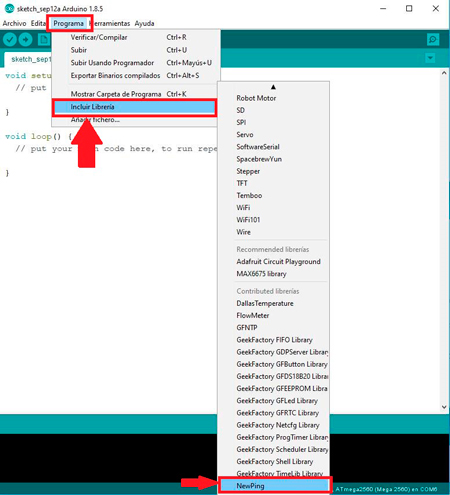
- When performing the previous step, you should see the library included at the start of the program as follows:
#include, <NewPimg.h> - It is also possible to write this line in each of the programs that use the NewPing bookstore. Therefore, it will not be necessary to Installation procedure for each of the programs that you want to run, since the library will already be installed for all the programs. Simply insert the directive “include” in each of the programs that use the library.
Learn about the main libraries that we can use on an Arduino board
In the Arduino platform a bookstore is a function collection that provides certain specific functionalities. In addition, the same collection can be used for several different projects. Many of them can be used without the need for extend the Arduino with other deviceswhile others of them must be used with additional electronic components.
Currently there are three main types of Arduino libraries such as the base, standard and contributions, which we explain below:
base library
The base collection is part of the environment powered by Arduinowhere the purpose of this library is to hide much of the complexity that involves working with this microprocessor. Therefore, it can be said that this is one of the most frequent reasons why beginners and more experienced users show some very little difficulty in working with traditional microprocessors.
In this way, base collections have become one of the great advantages of Arduino by making it easily accessible to any user no matter their knowledge levels. This is how the designers of this platform have developed this library from the requests of the students and include those actions that are most common.
It should also be borne in mind that most of the projects read data from input or write data to one of outputs. This is how the base collection makes each of these common tasks simple to perform, difficulty aside. In order to read the value of a digital pin, the user must simply use the function “Digital Read”.
standard library
When downloading and installing the developer environment of the Arduino (IDE)), including several standard collections with installation. Remember that these collections are those that the development team of Arduino I think and thought that they would be necessary for the projects developed by many of the users. Also note that these collections are not included as an option. by default in your sketchesso they must be loaded one by one as long as you need them.
Everything allows them to be used the memory resources of the Arduino with higher load efficiency, only those libraries that you are going to use in your sketch. To be able to add a library, just add a declaration #include at the beginning of the skit. Now in the case you want add liquid crystal librarywhich is used to display the data of a LCD screenthen you should add the following: #include <liquidcrystal.h>.
Bearing all this in mind, here we show you the different standard libraries that you can find:
- servos collection.
- EEPROM Collection.
- SPI collection.
- SD Collection.
- ArduinoTestSuite collection.
- Wire Collection.
- Ethernet Collection.
- LiquidCrystal Collection.
- Signature Collection.
- SoftwareSerial Collection.
Contribution Library
Just as their name says, they are collections from other Arduino users that are not distributed as part of the IDE development environment, many of them can now be found in the Arduino website. Many of them are extensions of the standard library that add supplementary functions, where over time if the functions are useful the development team usually add them to the standard library. standard or base library.
It should also be mentioned that the collection of contributions It is designed to work primarily with specific devices such as game consoles. Keeping in mind that they are not part of the IDE, you will have to do a series of previous operations to be able to work with it.
In order to add a new collection to the IDE development environment, you simply have to perform the following steps:
- Download the library will mostly appear as a ZIP file.
- now you must install it in the IDE copying the extracted files from the archive zip to the default directory for libraries. In the event that the directory does not appear, then you must create it.
- In the case that SDI is already working, then you must restart it. After restart the IDE It must be available for the inclusion of the sketches.
- Then you must add the library to your sketch by selecting the options of “Sketch > Import Library” on the menu.
Finally, after added collection to IDEit will be available for use with your future projects. In the same way as the standard collections. Once you are all features installed they will become available automatically.
Computing