
Index:
UPDATED ✅ Want to use OpenMediaVault to turn your Raspberry Pi into a NAS server? ⭐ ENTER HERE ⭐ and Learn Everything FROM ZERO ⭐
If there is anything to mention about the Raspberry Pi is its versatility of useand it is thanks to this that these mini PCs They can be used to perform a myriad of basic and advanced projects.
One of the most popular projects that can be created with this board is that of build your own NAS serverwhich becomes an excellent alternative considering NAS model prices available on the market.
So if you want to start riding your own server homemade NAS in a raspberrypi, here we are going to explain everything you need for it in an easy and fast way.
What is OpenMediaVault and what is this tool for on a Raspberry Pi?
If you are starting to take your first steps in the world of the NAS and you want to start create your NAS server at home, then it is very important that you meet OpenMediaVault, it is a very popular distribution that is directly oriented towards NAS, started by one of the former participants of the project FreeNAS. Note that it is based on Debian and unlike the other similar projects, OpenMediaVault It is characterized by supporting a wide variety of hardware.
So this system is qualified as a NAS distribution compatible with ARM chipsas it is the Raspberry Pi, Banana Pi, Orange Pi or Odroid. That is how OpenMediaVault or also known as OMV has all the necessary features to create a NAS server.
So that It has a simple system for updating and installing packagesa web management system, SMART Wake on lan, volume managers, email notifications, data sharing protocols, all kinds of services, an interesting system of extensions that offer more power and many more advanced features.
Allows configuration to manage different hard drives in a RAID configuration so that the data is backed up minimizing the risk of information loss. This program has the ability to constantly monitor all SMART parameters of the storage units in use, identifying those unusual situations and imminent damage. In this way, it is a fairly good solution to be able to build a NAS with total autonomy from your Raspberry Pi.
What are the benefits of using OpenMediaVault to turn your Raspberry Pi into a NAS?
Today you can find a large number of NAS models available in the market, as well as different types of brands, but you also have to consider their prices, which are usually a bit expensive. All this has helped microcomputers to be considered as a central axis to mount your own NAS at home.
buy a commercial NAS It can surely be the best option for many, since they usually offer already consolidated applications and software. But to all these facilities we must add that being able to choose one of them can be somewhat difficult, since you have to know very well what model are you going to buysince if you later acquire a model and it falls short of what you want or ends up offering you more than you need, it can become a problem.
Taking into account the investment that this requires you must make sure very well which model to buy. Therefore, it is considered that build your own NAS will offer you better benefits, as well as greater freedom to enlarge or decrease when you need it, so it will help you save a lot of trouble.
Also, thanks to the raspberry pi This has become a fairly simple process to carry out, so in the future it can become a very good alternative for you. One of the main advantages that should be mentioned in this case is that creating your own NAS with a Raspberry you will get a lot more economical to acquire one in the market, so this is considered more than enough to try.
Learn step by step how to install and configure OpenMediaVault to turn your Raspberry Pi into a NAS server
If according to everything mentioned above in the post you want turn your Raspberry Pi into a NAS server, So here we are going to explain step by step how you can install and configure it using OpenMediaVaultthis being the most recommended option for it.
Therefore, before starting this procedure, you will need to meet the following requirements:
Requirements to mount NAS with Raspberry Pi
Perhaps the most important aspect to carry out this project is the microcomputer that is going to be used, previously it was used the Raspberry Pi 2 and the Pi 3, but now with the latest model released from the Pi 4, the Pi 2 perhaps it is not the most recommended since its operation is a bit slow, so it is recommended to use the Raspberry Pi 3 or 4 to do this, since both have enough power for the server to work properly.
Not only do you need the correct board for this, but you must also have at least two storage media, both of which can be flash drives with 100 or more gigabytes of storage that are powered directly by raspberrypi, It is also recommended to use class 10 micro SD cards with classification A1since they are very good for this or using external hard drives.
In accordance with all this, if you already meet these minimum requirements you will be able to start with the installation of the NAS server on the board, to do this follow each of the steps that we are going to indicate below:
Installing OpenMediaVault
Formerly for the installation of MVNO just like any other operating system for raspberry pi needed to download the corresponding image and write it to the Micro SD card using Etcher. When it was already installed on the micro SDit had to be inserted into the board and wait for the first system boot which took a while.
However, with the latest released version of this program MVNO 5 all this changed, so now there are no images for SBC so to install OMV it will be necessary to perform the download raspbian booster lite and copy it to a Micro SD card. Therefore, to carry out this installation it is necessary to do the following.
The first thing will be to connect through SSH and then execute the following commands that will allow OMV to be installed:
Sudo su

Apt-get update && apt-get upgrade

Reboot

.

Sudo su

Wget –O – https://github.com/OpenMediaVault--plugin-Developers/installScript/raw/master/install | sudo bash
when this is over interface can be accessed going to the IP of the Raspberry Pi.
By default, the access credentials are the following:
- Console: The user: root, while the password will be: openmediavault.
- Web interface: The user: admin, while the password will be: openmediavault.
It is important that you do not forget that by default access root via SSH it’s found disabled.
Initial OpenMediaVault setup
Before starting the initial configuration it is it is essential that the administrator password be changed of the web interface, for this you will have to access the menu on the left and there enter “General Options” and then select “Web administrator password”. When you have changed it, then you can start with the configuration.
Network settings
- The first thing to do is configure the network interfaces, in this case the wired interface will be configured with a static IP. To carry this out in OpenMediaVault you must access “System” and then to “Net”.
- When you are in the section of “Net” you must enter the tab “General” and from there you can modify the name of the computer and the domain. However, this is not the most important thing, since what you are really looking for is to add and configure the network interfaces, so you have to access the tab of “Interfaces”.
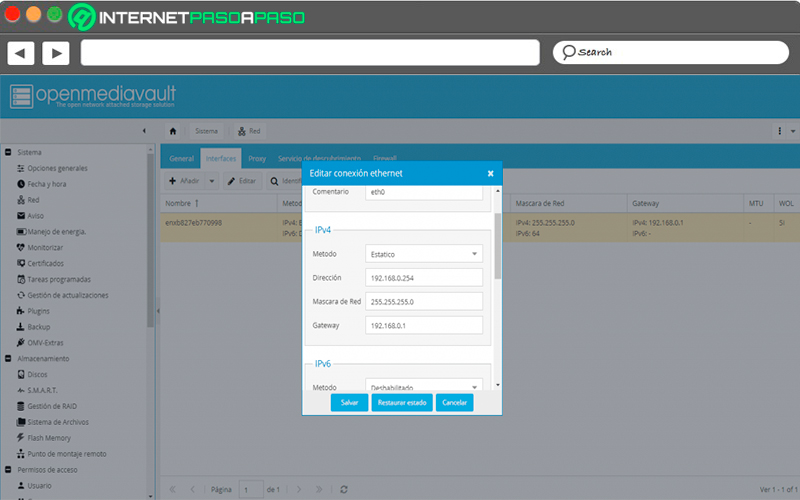
- Here you will have to click on the option “Add” to be able to add the network interface, in this case it has been added only the Ethernet interface and it has been placed the static IP, Since it is a server, this is the most practical, since a dynamic IP will only cause problems to access it.
Add the drives
- After having done all of the above, the next thing to do is to add at least one hard drive to the server, to do this, with the hard drive plugged into a Raspberry Pi USB port, you will have to enter the section of “Storage” and then to “Disk” and there you will make sure that the hard drive has been detected.
- Now if it has not been detected you will have to click on Scan and it should be recognized there. Once the drive is plugged in and detected by the system, the next thing to do is create a file system. All this is done from “Storage” Y “File System”.
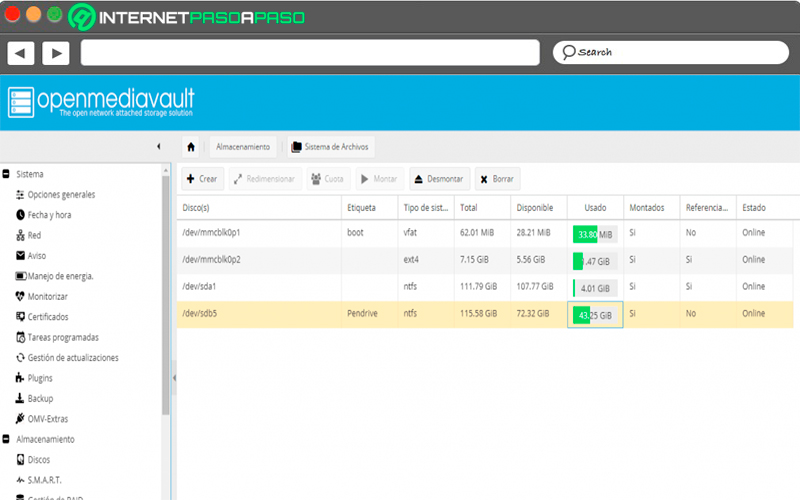
- Yes we already have the disk formatted and we want the data to appear there, then you just have to mount it. If this is not the case, then you will need to create a new file system with its corresponding partitions. To do this you will have to click on the option “To create” and there select the device and the file system.
- The best thing to do at this point is to use ext4, because it can only be read in linux systems, is much more efficient than NTFS in these types of systems.
Create shared folders
- The Shared folders are very important in this procedure, since they are the ones that will allow access to disks and files. Here you must create one for each folder you want to access.
- To do this you must enter the section of “Access permission” and then to “Binder shared”. Once there just click on “Add”, in the next dialog box you must complete everything that appears there.
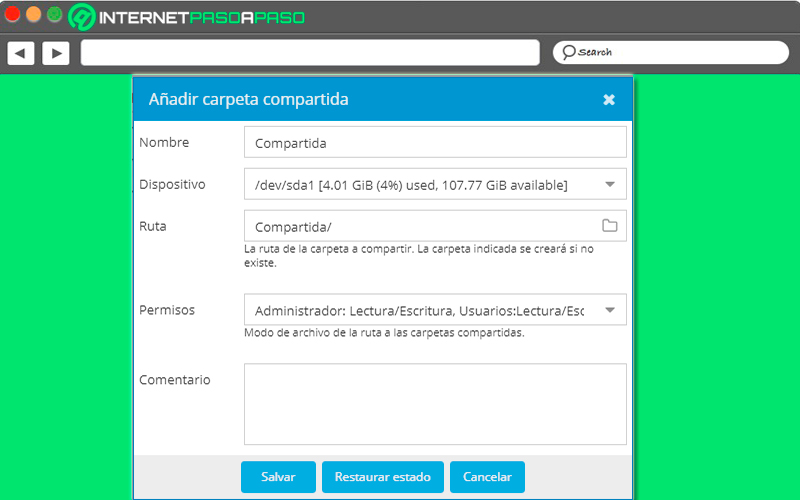
- As you can see in this box, you can add a name to the shared folder, select the device and the path where it will be located, as well as define all the necessary access permissions.
- These permissions include what is read/write, read or nothing for administrators, users or public. Note that the users will be created next.
User creation
- Being able to control access to shared folders is very important, as well as to services, and to achieve this it will be necessary create users. All the users that are created will be system users, that is, they will be able to log in with them or use them for any service that it supports. pam-authentication.
- In this case the users will be created in “Access permission” and there you enter the “users” section and then select the option “Add”.
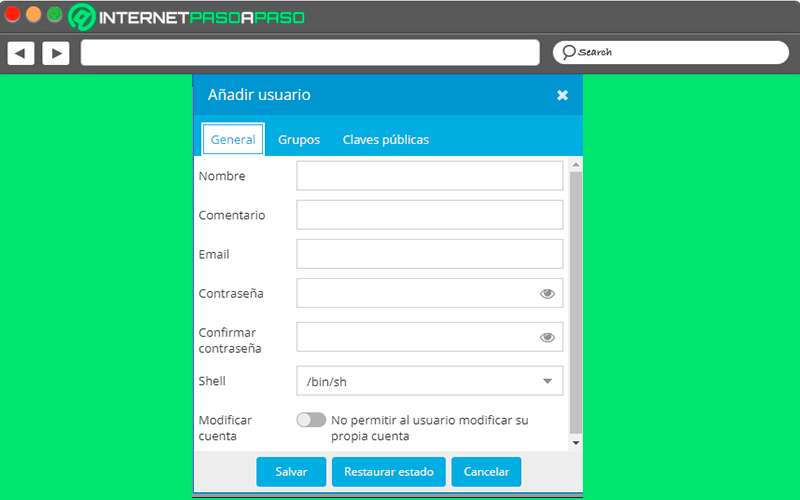
- There you will have to complete the entire form and enter the tab “Groups” and add the user to the groups you want. By default, all the users that are created will be part of the users group. In this case it is recommended to create a user to be able to log in via SSH and manage the server. This type of user should belong to the sudoers and ssh groups.
- Finally you can choose if you want to activate the home folders of users in the tab setting.
Service configuration
After having made initial setup in its entirety, the next thing will be to perform the service configurationfor this it will be necessary to carry out each of the steps that we will indicate below.
Samba Configuration
- When you already have your shared folders and users configured, the next thing will be to configure the Samba service in order to access shared folders from another computer. For this it is necessary to access the section of “Services” and there to “SMB / Cifs” and in the configuration the service must be enabled and the name of the work group to be used will be configured.
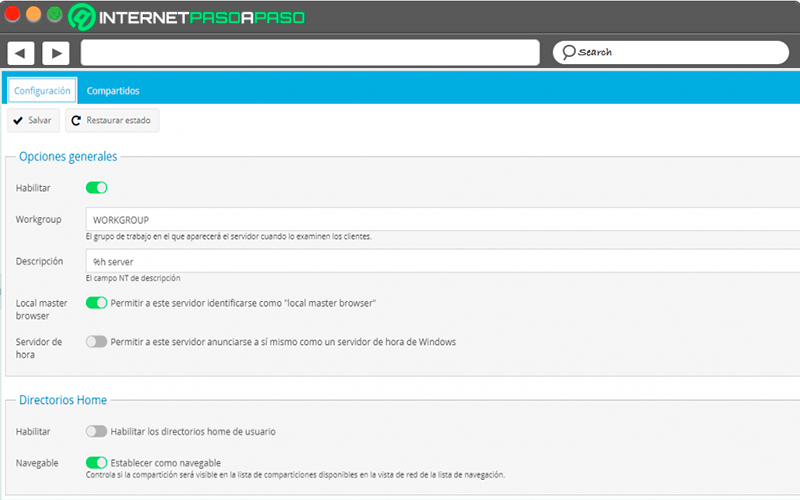
- If you want it, you also have the opportunity to enable user home directories to be shared via Sambabut this as long as they are activated as is, as mentioned earlier in the post.
- After this you will have to choose the folder that you want to share through this service, here you will simply have to add it to the tab “Shared” clicking on the button “Add” and selecting the folder you want:
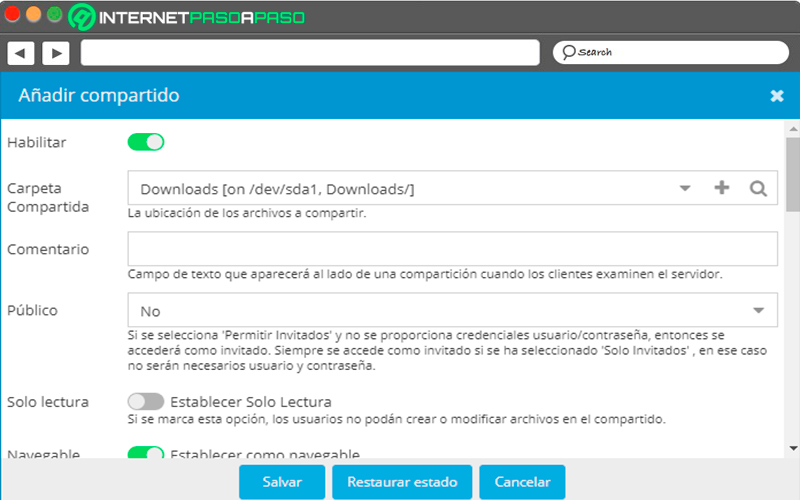
- Once all this is done, then this folder can be accessed through “network sites” in Windows or by accessing through
IP/hostname/nombre_carpeta_compartida.
FTP access configuration
As in the previous section, you can also carry out the configuration of the FTP access since “Services” and then in “FTP”. To do this, you will only have to activate the service and then select which are the folders to which you will be given access by FTP. As you can see it is a fairly simple process. In the case of FTP It has advanced properties such as enabling the SSL access or the creation of exclusion rules for FTP connections.
Configuring SSH access
To finish the whole configuration process, will enable SSH accesslike the previous cases, it will be done from the section of “services” and then in “SSH”. Although this is not completely necessary, it is considered to be a very good alternative to have it activated in order to carry out certain administrative tasks.
In this case, it is best to leave root access disabled and create a user specific for SSH adding it as it was done before, this time to the group sudoers and SSH. In this way you are completing the installation and configuration of OMV on a Raspberry Pi.
List of the most profitable Raspberry Pi boards that you can use as a storage server on the network
Currently these boards have several versions and models available on the market, each one of them offers its own characteristics so they can be used to carry out various types of projects.
This is how not all of them will be useful to you to use them as a storage server on the network. Therefore, here we show you which Raspberry Pi you can use to create your homemade NAS server:
Raspberry Pi 2
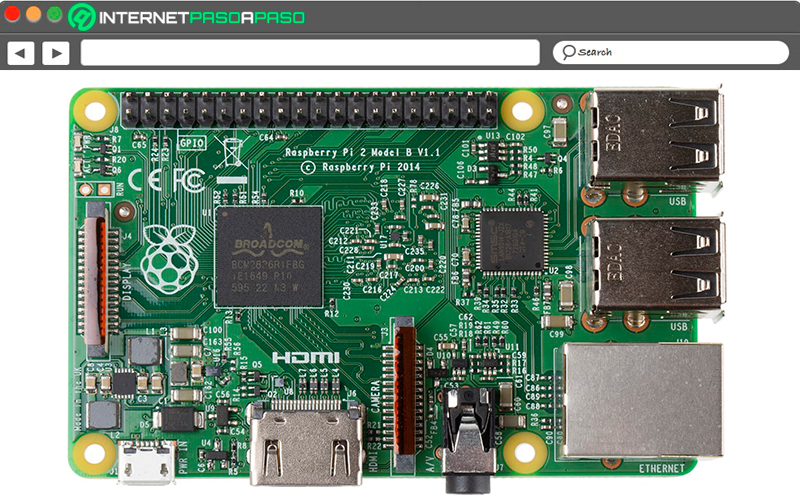
This model of microcomputer became the first to be used as NAS, this thanks to the Pi 2 It has many features that were improved with respect to the previous version and that allowed it to obtain the necessary power to carry out these types of projects. Nevertheless, It should be mentioned that on some occasions the servers tend to work a bit slowly with this board..
But if you already have one of them and don’t want to buy a new board, then you can start using it to create this type of project. Keep in mind that it includes a 1GB RAM at 450MHza new 900MHz quad-core ARM Cortex-A7 CPU and it no longer has the BCM2835 chip, but a new BCM2836 chip with more MHz and keeping the same structure was installed.
Thus the Pi 2 It has a large number of improvements and innovations that undoubtedly made it a more powerful board than all its predecessors, where many claim that it can be up to six times more powerful than previous models and is also compatible with windows 10 updates.
Raspberry Pi 3
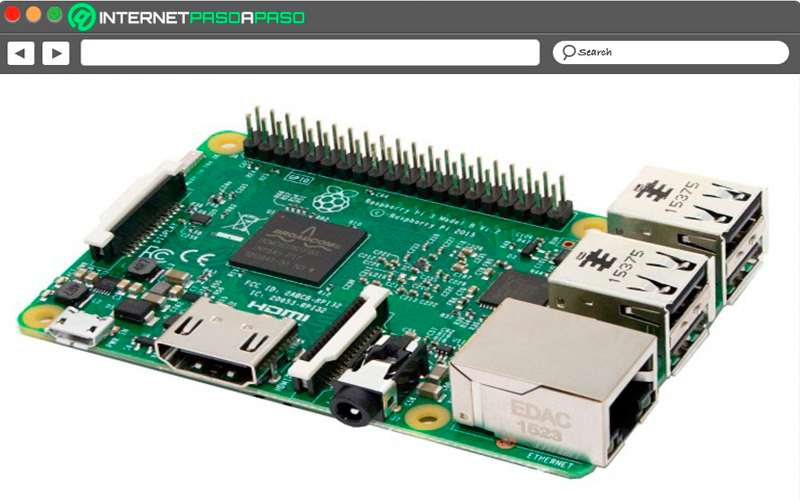
This model was launched with the purpose of replacing and improving the Pi 2, so they were clearly in charge of improving the most necessary aspects with respect to its predecessor. It’s like this new pi 3 board offers a ARM Cortex A53 processor, quad-core 1.2 GHz 64-bitwhich is presumed to offer up to 10 times better performance than the original Raspberry and at least 50% better than the pi 2 model.
Nevertheless, one of the most important new features of the pi 3 has been that it now includes a Wi-Fi and Bluetooth connectivity so it is no longer necessary to use wireless adapters to be able to connect to the network without the need for Ethernet cables. Just as if it had to be done with his predecessor. This type of characteristics has undoubtedly made it one of the best options when it comes to create your homemade NAS.
In addition, at create your NAS server on this board you will not have performance problems so its operation will not be slow as it can happen in some cases with the Raspberry Pi. Finally, it should be mentioned that this microcomputer has USB port, 10/100 Ethernet input and microSD slot.
Raspberry Pi 4
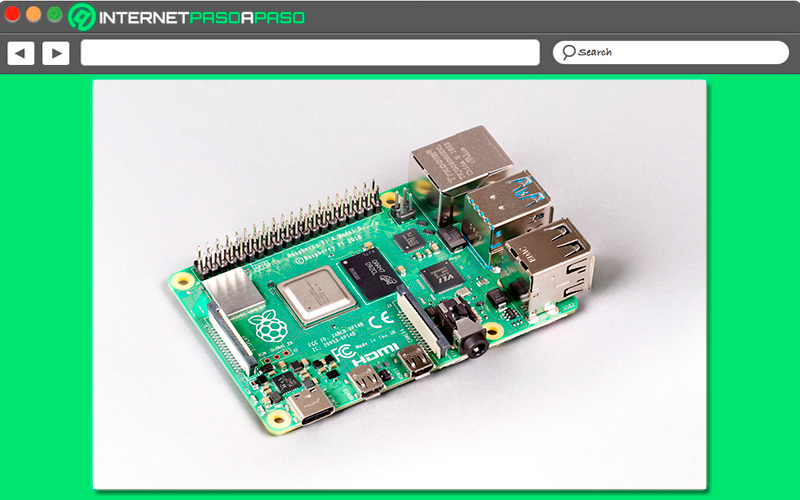
Finally we present you the Raspberry Pi 4, which has been the last released plate of raspberry, it has much more advanced and powerful functions than all previous models. One of its most outstanding characteristics is that of AC Wi-Fi networks and has a bluetooth support of 5.0. In addition, it has higher performance thanks to all the specifications of its processor.
It also has a random memory that can reach the 8GBso thanks to this you can use applications that are much more demanding in RAM such as servers or computer formats. In this way, all these characteristics have made the Raspberry Pi becomes the best alternative when you want to create a server, so it will work ideally for you as homemade NAS.
However, it should be mentioned that this plate is the most expensive of all and has an approximate value of 55 euros. Likewise, it has two USB ports 3.0 and 2.0, it has two HDMI ports so it offers a multi-monitor supportas well as a new graphics processor that allows 4k video output at 60 Hz refresh rate.
Computing