
Index:
UPDATED ✅ Do you want to know how to make a profit and expense control sheet in Microsoft Excel? ⭐ ENTER HERE ⭐ and learn everything FROM ZERO!
For both a company and family economy it is important to keep a control over money. Since, if we lose sight of this, it can imply a future headache. Unfortunately, It is impossible to perform all these calculations mentally.. Doing it in notebooks and by hand these days is archaic and impractical.
The professionals who perform these tasks for companies, use specialized software. They are usually quite expensive and difficult to manage.
Fortunately, we have Microsoft Excel which allows us to create spreadsheets Y arrange in a simple document all our income and expenses of money.
What are the best Excel functions and formulas to make an income and expense control sheet?
Although it sounds complicated, the truth is that income, expenses and balances are calculated with two basic operations: addition and subtraction. However, we are talking about a great number of variables. This can complicate things a bit if we don’t organize the categories well.
In this way it will be essential to distribute the tables in an orderly manner in the spaces available Y through the document sheets. The formulas will be reduced to those mentioned before and we will only use the paste special function.
To help you with this task and speed up your monthly budgets, we offer you these simple ways to make your expense control table and monthly income.
Steps to create an income and expense control sheet in Microsoft Excel
There are two basic ways to access such a control sheet. With both methods you will get the same result. The important thing will be that you try to load all the possible data and thus take control more effectively.
Let’s see what they are:
with a template
The first is about use a pre-designed document. There are lots of them within the same program. You just have to choose the one that best suits your needs.
To achieve this, follow these steps:
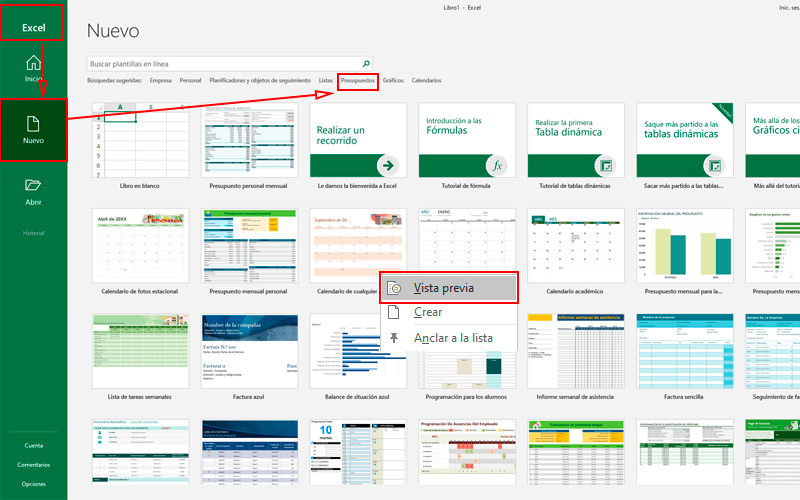
- Start Microsoft Excel. You can do it from start menu if you don’t have a desktop shortcut.
- On the welcome screen go to the button “New” found in the sidebar.
- There you can see several examples of templates. However, the ones we are interested in are in “Budgets”.
- This option is located between the bar and the examples. Click there.
It is also possible to enter keywords to perform a rough search. It is important to mention that all these documents are obtained online, so an internet connection is essential to download them (not so when working them).
Each template has a name that somehow describes its content. If this is not enough, right-click on it and choose the option “Preview”. This will display a window with a screenshot of the content. You can too open the document and explore further.
Each of these designs incorporates its own formulas and functions. So you only have to fill in the corresponding cells and change some names.
Individually
If the previous method does not convince you, you can make your own spreadsheet to control your expenses and income with very simple steps.
Taking into account that the personal income generally come from one or two sources, the most important will be separate expenses into categories. Of course, this could vary in each particular case.
However, as an example, we recommend the following:
- Accommodation. Here you can group the fixed expenses of your home such as electricity, drinking water, gas, rent, telephone, etc.
- Transportation. If you move with public mediaCalculate the monthly expenses. If instead you do it in a own vehicleKeep in mind the insurance, maintenance, fuel, and everything relevant to this category.
- Food. Behold the supermarket shopping and also the outings to restaurants.
- Debts. This group includes payments to Credit cards and the personal loans that you can have
- Taxes. Take into account those of the car, Public servicess and all you pay depending on the region where do you live.
- Pets. Although not always taken into account, our animals also represent a monthly expense. Keep in mind the food, vets, toys, and cleaning supplies used to maintain it.
- Entertainment. They represent the movie outings, theaters, concerts, streaming services, sporting events and what you consider falls into this group.
At first, you may not have all the numbers needed to fill the cells. But it’s a good opportunity to start collecting receipts and organize your expenses. You can also use the last month’s expenses and get a rough notion.
It’s time to pass this information to software. You will see how the categories that we mentioned and their descriptions will help you to streamline the design process.
The steps to follow are those:
- Begins starting microsoft-office.
- On the main screen, create a “blank book”.
- In the first cell, put the title of our document. You can give it header format to make it stand out on the page.
- Name cells A3, 4 and 5 with Income, Expenses and Balance respectively. You can color them with the paint icon in the section “Font”. If you want to have all the months in a single document, put their name in the second row.
- Rename the leaf as “Homepage” To do this, right-click on “Sheet 1” and choose “Rename”.
- Creates a new sheet and name it as “Income”.
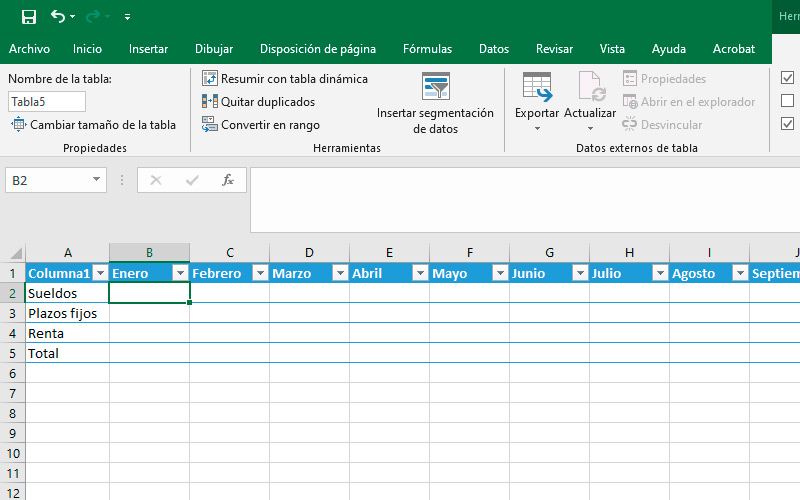
In it we will place all the money we get for month organized according to where they come from. For example, salaries, fixed terms, rent, etc. As before, write the months of the year.
Next:
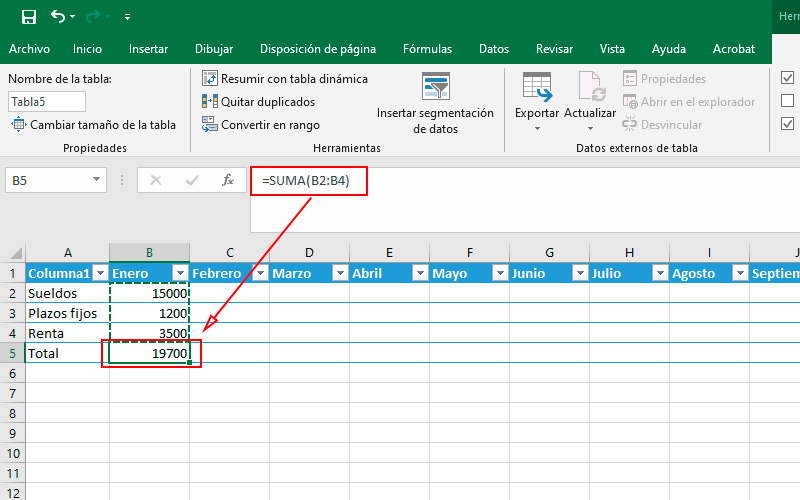
- At the end of the list we will place the total corresponding to each period. To do this enter “=SUM()” taking into account that the cells you want to add must go between the parentheses. In the case of the image it would be “=SUM(B2:B4)” this tells the program to add the figures in column B, from rows 2 to 4.
- copy with “Ctrl+C” the result.
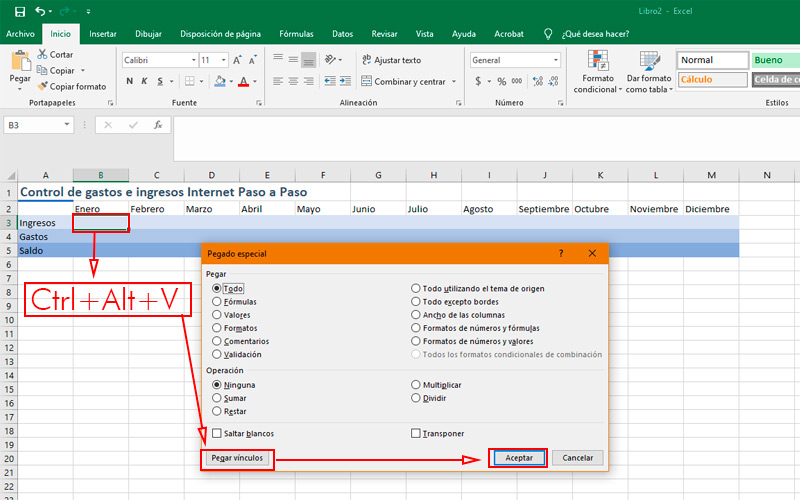
- Again on the main page, in the income box corresponding to the month in questionwe will make a special glue. This will cause any modifications made to the spreadsheet to “Income” is reflected in this cell.
- To do this, press “Ctrl+Alt+V”. In the window that appears, choose “Paste Links”.
- It’s time to create a expenses sheet. To do this, repeat the first steps.
- In this section we will have to elaborate more on its components. You may guide you through the categories that we mentioned before.
- At the end of each of them enter a subtotalwhat will it be the sum of all the figures of each group of each month.
- In the lower end places the totalwhich will be made up of the sum of all subtotals. To do this enter “=SUM()” but this time, instead of dragging, you will select each of them by keeping the key pressed “ctrl”. In the example it remains “=SUM(B10,B19,B26,B33)”.
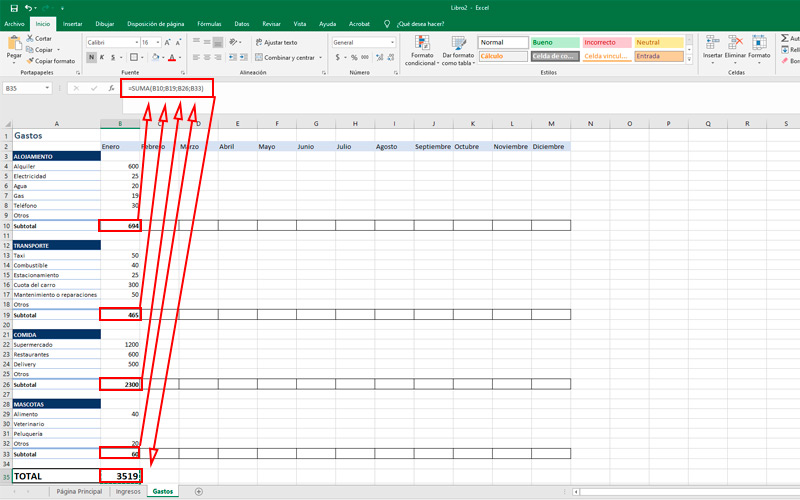
- Copy this last result and perform the paste special in the corresponding cell from the main page.
- Finally, in the box “Balance” Subtract between income and expenses. In the example the formula is “=B3-B4”. If you haven’t forgotten any transactions, this number should be similar to the one you have available.
Computing