
Index:
UPDATED ✅ Do you want to know how to lock one or more cells in an Excel spreadsheet? ⭐ ENTER HERE ⭐ and learn everything FROM ZERO!
By default, Microsoft Excel is the most widely used spreadsheet program in the office environment, for present and manage any flow of data effectively. Reason why, it has numerous users today.
Thus, many of them use this Microsoft tool to expose a series of data (especially numerical) for easy distribution. Therefore, for security reasons, they require certain options that allow them to protect them and thus prevent third parties from modifying them.
In this sense, to send your data via Excel files and at the same time make sure that no one else can edit them, it is necessary to protect the cells of these documentsmaking use of the program’s own built-in functions.
Why should I lock an Excel cell and in what kind of documents?
Today, just as the Internet simplifies different processes, it can also generate certain risks for its users. For this reason, when sending or distributing by any of its means a file or any information, it is important to take into account certain forecasts.
Faced with this need, Microsoft Excel has been reinforced and has some great security options. One of them refers to the possibility of protect or block a given cell in a file made from there.
Thus, one of the most important reasons to make use of this function, without a doubt, is that it can help you prevent changes to the information or formulas entered in those fields. So, in a certain way, users will achieve keep your copyright and prevent any spoofing in your Excel documents.
Added to this, said utility of this program, guarantees the free handling of the document by its creator, solely and exclusively. That is, only the user who locked a cell in the first place will be able to unlock and edit it. Thanks to this, it consists of a function that certifies great exceptionality to data managers.
Now, locking a cell is a must-use feature, especially in those documents that are distributed on the web and in which collaborators intervene, whether they are administrators or editors. Since, they are ideal for making sure that the owners or administrators of the spreadsheet are the only ones with the power to unlock, edit or delete them. While, the editors will display the locked cells without the possibility of modifying the values added in them.
Steps to lock and unlock a cell and other sections of an Excel spreadsheet
In view of the remarkable utility that the function of restricting a cell in any Excel spreadsheet exhibits, it is relevant to know each step to follow to protect one of said fields in this program, easily and correctly. Next, we teach you how to block and unblock them:
Block
In case the spreadsheet in question is protected, the procedure to follow consists of:
- Once you access the Excel document, go to the options bar and click on the “Review” tab.
- Next, in the Changes group, click on “Protect sheet” and a pop up box will be shown, there uncheck the option “Protect sheet and contents of locked cells”. In case you are asked for the password to unprotect the book, enter it and press “OK”.
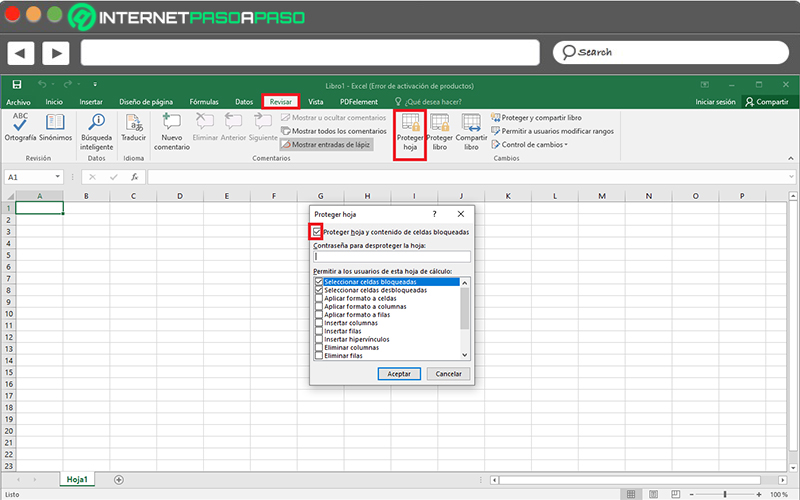
- Now, select the entire spreadsheet by clicking the button “Select all” located in the upper left corner of the page.
- Then, from the Home tab, press the inclined arrow belonging to the Font group and a new Format Cells window will be displayed, where You will need to click on the “Protect” tab.
- After that, it’s time to uncheck the box that says “Blocked” and click on the button “To accept”.
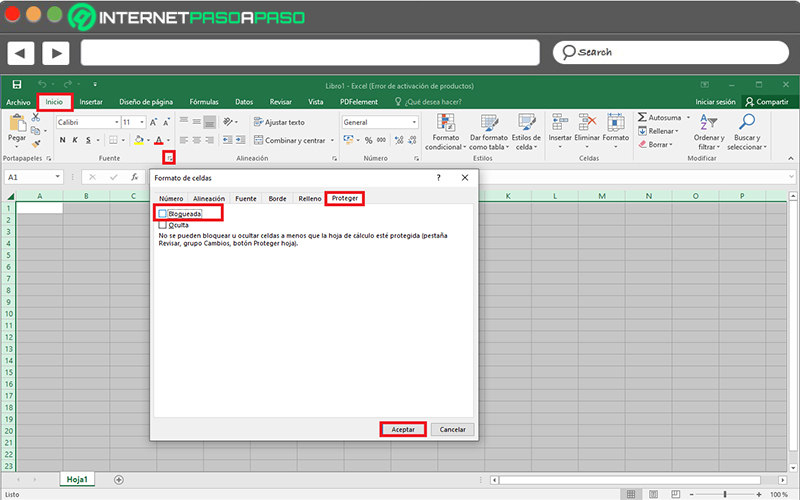
- Once this is done, all the cells in the spreadsheet will automatically be unlocked and now, it is time to select the cells that you want to specifically restrict.
- Once you choose all the boxes to protect, go back to the “Format cells” box from the Home tab and the group Font. To enter the section “Protection” Y activate the box that indicates “Blocked”. So click on “To accept”.
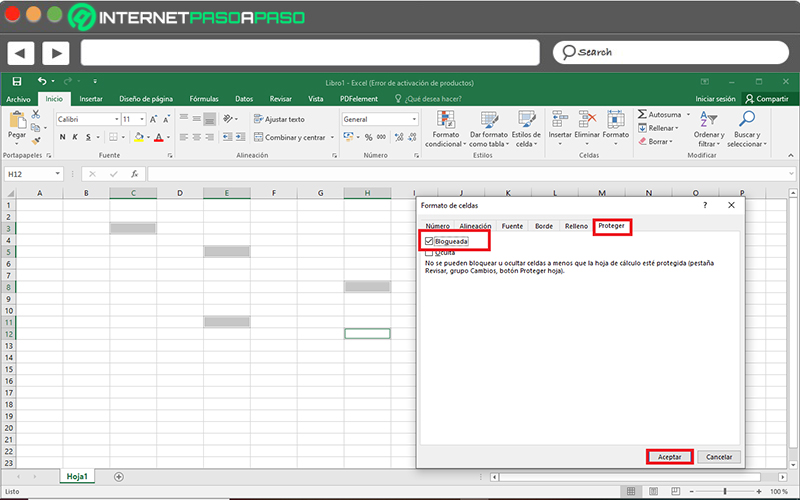
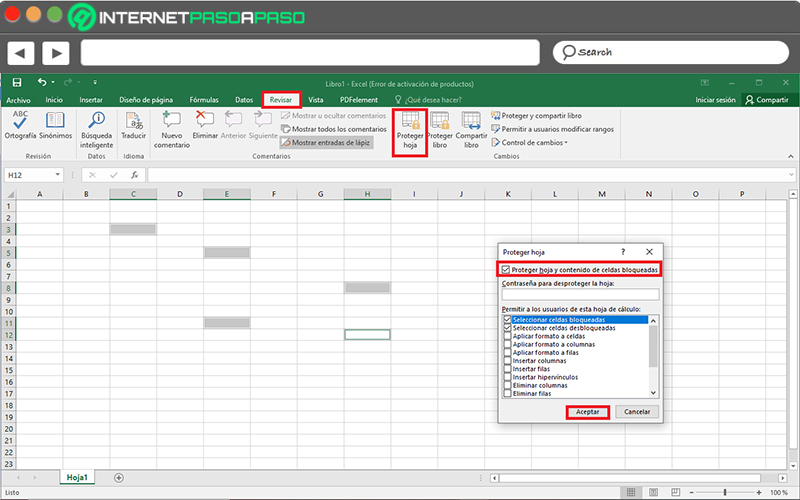
- Finally, from the ribbon, select the “Review” tab and in the Changes group, Click on the checkbox “Protect sheet and contents of locked cells” and then click OK.
To unlock
In addition to restricting the cells of an Excel sheet, it is also possible to unlock all those boxes or other ranges that are protected, so that other users can freely modify and manage them. Next, We specify the step by step that has to be followed:
- First, search and access the spreadsheet that you need to manage in this way.
- Followed by that, locate yourself at the top of the main window, in the options bar specifically and click on the “Review” tab.
- Subsequently, several options will be displayed and within the Changes group, choose “Allow users to modify changes” which is an option available only when the spreadsheet is not protected.
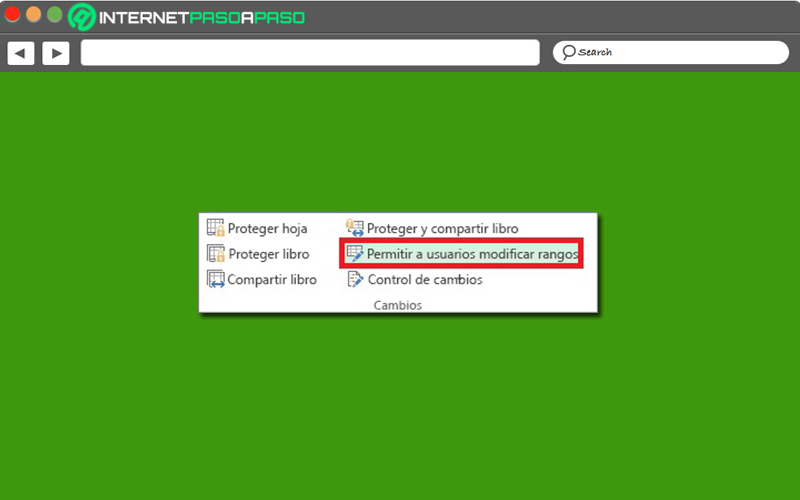
- Next, if you need to add a new editable range, click on “New”.
- If you want to modify an existing editable range, just select it in “Range unlocked by password when sheet is protected” and then press on “Modify”.
- In case you need to delete an editable range, click on it in the box “Range unlocked by password when sheet is protected” and finally, click “Delete”.
- Also, in the Title boxyou can enter the name of the rank you want to unlock.
- Also, directly from the Corresponding to cells box, you can write the equal sign (=) and add the reference of the range to unlock.
- If it is a password access, write a password that allows access to the range, in the box “Range Password”.
- For access permissions, click on “Permissions” and then on “Add”. To specify the type of permission for the user you have chosen, in the Permissions box, check or uncheck the Allow or Deny checkboxes and then, click “Apply”.
Computing