
Index:
UPDATED ✅ Do you want to start the project of creating an Alexa speaker with a Raspberry PI? ⭐ ENTER HERE ⭐ and Learn Everything FROM ZERO ⭐
As if that were not enough, this microcomputer also It has been shown to have great compatibility with the sAmazon Alexa Serviceso that Raspberry Pi users will be able to enjoy this voice assistant.
This allows them to enjoy all Alexa functions without the need to have a amazon deviceso they will be able to integrate the wizard into their own mini PC.
Considering that Amazon Echo or Echo Dot are devices with high prices, this board becomes a much cheaper alternative. This is how we will teach you how to turn the raspberry pi into a voice assistant.
What do I need to turn my Raspberry Pi into an Amazon Alexa speaker?
no doubt some power turn your microcomputer into Amazon’s voice assistant becomes a great idea for many, and that is Alexa It stands out mainly for having a large number of functions that you will now be able to enjoy directly from your motherboard at much lower costs than they purchased directly. Amazon products.
However, it should be mentioned that not all versions of the Raspberry Pi are compatible with this voice service, so your board must have the necessary requirements if you want to install it on it. So that you can take into account the Raspberry Pi 2 model (model B) It is one of the most recommended to use since it works optimally, but of course any version higher than this will also be compatible.
It is important that you bear in mind that to ensure correct operation of Alexa will have to be Conected to internetin case you use the Raspberry Pi 2 Model B you will have to purchase a wifi adapter since this plate does not include, something that will be achieved in the superior models. So you can also choose to use the Raspberry Pi 3 or simply the latest version released on the market the Pi 4.
Taking into account the type of board you must have to be able to install Alexa, you will also need to add other requirements that you must meet and which we will show you below:
- A USB charger of at least 2000mAh
- A USB microphone.
- USB or Bluetooth speaker (In the case of the Raspberry Pi 3 or Pi 4).
- micro SD card with a minimum capacity of 8 GB, the recommended one should be 16 GB or higher.
With this function the sound is going to be one of the most important aspects you are going to be able to improve, for this you have the possibility of connect the USB sound card to the board. And lastly, if you don’t want to run the OS and Alexa setup and configuration remotely from your computer via headless mode, then you can connect the screen, USB keyboard and mouse to the microcomputer and perform the procedure from there directly.
What are the most useful Raspberry Pi boards to turn into an Amazon Alexa speaker?
Nowadays you can find different Raspberry Pi board models on the market, but clearly not all of them are compatible with this service, so you will have to have a mini pc to be wizard-friendly if you want to have it.
That is why we are going to show you each of the plates that you can use to create your own Amazon Alexa speaker from home:
Raspberry Pi 2B Model
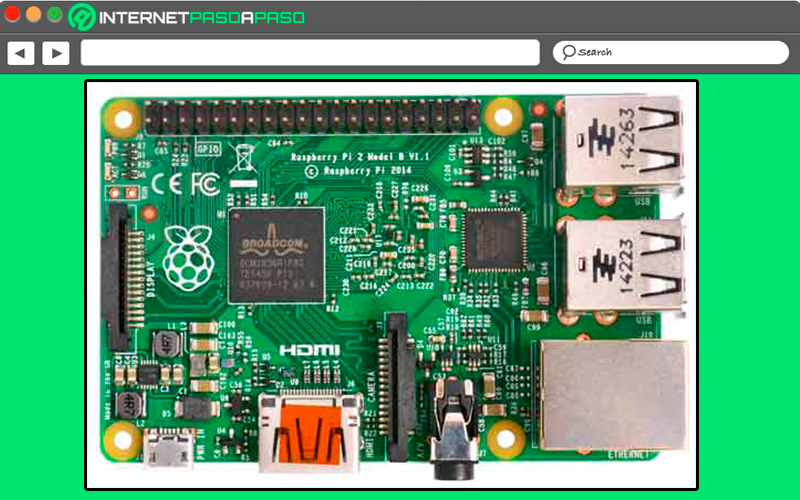
Keep in mind that the Pi 2B It was an updated version of the Pi2, where one of the main changes was the computing power, which is much higher in the new version of the board. In addition, it mounts a Broadcom BCM2836 SOC, 1 GB of SDRAM and a processor ARM Cortex A7 quad-core 900 MHz, while holding the VideoCore IV graphics chip.
In addition, it should be mentioned that it has 4 USB portsa ethernet port 10/100, one slot for micro SD cardwith a number of GPIOs that has been expanded to 17 and maintains the functions of SPI, IC, UART. As you can see all these improvements They allowed it to become a powerful and ideal board to carry out different types of projects..
This is how this model has become one of the most suitable for installing the alexa voice assistant. In addition, being one of the cheapest allows a greater number of users to enjoy this service of Amazon, although it should be mentioned that perhaps the only con against Pi2 is that it does not have a port for Wifiso users will need a Wi-Fi adapter if you don’t want to have it connected all the time for Ethernet cable for internet connection which is required for its operation.
Raspberry Pi 3 model B/B+ /A+
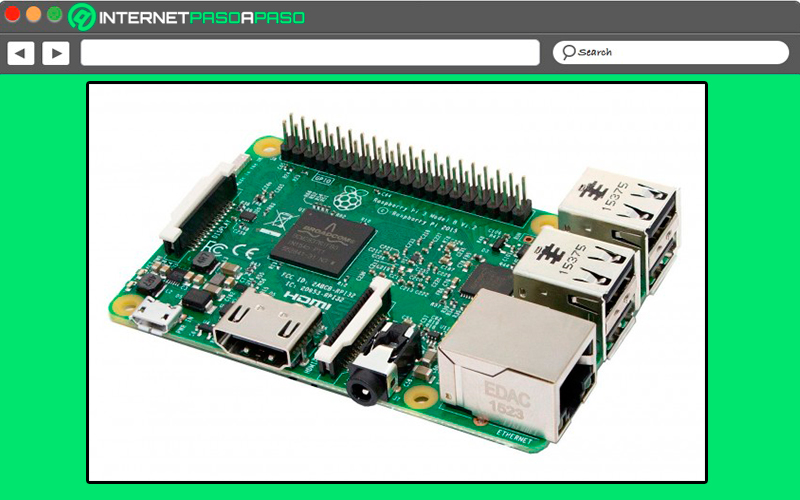
This plate model became one of the most important of the company, thanks to the fact that it has a large number of accessories that will allow you to save money, one of them is that you no longer have to buy an adapter to the Wi-Fi connection since it has its own port, it also allows you to have a lower energy consumption and the heat generated is lower compared to its predecessors. Count with one HDMI port and a is powered from a standard charger or from a USB cable connected to the computer CPU.
It is recommended that it be 5V and 2.5A. Of all the available models of the Pi 3, the Raspberry Pi 3 Model B+ It is the most complete of all, so it is also usually the most expensive. One of the main differences that can be found between the Raspberry Pi 3 and the Pi 3 B+ are that the second one has a slightly faster CPU the step of Wi-Fi AC and an Ethernet connection with higher data transfer and some other less important details.
However, all of its components and features have made this board a very good choice for making it the Alexa voice assistant. So this microcomputer model will not offer you any type of limitations as it happens with the Pi2B, since it has its own function Wifi so you don’t need to use adapters and it also has a lot of RAM which will allow you to install the wizard easily.
Raspberry Pi 4 Model B
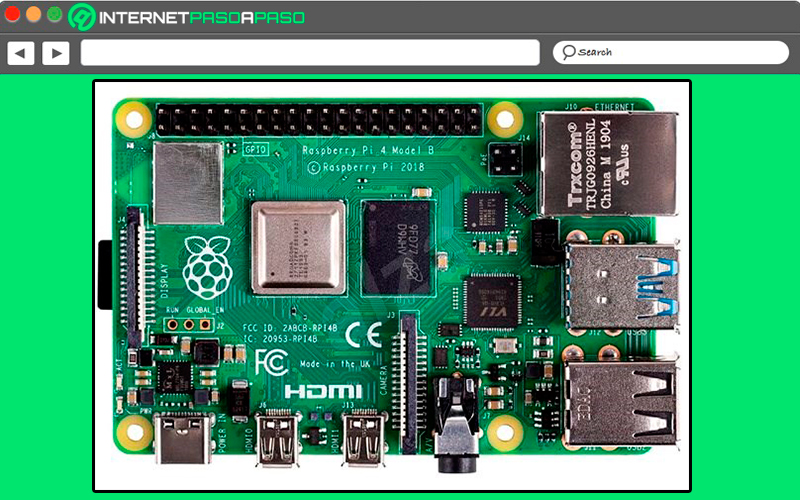
It is the latest version of the board launched on the market, so it is clearly the most powerful and expensive of all. It usually has a price of 55 euros on the market, but which has a more power and better performance compared to its predecessors.
One of its main advantages is the specifications of its processor and its random access memory that reaches even 8GB. Having a memory of this size allows you to install much more advanced applications and demanding on RAM, so being able to install Alexa will not be a problem in she.
Needless to say, the Pi 4 Model B It is an ideal plate to turn it into your amazon assistant, so you can start getting the most out of it with this feature. Among some of its most striking components we find that it has two USB 3.0 and two 2.0 ports. Likewise, it has two HDMI portsso it offers a multi-monitor support and an output of 4k and 60hz video refresh rate and finally has WiFi AC networks and support for Bluetooth 5.0 connections.
Learn step by step how to install and configure your Raspberry Pi to transform it into an Alexa smart speaker
Considering what they are the requirements for the installation of the voice assistant and which are the most suitable plates to use them with Alexathe next thing you should know is how to perform the installation and configuration of the Amazon wizard. Nevertheless, before configuring it is necessary to install an operating system on the Raspberry Pi or on the SD card you are going to use.
The SO recommended in this case is Raspbiansince it has the official support of Raspberry Pi Foundation and which can be downloaded as an image file directly from the foundation’s website. For this it will be necessary to unzip the file in the SD card and open it to start the raspberry pi and proceed to install the operating system. If for some reason you don’t want to install the operating system, then you can buy a SD card ready to use with Raspbian.
Therefore, when the operating system is already installed on the board, you can start the Alexa installation, to do this follow each of the steps that we are going to indicate below:
The first thing will be to create an Amazon developer account
- Please note that in order to access Amazon Voice Service You will necessarily need an Amazon developer account, you can easily create it by accessing the Amazon developer page. Amazon Developer. When you have entered there you must click on the option “Identify” and then select “Create your account…” If you already have an Amazon account, then simply sign in with yours.
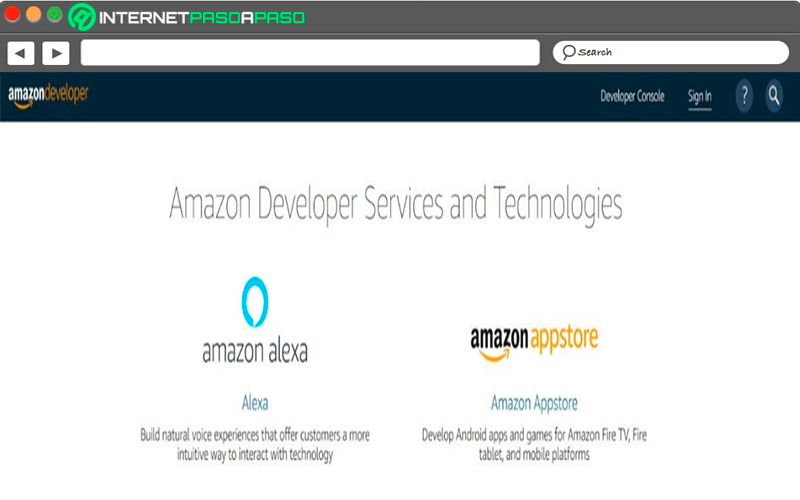
- By having an account Amazon Developer you will have the opportunity to use some of the developer services of this company. Therefore, you only have to enter the registration data such as the email address, name and password and click on “Create your account…”.
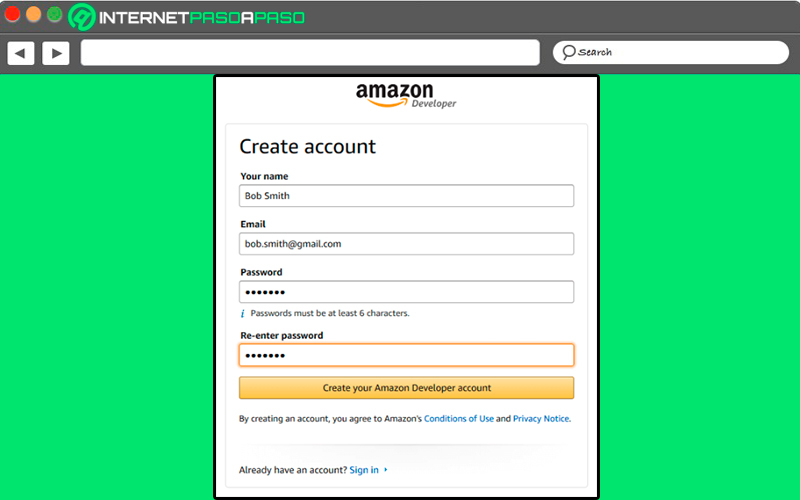
- As already mentioned, if you already have an account, then that will work for you to use the developer tools. so just Enter the data and access. If you have created it correctly, then just auto login to developer zone.
- However, you should know that before using the service of Alexa VoiceServeryou will need to add more personal data, to do so simply click on “Finish registration” located in the top menu bar.
Now register the Raspberry Pi in Alexa Voice Service
- When you have already entered all the requested data and accepted the terms and conditions of use, then you will have the opportunity to access the developers panel, here you will have the opportunity to view and manage all your Amazon projects.
- If you look closely you will find the Amazon Alexa category and below the button “Alexa Voice Service”, where will you be able to start Raspberry Pi activation to use the voice control assistant.
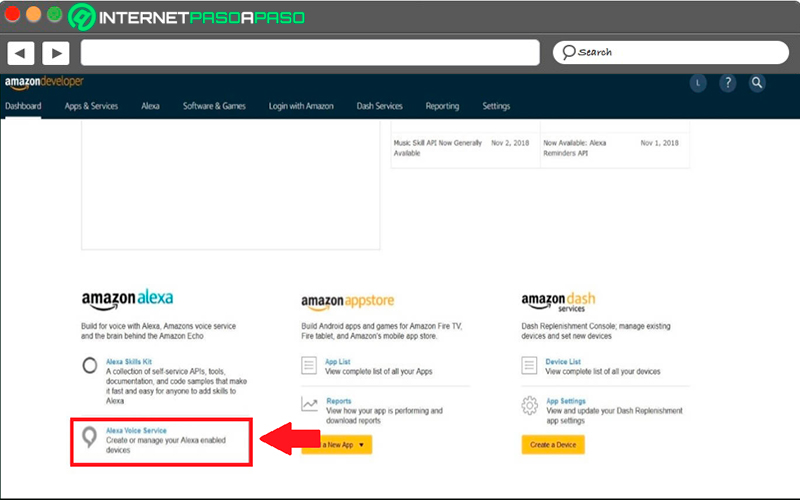
- Within the control panel you will have the opportunity to consult reports on the status of all your company projects, as well as announcements and new features, and some other information. In the next menu that appears on the screen, you must select the option “Get Started” and there they will ask you for some information about the planned project.
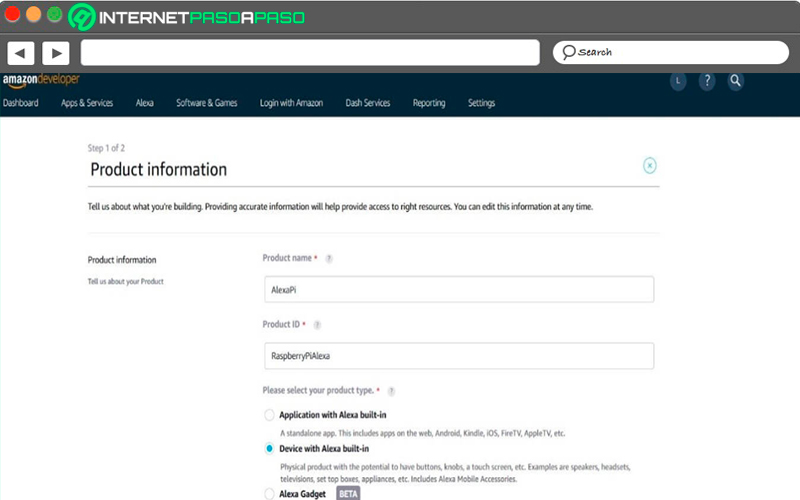
- It is important to note that unlike the product name, the product ID cannot have any spaces. Now in the fields “Product name” Y Product ID as an example you can enter “AlexaRpbPi” either “RaspberryPiAlexa”.
- Then as type of product you will have to select the option of device with Alexa Built-in” in Spanish “Device with Alexa built in” and to the question of “Will your device use a companion app” You must answer a Nope. Then in the dropdown list “Product category” you will have to select the option Wireless Speakers.
- Next in the Product description you can answer very briefly like Raspberry Pi Alexa Speaker. So you won’t have to extend much there since it is not necessary. Keep in mind that the main objective is to be able to configure the board to Alexa as a classic speakerexclusively by voice control, so you must mark the options of “Voice control from close by” (Hands-free) and voice control from afar (Far field) as the type of interaction desired.
- Now in the final questions it will be necessary for you to check the box for “Nope” about commercial use, “Alexa Mobile Accessory Protocol” Y “Alexa for Business”, as well as the other question about whether the project is designed specifically for children.
Start creating an LWA security profile
- The next thing will be to create an LWA security profile (Login with Amazon) for the raspberry pi, this in order that said company can verify it. In order to do this, it is necessary to select the item of “Create New Profile” and then write the appropriate name followed by a brief description of the profile.
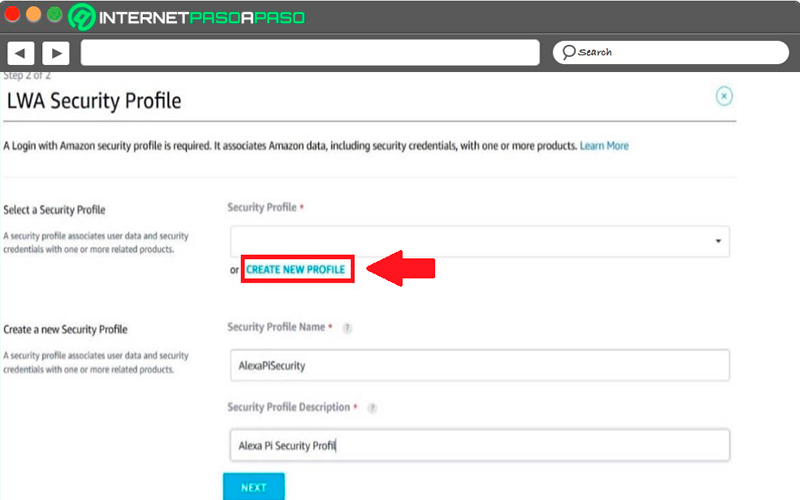
- This required LWA security profile is going to link user data and security credentials to one or more products. After clicking on the option “NEXT”, A new menu will appear in which you will have to specify the URL addresses for the LWS authentication.
So you will have to enter the following addresses here and then you are going to save them by selecting “ADD”:
Allowed origins: localhost
Allowed return URLs: localhost/authresponse
- Later you will have to review the conditions of Amazon and Alexa Voice Servicethere you must select the consent box and finish the profile creation process by clicking the button “Finish”.
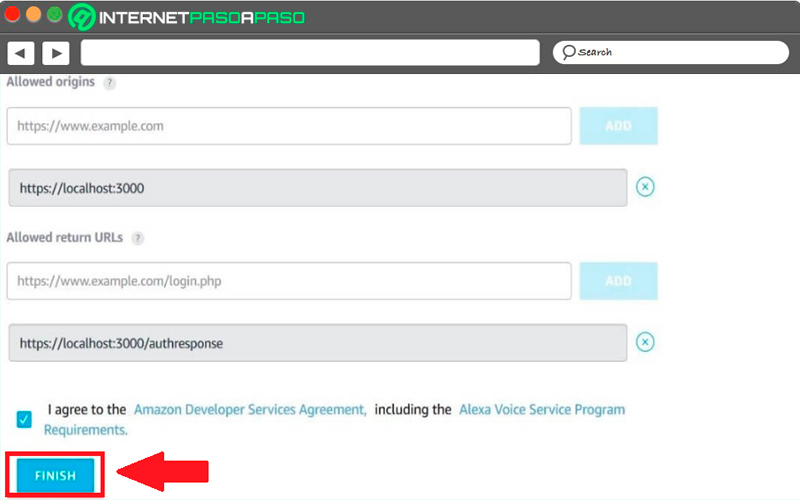
- There you will find an option that allows you add different urls, as well as being able to delete them at any time simply by clicking on the icon the X of every one of them. If all this configuration was done correctly, then you will see a notification from Amazon in a pop-up window that will confirm it.
Record customer and product information
- When you have reached this point your profile of alexapi that you just created will always be available in “Products”. However, at this point, before moving on to installing Alexa, you’re going to need to take a look at the product and customer data required for the installation. voice assistant settings.
- For this you will have to click on the profile of the Raspberry Pi in the general description of the product and then take note of the data that appears under “client secret” Y “ClientID”. Please note that the most important information with the product is “Product ID”, which is equivalent to the name assigned to the product.
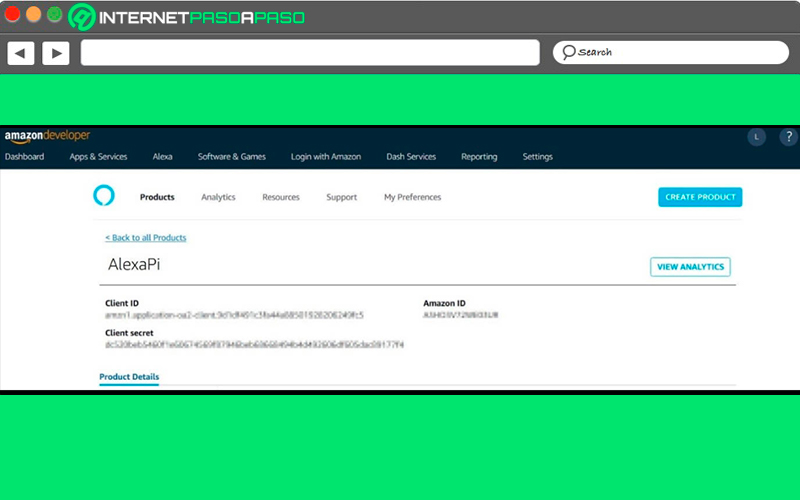
- Keep in mind that in the product profile you will not only be able to consult the verification data, but you can also enable functions such as reminder or Bluetooth if you want.
Install Alexa on the Raspberry Pi
Here you will start with Installing Alexa on the Raspberry Pithe easiest way to achieve this is through the platform of GitHub development. This is how there you are going to get with the example application Alexa AVS Sample Appwhich will allow you to install the voice control software on the microcomputer.
Download Alexa AVS Sample App
Thus, the requirement for this is to be able to have a Git clientit can be downloaded immediately after performing a quick system update, if it is not installed by default.
In order to update the system software, it will be necessary to first enter the following commands in the Raspbian terminal:
Sudo apt-get update

Sudo apt-get upgrade –y
After this it is the turn of the Git client:
sudo apt-get install Git
With the help of this client you will download the sample application AVS Sample App or clone the GitHub repository:
sudo git clone https://github.com/alexa/alexa-avs-sample-app.git
When you have transferred the GitHub repository to the Raspberry Pithen you will have to transfer the data stored during the fourth passed to the installation file “Automatic_install.sh”. Here you will have the opportunity to open it through the text editor of your choice, such as GNU nano. There you will have the opportunity to replace the placeholders with your individual data right after the equals sign.
Next you must save all the changes and start the installation of Alexa on the Raspberry Pi with the following command:
Automated_install.sh
Perform the first configuration steps during the installation
When the installation of the voice control software, it will be It is necessary to make the first configurations and answer some questions that the system asks you. One of the first things you will have to do is accept the terms and conditions in order to continue, as well as the use of third-party applications. After Other questions will appear where you must declare that you already have an Amazon developer profile.
While in the next question you are going to confirm the data of “Client ID”, “Client secret” and “Product ID”, In these three cases write “Y” and then press the key “Enter”. Now one of the most important configuration options appears, such as the choice of the desired voice output, here it is necessary that you select the option of en-ES to set Spanish as the primary language in which you will communicate with Alexa.
You will also need to determine if the sound output from the speaker is raspberry pi Alexa is going to be through a pin connector (3.5mm) or through the HDMI connector. Lastly, you will need to specify if you want to keep the default wake word “Alexa” or do you want use some other voice command that allows you to activate the assistant.
Authenticate Raspberry Pi Alexa Speaker
In this step you need to be able to authenticate the Raspberry Pifor this you need the “Alexa Companion Service”, it is a kind of interface or gateway that allows you to establish the connection between the microcomputer and the AVS servers. In order to make use of this server, it is necessary to change to the appropriate directory through the terminal and then you must start the application with the package service npm.
For this you need to insert the following commands:
cd ~/alexa-avs-sample-app/samples/companionService

npm start
If when you have done this it has started correctly, the terminal will show you the following message “Listening on Port 3000” here you will have to minimize the terminal window and then open a new instance of the command prompt. Keep in mind that it is minimize and not close the window. Once here you are going to open the directory of the Companion client.
Being programmed in Java, you will be able to use Maven, it is the Java project management tool (mvn):
cd ~/alexa-avs-sample-app/samples/javaclient

mvn exec:exec
After a few seconds of entering the command a pop-up dialog will open where you will be prompted to access a specific URL with a browser to register the raspberry pi. Here you will have to accept the request and the link will open automatically in the default browser.
When you are inside the browser, you will be presented with the Amazon login page, or in some cases with a message that the site is not available. If you see this quiet warning that does not mean any problem, in that case just click on “Advanced” located in the lower left corner of your screen and then in “Proceed to localhost” to access the login window.
There you will have to log in with your account. amazon developer and then confirm that you alexa raspberry pi speaker you can get access to Amazon account. In this way, if the authentication is carried out correctly, the browser will show you the following message “device tokens ready” and then click on “Okay” in the Java client window that you previously ignored to finish authentication.
Enable wake word detection
When you have reached this point Alexa will be ready to use, so you will be able to interact with the voice software at the time you want through the avs clientto do this you must click on the icon of the “Microphone” and ask the question you want. It is important that you keep in mind that in order for Alexa to activate when you say the activation word as it is “Alexa”, you’ll have to initiate the call Waki Word Agent.
For this, in a new terminal window, access the agent directory:
cd ~/alexa-avs-sample-app/samples/wakeWordAgent/src

./wakeWordAgent -e kitt_ai
If with this the terminal shows you the message of “Connected to AVS client”, then you can use Alexa as normal by voice assistant.
Start creating an autostart script for Alexa on the Raspberry Pi
Once here, you should know that this is the last step to complete the installation wizard. That is why to avoid having to start Alexa manually every time you turn on the raspberrypi, you may create a startup script which will run automatically every time you turn on your mini PC.
In order to do this, the first thing you will have to do is create a script file with the following command:
sudo nano Alexa.sh
Within the scripts you will have to enter the following lines of code:
#!/bin/bash

lxterminal -l -e "cd ~/alexa-avs-sample-app/samples/companionService && npm start;" &

sleep 10s

lxterminal -l -e "cd ~/alexa-avs-sample-app/samples/javaclient && mvn exec:exec;" &

sleep 30s

lxterminal -l -e "cd ~/alexa-avs-sample-app/samples/wakeWordAgent/src && ./wakeWordAgent -e kitt_ai;" &
Is about a script that will automate the authentication process described in the seventh stepso first you’re going to start the Alexa Companion Service and then the Java client. After this you will start the Wake Word Agent described in the eighth step.
Here you will have to save the script and give it access rights to the system using chmod:
sudo chmo +x Alexa.sh
For the script you will have to create an autostart file:
sudo nano /home/pi/ .config/autostart
Here you will have to complete the file with the following command, so that the generated script is executed automatically every time you start the Raspberry Pi as an Alexa speaker:
[Desktop Entry]

Comment=Comment

Exec=/home/pi/alexa.sh

Name=alexa.sh

Path=/home/pi/alexa.sh

Type=Shell
Download and configure AVS credentials step by step on your Raspberry Pi from scratch like an expert
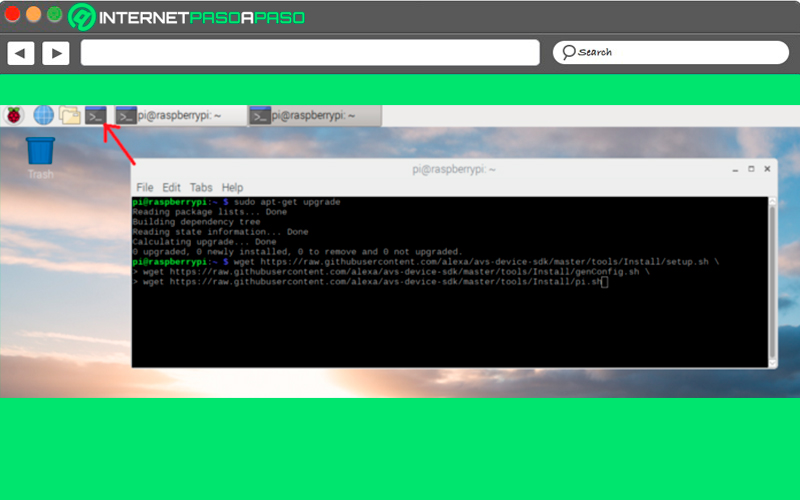
When you already have the entire system connected to the Internet, the next thing to do is to use the terminal to download scripts and configuration files with the wget command.
But it is important that before starting this you make sure you have the updated system with:
sudo apt-get upgrade
After this you will simply have to copy and paste the following instructions into your Raspbian OS terminal:
wget https://raw.githubusercontent.com/alexa/avs-device-sdk/master/tools/Install/setup.sh

wget https://raw.githubusercontent.com/alexa/avs-device-sdk/master/tools/Install/genConfig.sh

wget https://raw.githubusercontent.com/alexa/avs-device-sdk/master/tools/Install/pi.sh
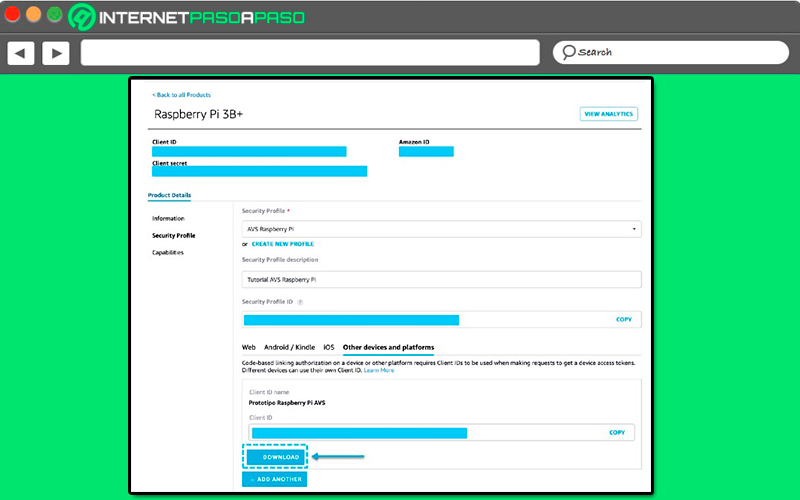
- Now what you will have to do is download the credentials, to do so from the AVS console, in the “Product Details” you are going to select the option “Other devices and platforms” and there you will find the option to download the file config.json.
- When this file has been Discharged you will have to move it to the directory
/home/pi/for later be able to run the configure command.
We show you step by step how to configure the AVS SDK to turn your Raspberry Pi into an Alexa speaker
If you have already configured the credentials correctly, then you will have everything ready to run the installation files. Keep in mind that during this process all dependencies will be installed, including the alert manager for Alexa or Wake Word Engine (WWE). In this case WWE it is in charge of being able to filter the audio that arrives through the microphone to detect the keyword “Alexa” or those that you have programmed and in this way begin the transmission to the cloud.
In this case it is necessary to access the execution of the installed one, for this you will only have to open the Raspbian OS terminal window and write the following commands there:
cd /home/pi/

sudo bash setup.sh config.json [-s 1234]
- For be able to start the installation process you will have to first accept the terms and Conditions explicitly, for this you are going to write the word “Agree” when the installer asks you the respective question.
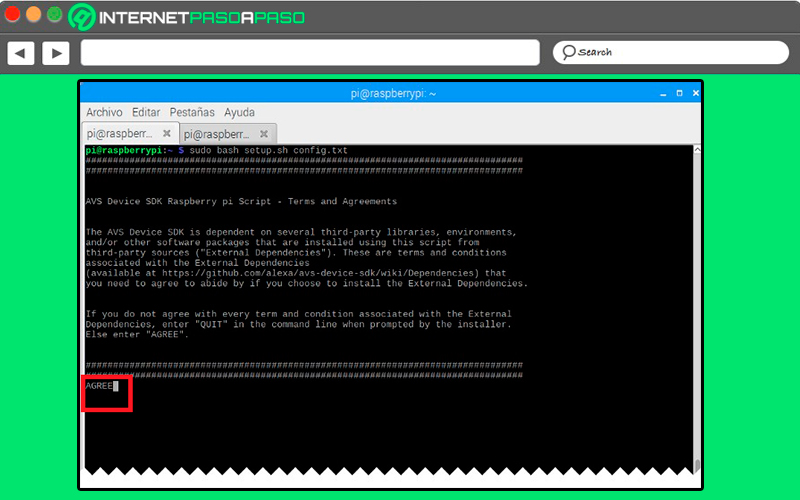
- If for any reason you have made a mistake during credential settings, then the installer will let you know that something is wrong and that some of the values that appear there need to be corrected. Therefore, it is recommended to check once again all the values to know that you have obtained the correct ones for each variable from your console. AVS products.
- If you verify and everything is correct, then when these steps are completed you will get a success message on screen which will be accompanied by help notes and example commands to run the test application.
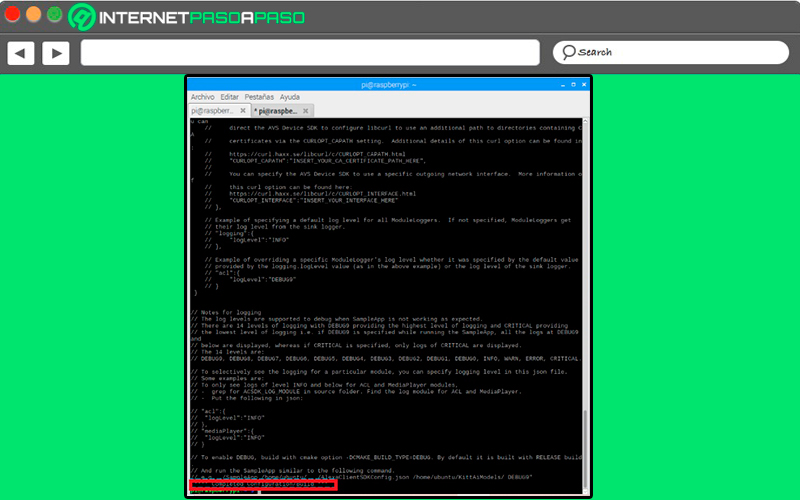
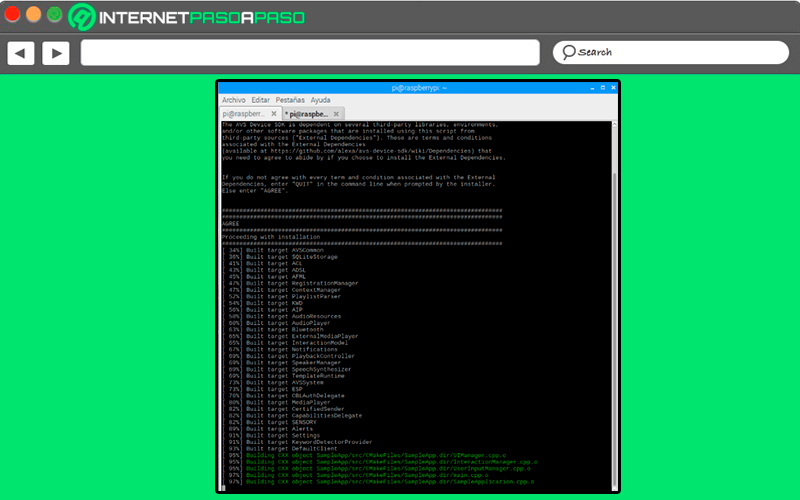
- When you have reached this point you just have to run the sample application and make sure you get the new token from the AVS service. Since this is the only way for the device to be able to authenticate with the cloud using the Login With amazon (LWA).
Most common problems and errors when turning your Raspberry Pi into an Alexa speaker
On many occasions when it comes to turn the raspberry pi into an alexa speaker some inconveniences usually occur that can be quite tedious for everyone, the most common are problems with microphone and speakers.
This is how here we are going to explain what each of these inconveniences that you could get during this procedure consists of:
microphone problems
In some of the cases when you want activate Alexa with the correct word for it, nothing happens, that is, Alexa does not answer any calls. One of the possible causes of all this is that your microphone is not connected or configured correctly. Therefore, the most recommended in this case is to check the microphone settings, so you will only have to go to the audio options from the menu of Raspbian startup and from there activate the option “Control Selection” of your sound card.
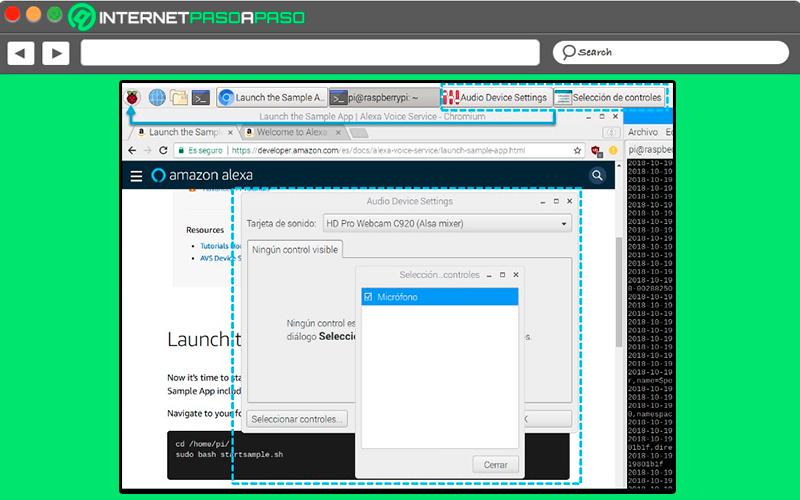
speaker problems
Another common drawback is speaker problems, In many cases there are usually no problems with detection of the USB microphone connected to the card, but when trying to give voice commands to the assistant you can notice that this service receives your instructions, but no response is received from the speakers that have been connected to the Raspberry Pi.
This is because on some occasions it is necessary to carry out a setting additional that allows correct operation of the sound system, Fortunately, it is a fairly simple procedure.
In this case, the first thing to do is start the audio configuration system with the command:
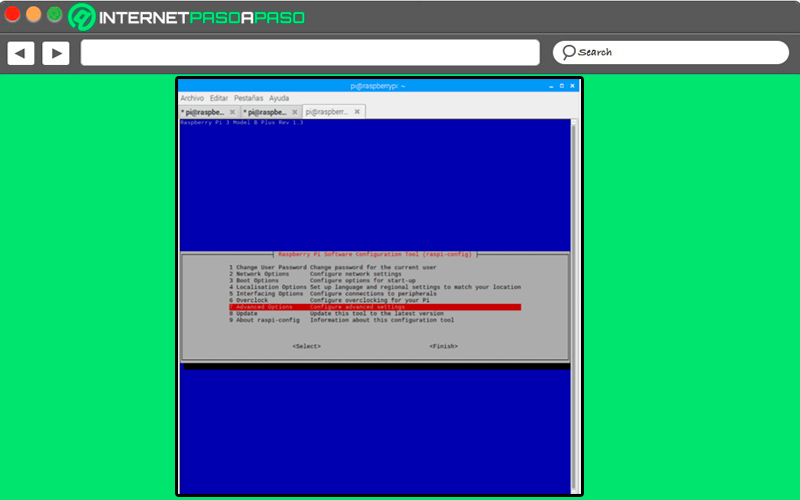
sudo raspi-config
Here you must enter option number 7 of the configuration menu, this number corresponds to the option of “Advanced Options”.
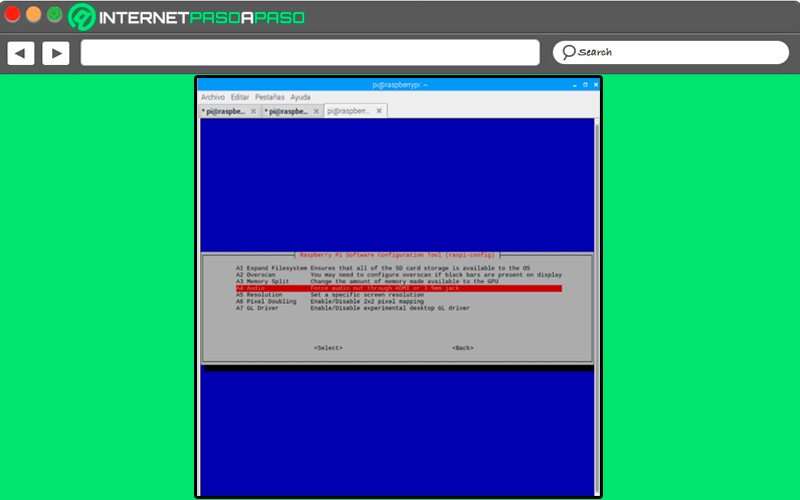
When you are inside the section of “Advanced Options” you will have to look for the element “A4” of the corresponding menu of the audio, it is an option that allows you to force the audio through the HDMI connector or the option that interests you in this case, the 3.5mm audio jack.
Finally, you will have to select the corresponding menu option when connecting that will be used. For the version of the tool “Setting” corresponds to the first “Force 3.5 mm (headphone) Jack” option.
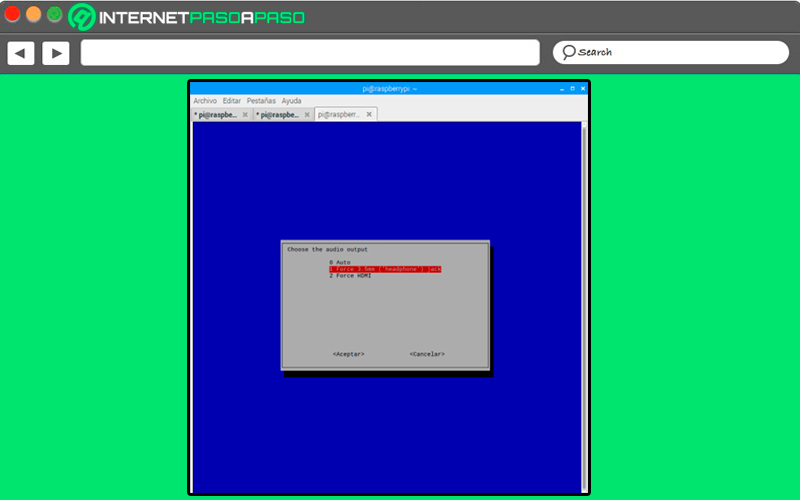
By accepting the changes, the sound card starts to work correctly and without the need to perform any other extra step or restart some of the services.
The best Alexa Skills that you can use on your Raspberry Pi to get the most out of this project
If you already have installed Alexa on your Raspberry Pithen you should start using the best assistant skills so that you can start to get the most out of this project. And it is that these components will allow you to get extra skills in Alexa so your experience in it will be much broader and more pleasant.
This is how below we show you the best skills that you must install in your microcomputer:
Cookpad

It has been created for all those users who love to cook, so Alexa will be the best helper in these cases and thanks to this skills she will have the opportunity to teach you many food recipes that she will tell you as you interact with her where It also offers a timer function where it will help you keep the cooking time of each food.
In terms of handling it is quite simple, simply you must call him by his name and ask him what you want to do or eatthus Alexa It will tell you everything you want to hear. Thus Cookpad is one of the best alternatives for all those who love cooking and who want to learn to create new recipes and food dishes.
My personal trainer
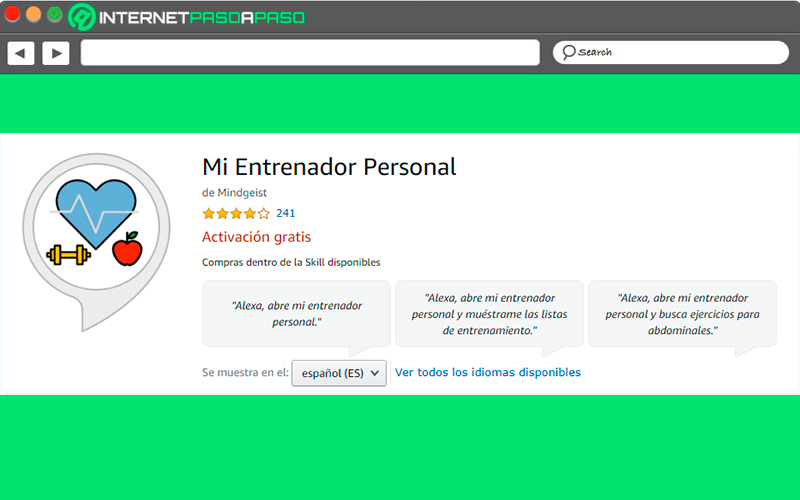
Dedicated to all those people who want to stay in shape at all times. It must be borne in mind that the physical form is one of the most important aspects for health, but that on many occasions you do not have the perfect assistant for it. This is how with this application you will have the opportunity to get routines that are focused directly on you.
It is an application that offers multiple options, from warm ups previous, circuits, stretching, exercises for specific muscle groups and much more. so this skills can become your best gym teacher. For this too It will offer you some explanations that will allow you to understand much better the objective of each exercise and how you should execute it without doing any physical damage.
Trivial
Without a doubt, trivial is one of the most famous classic games of all time and which is still present in the lives of many people. It is a game that will be played clearly by voice and that has Two levelsone focused directly on children, while another with greater difficulty for adults, where they can play from 1 to 4 people at a time.
Therefore, all this will allow you to get more entertainment when playing table games, where thanks to Alexa are going to have a new meaning, where this assistant will allow you to make everything more dynamic. You can also find other similar games that you can play from your microcomputer.
Nature sounds
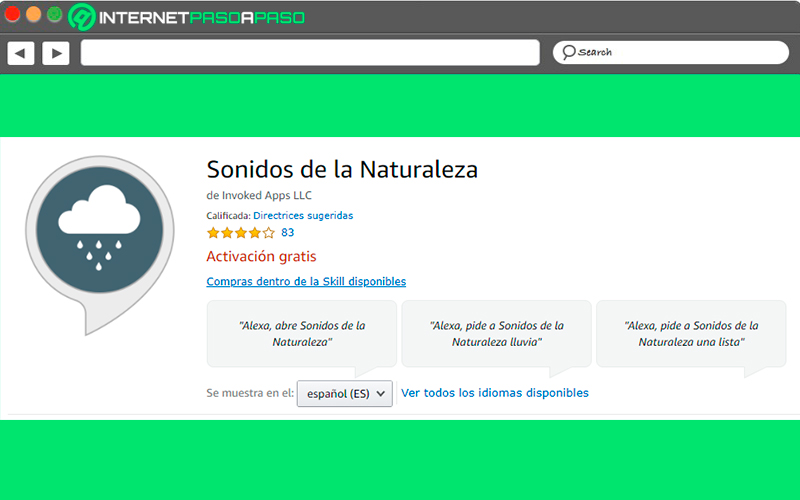
If you are one of the people who likes relaxation and tranquility, then you can start using this skills, which can give you a great help to stop those moments where you have anxiety or stress or you are going through some labor, personal or economic inconvenience. so it will help you take care of mental health and at the same time to train your mind.
Here you are going to get a lot of relaxing sounds such as those of the waves that will immediately transport you to the beach of your dreamsas well as the wind between trees that will make you travel to a forest with lots of vegetation. It has loops of up to 4 hours in length and with very good audio quality. In addition, it can also be used to combat insomnia that can be caused by so much work and thus achieve greater relaxation.
Pocoyo’s dreams
For the smallest of the house you will also find a large number of skills, one of the most important are the Pocoyo dreams, where you will be able to find a large number of children’s stories that are set in different times and places of Pocoyo, so it becomes one of the best alternatives so that the smallest of the house can spend entertaining times.
Not only is he in charge of entertaining the children, but in each of his stories he leaves a teaching so that children can learn new things. So you can start using Pocoyo’s dreams to tell a bedtime story to the little ones in the house.
Mediktor
if you ever wanted have your own private doctor at home, then you will get it and best of all you will not be charged for it. It is an application that will help you discover what disease you have according to everyone your symptoms, so it will ask you some questions that you will have to answer. In this way if you feel a little sick or feel any strange symptoms, you can resort to Mediktor and that way find out what you have.
Computing