
Index:
UPDATED ✅ Do you want to configure your Raspberry Pi mini computer to get the most out of it? ⭐ ENTER HERE ⭐ Learn Everything FROM ZERO! ⭐
Currently Raspberry Pi has become one of the mini computers preferred by most usersespecially to carry out different activities from home.
Although it is true, the operation of these plates is quite good, but since it is never enough, you will be able to improve settings of the same in order to be able get the most out of it.
There are different aspects that can be configured for these microcomputers and this way improve your experience on it. That is why here we are going to explain how you can configure it and take advantage of it 100%.
What is Raspberry Pi and what is it for?
It is a miniature computer with a ARM architecture that you will be able to easily carry from one place to another. This plate has been created in the United Kingdom as a university project that would help students to carry out certain computer and electronic projects. However, its use expanded much further, and that is how it is currently used by a large number of people around the world.
In the case of the arm architecture is used in your processor and the best thing is that it is available for a large number of operating systems that are based on Linuxhow can it be Raspbian, Pidora, ArchLinux ARM, among many others. On the latest available versions of these boards the operating systems must be installed on a micro SDsince it still does not have an internal memory where the operating system can be stored.
Currently you will be able to find different versions and models of this board available in the marketas well as a second line much cheaper called raspberry pizerowhich are boards that have fewer resources and components, but whose market value ranges from 5 up to 15 eurosso they are accessible to many people.
Requirements and materials needed to configure your Raspberry Pi. What do I need to do the process?
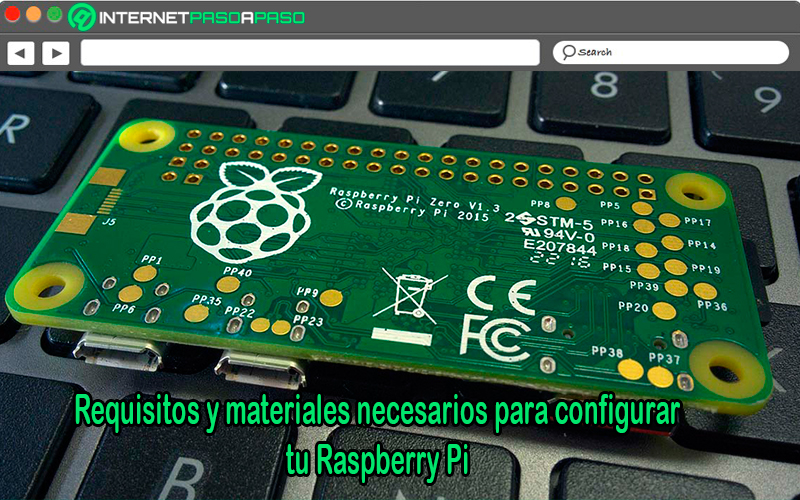
Before starting the procedure of configuration of your Raspberry Pi, it is important that you take into account What are the materials you need to carry out this process?.
To do this, follow in detail the list that we are going to show you below:
- The image of the selected operating systemin this case you must use the one you want, most users use Raspberry Pi Imager since it is an image that allows you to test several of operating systems supported currently for this plate.
Download Raspberry Pi Imager for Windows
Download Raspberry Pi Imager for MacOS
Download Raspberry Pi Imager for Linux
- A team with Mac OS X, GNU/Linux, or Windows where can you download raspberry pi imager and transfer it to the SD card.
- The plate raspberrypi, which you will be able to find in the official store along with the kits so that you have everything complete, otherwise you will have to use some auxiliary elements with a suitable power supply cable, micro SD card compatible whatever greater than 4GB, an HDMI cable so you can connect it to a screen or TV, among others.
- You will also need other elements such as what they are micro cards SD, an adapter to be able to insert them into your computer, a television or monitor with HDMI input or RCA cable, USB mouse and keyboard. In case you want another system different from the Raspbianthen you will need an Ethernet cable or a USB Wi-Fi card to insert it into your plate and thus be able to have an Internet connection where you can download more systems.
Learn step by step how to configure a Raspberry Pi and start it up in the easiest way
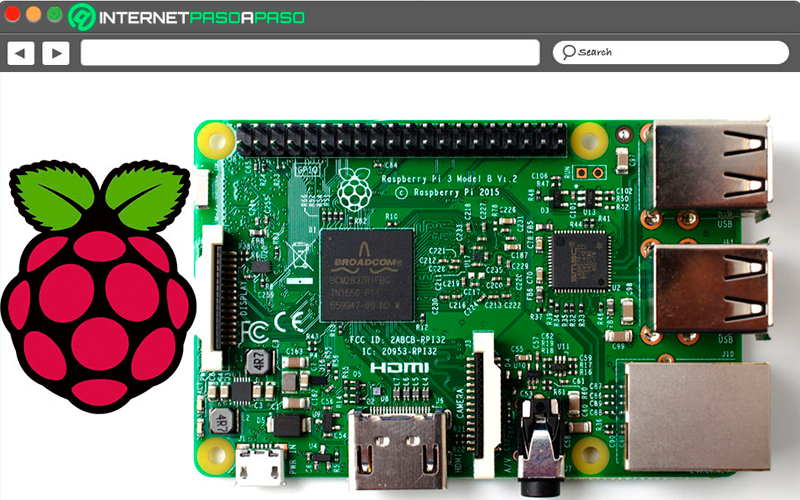
The process of setting up your Raspberry Pi It is quite simple to do, all this will allow you to get the most out of it through Raspberry Pi Imager, This is how here we are going to teach you step by step how to make this configuration easily and quickly.
To do this, follow in detail each of the methods that we will teach you below:
Assembly and configuration
You may have purchased the complete kit or it is a case for the plate, regardless of which of them you have, the first thing you are going to do is insert the board inside the casing the only way it can be done, so you shouldn’t have any trouble doing it. You will simply have to match the openings on each of the ports correctly and then tighten the 4 screws for it to fit.
After that It will be ready and protected so it can be handled in a better way. What follows is to connect all the cables, as they are the hdmi cables to match it with your screen or television, the power supply, USB mouse and keyboard.
It is important that you do not connect it to the electrical network yet, as this will cause the Raspberry Pi to turn on immediately and the micro SD has not yet been inserted with the system. What follows is to prepare the SD card with the chosen operating system. If for some reason you want to do it with another system, then the process will be the same, although some operating systems change only a little.
Install Raspberry Pi Imager
When you have ready operating system use, in this case the Raspberry Pi Imager, then the first thing to do is download the ZIP from the official website. Now if you bought one SD card with the image already pre-recordedthen you can skip this step and go directly to the section on insert the micro SD to the Raspberry Pi to start it.
So, if you have to download it, then do the following:
- When you have downloaded it, you should check the MD5 sum or SHA-1 hash, you can do this with an application that allows you to determine that the downloaded image is not the wrong one. On the official website you will find two types of downloads, one of them is the direct or by BitTorrent, in In this case, the second option was chosen, since here it will not be necessary to check the sum, since the clients of this download protocol are performed automatically to verify that the download has been correct.
- Subsequently, it must unzip the zip that was downloaded in the previous step. The content that is there you will have to pass it to the SD card previously prepared as it will be explained to you below, whether you do it from Linux, Windows, or Mac.
Prepare SD from Windows
When you have already downloaded, you will need to perform the following steps:
- To start you must format the Micro SD using the options windows formatting. To do this, you must go to “Equipment” either “My PC” depending on your case, keep in mind that the SD card must already be inserted in the computer. Once it appears there you must right click on the unit and in the drop-down menu select “Format”. Here keep in mind to leave all the values as they are by default, the format must be in FAT, now if you want you can put a name to the volume label.
- Later you will have to copy and paste the uncompressed content of the ZIP inside the micro SD. If you are using software compression/decompressionthen you will have to select the option of “Extract” when you open said zip file and then select the SD as the correct destination.
- After you have done all this, you will have it installedhere you will be able to safely remove the SD from the PC slot and then insert it into the RaspberryPi. If for some reason you have a Pi with a slot micro SD, then you should remove the adapter.
Prepare SD from Linux
For users of Linux there is a greater variety, since they can do this from various methods or programs. However, this time we are going to teach you how to do this from the GParted programbut if you want another option you can also try using the command parted.
Then follow these steps:
- The first thing you will have to do is start GParted with the SD card already inserted in the equipment. There you will have to place the root password what will be asked of you
- Now in the upper left menu you are going to select the SD cardkeep in mind that all the partitions you have will appear here, so you must make sure to select the correct one.
- Later you will have to unmount the sdyou can easily do this from the menu GParted clicking the right mouse button on it and then selecting the item from “Disassemble”. Another way to do this is to carry out a traditional method from the terminal to be able to unmount a device.
- Then in the main window of the program you will go to the partition or partitions of the SD that will appear, there you will have to click on the option “Remove” for them to be deleted. If it is a new card, then only one partition should appear.
- Here you will have to click on the unallocated space that has been generated and then select “New” so that you can create a new partition.
- Inside the pop-up window you are going to select the file system FAT and leave all other options as they appear by default. If you want you can set a label name.
- You must confirm all this select the green icon located at the top. A notice will appear informing you that all data will be deleted, you must accept it and wait a few minutes while it completes.
- After this you will pass the content unzipped from ZIP and you will save it in the SD card. Here you must remove it from the computer and then insert it on the Raspberry Pi.
Prepare SD from MacOS
Now if your operating system is MacOS, then you can choose to do it from the system itself through these steps:
- To start you must insert the micro SD on your team.
- The next thing will be to format the SD card, for this you will need to enter “Applications” inside your Mac’s hard drive, and then go to “Utilities”, then you must click on “Disk Utilities” and the app will launch.
- Here you will have to select the SD icon and then press the option “Erase”, in the case that you want you will be able to assign a name to it. It is important that the format be FAT, to do this you choose it in the drop-down menu in the option of “Format” and then click “Erase” and then confirm the delete action in the pop-up window that appears on the screen.
- At this point you will have to wait a few minutes for the process to complete and then you will have the list to decompress the content ZIP and save it in it. Once this is done, the following will be remove the SD card from the computer and insert it into the Raspberry Pi to run it.
Choose Operating System
Earlier it was mentioned to you that you were not going to connect the board to the mains power supply because it would start automaticallysince it does not have on/off switches, so this is done by connecting or disconnecting from the current. Based on this, now if you’re going to need to plug it in for it to turn on, it’s important that the SD card is already inserted and all other cables connected.
Once you get power immediately the LEDs they will start to flash and on the screen you will see some colors first and then the main menu will appear, all this when boot the raspberry. The screen of Recovery Tools will show you the operating systems available in the version you have downloaded, taking into account that this offline and LITE version. You must also select the language in the language menu, in this case choose the one of your preference.
If none of this is appearing on the screen, then it may be that you have made a mistake in the previous steps, so you should check everything again. The first thing that is recommended to do is to check the connections, most of the problems are generated by the power supply and the HDMI cable. If everything is in order, and the Pi is working, then you can check if the Raspberry Pi Imager has been successfully copied to the micro SD card.
Also It is important to mention another frequent mistake that many users usually makewhen turning on the television it is necessary to place it in Input or HDMI from the remote control, since if it remains on TV it will continue to show the signal from the antenna and not from the panel.
Here you will have to start using one of the operating systems available there, in the case of the normal version you will only be able to install Raspbian no Internet connection, so for the other versions you need to be connected to the Internet network. With this in mind, select the operating system you want and press the key “Enter” or click the button “Install” that appears there. If for some reason you want to change the installed OS, then you will have to press the Shift key when starting the Raspberry Pi.
If you look at the right side of each operating system entry in the menu, an icon will appear, there you will see how the systems that are in the SD have the SD card symbol and the ones you have to install from the network a Ethernet connection symbol. Thanks to system of partition Management, it is capable of saving users and configurations in order to be able to change back to the previous operating system and recover it without problems.
Set up final details
At the end of the installation it is very possible that the plate restart, if it doesn’t, it’s best to do this manually, since that way you can ensure that all the changes are applied and it works correctly. When restarting it you will be able to see if the system detects if it has any server or network shared folder from which you want to obtain information.
Here you will have the opportunity to configure the final details, such as desktop customization, language, add-ons you want to install, TV or monitor margin settings. Something that is very important to do, among many other aspects to configure.
This list will depend on the operating system you have selected for installation. In this way you raspberry pi It will be completely ready to use, so you can experiment and teach the smallest of the house with the concepts basics of programmingas well as create your own media player for tvamong many other options you can do with it.
Discover how to configure a Raspberry Pi from scratch with Berryboot easy and fast
Keep in mind that BerryBoot does the same thing as Raspberry Pi Imager, so it is also considered as a tool for beginners and novices. This means that from it you will be able to install multiple operating systems on your board.
To do this, you will need to follow each of the steps that we are going to indicate below:
Install BerryBoot on the Raspberry Pi
- To start with this procedure, the first thing you are going to do is download BerryBoot and only by decompressing the file on the SD card Windows or the one you prefer you will have. Then you are going to place the SD in the Raspberry connected to the Internet by a cable ethernet and when you connect it to the power to turn it on, a menu will appear where you will be able to select the operating system to install and then it will partition the card by itself, download the system and leave it installed.
Download BerryBoot
- For this demonstration, the remote installer has been used by means of VNC on Ubuntuthat is why in the following image the bar of Unity on the left side of the screen. In order to access you will have to know the IP of the Raspberry and connect it in a similar way as with the terminal.
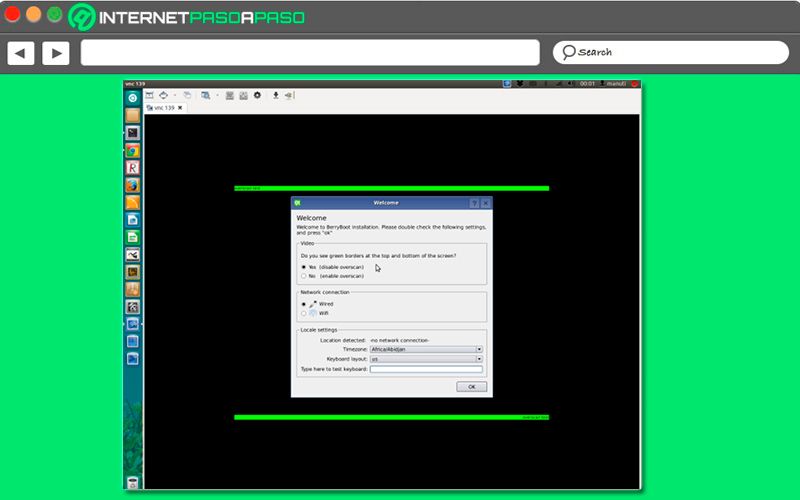
- The first thing to do here is to confirm that you see the entire screen, you must select the type of connection to the network, either by Ethernet cable or WiFi and the location for the time and the keyboard.
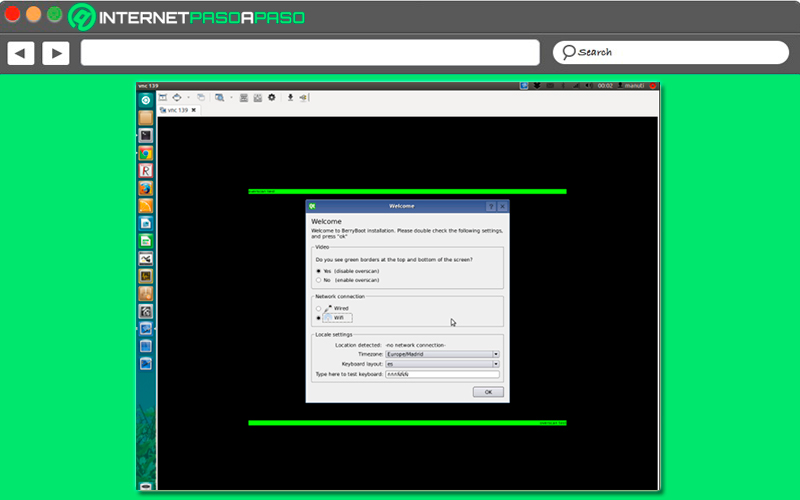
- Here you will have to select the appropriate options and with the keyboard you can check if the window to write works.
- You may not recognize the Wi-Fi or you don’t have it installedso it will cause an error when trying to use it.
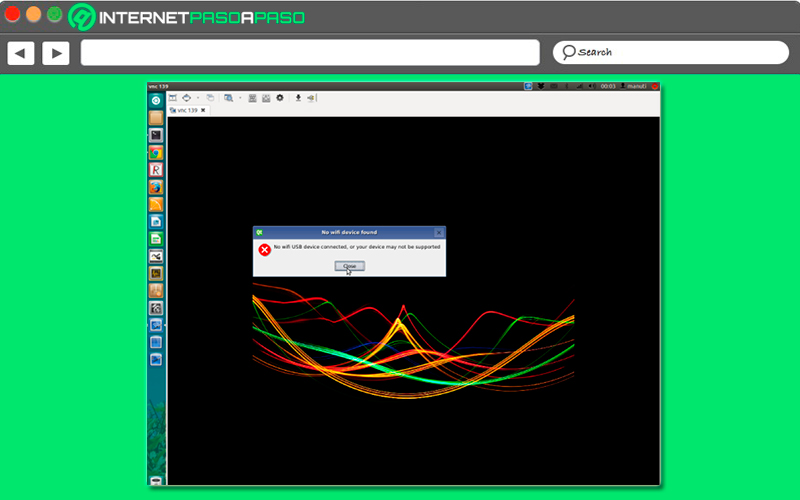
- For this occasion a wired network is selected “wired” and then click on “Okay” to continue.
- Later you will be asked where you want to install the operating system, in this case only the option of the SD card Y a network drive. Keep in mind that when you select the drive, it will be formatted. At the bottom you must select the type of partition, normally it is selected “ext 4 (no trim/discard)” and we give to “Format”.
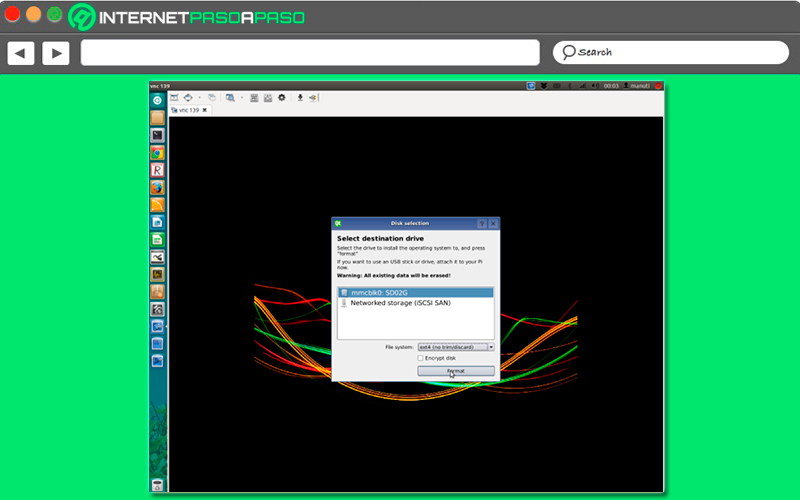
- After that BerryBoot will create two normal partitions raspberry, one of them is bootable and the other is for operating systems.
- Once this is done formatting has startedso if an error has already occurred it is too late for it.
- now they go to copy the files necessary for startup.
- Here you have to wait a few minutes while the process is finished.
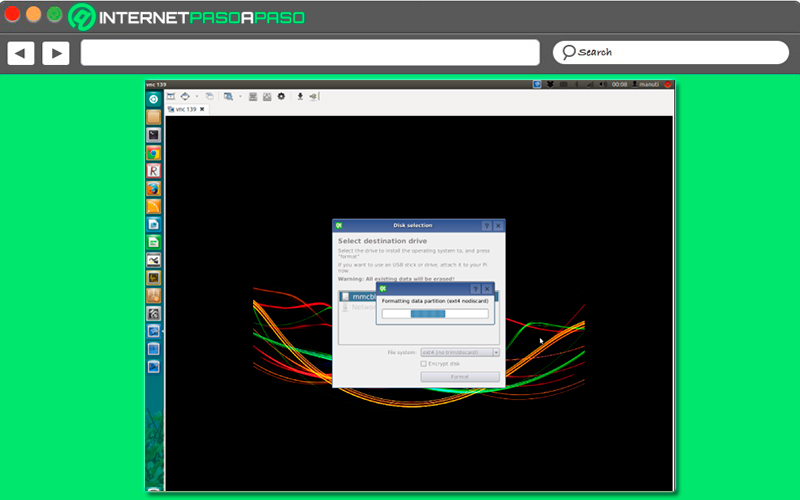
- When you’re done you go to create and format the main partition.
- I know you must mount the partitions to be able to use them in the next part of the installation.
- As you can see it will end the process.
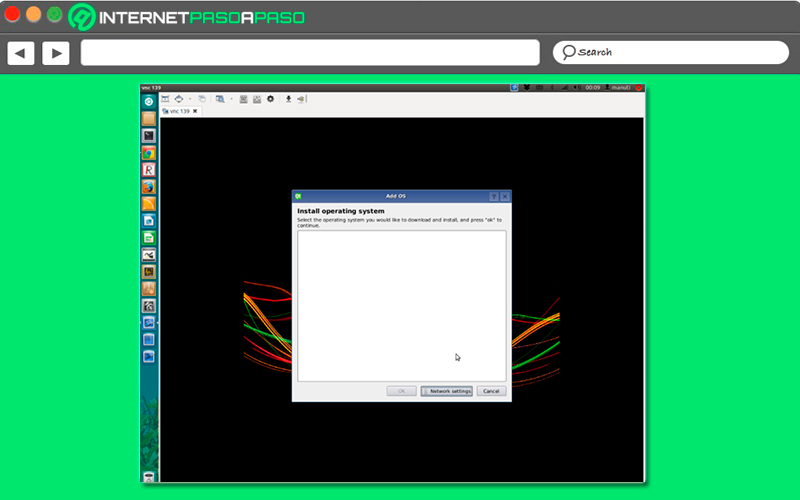
- After this it will be finished so it will be necessary to define the network configuration according to what has been selected at the beginning either WiFi or Wired in “Network Setting”.
- In the event that you do not know the data of your network, then let the router complete it for you, for this you will have to select “Assign automatically using DHCP”.
- If you know all your network information, then you can add with “Specify static IP-address”.
Installing operating systems with BerryBoot
- When BerryBoot have an Internet connection you will download the list of operating systems available online to download and install automatically, here you can see: Debian Wheezy Rasbian, Puppy Linux and OpenELEC. While in the other windows you will find: RaspRazor, LTSP thinclient, Sugar, Berry Webserver with LightTPD and memtester.
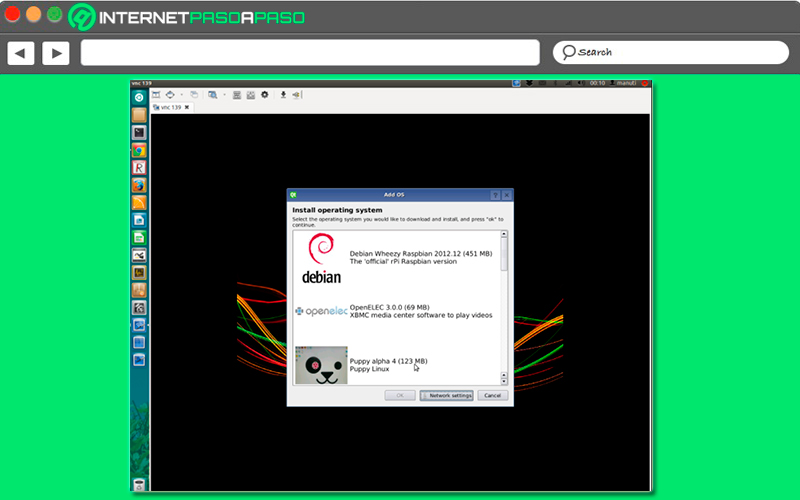
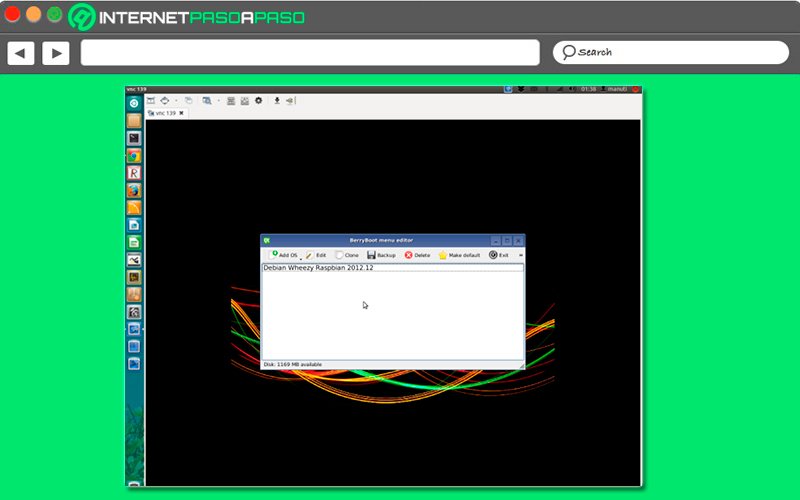
- This time he chose Rabian so it will be downloaded and after this it will be available to boot, so it will already be installed said operating system with BarryBoot.
Computing